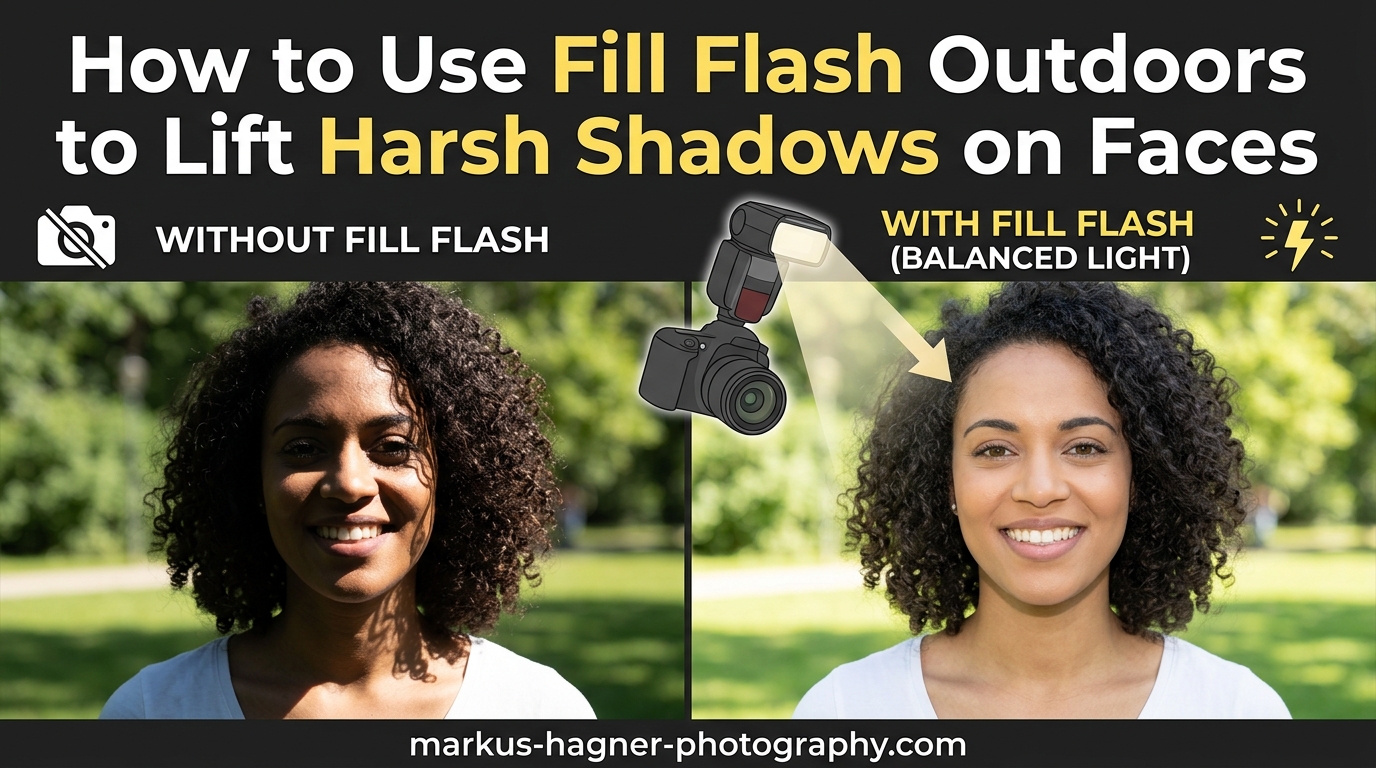
Nothing ruins an outdoor portrait faster than harsh shadows carving dark lines across your subject’s face. You know the look: deep shadows under the eyes (often called “raccoon eyes”), dark patches around the nose and mouth, and an overall unflattering contrast that makes skin look uneven. The good news? Learning how to use fill flash outdoors solves this problem completely.
Fill flash is one of those techniques that separates snapshot photographers from portrait artists. It takes practice, but once you understand the concept, you will never shoot outdoor portraits the same way again. In this guide, I will walk you through everything you need to know about fill flash outdoors, from the basic concept to advanced settings that pros use in challenging conditions.
We will cover what fill flash actually is, when you need it, what equipment works best, and a step-by-step setup process you can follow on your next shoot. By the end, you will have the knowledge to lift those harsh shadows and create beautifully balanced outdoor portraits in any lighting condition.
What Is Fill Flash and How Does It Work?
Fill flash is a photography technique where you use your flash not as the main light source, but to “fill in” shadowed areas of your scene. Think of it this way: your main light outdoors is the sun, and your flash becomes a supporting player that adds just enough light to balance out harsh shadows.
The key concept to understand is that every outdoor flash photo actually has two separate exposures happening at once. First, there is the ambient exposure: how bright or dark the background and naturally lit parts of your scene appear. This is controlled by your shutter speed, aperture, and ISO. Second, there is the flash exposure: how bright the flash-lit parts of your subject appear. This is controlled by your flash power and distance from the subject.
When shooting fill flash outdoors, you set your camera exposure for the background first. Then you add flash at a lower power setting to illuminate just the shadowed areas of your subject. The result looks natural because the flash is not overpowering the scene. It simply lifts the shadows to a level that matches the overall exposure.
This technique differs from using flash as your main light source. In that case, the flash would dominate the scene and the ambient light would become secondary or even disappear. With fill flash, the sun remains the star of the show. Your flash just helps it look better.
When Should You Use Fill Flash Outdoors?
Not every outdoor situation requires fill flash, but there are several scenarios where it becomes essential for professional-looking results. Understanding these situations helps you know when to reach for your speedlight.
The most common scenario is harsh overhead sunlight, typically between 10 AM and 3 PM. When the sun sits high in the sky, it creates deep shadows in the eye sockets, under the nose, and around the mouth. These shadows are unflattering and can make even the most photogenic subject look tired or harsh. Fill flash lifts these shadows and creates a much more pleasing result.
Backlit subjects are another prime candidate for fill flash outdoors. When your subject has bright light behind them, like a sunset or bright sky, your camera will either expose for the background (leaving your subject in silhouette) or expose for the subject (blowing out the background). Fill flash lets you properly expose both by balancing the light on your subject with the bright background.
Dappled light through trees creates patchy shadows across faces that look messy and distracting. A fill flash evens out these uneven patches and creates consistent lighting across the entire face. This is especially common in park settings where many portrait sessions happen.
High contrast scenes in general benefit from fill flash. Any time you have bright highlights and deep shadows in the same frame, adding fill light to the shadow areas reduces contrast and preserves detail. This is particularly useful for group portraits where some faces might fall into shadow while others are fully lit.
Equipment You Need for Outdoor Fill Flash
Getting started with fill flash outdoors does not require a massive investment, but having the right gear makes the process much easier. Let me break down what you need at different levels.
The essential piece of equipment is a speedlight or external flash. While your built-in pop-up flash can work in a pinch, it lacks the power and control needed for most outdoor fill flash situations. A dedicated speedlight gives you more power, bounce and swivel capability, and better control over light quality. Popular options include flashes from Canon, Nikon, Sony, or third-party manufacturers like Godox that offer excellent value.
Diffusers and modifiers dramatically improve your fill flash quality. A simple plastic diffuser that fits over your flash head softens the light and spreads it more evenly. For even better results, small softboxes designed for speedlights create beautifully soft fill light. Bounce cards attached to your flash can also help direct and soften the light when shooting on-camera flash.
For off-camera fill flash, you will need flash triggers or a TTL cable. Off-camera flash gives you more control over the direction of light, which creates more three-dimensional results. Triggers come in manual versions (cheaper) and TTL versions (more expensive but easier to use). Many modern cameras and flashes also have built-in wireless capabilities.
Reflectors offer a flash-free alternative for fill light outdoors. A simple reflector positioned to bounce sunlight back into shadow areas can work beautifully. White reflectors give soft, neutral fill. Silver reflectors add more punch. Gold reflectors add warmth to skin tones. Reflectors are affordable, require no batteries, and produce very natural-looking results.
Finally, make sure your camera has proper flash sync capability. Most cameras sync with flash at shutter speeds up to 1/200 or 1/250 second. For brighter conditions, you will need a flash and camera that support High Speed Sync (HSS), which I will explain later in this guide.
How to Use Fill Flash Outdoors: Step-by-Step Setup
Now let me walk you through the exact process I use when setting up fill flash outdoors. Follow these steps and you will get consistent results every time.
Step 1: Set Your Ambient Exposure First
Start by turning your flash off completely. You want to establish your base exposure for the scene without any flash influence. Set your camera to manual mode and adjust your shutter speed, aperture, and ISO to get the background looking how you want it.
For a natural look, expose the background slightly brighter than normal. Many photographers underexpose the ambient by about one stop to make the subject pop more when the flash is added. This is a creative choice you can experiment with. The key is deciding how you want the background to look before adding flash.
Pay attention to your shutter speed. If you are shooting in bright sunlight, you might hit your camera’s maximum sync speed (usually 1/200 or 1/250). If your proper exposure requires a faster shutter speed, you will need to use High Speed Sync or adjust your aperture and ISO to stay within sync speed limits.
Step 2: Position Your Subject
With your ambient exposure set, position your subject in relation to the available light. For fill flash outdoors, you typically want the sun behind or to the side of your subject, not directly in their face. This creates a more flattering rim light effect on the hair and shoulders while leaving the face in softer light.
If the sun must be in front of your subject due to location constraints, fill flash becomes even more important. The direct sun will create harsh shadows that your flash needs to fill. Consider having your subject face away from the sun for more flattering results whenever possible.
Step 3: Add and Position Your Flash
Turn on your flash and position it appropriately. For on-camera flash, this simply means attaching it to your hot shoe and angling the head. Direct the flash straight at your subject for basic fill, or angle it slightly upward and use a bounce card for softer light.
For off-camera flash, position the light at about 45 degrees to your subject and slightly above eye level. This mimics natural light direction and creates more dimension. Keep the flash relatively close to your subject for softer light quality. The farther the flash is from your subject, the harder the shadows it creates.
Step 4: Set Flash Power and Mode
Choose between TTL and manual flash mode. TTL (Through The Lens) mode automatically calculates flash power based on your camera’s metering. It is easier for beginners and works well for changing conditions. Manual mode gives you consistent, repeatable results but requires more practice to master.
For TTL users, start with your flash exposure compensation set to -1 to -2 stops. This ensures the flash provides fill rather than becoming the main light. Adjust from there based on your results.
For manual flash users, start at 1/8 or 1/16 power and adjust up or down based on test shots. The goal is to add just enough light to lift shadows without making the flash obvious.
Step 5: Fine-Tune with Flash Exposure Compensation
Take a test shot and review your results. If the flash is too obvious or your subject looks washed out, reduce the flash power or negative flash exposure compensation. If shadows are still too dark, increase the flash power or reduce the negative compensation.
The ideal fill flash result looks like there was no flash used at all. The shadows should be lifted but still present. Complete shadow elimination looks unnatural. You want to reduce the contrast, not eliminate it entirely.
Step 6: Review and Adjust
Check your histogram and look at the overall balance between ambient and flash light. The background should look natural, not underexposed into darkness. Your subject should be properly exposed with lifted shadows but not flat lighting.
Make small adjustments and shoot again. Fill flash outdoors is an iterative process. Each adjustment brings you closer to that perfect balance where the light looks completely natural but the shadows are controlled.
Flash Settings and Ratios for Natural Results
Understanding the technical aspects of flash settings helps you achieve more predictable results and troubleshoot problems faster. Let me break down the key concepts.
TTL vs Manual Flash Mode
TTL flash mode measures the light coming through your lens and automatically adjusts flash power for what the camera thinks is correct exposure. This works great for fill flash outdoors when lighting conditions change frequently, like on partly cloudy days. The downside is inconsistency: TTL might give you slightly different exposures from shot to shot.
Manual flash mode puts you in complete control. You set the power level and it stays the same for every shot until you change it. This consistency is valuable for portraits where you want identical lighting across multiple images. The trade-off is that you need more experience to quickly dial in the right power setting.
Flash Exposure Compensation
Flash exposure compensation (FEC) lets you tell your flash to output more or less power than the TTL system calculates. This is essential for fill flash outdoors because the TTL system often tries to light your subject as if the flash were the main light source.
For natural fill flash, start with FEC set between -1 and -2 stops. This tells the flash “give me less light than you think I need.” The result is a subtle fill that lifts shadows without overpowering the natural light. Adjust from this starting point based on your specific conditions.
Understanding Flash Ratios
Flash ratio describes the relationship between the highlight side of your subject (lit by ambient) and the shadow side (filled by flash). A 1:1 ratio means both sides are equally bright, creating flat lighting. A 2:1 ratio means the highlight side is twice as bright as the shadow side. A 4:1 ratio creates more dramatic contrast.
For fill flash outdoors, most photographers aim for ratios between 2:1 and 4:1. This provides visible fill while maintaining some dimension and contrast. Going beyond 4:1 starts to look like there is no fill at all, while ratios below 2:1 can look flat and artificial.
High Speed Sync for Bright Conditions
Here is where many photographers run into trouble with fill flash outdoors. Your camera has a maximum flash sync speed, typically 1/200 or 1/250 second. At faster shutter speeds, the shutter curtain is never fully open, so your flash only illuminates part of the frame.
In bright sunlight, proper exposure at ISO 100 and f/8 might require a shutter speed of 1/500 or faster. This exceeds your sync speed and creates a black band across your image. High Speed Sync (HSS) solves this problem by pulsing your flash thousands of times per second, effectively turning it into a continuous light source for that brief moment.
The trade-off is reduced flash power. HSS significantly decreases your effective flash output, which means you need to be closer to your subject or use more powerful flashes. Not all flashes support HSS, so check your equipment specifications before shooting in bright conditions.
Common Mistakes and Troubleshooting
Even experienced photographers make mistakes with fill flash outdoors. Here are the most common problems and how to fix them.
Flash Looking Too Obvious
If your photos scream “flash was used here,” you have too much flash power. The telltale signs are overly bright subjects against dark backgrounds, harsh shadows from the flash itself, or that “deer in headlights” look on your subject’s face. Reduce your flash power or increase your negative flash exposure compensation. Remember, the goal is for the flash to be invisible in the final image.
Washed Out Skin Tones
Overexposed skin from too much flash loses detail and looks flat. This happens when your flash is set too high or positioned too close to your subject. Back off on the flash power and consider adding a diffuser to spread and soften the light. Shooting in RAW gives you more recovery room if you slightly overexpose.
Sync Speed Issues (Black Bands)
If you see black bands across your images, your shutter speed exceeds your camera’s maximum sync speed. Either enable High Speed Sync on your flash, or lower your shutter speed by stopping down your aperture, lowering your ISO, or adding a neutral density filter to reduce the light entering your lens.
Not Enough Flash Power
In very bright conditions, your flash might struggle to compete with the sun. This is especially true when using HSS, which reduces effective power. Move your flash closer to your subject, use multiple flashes, or wait for slightly less bright conditions. A more powerful flash or a strobe instead of a speedlight also helps in extreme situations.
Harsh Shadows from the Flash Itself
Sometimes your fill flash creates its own harsh shadows, defeating the purpose. This happens when your flash is too direct and too small. Add a diffuser or bounce card to increase the apparent size of your light source. Position the flash at an angle rather than straight on. Or switch to off-camera flash with a softbox for even softer light.
Frequently Asked Questions
How to remove harsh shadows in a photo?
Harsh shadows in outdoor portraits are best removed using fill flash. Position your flash to add light into the shadowed areas of your subject’s face. Set your flash power lower than your ambient exposure, typically -1 to -2 stops, to create natural-looking fill. Alternatively, use a reflector to bounce sunlight back into shadow areas, or reposition your subject so the light is more flattering.
When should you use fill flash?
Use fill flash outdoors when shooting in harsh overhead sunlight that creates deep eye shadows, when your subject is backlit by a bright sky or sunset, in dappled light under trees that creates patchy shadows, and for high-contrast scenes where you want to preserve detail in both highlights and shadows. Fill flash is also valuable for group portraits in mixed lighting conditions.
How to get rid of shadows in flash photography?
To eliminate harsh shadows in flash photography, increase the size of your light source using a diffuser, softbox, or bounce card. Position your flash at an angle rather than straight on. Use off-camera flash to control the direction of light. Reduce flash power and increase distance for softer shadows. The goal is soft, gradual shadow transitions rather than hard-edged shadows.
Does a softbox stop shadows?
A softbox does not completely stop shadows, but it significantly softens them. By increasing the apparent size of your light source, a softbox creates more gradual shadow transitions that are flattering for portraits. The larger the softbox relative to your subject, the softer the shadows become. For fill flash outdoors, even a small softbox on your speedlight produces noticeably better results than direct flash.
Putting It All Together
Mastering fill flash outdoors transforms your portrait photography. You gain the ability to shoot in challenging lighting conditions and still produce professional results. The harsh midday sun that ruins most portraits becomes just another lighting situation you can handle with confidence.
Start simple: practice with on-camera flash and a diffuser before investing in off-camera setups. Learn to read the light and understand when fill flash will improve your images and when you can work with available light alone. The more you practice, the faster you will be able to set up and adjust your fill flash outdoors for any situation.
Remember the key principles: expose for your ambient light first, add flash at reduced power to fill shadows, and adjust until the flash becomes invisible in your final image. With these fundamentals and regular practice, fill flash outdoors will become second nature and your outdoor portraits will dramatically improve.