Standing in front of the Eiffel Tower with camera in hand, I watched dozens of tourists take the exact same shot. You know the one. The tower centered perfectly, filling the frame, shot from the Trocadero gardens. It is a beautiful image, but it has been captured millions of times. This is the challenge every travel photographer faces: how do you create something fresh at locations that have been photographed endlessly? Learning how to photograph famous landmarks from unique angles transformed my travel photography from generic tourist snapshots into images that actually tell a story.
In this guide, I will share the techniques I have developed over years of shooting iconic locations worldwide. You will learn practical methods for finding fresh perspectives, the gear choices that make the biggest difference, and creative approaches that will help your landmark photos stand out. Whether you are shooting with a professional camera or your smartphone, these strategies will help you see famous places in entirely new ways.
Research and Plan Before You Shoot
The most unique photographs rarely happen by accident. I spend hours researching before visiting any landmark, and this preparation consistently leads to better results. Start by studying what others have already captured at your destination. Browse Instagram, Flickr, and Google Images to identify the shots everyone takes. Your goal is not to copy these images but to understand what has been done so you can do something different.
Google Earth has become one of my favorite scouting tools. I use it to explore the area around landmarks from above, identifying potential shooting positions that most visitors never consider. You might discover a rooftop terrace, a quiet side street, or a park that offers an unconventional viewpoint. I also check sun position tools like PhotoPills to understand exactly where light will fall at different times of day.
Weather research matters more than you might think. A foggy morning can transform a familiar landmark into something mysterious. Storm clouds add drama that blue skies cannot match. I actually get excited when forecasts predict challenging conditions because I know most photographers will stay home, leaving me with unique shooting opportunities.
Plan to visit your chosen landmark multiple times if possible. Light changes dramatically throughout the day, and a location that looks flat at noon might become magical during golden hour. I often do a quick reconnaissance visit without my camera, just walking the area and noting interesting angles for later.
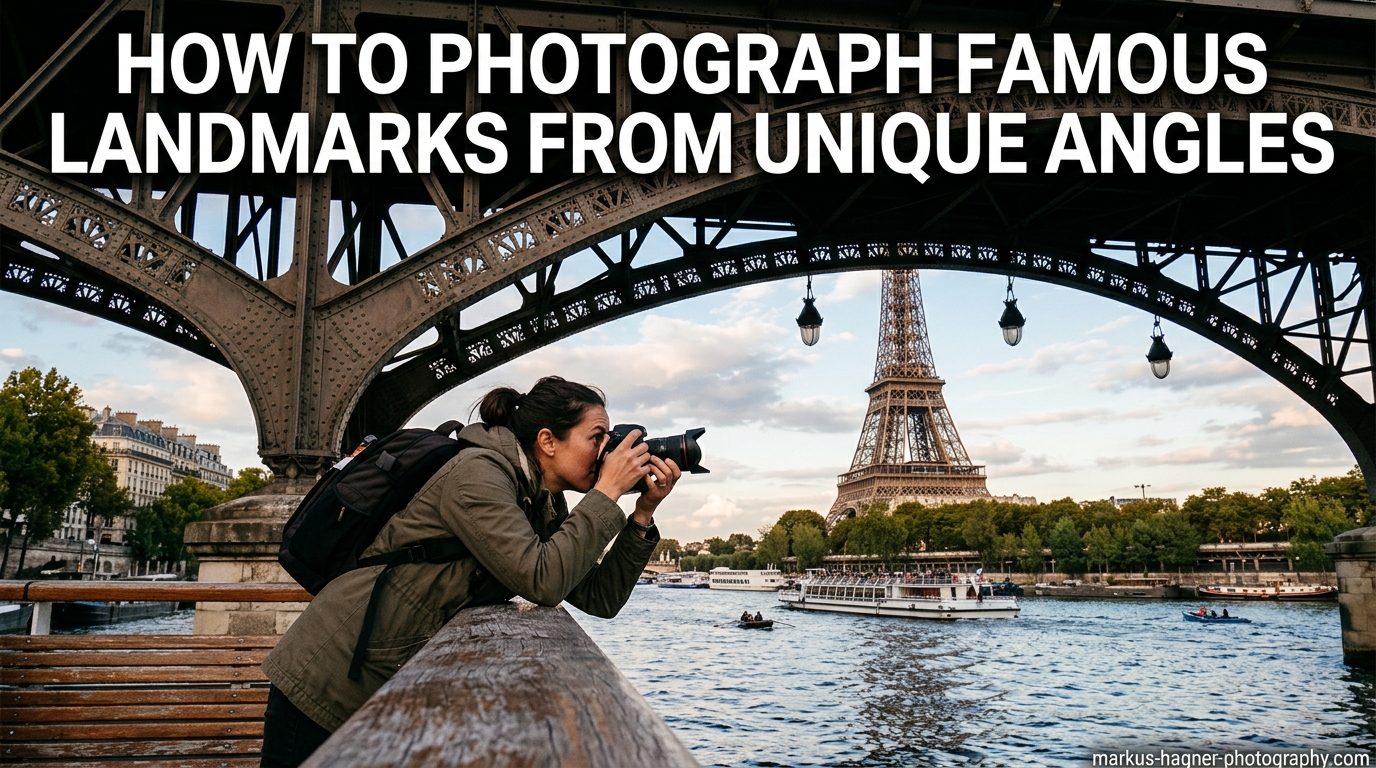
How to Photograph Famous Landmarks from Unique Angles?
Finding unique angles requires both physical effort and creative thinking. The most obvious viewpoints are usually the most crowded and produce the most overused images. Here are specific techniques I use to capture fresh perspectives.
Get low to the ground. I am constantly surprising my travel companions by dropping to my knees or lying flat on the pavement. This low angle transforms ordinary foreground elements into dramatic leading lines. A simple row of cobblestones, a patch of flowers, or even puddles after rain becomes a powerful compositional tool when shot from below. The landmark itself often appears more imposing and majestic from this perspective.
Climb higher whenever safely possible. Rooftop bars, parking structures, and hilltops offer bird’s-eye views that most ground-level photographers miss. When shooting the Colosseum, I found a small hill behind the structure that barely anyone visited. The elevated position let me capture the entire amphitheater with Rome’s cityscape stretching into the background. Always prioritize safety and respect any access restrictions.
Shoot through objects to create natural frames. Doorways, arches, tree branches, and even other buildings can frame your subject in compelling ways. I captured one of my favorite shots of the Sagrada Familia by shooting through an ornate doorway several blocks away. The frame adds depth and context while creating a more intimate viewing experience.
Consider photographing the landmark from the “wrong” direction. Instead of facing the monument directly, turn around and capture what the landmark sees. This approach works particularly well at scenic viewpoints. I once photographed the entire crowd at the Grand Canyon’s Mather Point, with their cameras all pointed at the canyon. The image told a more interesting story than another canyon vista would have.
Lens Choice and Focal Length Techniques
Your lens selection dramatically affects how landmarks appear in your final image. Understanding focal length effects gives you a powerful creative tool for unique perspectives.
Wide-angle lenses between 16mm and 24mm excel at capturing landmarks within their environment. The expanded field of view lets you include foreground elements that add context and depth. I love using my wide-angle to show how a landmark relates to its surroundings rather than isolating it completely. Just be aware that wide angles can make distant subjects appear smaller, so you may need to get closer than expected.
Telephoto lenses in the 70mm to 200mm range create compression effects that can make landmarks appear dramatically different. Compression makes background elements appear larger and closer to your subject. When photographing city landmarks, I often use a telephoto to compress the scene, making distant buildings appear to stack behind the main subject. This technique creates a sense of scale and density that wide angles cannot achieve.
Focal length also affects how crowds appear in your images. Wide angles tend to make people near the camera look prominent while shrinking those near the landmark. Telephoto lenses compress this distance, making crowds appear denser. Both effects can work creatively depending on your vision.
Prime lenses force you to move your body to find compositions, which often leads to more creative angles. My 50mm lens has produced some of my most unique landmark shots simply because I had to work harder to find interesting perspectives. Zoom lenses offer convenience, but primes encourage the kind of physical exploration that leads to fresh images.
Timing and Lighting Strategies
The difference between a snapshot and a compelling photograph often comes down to timing. Understanding how light transforms landmarks throughout the day will dramatically improve your results.
Golden hour occurs during the first hour after sunrise and the last hour before sunset. The low sun creates warm, directional light that adds dimension to architectural subjects. Shadows become longer and more dramatic. Textures pop with enhanced contrast. I prioritize golden hour for nearly all my landmark photography and adjust my entire travel schedule around these windows.
Blue hour happens during twilight, just before sunrise and just after sunset. The sky takes on a deep blue tone while city lights begin to glow. This creates a magical combination of natural and artificial light that works beautifully for landmarks in urban settings. The mix of cool sky and warm illuminated architecture produces images with rich color contrast.
Night photography opens entirely new possibilities for unique landmark images. Many famous monuments are beautifully illuminated after dark, creating scenes that look nothing like their daytime counterparts. You will need a tripod and longer exposures, but the results are worth the extra effort. I often shoot landmarks at blue hour and continue into full darkness, capturing completely different moods of the same location.
Do not dismiss harsh midday light entirely. While it creates challenges, strong overhead sun can work for certain compositions. High contrast scenes lend themselves to dramatic black and white conversions. Reflections in water features become more pronounced. Architectural details cast sharp shadows that emphasize form and texture.
Weather conditions that send other photographers running often produce the most distinctive images. Fog simplifies compositions by obscuring distracting backgrounds. Storm clouds add theatrical drama. Rain creates reflections on wet surfaces. I have captured some of my favorite landmark photos in conditions that most people would consider terrible for photography.
Adding Depth and Layers to Your Images
Flat, two-dimensional photos rarely capture attention. Creating depth transforms your landmark images from snapshots into immersive experiences that draw viewers into the scene.
Foreground elements are your most powerful tool for creating depth. Rocks, flowers, fences, or architectural details in the immediate foreground establish a clear sense of distance between the viewer and the landmark. I constantly scan for interesting foreground subjects when composing landmark shots. The technique works with any focal length, though wide angles tend to exaggerate the effect.
Leading lines guide the viewer’s eye through the frame toward your subject. Roads, paths, rivers, fences, and architectural lines all work effectively. The key is finding lines that actually lead somewhere interesting rather than cutting randomly through the frame. I look for lines that start near the bottom corners and converge toward the landmark.
Atmospheric perspective occurs naturally when humidity, haze, or distance separate layers of a scene. Objects farther away appear lighter and less saturated. You can enhance this effect during post-processing by slightly reducing contrast and saturation in background layers. The result creates a sense of vast distance that flat lighting cannot achieve.
Overlapping elements create depth by showing that some objects are in front of others. Rather than isolating your landmark against a clean sky, include other buildings, trees, or structures that partially overlap with your subject. This technique is particularly effective in dense urban environments where you want to show the landmark as part of its context.
Including Human Element for Scale
Landmarks photographed in isolation often fail to convey their true scale. Including people in your compositions adds context, story, and emotional connection that pure architecture cannot provide.
Silhouettes work beautifully against landmark backdrops, especially during golden and blue hour. Position yourself so that people pass between you and the monument, and expose for the sky. The resulting silhouettes add human presence without distracting from the main subject. I find that solitary figures create a sense of contemplation while crowds convey the energy of popular destinations.
Scale becomes immediately apparent when you include a human figure next to massive architecture. A tiny person standing at the base of a cathedral emphasizes its grandeur in a way that no technical specification could communicate. Look for positions where people naturally congregate and wait for the right moment when someone enters your frame.
Authentic moments often produce more compelling images than posed shots. I prefer capturing people genuinely experiencing the landmark rather than asking companions to stand stiffly in frame. Watch for moments of wonder, contemplation, or interaction. These candid captures tell stories that feel real and relatable.
Consider whether crowds enhance or detract from your vision. Empty landmark shots have a serene, timeless quality. Images with crowds convey popularity and energy. Neither approach is wrong, but you should make a conscious choice rather than accepting whatever crowd level happens to be present.
Detail-Focused Photography Approach
Not every landmark photo needs to show the entire structure. Focusing on details can produce more distinctive images than wide establishing shots.
Architectural details often tell fascinating stories that broad views miss. Gargoyles perched on cathedral walls, intricate tile work on mosque facades, or the weathered texture of ancient stone all deserve attention. I spend significant time with a telephoto lens, hunting for these intimate details that most visitors walk past without noticing.
Patterns and textures become compelling subjects in their own right. The repeating arches of a colonnade, the geometric patterns of Islamic architecture, or the organic forms of Art Nouveau details all create strong visual interest. These abstract interpretations of landmarks often feel more personal and artistic than standard overview shots.
Creating a unified series of detail shots can tell a more complete story than a single wide image. When I visit a landmark, I often produce a collection: one establishing shot for context, followed by multiple detail images that explore specific elements. This approach works particularly well for sharing on social media as carousel posts or creating photo essays.
Zoom in on how light interacts with architectural surfaces. The way golden hour sun illuminates carved stone details, or how shadows create geometric patterns across facades, often produces more engaging images than the monument as a whole. These lighting moments are ephemeral, so patience and timing become essential.
Creative Post-Processing Techniques
Post-processing offers opportunities to further distinguish your landmark images from the countless others captured at the same location.
Black and white conversion can rescue images shot in harsh light and emphasize form over color. Without the distraction of color, viewers focus on composition, texture, and light. Architectural subjects often work beautifully in monochrome because their strong lines and shapes translate well to grayscale. I particularly love converting overcast day shots to black and white, transforming flat lighting into moody, atmospheric images.
HDR techniques help manage the extreme dynamic range often present when photographing monuments against bright skies. The goal is natural-looking results that retain detail in both highlights and shadows. I use HDR sparingly, blending multiple exposures only when the scene truly requires it. Heavy-handed HDR processing ages poorly and immediately identifies images as products of their era.
Color grading establishes mood and can differentiate your work from others. Warm tones evoke nostalgia and comfort. Cool tones suggest tranquility or melancholy. Selective color adjustments can draw attention to specific elements while muting distractions. I develop consistent color approaches for different types of landmarks, creating a recognizable style across my portfolio.
Cropping in post-production often reveals stronger compositions than what you captured in camera. Do not hesitate to crop heavily if it improves the image. Sometimes the best shot within your frame is not the one you originally composed. I regularly review my images with cropping in mind, looking for hidden compositions I missed while shooting.
Smartphone Techniques for Unique Angles
Most travelers photograph landmarks with smartphones, and these devices offer unique advantages for creative shooting.
The portability of smartphones allows angles that would be difficult or impossible with larger cameras. You can hold your phone above your head for elevated shots, position it at ground level without lying down, or squeeze it through gaps that a DSLR cannot fit through. I always capture a few smartphone shots alongside my camera work, often getting perspectives I cannot achieve otherwise.
Ultra-wide lenses on modern smartphones create distinctive distortion effects. The exaggerated perspective can make landmarks appear more dramatic and surreal. Use this distortion creatively rather than fighting against it. Position your phone close to foreground elements and watch how the wide angle stretches the scene in interesting ways.
Low angle photography becomes trivial with a smartphone. Simply place the phone on the ground and use the self-timer or a remote trigger. This technique produces dramatic foreground emphasis without requiring you to lie in dirt or on wet pavement. Some smartphones even let you use voice commands or hand gestures to trigger the shutter.
Apps extend your smartphone’s capabilities for landmark photography. Sun position apps help plan timing. Long exposure apps simulate slow shutter effects. Editing apps allow sophisticated post-processing on the go. I use these tools to maximize what my phone can achieve when traveling light.
Frequently Asked Questions
How do you capture photos from unique angles?
Capturing unique angles requires changing your physical position relative to your subject. Get low to the ground for dramatic foreground emphasis, climb higher for bird’s eye perspectives, shoot through objects for natural framing, and explore the area around landmarks rather than only shooting from obvious viewpoints. Research locations beforehand using tools like Google Earth to identify unconventional shooting positions that most photographers miss.
What is the best camera angle for photos?
There is no single best camera angle for all situations. Low angles create drama and make subjects appear more imposing. High angles provide overview perspectives and can make subjects appear smaller within their environment. Eye-level angles feel natural and intimate. The best angle depends on your creative vision and what story you want to tell with your image.
What lens is best for landmark photography?
Wide-angle lenses between 16mm and 24mm work well for capturing landmarks within their environment and emphasizing foreground elements. Telephoto lenses between 70mm and 200mm create compression effects and excel at isolating architectural details. Many photographers carry both a wide-angle zoom and a telephoto zoom to cover different creative possibilities when photographing landmarks.
When is the best time to photograph landmarks?
Golden hour, the first hour after sunrise and last hour before sunset, provides warm directional light that adds dimension to architectural subjects. Blue hour, during twilight before sunrise and after sunset, creates a beautiful mix of natural blue sky and artificial lighting. Night photography offers completely different moods as landmarks are often dramatically illuminated. Each time produces distinctly different results.
How do I avoid taking cliché tourist photos?
Research your destination beforehand to understand what shots are overused. Look for unconventional viewpoints away from main tourist areas. Focus on details rather than always capturing the entire landmark. Include foreground elements and human subjects for scale and story. Shoot during less popular times like blue hour or in challenging weather conditions. Experiment with different focal lengths to see familiar subjects in new ways.
Conclusion
Creating unique photographs of famous landmarks requires intention, effort, and a willingness to see familiar subjects differently. The techniques I have shared here come from years of standing in front of iconic locations and asking myself what everyone else was missing. Research helps you identify overused angles. Physical exploration reveals unconventional viewpoints. Understanding light and timing transforms ordinary conditions into extraordinary opportunities.
The most important lesson I can offer is this: learning how to photograph famous landmarks from unique angles is ultimately about developing your own vision. Every landmark has been photographed millions of times, but no one has captured it exactly as you will. Your perspective, your timing, and your creative choices combine to create something genuinely original. The technical skills matter, but your curiosity and willingness to explore matter more.
Start with the obvious shots if you must. Get them out of your system. Then push yourself to find something different. Walk around the entire landmark. Return at different times of day. Look up, look down, and look behind you. The unique image you are searching for exists, but you have to be willing to work for it. Your future self will thank you when you return home with photographs that actually stand out from the millions of others taken at the same location.