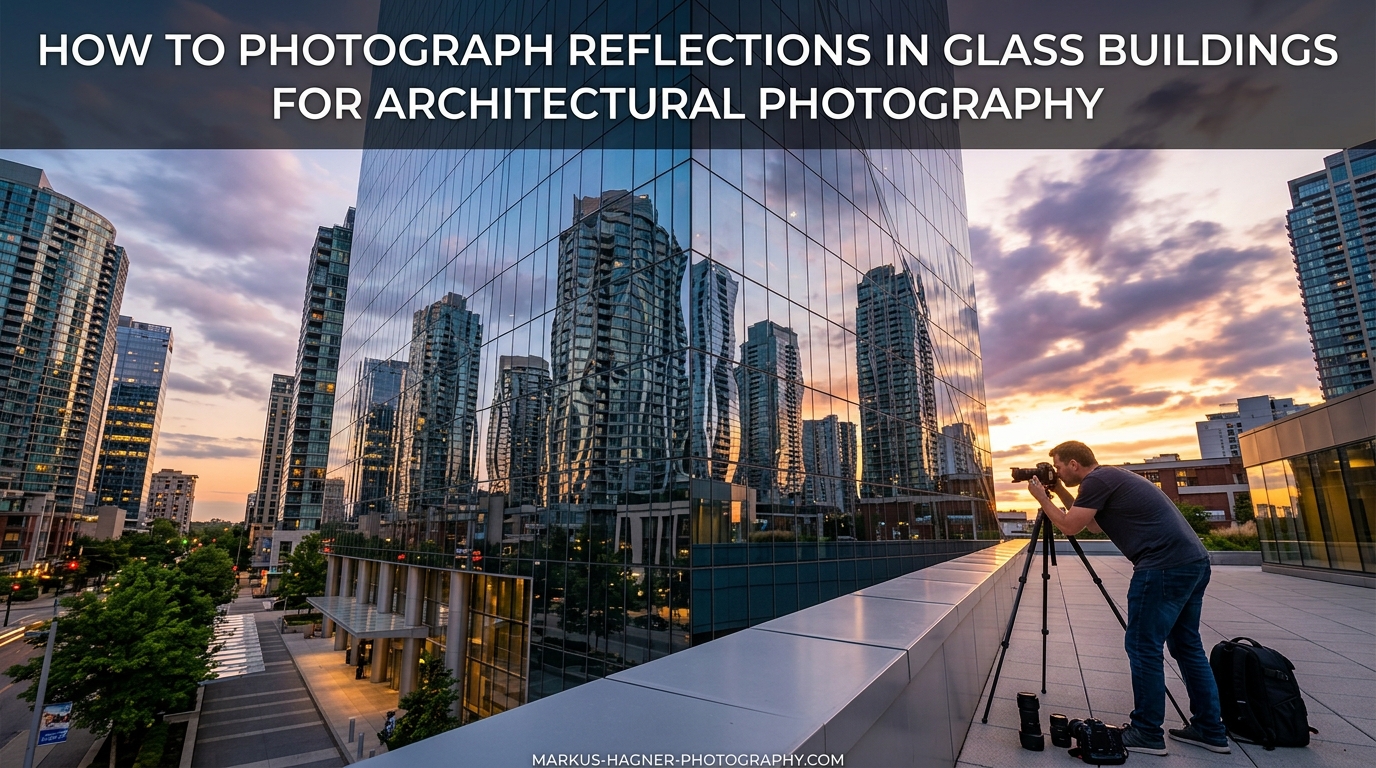
Glass buildings offer some of the most creative opportunities in architectural photography. When I first started photographing modern architecture, I was fascinated by how glass facades could transform an ordinary building into a canvas of reflections. Learning how to photograph reflections in glass buildings for architectural photography opened up entirely new ways to see and capture the urban landscape.
In this guide, I will walk you through everything you need to know about capturing stunning glass building reflections. You will learn camera positioning techniques, composition methods, the best lighting conditions, and creative approaches that will elevate your architectural photography. Whether you are shooting with a professional DSLR or a smartphone, these techniques will help you create compelling images that stand out.
Understanding Reflections in Architectural Photography
Reflections occur when light bounces off a surface and travels back to your camera lens. Glass buildings act like giant mirrors, reflecting everything around them: neighboring structures, clouds, sky, and even people walking by. This reflective quality makes glass architecture uniquely photogenic because it adds depth and layers to your images.
Not all glass surfaces behave the same way. Modern skyscrapers often use curtain wall glass systems that are highly reflective. Tinted glass creates warmer or cooler reflections depending on the tint color. Mirrored glass produces crisp, almost perfect reflections. Understanding these differences helps you choose which buildings to photograph and how to approach them.
The angle of incidence is the key principle behind all reflection photography. This is the angle at which light hits a surface. The reflected light bounces off at the same angle on the opposite side. When you position your camera at specific angles relative to the glass, you can either capture strong reflections or minimize them entirely. I will explain exactly how to use this principle in the camera positioning section below.
Why do reflections matter so much in architectural photography? They transform flat, two-dimensional images into layered compositions with visual depth. A glass building reflecting clouds appears to contain the sky itself. A facade mirroring an older neighboring structure creates a visual dialogue between past and present. These layers make viewers look longer and engage more deeply with your photographs.
Equipment and Preparation for Glass Building Photography
You do not need expensive gear to photograph glass building reflections, but certain equipment makes the process easier. A telephoto lens in the 70-200mm range is ideal for isolating specific reflections and compressing the scene. Wide angle lenses work well when you want to include the entire building and its surroundings in the frame.
A circular polarizing filter is one of the most useful tools for reflection photography. It allows you to control the intensity of reflections by rotating the filter. This can help reduce unwanted glare or enhance reflections depending on your creative vision. Polarizers work best when your camera is at a 30-45 degree angle to the reflective surface.
A sturdy tripod helps with composition and allows you to shoot at slower shutter speeds during golden hour and blue hour. If you prefer shooting handheld, image stabilization in your lens or camera body will help keep your images sharp. I also recommend wearing dark, non-reflective clothing to minimize your own reflection appearing in the glass.
Consider bringing multiple focal lengths if you have them. A 24-70mm zoom covers many situations, while a 70-200mm telephoto excels at isolating abstract reflections. Prime lenses in the 50mm or 85mm range offer excellent sharpness and often have faster maximum apertures for lower light situations. Your lens choice should match your creative intent for each shot.
Camera Positioning Techniques for Glass Reflections
Getting the right camera position is the most critical skill when you photograph reflections in glass buildings for architectural photography. Here is a step-by-step approach that I use on every shoot.
Step 1: Scout the building from multiple angles. Walk around the entire structure and observe how reflections change from different positions. Note where the strongest reflections appear and what they show. Take test shots from several locations to compare later.
Step 2: Position yourself at a 30-45 degree angle to the glass surface. This angle typically produces the most intense reflections while still allowing you to frame the building attractively. Direct frontal shots often show weaker reflections because the angle of incidence does not favor strong reflected light reaching your lens.
Step 3: Move closer or farther to change what appears in the reflection. The distance between you and the building affects what gets reflected. Sometimes stepping back 20 feet reveals an entirely different reflection composition. The reflected scene changes based on your vantage point relative to both the glass and the reflected objects.
Step 4: Watch for your own reflection. If you see yourself in the glass, shift your position slightly or crouch lower. Dark clothing helps minimize this problem. The closer you stand to the building, the more likely your reflection will appear, so increase distance when possible.
Step 5: Use your camera’s live view to fine-tune the composition. Live view shows you exactly what the reflection will look like in the final image. This is especially helpful for precise symmetrical compositions. Zoom in during live view to check critical alignment.
Step 6: Adjust your height. Shooting from different heights dramatically changes reflections. Low angles often capture more sky and clouds in the reflection. Higher angles, such as shooting from a parking structure or elevated walkway, can reveal reflections of the street level and neighboring buildings below.
The angle of incidence rule states that light reflects off a surface at the same angle it hits. If light strikes the glass at 40 degrees, it bounces off at 40 degrees in the opposite direction. By positioning your camera along this reflection path, you capture the strongest reflected image. Move off this path, and the reflection weakens. This principle explains why walking around a building changes what you see reflected so dramatically.
Composition Techniques for Glass Building Reflections
Composition transforms a snapshot of a reflective building into a compelling architectural photograph. I rely on several compositional approaches when working with glass reflections.
Symmetrical Compositions create powerful, balanced images. Position your camera so the reflected image mirrors the actual building or scene. Perfect symmetry requires careful alignment and often works best when you shoot directly toward the center of the reflective surface. Even small misalignments become obvious in symmetrical shots, so take your time with alignment. Symmetrical reflections suggest order, precision, and formal beauty.
Abstract Reflections focus solely on the reflected image without showing the actual building. Get close to the glass and zoom in on interesting patterns, colors, or shapes within the reflection. Abstract shots work particularly well when neighboring buildings create geometric patterns in the glass. These images often become more about form, color, and pattern than about the architecture itself.
Leading Lines guide the viewer’s eye through the image. Use reflected lines from adjacent buildings, roads, or architectural features to create visual flow. A telephoto lens helps isolate and emphasize these leading lines. Lines that converge in reflections create depth and draw attention to specific areas of the frame.
Juxtaposition creates visual tension by contrasting elements. Old buildings reflected in new glass facades, nature reflected in industrial structures, or clouds floating through rigid architectural lines all create compelling juxtapositions. Look for opportunities where the reflection tells a story about the relationship between the building and its environment. These contrasts make images memorable and thought-provoking.
Framing with Reflections uses the reflective surface as a frame within your frame. Position yourself so the reflection creates a natural border around your main subject. This technique adds depth and draws attention to specific elements. The building edge itself can frame the reflection, or the reflection can frame something beyond the building.
Multiple Reflection Layers occur when one glass building reflects another glass building, creating layers upon layers of reflections. These complex compositions require careful positioning but can produce stunning, almost kaleidoscopic results. Look for clusters of glass buildings where this effect naturally occurs.
Negative Space around reflections gives the image room to breathe. Rather than filling the frame edge to edge with reflected content, leave areas of simpler reflection or the building surface visible. This creates visual rest and emphasizes the more complex reflected areas.
Best Lighting Conditions for Glass Reflection Photography
Lighting dramatically affects how reflections appear in your images. The time of day and weather conditions can make the difference between a mediocre shot and an exceptional one.
Golden Hour (the hour after sunrise and hour before sunset) provides warm, directional light that enhances reflections. The low sun angle creates long shadows and brings out textures in reflected surfaces. Buildings facing east catch beautiful morning golden hour light, while west-facing structures glow in the evening. I prefer evening golden hour because the light tends to be warmer and more consistent. The golden tones reflect beautifully in glass and create a cohesive color palette across the image.
Blue Hour (the period just after sunset or before sunrise) offers completely different opportunities. The deep blue sky reflects in glass facades while interior lights begin to glow. This creates a stunning color contrast between cool blues and warm yellows. Blue hour shots require a tripod because of the lower light levels. The graduated sky color also adds visual interest when reflected in tall glass buildings.
Overcast Conditions produce soft, diffused light that reduces harsh reflections and glare. Cloudy days are excellent for capturing subtle reflections without blown-out highlights. The even lighting also makes post-processing easier. Overcast skies themselves often appear in reflections, adding texture and interest. Large, dramatic clouds reflected in glass can become the main subject of your composition.
Weather Impacts go beyond just cloud cover. Rain creates puddles that offer secondary reflection opportunities at ground level. Fog softens reflections and creates an ethereal mood. Clear, crisp days produce the sharpest reflections but can also create harsh contrast. I check weather forecasts before every architectural shoot and plan accordingly. Each weather condition offers unique creative possibilities.
Midday sun creates challenges for reflection photography. The overhead light produces strong reflections but also harsh shadows and potential lens flare. If you must shoot at midday, look for buildings where the glass faces north or is shaded by adjacent structures. A polarizing filter becomes especially valuable during midday shoots to control excessive glare.
Creative Approaches and Unique Angles
Beyond standard techniques, several creative approaches can make your glass building reflection photos stand out.
Isolating Pure Reflections means framing only the reflected image without any of the actual building. This creates dreamlike images where viewers might not immediately realize they are looking at a reflection. Get close to the glass and use a telephoto lens to exclude the building edges from your frame. These abstract compositions work well as fine art architectural photographs.
Urban vs Rural Settings offer different reflection opportunities. Urban glass buildings reflect dense cityscapes, creating complex layered images. Rural or suburban glass structures might reflect nature, open sky, or simpler surroundings. Each environment produces a distinct mood. Consider what story you want to tell and choose locations accordingly.
Smartphone Techniques work surprisingly well for glass reflection photography. Modern smartphones handle reflections capably, and their smaller sensors often produce good results in challenging light. Use the phone’s native camera app for the most control, and tap to focus on the reflection itself. Smartphone lenses are naturally wide, so get closer to the building for stronger compositions. Some phones allow attaching clip-on polarizing filters for additional control.
Low Angle Shooting changes what appears in reflections. Crouching or lying down shifts your perspective and can reveal reflections of the sky, clouds, or upper portions of neighboring buildings that you would miss from standing height. This technique works especially well with buildings near water features or reflective pavement.
Interior Glass Reflections present a different challenge. When photographing from inside a glass building looking out, you often get reflections of the interior superimposed on the exterior view. Control this by reducing interior lighting or using a polarizing filter. These shots work well during blue hour when the interior and exterior light levels are more balanced.
Time-Lapse Reflections capture how reflections change over time. Set up a tripod and shoot at intervals as light conditions shift. Clouds moving across the sky create dynamic reflection patterns. This approach works particularly well during the transition from golden hour to blue hour.
Common Mistakes to Avoid
After years of photographing architectural reflections, I have made plenty of mistakes. Here are the most common ones to watch for.
Unwanted Self-Reflections ruin otherwise good shots. Always check the glass for your own reflection before shooting. Wear dark clothing, change your angle, or move farther from the building to minimize this. A quick visual scan of the glass surface saves time in post-processing.
Poor Timing leads to disappointing results. Arriving at midday when golden hour would have been better, or missing blue hour entirely, limits your creative options. Plan your shoots around the best light. Scout locations in advance so you know exactly where to position yourself when the light is right.
Wrong Lens Choice can make compositions difficult. Using a wide angle when you need compression, or a telephoto when you need context, forces you into awkward positions. Bring multiple focal lengths if possible, or know your lens limitations before arriving at a location.
Ignoring Weather means missing opportunities. Overcast days that might seem uninspiring actually produce beautiful, soft reflections. Check forecasts and adapt your approach to conditions. Some of my best reflection shots came on days I almost skipped because of weather.
Overlooking Background Elements creates distractions. What appears behind the glass building matters as much as the reflection itself. Utility poles, signs, or other distractions can ruin an otherwise strong composition. Walk around to find angles that minimize background clutter.
Post-Processing Tips for Reflection Photos
Post-processing enhances your reflection images but should not completely transform them. I focus on subtle adjustments that bring out the best in the captured reflection.
Enhancing Contrast helps separate the reflected image from the glass surface. Increase contrast slightly to make reflections pop, but avoid overdoing it. Heavy contrast adjustments can create unnatural halos around edges and lose subtle detail in reflections.
Adjusting Clarity and Sharpness brings out details in reflections. A modest clarity boost adds definition without looking artificial. Apply sharpening selectively to the reflected areas rather than the entire image. Oversharpening creates artifacts that look unnatural in smooth reflective surfaces.
Color Correction ensures accurate representation of what you saw. Glass tints can shift colors in reflections. Use white balance adjustments to correct for tinted glass or enhance warm tones from golden hour shots. Be careful not to overcorrect, as some color shift is natural and expected in reflections.
Maintaining Authenticity means not over-processing. Reflections have a natural softness and occasional distortion. Embrace these qualities rather than trying to eliminate them completely. The goal is enhancement, not transformation. Viewers should recognize the image as a photograph, not a digital creation.
Vertical and Horizontal Corrections may be needed if your camera was not perfectly level. Architectural photography typically requires straight vertical lines. Most editing software offers perspective correction tools to fix converging lines caused by tilting the camera.
Frequently Asked Questions
How do I avoid glass reflection in photography?
Position your camera at a 30-45 degree angle to the glass surface rather than shooting straight on. Use a circular polarizing filter to reduce reflections by rotating it while viewing through your lens. Wear dark clothing to minimize your own reflection. Increase the distance between you and the glass to weaken reflected images.
What is the best lens for photographing glass building reflections?
A telephoto lens in the 70-200mm range works best for isolating specific reflections and compressing visual elements. Wide angle lenses from 16-35mm are excellent for capturing entire buildings with their reflections in context. Many photographers carry both focal lengths to handle different compositional situations.
When is the best time to photograph glass building reflections?
Golden hour (one hour after sunrise or before sunset) provides warm directional light that enhances reflections beautifully. Blue hour (just after sunset) creates stunning color contrasts between the blue sky reflections and warm interior lights. Overcast days offer soft, even lighting that reduces harsh glare.
Do I need a polarizing filter for architectural reflection photography?
A circular polarizing filter is extremely helpful but not absolutely necessary. It allows you to control reflection intensity by rotating the filter, which can enhance or reduce reflections depending on your creative intent. Polarizers work most effectively when shooting at 30-45 degree angles to reflective surfaces.
How do I photograph reflections without showing my own reflection?
Wear dark, non-reflective clothing to blend into shadows. Position yourself at an angle where the glass reflects sky or surroundings rather than your position. Move farther from the building to reduce your presence in the reflection. Use a tripod and remote shutter to step out of the frame during exposure.
Conclusion
Mastering how to photograph reflections in glass buildings for architectural photography takes practice and experimentation. The key principles are understanding the angle of incidence, positioning your camera correctly, choosing the right lighting conditions, and applying thoughtful composition techniques. Start with the basics: find an interesting glass building, visit during golden hour, and practice positioning yourself at different angles to see how reflections change.
Every glass building offers unique opportunities. Some will give you crisp mirror-like reflections while others produce softer, more abstract results. Embrace these differences and let them guide your creative choices. With time, you will develop an instinct for where to stand, when to shoot, and how to compose for the most compelling reflection images.
Remember that the best reflection photographs often come from patient observation. Watch how light moves across a building throughout the day. Return to promising locations in different seasons when the sun angle changes. Build a mental library of glass buildings in your area and their best reflection angles. Most importantly, grab your camera and start exploring the reflective surfaces in your city. Each shoot teaches you something new about this rewarding aspect of architectural photography.