Street photography moves fast. One moment you see the perfect composition, and the next it is gone. I have missed countless shots because my autofocus hunted for focus or locked onto the wrong subject. That frustration led me to zone focusing, a technique that transformed my street photography. In this guide on how to master zone focusing for fast-paced street photography, I will teach you everything I learned through years of practice. You will understand what zone focusing is, how to set it up, which lenses work best, and how to train yourself to estimate distances accurately. By the end, you will have the skills to capture those fleeting decisive moments without relying on autofocus.
What Is Zone Focusing?
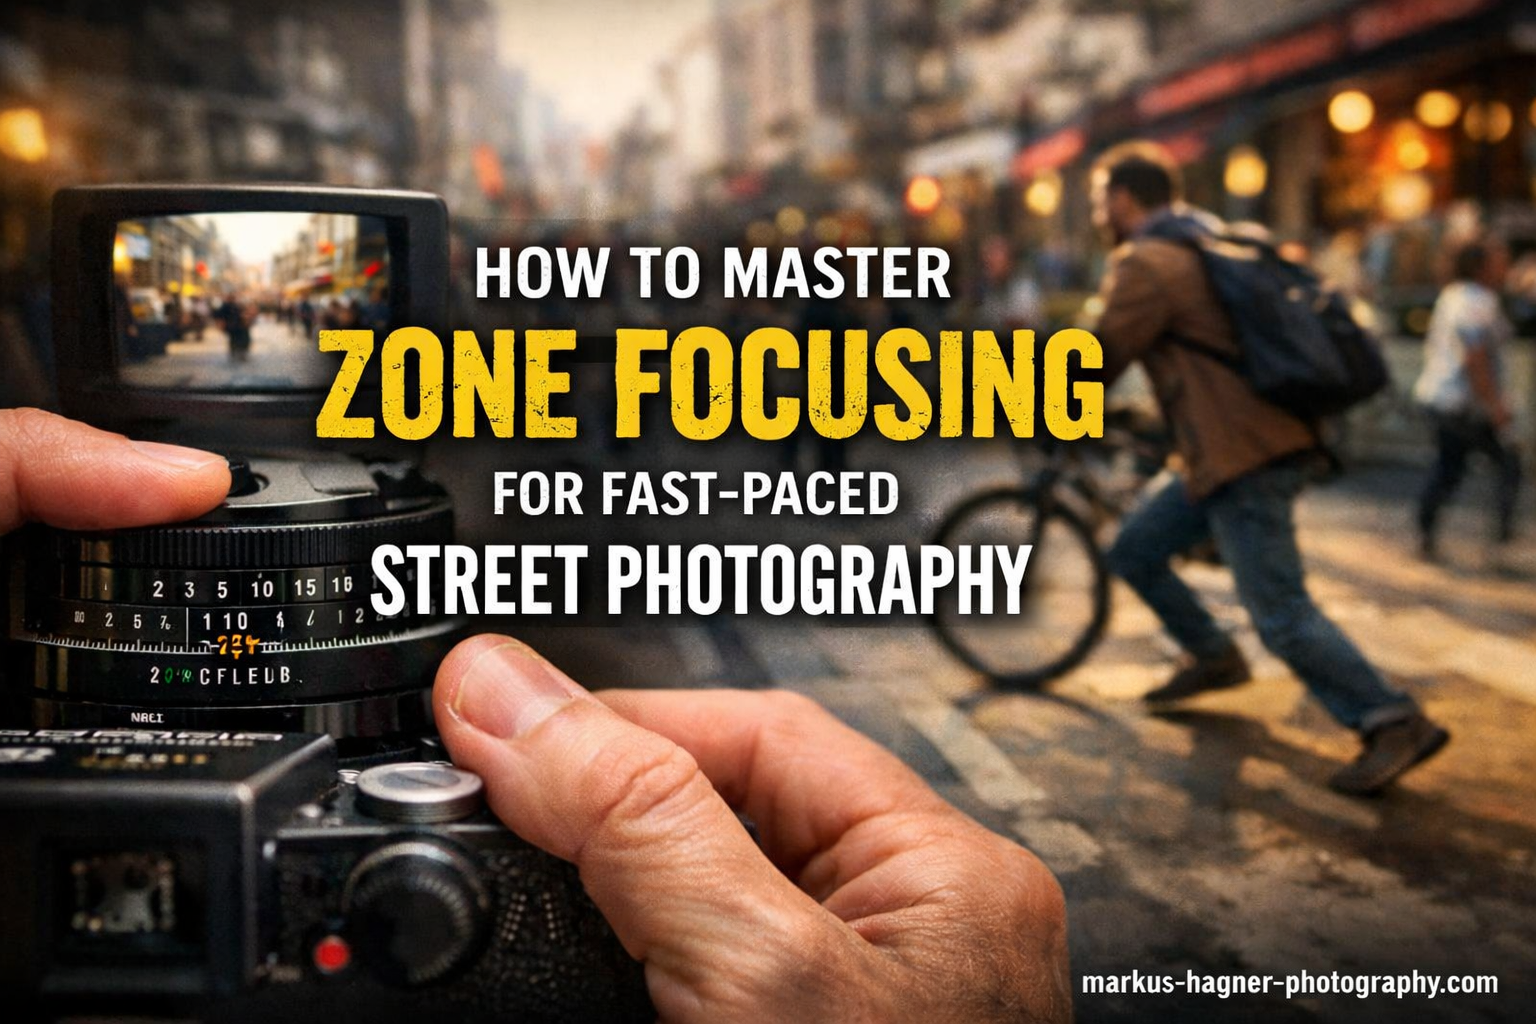
Zone focusing is a manual focus technique where you pre-set your lens to a specific distance and aperture, creating a zone of acceptable sharpness. Instead of focusing for each shot, you set your camera once and capture images instantly. Everything within your predetermined range appears sharp enough for street photography.
The technique relies on depth of field, the range in front of and behind your focus point that appears acceptably sharp. When you use a small aperture like f/8 or f/11, this range expands significantly. A 35mm lens at f/11 focused at 3 meters might keep everything from 1.5 meters to infinity reasonably sharp.
Street photographers have used zone focusing for decades. Henri Cartier-Bresson and other pioneers relied on it because autofocus did not exist. Today, many experienced photographers still prefer zone focus because it removes a variable from the shooting process. You stop worrying about focus and start concentrating on composition, timing, and storytelling.
Zone focusing differs from both autofocus and traditional manual focus. Autofocus requires your camera to find focus for each shot, which takes time. Traditional manual focus requires you to focus precisely for each image. Zone focus eliminates both steps. You set your focus distance once, then simply point and shoot.
The concept might sound technical, but the practice feels natural. Think of it like throwing a ball to someone standing a few meters away. You do not measure the distance or calculate trajectories. Your brain estimates the distance automatically based on experience. Zone focusing works the same way once you develop the instinct.
Why Zone Focusing Beats Autofocus for Street Photography?
The main advantage of zone focusing is speed. Autofocus systems, even the fastest ones, need time to acquire focus. That delay might last 0.1 to 0.3 seconds, which sounds fast until a decisive moment disappears. Zone focus has zero lag because you pre-set everything before the action happens.
Beyond speed, zone focusing frees your attention. When I shoot with autofocus, I constantly check focus points and worry about whether my camera locked onto the right subject. With zone focus, I set my camera and forget about it. My mind stays focused on finding compositions and anticipating moments.
Zone focusing also excels in challenging lighting. Autofocus struggles in low light, high contrast scenes, or when subjects have low contrast. I have watched my autofocus hunt endlessly in dim evening streets. Zone focus works regardless of light because you control the settings manually.
This technique suits candid street photography perfectly. You can shoot from the hip without looking through the viewfinder. Your subjects never know when you pressed the shutter. The camera becomes an extension of your reflexes rather than a tool that demands constant attention.
Another overlooked benefit involves battery life and camera responsiveness. Autofocus systems constantly adjust, consuming power and sometimes causing slight delays in camera response. Zone focus eliminates this overhead. Your camera responds instantly because it does not need to perform focus calculations before each shot.
Many photographers also find zone focusing more discreet. Without autofocus motors whirring or focus points illuminating, you attract less attention on the street. This subtle approach helps you blend into environments and capture more natural moments.
How to Zone Focus – Step by Step
Learning zone focusing takes practice, but the setup is straightforward. Follow these steps to configure your camera for zone focus street photography.
Step 1: Switch to Manual Focus
Turn off autofocus on your lens or camera body. Many modern lenses have a switch labeled AF/MF. Flip it to MF. If your camera uses menu settings, navigate to the focus mode and select manual focus. Some photographers prefer using autofocus lenses in manual mode, while others swear by dedicated manual focus lenses. Both work for zone focusing.
Step 2: Choose Your Aperture
Select an aperture between f/8 and f/16. These smaller apertures create the depth of field needed for zone focus. I typically use f/11 on sunny days and f/8 when light is limited. Avoid apertures wider than f/5.6 because your zone of acceptable sharpness becomes too narrow for reliable zone focusing.
Step 3: Set Your Focus Distance
This step requires a distance scale on your lens or camera. Set your focus to approximately 2 to 3 meters (6 to 10 feet) for most street photography situations. This distance captures subjects at typical street photography ranges. If your lens has distance markings, align the focus indicator with your chosen distance. Modern mirrorless cameras often display electronic distance scales in the viewfinder or on the LCD.
Step 4: Configure Shutter Speed and ISO
Set your shutter speed fast enough to freeze motion, typically 1/250 second or faster for walking subjects. Configure ISO to achieve proper exposure with your chosen aperture and shutter speed. Many street photographers use auto ISO with a minimum shutter speed setting. This approach lets your camera adjust sensitivity while you maintain control over aperture and focus.
Step 5: Frame and Shoot
With your settings locked in, you are ready to shoot. Frame your composition and press the shutter without adjusting focus. Trust your zone. After each shot, review your images to verify sharpness. Make small adjustments to your focus distance if needed.
I recommend starting with static subjects to verify your setup works. Photograph a wall or sign at various distances to see your zone of acceptable sharpness. Once you understand your range, move on to moving subjects.
As you practice, develop a quick setup routine. I can configure my camera for zone focus in about five seconds. This speed matters because street photography opportunities appear without warning. You want to switch into zone focus mode quickly when the situation calls for it.
Aperture Settings and Depth of Field for Zone Focus
Your aperture choice directly controls the size of your focus zone. Understanding this relationship helps you make better decisions in different situations.
At f/8 with a 35mm lens focused at 3 meters, your zone of acceptable sharpness typically extends from about 2 meters to 6 meters on a full frame camera. This range covers most street photography scenarios. Subjects within this zone appear sharp in prints and screen displays.
Stopping down to f/11 expands this zone significantly. The same 35mm lens at f/11 focused at 3 meters might keep everything from 1.5 meters to infinity acceptably sharp. This wider zone gives you more margin for error but requires more light or higher ISO.
At f/16, your depth of field becomes even larger, but diffraction starts reducing overall image sharpness. I use f/16 only in bright daylight when I need maximum depth of field. The trade-off between depth of field and image quality matters for large prints but rarely affects web-sized images.
Consider this practical guideline for aperture selection. Use f/11 in bright conditions for maximum zone width. Switch to f/8 in overcast or shaded conditions when you need faster shutter speeds. Avoid f/16 unless absolutely necessary because diffraction softens your images.
The relationship between aperture and depth of field follows predictable physics, but real world results vary. Factors like sensor size, lens design, and print size all affect what appears acceptably sharp. Test your specific equipment to understand how your lenses behave at different apertures.
One useful exercise involves photographing a ruler or measuring tape at an angle. Set your focus point and aperture, then examine which portions of the ruler appear sharp. This visual feedback helps you internalize the relationship between settings and results.
Best Lenses for Zone Focusing (2026)
Your lens choice significantly impacts zone focusing success. Some lenses make the technique easy, while others fight against you.
Wide-Angle Lenses Work Best
Lenses between 28mm and 35mm (full frame equivalent) excel at zone focusing. These focal lengths naturally provide more depth of field than telephoto lenses at the same aperture and focus distance. A 28mm lens at f/8 focused at 2 meters keeps a much larger zone in focus than a 50mm lens with identical settings.
Many street photographers prefer 35mm lenses for zone focus work. This focal length closely matches human vision and works well for environmental portraits. The 28mm offers even more depth of field and suits wider street scenes. Both focal lengths appear consistently in street photography kits for good reason.
Distance Scales Matter
Lenses with distance scales printed on the barrel make zone focusing intuitive. You simply turn the focus ring until your chosen distance aligns with the indicator. Many vintage lenses and some modern manual focus lenses include depth of field markings that show your zone at different apertures.
Modern autofocus lenses often lack physical distance scales. Some include electronic scales displayed in the viewfinder. Fuji cameras show digital distance scales that work with any electronically coupled lens. Sony and other mirrorless systems offer similar features. These electronic scales work well once you learn to read them quickly.
Manual Focus Lenses vs Autofocus Lenses
Dedicated manual focus lenses offer several advantages for zone focusing. The focus rings typically have longer throw, allowing precise distance adjustments. Distance scales are usually larger and easier to read. Many manual focus lenses include depth of field scales directly on the barrel.
Autofocus lenses work fine for zone focusing when switched to manual mode. The focus rings often have shorter throw and feel less precise, but you can adapt to these differences. The advantage is using one lens for both zone focus and autofocus situations.
Zone Focusing with Modern Mirrorless Cameras
Modern mirrorless cameras offer features that enhance zone focusing. Electronic viewfinders display distance scales, focus peaking shows areas of sharpness, and magnification assists with precise focusing. These tools bridge the gap between vintage zone focus techniques and digital photography.
Focus peaking highlights in-focus areas with colored outlines. This visual feedback helps you verify your zone covers the intended range. Some photographers use focus peaking during setup, then turn it off for actual shooting to reduce viewfinder clutter.
Crop Sensor Considerations
Crop sensor cameras behave differently for zone focusing. A 35mm lens on an APS-C sensor has the field of view of approximately 52mm on full frame. This effectively narrower angle of view reduces depth of field compared to the same lens on full frame. To compensate, use wider focal lengths or smaller apertures on crop sensors.
Many street photographers use 23mm lenses on Fuji APS-C cameras for zone focusing. This focal length matches a 35mm full frame equivalent and provides good depth of field characteristics.
Legacy and Vintage Lenses
Older manual focus lenses from the film era often excel at zone focusing. These lenses were designed when zone focus was the primary focusing method for many photographers. They typically feature prominent distance scales with depth of field markings. Brands like Olympus, Nikon, and Canon produced excellent manual focus lenses that work beautifully on modern mirrorless cameras with adapters.
How to Estimate Distance for Zone Focusing
Distance estimation is the skill that separates competent zone focus photographers from frustrated beginners. With practice, you develop an instinct for distances that makes zone focusing second nature.
Use Your Body as a Reference
Your body provides reliable distance references. Most people can reach about 1 meter from their body. Use this to gauge close distances. Two arm lengths equal roughly 2 meters. Learn what 3 meters looks like relative to your height.
Environmental Markers
Streets contain consistent distance markers. Sidewalks often measure about 1.5 meters wide. Parking spaces typically span 2.5 to 3 meters. Use these references to estimate subject distances quickly.
Practice Exercises
I developed my distance estimation through deliberate practice. Here is an exercise that works well. Find a location with consistent foot traffic like a busy corner. Estimate the distance to a walking person before they pass you. Then verify your estimate against a known reference like sidewalk width or parking space length. Repeat this process until your estimates become accurate.
Another exercise involves photographing objects at various distances without checking your estimates first. Review your images later to see which distances fell within your zone of acceptable sharpness. This feedback loop accelerates learning.
Memorize Key Distances
Most street photography happens between 2 and 5 meters from your camera. Memorize what these distances look like in various contexts. A person filling half your frame width at 35mm stands roughly 3 meters away. Someone filling the full frame width might be 5 to 6 meters distant.
Practice estimating distances even when you are not photographing. Walking down the street, mentally note distances to people and objects. This constant practice sharpens your estimation skills without requiring camera time.
Zone Focusing Practice Routine
To truly master zone focusing, you need a structured practice routine. Here is a week-long training plan I developed through years of teaching this technique.
Day 1-2: Focus on Setup Speed
Time yourself switching from your normal shooting mode to zone focus settings. Aim to get this under 10 seconds. Practice the muscle memory of switching to manual focus, setting f/11, and dialing in 3 meters on your distance scale.
Day 3-4: Work on Distance Estimation
Find a spot with foot traffic and practice guessing distances before subjects pass. Use environmental markers like sidewalk width to verify your estimates. Keep mental notes of common errors you make.
Day 5-6: Shoot Real Situations
Go out with zone focus locked in and commit to not changing it. Accept that some shots will be soft. Focus on timing and composition instead of technical perfection.
Day 7: Review and Adjust
Look at your images critically. Are most subjects sharp? If not, adjust your focus distance slightly. If subjects are consistently sharp, try working with a slightly wider aperture to gain shutter speed.
Common Zone Focusing Mistakes to Avoid
Even experienced photographers make these errors when learning zone focusing. Awareness helps you avoid frustration.
Using Too Wide an Aperture
The most common mistake is choosing an aperture that provides insufficient depth of field. F/2.8 might work for portraits where you focus precisely, but zone focusing at f/2.8 leaves almost no margin for error. Start with f/11 and only open up when you understand your zone.
Incorrect Distance Estimation
Beginners often underestimate distances, thinking subjects are closer than reality. This places your subject outside your zone of sharpness. If your images consistently appear soft, try focusing slightly farther than you think necessary.
Forgetting to Adjust for Lighting
Zone focus settings that work in bright daylight fail in darker conditions. You might need to open your aperture or raise ISO when light dims. Check your settings when moving between indoor and outdoor environments.
Not Practicing Enough
Zone focusing feels foreign at first. Many photographers try it once, get blurry images, and abandon the technique. Commit to shooting exclusively with zone focus for at least a week. Your skills develop through repetition and feedback.
Ignoring Shutter Speed
Photographers sometimes get so focused on aperture and focus distance that they forget about shutter speed. Motion blur ruins zone focus shots just as much as focus errors. Always ensure your shutter speed stays fast enough to freeze subject movement.
Expecting Perfection Too Soon
Zone focusing requires patience. Your first session might yield 20 percent keepers. After a week, that number climbs to 50 percent or higher. Accept the learning curve and keep shooting. The technique rewards persistence.
Frequently Asked Questions
What aperture should I use for zone focusing?
Use f/8 to f/11 for most zone focusing situations. These apertures provide enough depth of field for a usable focus zone while maintaining good image quality. Go to f/16 in bright light for maximum depth of field, but avoid f/16 in lower light where you would need to compromise shutter speed or ISO too much.
Can I zone focus with an autofocus lens?
Yes, you can zone focus with autofocus lenses by switching them to manual focus mode. The focus ring throw might feel shorter than dedicated manual focus lenses, but the technique works the same way. Many street photographers use autofocus lenses this way for flexibility.
Is zone focusing better than autofocus for street photography?
Zone focusing excels for candid street photography where speed matters more than critical sharpness. It eliminates autofocus lag and works in any lighting. However, autofocus produces sharper results for posed portraits or when you need precise focus on eyes. Many photographers use both techniques depending on the situation.
Does zone focusing work on crop sensor cameras?
Zone focusing works on crop sensor cameras, but you need to account for the effective focal length change. A 23mm lens on APS-C behaves like a 35mm on full frame. Use wider focal lengths or smaller apertures on crop sensors to achieve similar depth of field to full frame setups.
How long does it take to master zone focusing?
Most photographers see significant improvement after one week of dedicated practice. However, developing reliable distance estimation instincts typically takes several months of regular use. The technique becomes second nature after about 50 to 100 shooting sessions.
What is the best focus distance for street photography zone focusing?
Set your focus distance between 2 and 3 meters (6 to 10 feet) for most street photography situations. This range captures subjects at typical street distances while providing a usable zone of acceptable sharpness. Adjust based on your typical shooting style and lens focal length.
Conclusion
Zone focusing transformed my street photography by removing the frustration of missed autofocus. The technique gives you speed, reliability, and creative freedom that autofocus cannot match for candid moments. Set your aperture to f/8 or f/11, focus at 2 to 3 meters, and practice estimating distances until it becomes instinct.
The path to mastering zone focusing for fast-paced street photography requires patience. Your first attempts might produce soft images. Keep practicing. Train your eye to recognize distances. Experiment with different apertures and focal lengths to understand how they affect your zone of sharpness.
Start this week. Commit to shooting with zone focus for your next street photography session. Leave autofocus behind and discover the freedom of preset focus. Those decisive moments you previously missed will start appearing in your viewfinder, sharp and ready to share. In 2026, zone focusing remains one of the most valuable techniques for capturing authentic street moments with confidence.