I spent three hours one morning at a mountain lake, waiting for the wind to settle. When it finally did, the water transformed into a perfect mirror. The mountains above reflected so precisely that I could barely tell where reality ended and the reflection began. That single shot taught me more about symmetrical composition than months of reading tutorials ever could.
Learning how to photograph reflections for perfectly symmetrical compositions opens up an entirely new way of seeing the world. You start noticing puddles in parking lots, glass facades on office buildings, and the stillness of early morning ponds. This guide walks you through everything you need to know about capturing stunning symmetrical images using reflections.
We will cover the types of symmetry you can create, the equipment that helps, camera settings that work best, and a step-by-step process you can follow on your next shoot. By the end, you will have the tools to create perfectly balanced reflection photos.
Understanding Symmetry in Photography
Symmetry in photography happens when two halves of an image mirror each other. The left side balances the right, or the top reflects the bottom. Our brains are wired to find this balance satisfying. Studies show that symmetrical faces and objects appear more beautiful to us because they signal order and predictability.
When you create symmetrical compositions, you tap into something primal. Viewers instinctively feel the balance in your image. This is why reflection photography works so well. The reflected image naturally creates that mirror effect our eyes love.
Symmetry differs from the rule of thirds in a fundamental way. The rule of thirds places subjects off-center for dynamic tension. Symmetry does the opposite. It centers everything for calm, formal balance. Neither approach is better. They just create different moods. A symmetrical reflection feels peaceful and contemplative. A rule-of-thirds composition feels active and engaging.
I often choose symmetry when I want viewers to linger on an image. The balanced composition gives their eyes nowhere urgent to go. They can explore the details at their own pace. This makes reflection symmetry perfect for landscapes, architecture, and minimalist subjects.
Types of Reflective Symmetry You Can Capture
Not all reflections work the same way. Different surfaces create different types of symmetry. Understanding these variations helps you choose the right approach for each situation.
Horizontal Symmetry
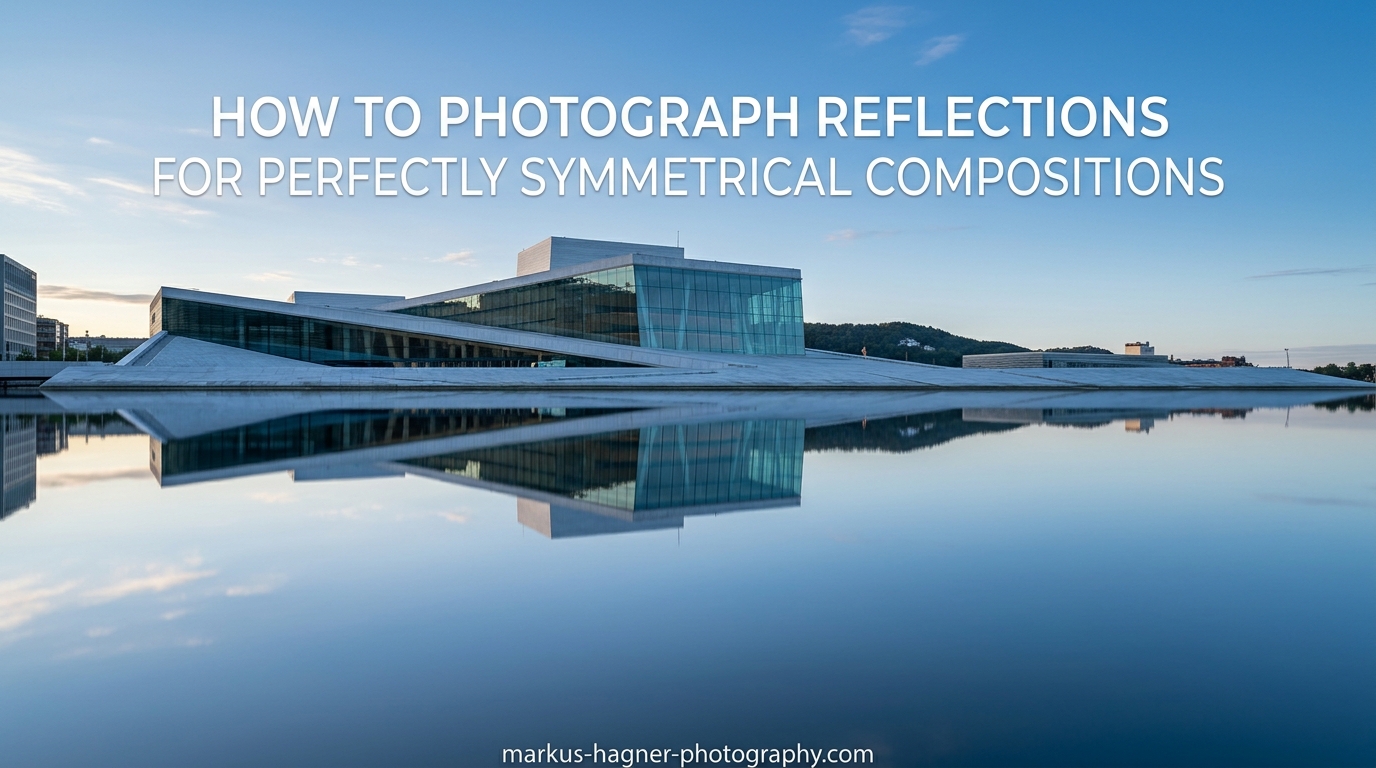
Horizontal symmetry is the most common type in reflection photography. A horizontal line divides the image in half, with the top and bottom mirroring each other. Water surfaces create this naturally. Lakes, ponds, puddles, and even wet pavement can produce stunning horizontal symmetry.
The reflection line typically sits at the center of your frame. But you can also position it along the lower or upper third for a different effect. I place the horizon line at the center when I want equal emphasis on the subject and its reflection. When the sky is more interesting, I move the line lower. When the reflection holds more detail, I shift it higher.
Vertical Symmetry
Vertical symmetry divides the image with a vertical line. The left and right sides mirror each other. Mirrors create this naturally, but you also find it in architecture. Glass buildings, symmetrical facades, and grand staircases often feature built-in vertical symmetry.
Photographing vertical symmetry requires precise alignment. Even a slight angle breaks the mirror effect. I always check my camera level before shooting. Many cameras have built-in electronic levels, or you can use a hot-shoe bubble level. The investment is small but the improvement is significant.
Radial Symmetry
Radial symmetry radiates from a central point like spokes on a wheel. You see this in circular patterns, ripples in water, and certain architectural features like domes or rose windows. This type of symmetry is less common but creates striking images when you find it.
Capturing radial symmetry usually means shooting straight down or straight at your subject. Any angle destroys the effect. I have gotten some of my best radial symmetry shots by positioning my camera directly above reflective surfaces and shooting downward.
Reflective Surfaces to Look For
Water remains the most popular reflective surface for photographers. Still lakes, ponds, and puddles all work well. But water is just the beginning. Glass windows and doors create clean reflections in urban environments. Mirrors let you control reflections indoors. Polished metal surfaces like car bodies and modern architecture add industrial reflections. Wet pavement after rain transforms ordinary streets into reflection opportunities.
The key is training your eye to spot these surfaces. Once you start looking, you will find reflections everywhere. I once captured a perfect symmetry shot using nothing but a spilled drink on a polished floor. The surface matters less than how you use it.
Essential Equipment and Camera Settings
You can capture reflection photos with almost any camera, including your phone. But certain gear makes the process easier and your results better.
Gear That Makes a Difference
A sturdy tripod ranks as the most important piece of equipment for reflection photography. Symmetrical compositions require precise alignment. Handheld shooting makes this difficult, especially in low light. A tripod lets you fine-tune your composition and keep it steady while you adjust settings.
A circular polarizing filter helps control reflections on water and glass. It can reduce glare and increase the visibility of what is being reflected. Sometimes you want more reflection, sometimes less. The polarizer gives you that control. I never shoot reflections without one.
Neutral density filters allow longer exposures in daylight. This helps smooth out water surfaces that have slight ripples. A 10-stop ND filter can turn choppy water into glass during the day. The effect is not always natural, but it creates a mood many photographers love.
Your lens choice affects how distortion impacts your symmetry. Wide-angle lenses can bow straight lines near the edges. This breaks the mirror effect. Telephoto lenses compress perspective and keep lines straighter. For perfect symmetry, I often reach for a 50mm or 85mm lens rather than an ultra-wide.
Best Camera Settings for Reflection Photography
Aperture controls your depth of field. For landscape reflections, you typically want everything sharp from foreground to background. This means using smaller apertures like f/8 to f/16. I start at f/11 and adjust from there. If you are focusing on a close reflection while blurring the background, wider apertures like f/2.8 work better.
Shutter speed depends on your creative goals. Fast shutter speeds freeze ripples and waves, showing the water’s texture. Slow shutter speeds smooth everything into glass. For mirror-like reflections, try shutter speeds of 1 second or longer. This requires a tripod and often an ND filter.
Keep your ISO as low as possible for maximum image quality. Reflection photos often contain fine detail you want to preserve. ISO 100 or 200 is ideal. Only raise ISO if you cannot achieve a proper exposure with your chosen aperture and shutter speed.
Focus requires careful attention. For water reflections, focus on the reflected subject, not the water surface itself. The water acts as a mirror. The reflection sits optically at the same distance as the actual subject. If your subject is 20 meters away, focus 20 meters away, not on the water at your feet.
How to Photograph Reflections for Perfectly Symmetrical Compositions: Step-by-Step
This section breaks down the process into five clear steps. Follow this workflow on your next reflection shoot.
Step 1: Find Your Reflective Surface
Location scouting makes or breaks reflection photography. Water locations are obvious choices. Lakes, ponds, rivers, and even puddles after rain all work. But think beyond water. Urban environments offer glass buildings, polished stone, and metal surfaces. Indoors, mirrors and shiny floors create opportunities.
Time your scouting for the right conditions. Early morning often provides the stillest water. Wind creates ripples that destroy reflections. I check weather apps for wind speed before heading out. Anything over 5 mph makes water reflections difficult. Early morning also brings fewer people to popular locations.
Consider what will be reflected. A perfect mirror reflecting nothing interesting makes a boring photo. Look for colorful subjects, interesting architecture, or dramatic skies. The reflection is only as good as what it reflects.
Step 2: Position Yourself for Perfect Alignment
Camera position determines your symmetry. For horizontal symmetry with water, get as low as possible. The lower your camera, the more of the reflected subject appears in the water. I often lie on the ground for puddle reflections. For lake reflections, setting up at the water’s edge works well.
Center your composition on the reflection line. This is where your camera’s grid overlay helps. Enable it in your settings. Use the center horizontal line to align with the horizon or water line. Take your time with this step. Even a few pixels of misalignment can break the symmetry effect.
Check your camera level. Many cameras display an electronic level in the viewfinder or on the LCD. If yours does not, a small bubble level in the hot shoe works. Perfect leveling ensures your reflection line stays straight across the frame.
Step 3: Choose the Right Time and Weather
Lighting transforms reflection photography. Golden hour provides warm, directional light that adds depth and color. The low sun angle also creates longer shadows and more dramatic reflections. Blue hour offers cooler tones and a different mood. Both times typically have calmer conditions than midday.
Overcast days create soft, even lighting. This works well for reflections because there are no harsh highlights or deep shadows. The soft light also reduces glare on water and glass. If you cannot shoot at golden hour, overcast is your next best option.
Wind is your enemy for water reflections. Even a light breeze creates ripples. Check the forecast and plan your shoot for the calmest part of the day. Early morning usually wins. If you encounter wind, look for sheltered coves or areas protected by trees and buildings.
Step 4: Frame Your Composition
Decide where to place the reflection line. Centering creates perfect symmetry and maximum balance. This works well for calm, formal images. Placing the line higher or lower creates visual tension. I center the line about 80 percent of the time for reflection shots.
Watch for distracting elements that break symmetry. A branch on one side, a person walking through, or an uneven shoreline all disrupt the mirror effect. Move your position or wait for the distraction to pass. Sometimes a slight shift left or right cleans up your composition completely.
Include or exclude the horizon based on your vision. Some photographers love showing the thin band between subject and reflection. Others prefer the pure mirrored look with no separation. Both approaches work. Just make sure your choice is intentional.
Step 5: Capture the Shot
Lock your focus on the reflected subject, not the reflective surface. Use single-point autofocus and place your focus point on the clearest part of the subject. For landscape reflections, focus about one-third into the scene to maximize depth of field.
Use a remote shutter or your camera’s timer to avoid camera shake. Even on a tripod, pressing the shutter button can introduce vibration. A 2-second timer works well. For long exposures, use mirror lock-up if your camera has it.
Bracket your exposures. Reflections often contain a wide dynamic range between bright skies and darker reflected surfaces. Shooting three to five frames at different exposures gives you options in post-processing. You can blend them later for balanced exposure.
Take multiple shots. Small variations in light, water movement, and cloud position change the image subtly. Shooting 20 to 30 frames increases your chances of capturing that perfect moment when everything aligns.
Common Mistakes and How to Fix Them
Even experienced photographers struggle with certain aspects of reflection photography. Here are the most common issues and their solutions.
Glare Ruining Your Reflections
Glare occurs when light bounces off the reflective surface at angles that overwhelm the reflection itself. This creates hot spots and loss of detail. The fix is simple. Use a circular polarizing filter and rotate it until the glare reduces. Change your shooting angle if the polarizer cannot fix it completely. Moving a few feet left or right often eliminates problematic glare.
Misaligned Symmetry
Slight tilts in your camera break the mirror effect. This usually happens when handholding or rushing setup. Slow down and use a tripod. Enable your camera’s electronic level. Take a test shot and zoom in to check alignment. Fixing this in post-processing means cropping, which loses image quality.
Ripples Destroying Mirror Effects
Wind creates ripples that turn your mirror into a textured surface. If you cannot wait for calmer conditions, use a longer exposure. A neutral density filter lets you extend shutter speed even in daylight. One to three seconds often smooths minor ripples. For larger waves, you need patience. Return when conditions improve.
Foreground Distractions
Rocks, branches, or debris at the water’s edge clutter your composition. Sometimes you can remove these in post-processing. Better yet, reposition your camera. Move closer to eliminate foreground clutter. Or find a cleaner section of shoreline. A few minutes of exploration often reveals a better vantage point.
Uneven Reflection Line
Sloped shorelines or uneven water edges create crooked reflection lines. This breaks the symmetry effect. Look for level stretches of shoreline. If none exist, adjust your composition. Tilt your camera to match the shoreline angle. This creates intentional diagonal symmetry rather than failed horizontal symmetry.
Creative Variations Beyond Perfect Symmetry
Perfect symmetry creates beautiful images. But sometimes breaking the rules produces more interesting work.
Intentional Asymmetry
Place your reflection line off-center for visual tension. A reflection taking up two-thirds of the frame while the subject fills one-third creates a different kind of balance. This works well when one side of the image is clearly more interesting than the other.
Abstract Reflections
Focus only on the reflection and exclude the subject entirely. This creates an abstract, dreamlike quality. Rippled water adds painterly effects. Colors and shapes become the subject rather than recognizable objects. These images often work as fine art pieces.
Multiple Reflections
Look for situations with more than one reflective surface. Two mirrors facing each other create infinite reflections. Glass buildings near water reflect both the subject and its reflection. These complex compositions reward careful observation and precise framing.
Frequently Asked Questions
What is the 20 60 20 rule in photography?
The 20 60 20 rule suggests spending 20 percent of your time planning your shoot, 60 percent actually photographing, and 20 percent reviewing and editing your images. For reflection photography specifically, the planning phase becomes even more important because location, weather, and timing make such a significant difference in your results.
What are common symmetry photography mistakes?
The most common mistakes include misaligning the camera so the reflection line tilts, shooting when wind creates ripples, failing to use a polarizing filter to control glare, focusing on the water surface instead of the reflected subject, and including distracting elements that break the symmetry. Most of these issues have simple fixes once you recognize them.
How to take symmetry photography?
Start by finding a reflective surface like water, glass, or a mirror. Position your camera so the reflection line sits exactly centered in your frame. Use a tripod and level to ensure perfect alignment. Focus on the reflected subject, not the surface itself. Shoot during calm conditions with soft lighting, ideally during golden hour. Use a circular polarizer to control glare and enhance the reflection.
What is the quickest method to compose a photograph for asymmetry?
The fastest way to create asymmetry is using the rule of thirds. Place your main subject along one of the vertical or horizontal third lines rather than centering it. For reflection photos specifically, position the reflection line at the upper or lower third instead of dead center. This immediately creates visual tension and a more dynamic composition.
Mastering how to photograph reflections for perfectly symmetrical compositions takes practice and patience. The technical skills are straightforward. Find a reflective surface, position yourself correctly, choose the right time, frame carefully, and capture the shot. The artistry comes from training your eye to see reflections everywhere and knowing when to follow the rules versus when to break them.
Start with the basics outlined here. As you grow more comfortable, experiment with creative variations. The most important step is getting out there and shooting. Every reflection teaches you something new about light, composition, and seeing the world differently.