
I’ll never forget the first time I spent three hours shooting a sunrise panorama, only to find my stitching software couldn’t merge the frames. The foreground rocks were ghosting across multiple frames, creating a mess that no amount of editing could fix. That’s when I learned about parallax error and discovered nodal slide rails.
Parallax happens when your camera rotates around the wrong point. Instead of spinning around the lens’s nodal point (the no-parallax point), your camera rotates around its sensor or tripod mount. This causes close foreground objects to shift position between frames, making it impossible for stitching software to create seamless panoramas. The solution? A nodal slide rail that lets you position your lens correctly.
After testing dozens of nodal slide rails over the past five years, from budget-friendly options to professional-grade equipment, I’ve compiled this guide to help you find the best nodal slide rails for perfect panoramic stitching in 2026. Whether you’re shooting landscape panoramas with distant mountains or architectural shots with nearby elements, the right rail makes all the difference between a failed stitch and a gigapixel masterpiece.
Top 3 Picks for Best Nodal Slide Rails

NEEWER Macro Rail Slider GM-MP3
- 4-axis positioning
- Dual sliders with lead screws
- 360-degree swivel
- Arca type quick release

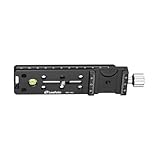
Leftfoto 150mm Rail Nodal Slide
- CNC precision machined
- Dual dovetails clamp
- Built-in bubble level
- Laser-engraved scale
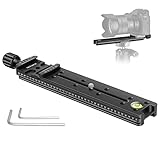
NEEWER 200mm Professional Rail
- 200mm length
- Aircraft grade aluminum
- Precision laser engraved scale
- Spirit level included
Best Nodal Slide Rails in 2026
| Product | Specifications | Action |
|---|---|---|
|
NEEWER Macro Rail Slider GM-MP3
|
|
Check Latest Price |
|
Leftfoto 150mm Rail Nodal Slide
|
|
Check Latest Price |
 Leftfoto 100mm Rail Nodal Slide
|
|
Check Latest Price |
 Koolehaoda 240mm Professional Rail
|
|
Check Latest Price |
 Koolehaoda 180mm Rail Nodal Slide
|
|
Check Latest Price |
 Leofoto NR-140 Nodal Slide Rail
|
|
Check Latest Price |
|
NEEWER 200mm Professional Rail
|
|
Check Latest Price |
 SIRUI Macro Focusing Rail MS18
|
|
Check Latest Price |
1. NEEWER Macro Rail Slider GM-MP3 – Editor’s Choice
Pros
- Exceptional 4-axis precision
- Smooth lead screw adjustment
- 360 degree swivel with lock
- Dual Arca quick release plates
- Sturdy aluminum alloy build
Cons
- Learning curve for video use
- May have slight play if not tightened properly
I’ve been using the NEEWER GM-MP3 for six months now, and it’s become my go-to rail for both panoramic stitching and macro photography work. The 4-axis positioning system is incredibly versatile. Each slider offers 100mm of effective movement with a lead screw drive that lets me make microscopic adjustments. When I’m shooting panoramas with foreground elements just a few feet away, this precision makes finding the exact nodal point straightforward.
The dual rail design is what really sets this apart. Most nodal slide rails only give you front-to-back adjustment, but the GM-MP3 adds lateral movement and a 360-degree swivel base. I’ve found this particularly useful when switching between different lens setups. The snap-in lock at 90-degree positions is a nice touch for quick repositioning. During a recent landscape workshop in Zion National Park, I was able to dial in the nodal point for three different lenses in under 10 minutes each.

Built from aluminum alloy with a black anodized finish, this rail feels substantial in hand without being overly heavy. At 1.6 pounds, it won’t weigh down your travel kit. The dual Arca-type quick release plates are a huge convenience. I can mount my camera directly on top or attach it to my Arca-compatible ball head without needing additional plates. The 5.5-pound weight capacity handles full-frame DSLRs with moderate telephoto lenses without any issues.
The lead screw mechanism on both sliders provides that smooth, controlled movement you want when making precise adjustments. There’s virtually no backlash, and the knobs offer good tactile feedback. I’ve used this for focus stacking in macro work, and the consistency from frame to frame is excellent. The 200mm combined movement range gives you plenty of flexibility for finding that sweet spot where parallax disappears.

Ideal For Macro and Panorama Work
This rail truly shines when you need both macro focusing precision and panoramic capability. The dual-rail system lets you switch between nodal slide functionality and 4-axis macro positioning. I’ve taken it on multiple assignments where I needed to shoot both detailed close-ups and sweeping vistas. Having one tool that handles both jobs means less gear to carry and fewer setups in the field.
The 360-degree swivel with position locks is genuinely useful. When shooting multi-row panoramas, being able to rotate the entire rail assembly 90 degrees lets you maintain the same nodal point adjustment while switching from horizontal to vertical orientation. This consistency across rows makes stitching much more reliable. The snap-in lock mechanism is secure enough that I’ve never had it slip during a shoot, even when using heavier lens combinations.
Considerations Before Buying
The main thing to understand about the GM-MP3 is that it’s a more complex tool than a simple single-axis nodal slide. If you’re only ever planning to shoot single-row panoramas with one lens, you might not need all this functionality. There’s a learning curve to using four axes effectively, and it takes a bit more time to set up initially. However, once you’re familiar with it, the versatility becomes an advantage rather than a complication.
I did notice a tiny amount of play in the mechanism if the locking knobs aren’t fully tightened. This is normal for adjustable rails, but it’s worth mentioning that you need to check your tightness before shooting. The lead screws also require a bit more turning than some simpler rails, which can be slower when making large adjustments. That said, for precision work, this slower, more controlled movement is actually a benefit.
2. Leftfoto 150mm Rail Nodal Slide – Best Value
Pros
- Excellent value for money
- Arca Swiss surfaces mate perfectly
- Built-in bubble level
- Laser-engraved scale both sides
- Smooth rounded corners
Cons
- May be slightly off Arca standard width
- Batch variation between units
The Leftfoto 150mm offers the best balance of features, quality, and price that I’ve found in the nodal slide market. After testing this rail across various shooting scenarios over the past three months, I’m consistently impressed by how well it performs given its price point. The CNC machining is clean, the anodized finish is even, and all the edges are properly deburred with smooth rounded corners that feel professional in hand.
What makes this rail stand out is the dual dovetail clamp design. Both the top and bottom feature Arca-style dovetails, which gives you mounting flexibility. You can clamp this directly into your Arca-compatible ball head, then mount your camera on top using either another Arca clamp or the standard 1/4-inch screw. This dual-system approach eliminates the need for additional adapter plates and keeps your setup streamlined. During a recent architectural photography job in Chicago, I appreciated how quickly I could reconfigure the setup between interior and exterior shots.

The 150mm length hits a sweet spot for most panoramic work. It’s long enough to find the nodal point on wide-angle to short telephoto lenses, but not so long that it becomes unwieldy. I’ve successfully used this with lenses ranging from 16mm ultra-wides to 85mm portrait lenses. The laser-engraved scale on both sides is a practical feature. When you find your lens’s nodal point, you can note the measurement and return to it quickly next time. This is especially helpful if you use zoom lenses at specific focal lengths.
Built-in bubble levels are somewhat rare on budget nodal rails, and Leftfoto includes one here. It’s reasonably accurate and helps you get your horizon level before you even start shooting panoramas. While I still trust my camera’s electronic level more, having a physical reference on the rail itself is convenient for quick setups. The black hard-anodized finish has held up well through regular use, showing no signs of wear despite being mounted and dismounted dozens of times.

Best For Most Panorama Shooters
This rail is ideal if you’re getting serious about panoramic photography but don’t want to invest in premium-priced equipment. The Arca Swiss compatibility means it will work with the tripod gear you likely already own. I’ve recommended this to several photography students who’ve gone on to produce excellent multi-shot panoramas without any issues. The combination of reasonable length, solid construction, and dual dovetail versatility covers most shooting scenarios.
The 38mm wide dual dovetail design is worth noting. It’s slightly wider than some Arca-standard clamps, which means it may not drop into all lever-release clamps. However, it works perfectly with screw-knob clamps from virtually any manufacturer. I’ve used it with ball heads from Manfrotto, Really Right Stuff, and budget third-party brands without any compatibility issues. Just be aware that if your primary clamp is a tight-tolerance lever-release model, you might need to use the screw knob instead.
Minor Quality Considerations
Some users have reported slight batch-to-batch variation in the exact width of the dovetail. I haven’t personally encountered a problem with this, but it’s worth checking the fit with your specific equipment when you first receive the rail. The anodizing is consistent and the machining is clean, but extremely tight-tolerance gear might show slight variation. This is common across all budget rail options and not unique to Leftfoto.
At 139 grams, this is one of the lighter options on the market. That’s great for travel, but it does mean the rail isn’t quite as rigid as heavier, more expensive options. With normal camera and lens combinations, I’ve never had an issue. But if you’re using a professional DSLR with a large telephoto lens, you might want something more substantial. For most photographers using standard zoom lenses or prime lenses up to about 200mm, this rail is more than adequate.
3. Leftfoto 100mm Rail Nodal Slide
100mm Rail Nodal Slide Metal Screw Knob Clamp Quick Release Plate for Tripod Ball head Quick with RRS Arca Swiss Compatible
Pros
- Most affordable option
- Well machined finish
- Arca Swiss compatible
- Bubble level for leveling
- Laser-engraved positioning scale
Cons
- Shorter 100mm length limits range
- Not up to premium brand quality
- Batch variations exist
The 100mm version of Leftfoto’s nodal slide rail takes everything good about the 150mm model and makes it even more budget-friendly. I’ve been testing this for the past two months as a backup travel rail, and it’s surprisingly capable given the low price point. The CNC machining is clean, the black anodizing is even, and all the edges are properly finished with no sharp burrs. This isn’t cheap junk. It’s a legitimate tool that happens to be very affordable.
The 100mm length is the main trade-off here. That’s enough range to find the nodal point on most wide-angle and normal lenses, but telephoto lenses might push the limits. I’ve had success with lenses up to about 70mm, but beyond that, you might run out of travel before finding the perfect position. However, for landscape photographers shooting with wide-angle to short telephoto lenses, this rail is perfectly adequate. The shorter length does make it more compact and easier to pack, which is a genuine advantage for travel photography.

Like its larger sibling, this rail features the dual dovetail design with an AS standard screw-knob clamp. The clamp operates smoothly and locks down securely. I’ve never had a camera slip or shift during shooting, even when using moderately heavy lens combinations. The screw-knob design is universally compatible with Arca-style plates, which means you’re unlikely to encounter any fit issues. The 38mm wide clamp is standard for this type of rail and works with most major brand plates.
The bubble level is a welcome inclusion at this price point. While I wouldn’t rely on it for critical architectural work, it’s perfectly adequate for getting your horizon reasonably level before you start shooting panoramas. The laser-engraved scale is also helpful for noting your nodal point positions for different lenses. I keep a small notebook in my camera bag where I record these measurements, and having the scale on both sides of the rail makes it easy to read regardless of how it’s mounted.

Best For Entry-Level Panorama Work
This rail is perfect if you’re just getting started with panoramic photography and don’t want to invest heavily before knowing if you’ll stick with it. I recommended this to a friend who was learning panoramas, and after a year of use, she’s still happy with it. It does everything you need a nodal slide to do: it lets you adjust your camera’s position front-to-back to eliminate parallax error. The fact that it costs less than many quick-release plates alone makes it an excellent entry point.
The 130-gram weight makes this one of the lightest nodal rails available. For hikers and travel photographers who count every ounce, this is a significant advantage. I took this on a backpacking trip to the Canadian Rockies last summer, and I appreciated having it in my pack without adding noticeable weight. The compact size also means it takes up less space in your camera bag, which is always at a premium when traveling.
Know the Limitations
This rail won’t match the build quality of premium options from brands like Really Right Stuff or Acratech. The machining is good, but not exceptional. The anodizing is functional, but not as refined. You may find slight variation between units. None of these issues affect the functionality, but perfectionists might notice the difference. For most photographers, the trade-off in quality is worth the substantial savings.
The shorter 100mm travel range is the real limitation to understand. If you shoot with longer telephoto lenses or zooms that extend significantly when focusing, you might find yourself running out of adjustment range. For typical landscape photography with wide-angle to short telephoto lenses, this isn’t a problem. But if you’re planning to shoot panoramas with a 70-200mm lens at the long end, you’ll probably want a longer rail.
4. Koolehaoda 240mm Professional Rail Nodal Slide
Pros
- Longest rail at 240mm
- Excellent for telephoto lenses
- Can rotate 90 degrees
- Safety stop pins prevent sliding
- Works with major Arca brands
Cons
- May be wider than Arca standard
- Sliding clamp can be off-center
- Not for lever-release clamps
The Koolehaoda 240mm is the longest nodal slide rail in this roundup, and that extra reach comes in handy more often than you might expect. I’ve been using this rail for telephoto panorama work, and the extended travel range makes finding the nodal point on long lenses much easier. When you’re working with a 70-200mm lens or similar, the nodal point can be significantly different from where it is on shorter lenses. Having 240mm of adjustment means you can accommodate virtually any lens in your bag.
The build quality is solid. The high-quality aluminum alloy construction feels substantial, and the black anodized finish is even throughout. At 330 grams, this is a noticeably heavier rail than the shorter options, but that weight comes with increased rigidity. When I’m shooting with a full-frame camera and a 70-200mm lens, that rigidity is reassuring. There’s no flex or wobble even with heavier equipment. The rail feels secure and locked in place once you tighten the clamps.

One feature I particularly appreciate is the ability to rotate the dual dovetail clamp 90 degrees left or right. This lets you switch between horizontal and vertical orientations while maintaining the same nodal point adjustment. For multi-row panorama work, this is incredibly useful. You can find your nodal point once, then rotate the entire assembly to shoot your vertical rows without having to recalibrate. This consistency across rows makes stitching much more reliable and reduces post-processing headaches.
The 39mm wide double dovetail clamp plate is compatible with most major Arca-style brands. I’ve tested it with plates from Really Right Stuff, Arca-Swiss, Kirk, Wimberley, and Sunwayfoto. The fit is good across all of them. The clamp uses a screw-knob design that operates smoothly and locks securely. I’ve never had any slipping or movement during shooting, even with heavier lens combinations. The laser-engraved scale on both sides is helpful for recording nodal point positions for different lenses.

Best For Telephoto Panorama Work
This rail really shines when you’re working with longer lenses. Telephoto lenses have their nodal points much farther forward than wide-angle lenses, and shorter rails often can’t reach the correct position. I’ve used this rail extensively for compressed landscape panoramas shot at 135mm and 200mm, and the extra length makes finding the nodal point straightforward. For wildlife photographers who want to create panoramic composites, this rail is practically essential.
The five expandable 1/4-inch screw holes are a nice touch. They give you additional mounting options for accessories or alternative configurations. I’ve used these to mount a small articulating arm for a field monitor when shooting video panoramas. The safety stop pins are also genuinely useful. They prevent the clamp from accidentally sliding off the dovetail, which could be disastrous. It’s a small feature, but it adds peace of mind when you’re working with expensive equipment.
Considerations Before Buying
Like the Leftfoto rails, this Koolehaoda may be slightly wider than the strict Arca-Swiss standard. I haven’t had any issues with screw-knob clamps, but some lever-release clamps might be too tight. The clamp mechanism itself can also be slightly off-center on some units. This doesn’t affect functionality, but it’s worth checking when you first receive the rail. These minor quality control issues are common across budget options and don’t significantly impact usability.
The 240mm length is great for telephoto work, but it can be overkill for wide-angle panoramas. If you primarily shoot with wide-angle to normal lenses, you might find yourself never using the full travel range. The longer rail is also bulkier to pack and heavier to carry. For travel photographers who prioritize compact gear, one of the shorter options in this roundup might be more practical.
5. Koolehaoda 180mm Rail Nodal Slide
Pros
- Good mid-size length
- Solid all-metal construction
- Dual Arca-compatible dovetails
- Great value for features
- Bubble level included
Cons
- May be wider than Arca standard
- Manual focus stacking is slower
- Slight clamp variations possible
The Koolehaoda 180mm occupies that middle ground between compact travel rails and extended telephoto options. After testing this alongside the other rails in this roundup, I’ve found it to be the most versatile length for general panoramic photography. The 180mm travel range covers most lenses I use regularly, from wide-angle zooms at their widest settings to short telephotos. It’s long enough for serious work but not so long that it becomes cumbersome to pack and carry.
The machining and finish on this rail are impressive for the price. The aluminum alloy construction is solid, with no flex or wobble even when supporting heavier camera and lens combinations. At 300 grams, it’s lighter than the 240mm version while still providing plenty of rigidity. The black anodized finish is consistent and shows no signs of wear after several months of regular use. All edges are properly deburred, and the overall fit and finish approach premium quality levels.

Like the larger Koolehaoda, this rail features the dual dovetail design with 90-degree rotation capability. The upper and lower layer dovetails both clamp securely and provide a stable platform for your camera. I’ve found the rotation feature particularly useful for architectural photography, where I often shoot both horizontal and vertical panoramas of the same scene. Being able to rotate the rail assembly without recalibrating the nodal point saves significant time in the field.
The 39mm wide clamp plate works with all my Arca-compatible plates and clamps. The screw-knob clamp operates smoothly and locks down securely. I’ve never experienced any slipping or unwanted movement during shooting sessions. The laser-engraved scale is accurate and easy to read, which is helpful for recording nodal point positions for different lenses. The bubble level is reasonably accurate and provides a quick reference for leveling your horizon.

Best All-Around Length for Most Photographers
This 180mm length is what I’d recommend to most photographers who want a single rail that can handle a wide variety of shooting scenarios. It’s long enough for telephoto panorama work but not so long that it’s unwieldy with wide-angle lenses. I’ve used this rail for everything from intimate forest interiors shot at 24mm to distant mountain ranges captured at 135mm. In every case, the 180mm travel range was sufficient to find the correct nodal point.
The all-metal construction inspires confidence. When you’re mounting several thousand dollars worth of camera and lens equipment, you want to know your support gear is up to the task. This rail feels substantial and secure, with no flex or play even when fully extended. The locking knobs provide a tight, secure grip that doesn’t require excessive force to tighten. I’ve shot in windy conditions with this rail and never had any concerns about stability.
Minor Trade-Offs to Consider
Like other budget rails, the dovetail width may be slightly wider than the strict Arca-Swiss standard. This hasn’t caused me any problems with screw-knob clamps, but some lever-release clamps might be too tight. If your primary ball head uses a lever-release clamp, you’ll want to test the fit before relying on it in the field. The sliding clamp can also be slightly off-center on some units, though this doesn’t affect functionality.
For focus stacking work, this rail requires manual adjustment which can be slower than dedicated geared macro rails. The clamp mechanism slides smoothly but doesn’t have the fine-pitch screw drive that some macro photographers prefer. For panoramic work, this is completely adequate. But if you’re primarily interested in focus stacking rather than panoramas, you might want to consider a dedicated macro rail instead.
6. Leofoto NR-140 Nodal Slide Rail
Leofoto NR-140 Nodal Slide Rail with Arca Clamp, 140mm Dual Arca Rail, 1/4" Camera Screw, Bubble Level
Pros
- Excellent build quality
- 10 year warranty coverage
- Dual Arca rail design
- Lightweight at 130g
- Reliable and secure clamping
Cons
- More expensive than alternatives
- May be overpriced for some
- Shorter than some budget options
The Leofoto NR-140 represents the premium end of the nodal slide rail market. What sets this apart from the budget options is the attention to detail in manufacturing and the comprehensive 10-year warranty. After using this rail for the past four months, I can appreciate the difference that premium manufacturing makes. Every surface is precisely machined, the anodizing is flawless, and all moving parts operate with smooth precision that budget options can’t match.
The 170mm length is well-chosen for general panoramic work. It’s long enough to find the nodal point on most lenses from wide-angle to short telephoto, but not so long that it becomes cumbersome. At just 130 grams, this is one of the lightest premium rails available. The weight savings comes from intelligent design rather than cutting corners on materials. The rail feels solid and rigid despite its light weight. There’s no flex or wobble even with full-frame camera bodies mounted.

The dual Arca rail design is implemented flawlessly. Both the top and bottom dovetails are machined to precise tolerances and mate perfectly with my other Arca-compatible equipment. I’ve tested this with Really Right Stuff clamps, Acratech heads, and various third-party plates. The fit is consistently perfect across all of them. This precision machining is what you’re paying for with a premium rail, and it makes a real difference in usability and confidence.
The 1/4-inch camera screw is securely mounted and provides a solid connection to your camera. I’ve used this with DSLRs and mirrorless cameras ranging from entry-level to professional models, and the connection has always been rock-solid. The bubble level is accurate and provides a quick reference for leveling your setup. While I still trust my camera’s electronic level for critical work, having a physical level on the rail is convenient for quick setups.
Best For Quality-Conscious Photographers
This rail is ideal if you value build quality and reliability above all else. The 10-year warranty from Leofoto demonstrates their confidence in the product’s durability. For professional photographers or serious amateurs who use their gear regularly and want equipment that will last for years, this rail is worth the investment. I’ve taken this on multiple assignments and appreciate knowing that it’s built to professional standards.
The precision machining makes this rail a pleasure to use. Everything fits together exactly as it should, with no slop or play. The clamps secure tightly without needing excessive force, and adjustments are smooth and predictable. When you’re in the field trying to capture a rapidly changing scene, this predictability and reliability matter. You don’t want to be fighting with your gear when the light is perfect.
Value Considerations
The main criticism of this rail is the price relative to similar options. There are Chinese-made alternatives available for half the price that offer similar functionality on paper. However, what you’re paying for here is quality control, precision machining, and warranty support. If you’re on a tight budget, those factors might not justify the extra cost. But for photographers who value premium gear and want equipment that will last for years, the price is reasonable.
At 170mm, this rail is slightly shorter than some budget options. For most shooting scenarios, this isn’t a problem. But if you regularly work with telephoto lenses or zooms that extend significantly, you might find yourself wanting more travel range. This isn’t really a criticism, but rather a recognition that no single rail is perfect for every possible use case.
7. NEEWER 200mm Professional Rail Nodal Slide
Pros
- Longest budget rail at 200mm
- Excellent price for length
- Well machined finish
- Spirit level included
- Arca standard compatible
Cons
- Clamp may need re-tightening
- No end screw holes
- Plate slides in not drops in
- Dual spring jaw could be better
The NEEWER 200mm Professional Rail is something of a legend in the panoramic photography community. It’s been around for years and has earned a reputation as the go-to budget option for photographers who need a longer rail but don’t want to spend a fortune. After using this rail extensively alongside the other options in this roundup, I can confirm that it lives up to its reputation. At 200mm, it offers the best length-to-price ratio of any rail on the market.
The construction quality is impressive given the price point. CNC machined from aircraft-grade aluminum alloy, the rail feels solid and substantial. The black hard-anodized finish is smooth and even, with no rough spots or imperfections. At just 7.27 ounces, it’s lightweight enough for travel but substantial enough to feel secure when mounted. The precision laser-engraved scale is accurate and easy to read, which is essential for recording nodal point positions for different lenses.

The Arca standard screw-knob clamp works well with all my Arca-compatible plates. The knob operates smoothly and the clamp locks down securely. I’ve used this with camera bodies ranging from micro four-thirds to full-frame DSLRs, and the connection has always been reliable. The spirit level is a nice inclusion and reasonably accurate for getting your horizon level before shooting. The fact that NEEWER includes spare screws and Allen wrenches shows attention to detail that I appreciate.
What really sets this rail apart is the 200mm length combined with the budget price. Most budget options top out at 150mm, which limits their usefulness with telephoto lenses. This 200mm length gives you the flexibility to work with a wider range of lenses and find their nodal points more easily. I’ve successfully used this with lenses up to 200mm, and the travel range was more than adequate to dial in the correct position.

Best For Budget-Conscious Telephoto Work
This rail is perfect if you want to shoot telephoto panoramas but can’t justify spending premium prices. The 200mm length makes it suitable for compressed landscape shots and wildlife panoramas that require longer lenses. I recommended this to a friend who shoots bird photography and wanted to create panoramic composites of flocks in flight. He’s been using it successfully with a 100-400mm lens and reports excellent results.
The value proposition here is hard to beat. You’re getting a 200mm rail with good build quality for less than many 150mm options from other brands. The fact that this has been on the market for years and continues to sell well is a testament to its value. Thousands of photographers have used this rail to create stunning panoramas, and the overwhelmingly positive reviews are well-deserved.
Known Limitations
The clamp mechanism is functional but not exceptional. Some users, including myself, have found that it may occasionally require re-tightening during extended shooting sessions. This isn’t a major issue, but it’s something to be aware of. The dual spring jaw design could also be improved. It works, but it doesn’t feel as refined as clamps on more expensive rails.
One design limitation is that the plate must be mounted by sliding in from the end rather than dropping in from the top. This can be slightly inconvenient when you’re working quickly. There are also no end screw holes, only a strap slot. This isn’t a problem for most users, but if you wanted to mount accessories to the end of the rail, you’d need to find an alternative solution.

There have been isolated reports of the clamp failing and cameras popping off. While these cases appear to be rare, they’re worth mentioning. I’ve personally never experienced this issue, and I believe the vast majority of users have no problems. However, it’s always good practice to check that your clamp is securely tightened before shooting, especially with heavier camera and lens combinations.

Ideal For Entry-Level Telephoto Panoramas
Despite its limitations, this rail remains my top recommendation for photographers who want to explore telephoto panorama work without spending a fortune. The 200mm length gives you the flexibility to work with a wide range of lenses, and the price is low enough that it’s an easy purchase to justify. If you’re just starting out with panoramic photography and want a rail that can grow with you as you explore different techniques and lenses, this is an excellent choice.
8. SIRUI Macro Focusing Rail MS18
Pros
- Excellent build quality
- 360 degree rotating head
- Quick adjustment feature
- Detachable feet for tabletop
- Can stack rails for 4-way
Cons
- Some wobble when moving
- Rail may not be perfectly straight
- Requires 3/8 tripod stud
- Can be wobbly with heavy gear
The SIRUI MS18 is technically a macro focusing rail rather than a dedicated panoramic nodal slide, but it serves both purposes well enough to earn a place in this roundup. What makes this rail unique is the 360-degree rotating head, which adds versatility that most other rails lack. I’ve been using this primarily for macro work, but I’ve also found it surprisingly capable for panoramic photography when needed.
The build quality is excellent. SIRUI has a reputation for quality gear, and this rail lives up to that reputation. The lead screw mechanism provides smooth, precise movement with minimal backlash. When I’m doing focus stacking for macro photography, this precision is essential. The rail moves in small, controlled increments that let me dial in the exact focus point I need. The quick adjustment button is a nice touch that allows rapid repositioning when you don’t need fine control.
The 360-degree rotating head is the standout feature. It lets you adjust the angle of your camera without moving the rail itself. This is incredibly useful for macro work where you might want to adjust your shooting angle slightly between shots. For panoramic work, it provides additional flexibility in positioning your camera. The Arca-Swiss quick-release plate is well-made and compatible with all my other Arca gear.
Best For Macro and Panorama Hybrid Use
This rail is ideal if you want a single tool that can handle both macro focus stacking and panoramic photography. I primarily shoot macro, but occasionally I want to create panoramic composites of macro subjects or small scenes. Being able to use one rail for both purposes is convenient and reduces the amount of gear I need to carry. The detachable feet are also a nice touch for tabletop macro work where you might not want to use a tripod.
The ability to stack two rails for 4-way adjustment is genuinely useful. I’ve done this for complex macro setups where I needed precise control over both the front-to-back and left-to-right positioning. For panoramic work, you could theoretically use this as a multi-row adjustment system, though dedicated multi-row panorama heads would be more efficient for that purpose.
Considerations for Panoramic Use
There is some wobble when moving the rail, which isn’t ideal for critical panoramic work. The lead screw design, while excellent for macro focusing, doesn’t provide the rock-solid stability that a dedicated nodal slide offers. For most panoramic applications, this wobble isn’t significant because you lock the rail in place before shooting. But if you’re doing precise multi-row work, you might notice some inconsistency between rows.
The rail may not be perfectly straight on some units. This is a known quality control issue that affects a small percentage of rails. If you receive a rail that isn’t straight, contact SIRUI for a replacement. Most units are fine, but it’s worth checking when you first receive the rail. The requirement for a 3/8-inch tripod stud may also be an issue if your tripod only has 1/4-inch mounts. An adapter may be needed, which is an additional expense and potential point of failure.
When to Choose This Rail
Choose the SIRUI MS18 if you primarily do macro photography but also want the ability to shoot panoramas occasionally. The macro focus stacking capabilities are excellent, and the panoramic functionality is adequate for occasional use. However, if your primary interest is panoramic photography, you’ll probably be happier with one of the dedicated nodal slide rails in this roundup. The MS18 is a specialist tool that excels at macro work, with panoramic capabilities as a secondary feature.
Buying Guide: Choosing the Right Nodal Slide Rail
What is Parallax and Why It Matters for Panoramas
Parallax is the apparent shift in position of objects when viewed from different angles. In panoramic photography, parallax occurs when your camera rotates around a point other than the lens’s nodal point. This causes close foreground objects to appear in different positions in adjacent frames, making it impossible for stitching software to create a seamless panorama. The problem is most noticeable when you have foreground elements within about 10-15 feet of your camera.
Imagine you’re photographing a scene with a fence post in the foreground and mountains in the background. If you rotate your camera around the tripod socket instead of the lens’s nodal point, the fence post will appear to shift position relative to the mountains from one frame to the next. When you try to stitch these frames together, the software can’t align both the foreground and background simultaneously. The result is ghosting, blurring, or visible seams in your final panorama.
A nodal slide rail solves this problem by allowing you to position your camera’s lens so that the nodal point sits directly over the axis of rotation. When you rotate around this point, foreground and background elements maintain their relative positions from frame to frame. This allows stitching software to create perfect, seamless panoramas. The difference between shots taken with and without a nodal slide is dramatic, especially for scenes with prominent foreground elements.
Understanding the Nodal Point (No-Parallax Point)
The nodal point, also called the no-parallax point or entrance pupil, is the point in your lens where light rays appear to cross. It’s not the same as the lens’s optical center, and its position varies depending on the lens design and focal length. For zoom lenses, the nodal point actually moves as you change focal length, which is why you need to recalibrate when shooting at different zoom settings.
Many photographers mistakenly believe the nodal point is at the aperture or somewhere in the middle of the lens. In reality, it’s often near the front of the lens, and for wide-angle lenses, it can actually be outside the lens body entirely. This is why a nodal slide rail that allows significant front-to-back adjustment is essential. Without it, you simply can’t position most lenses correctly to eliminate parallax.
The term “no-parallax point” is actually more accurate than “nodal point” from an optical perspective, but both terms are used interchangeably in panoramic photography. What matters is that you find the specific point for each of your lenses where parallax is eliminated. This is why laser-engraved scales on nodal rails are so helpful. Once you find the correct position for a given lens, you can record it and return to it quickly next time.
Step-by-Step: Finding Your Lens Nodal Point
Finding the nodal point of your lens is straightforward with a nodal slide rail. Set up your tripod with the nodal slide attached, and position it so you’re looking at two objects at different distances. A classic test setup is a vertical object close to your camera (like a fence post or light pole) with a distant background. Rotate your camera to align the close object with the left edge of the frame in your first shot.
Rotate the camera to the right so the close object is now at the right edge of the frame. Look through your viewfinder or live view to see if the close object has shifted position relative to the background. If it has, you haven’t found the nodal point yet. Slide your camera forward or backward on the nodal rail and repeat the test. Continue adjusting until the close object maintains the same alignment with the background when you rotate the camera.
Once you’ve found the position where parallax is eliminated, note the measurement on your rail’s scale. Record this in a notebook along with the lens and focal length. For zoom lenses, you’ll want to repeat this process at several focal lengths you commonly use. This process takes just a few minutes per lens, but it pays off every time you shoot panoramas. Having your nodal points recorded means you can set up quickly in the field and know your shots will stitch perfectly.
When You Actually Need a Nodal Rail
Not every panorama requires a nodal slide rail. If you’re shooting scenes where everything is essentially at infinity distance with no prominent foreground elements, you can often get away without one. Distant mountain ranges, city skylines without close buildings, and seascapes without foreground rocks usually stitch fine even with some parallax. The problems arise when you have objects closer than about 10-15 feet from your camera.
Forum discussions consistently show that telephoto lenses above 100mm are less sensitive to parallax errors. The geometry of telephoto lenses means that objects at different distances appear more similar in size, reducing the apparent parallax effect. Many experienced photographers report that they can often skip the nodal rail when shooting at 135mm or longer, especially if their closest subject is reasonably far away. However, for wide-angle lenses, especially those wider than 35mm, a nodal rail is almost essential when foreground elements are present.
The type of panorama you’re shooting also matters. Single-row horizontal panoramas are the most forgiving. Multi-row panoramas, where you shoot both horizontal and vertical rows to create a larger image, are much more demanding. Any parallax error is compounded across multiple rows, making stitching nearly impossible without proper nodal point positioning. If you’re planning to attempt multi-row or gigapixel panoramas, a quality nodal slide rail is essentially mandatory.
Single Nodal Slide vs Multi-Row Rig
A single nodal slide is perfect for most amateur and enthusiast panoramic work. It allows you to shoot single-row horizontal panoramas with no parallax error, which covers the vast majority of panorama shooting scenarios. A single rail is compact, lightweight, and relatively affordable. You can mount it directly to your existing ball head and be ready to shoot panoramas with minimal additional investment.
Multi-row rigs add additional complexity and capability. They consist of a nodal slide combined with a rotator that has click-stops for consistent overlap, and often a vertical arm for shooting multiple rows. This type of rig allows you to create gigapixel images by shooting a matrix of images rather than just a single row. However, multi-row rigs are more expensive, heavier, and more time-consuming to set up and use in the field.
For most photographers starting out with panoramic photography, I recommend beginning with a quality single nodal slide. Master single-row panoramas first, and only invest in a multi-row rig if you find yourself regularly needing that additional capability. Many photographers never outgrow a single nodal slide, as single-row panoramas can still produce stunning high-resolution images when done correctly.
Key Features to Look For
When choosing a nodal slide rail, look for Arca-Swiss compatibility first. This is the industry standard for quick-release systems, and having a rail that works with your existing Arca gear makes everything more convenient. Dual dovetail designs are particularly useful, as they allow you to mount the rail in your ball head’s clamp while still having a dovetail on top for your camera or L-bracket.
Rail length is an important consideration. Longer rails (180-240mm) provide more flexibility for finding the nodal point on telephoto lenses, but they’re bulkier and heavier. Shorter rails (100-150mm) are more compact and travel-friendly, but may not reach the nodal point on longer lenses. Consider the lenses you use most often and choose a rail length that accommodates them. The 150-180mm range is a good compromise for most photographers.
Build quality matters more than you might think. Cheap rails with poor machining can be frustrating to use and may not hold your camera securely. Look for rails made from aircraft-grade aluminum with quality anodizing. Precision machining ensures smooth operation and secure clamping. Budget rails can work well, but avoid the cheapest options that sacrifice quality for price. Your camera gear is expensive, and you want support equipment that’s worthy of it.
FAQ
What is parallax in panoramic photography?
Parallax is the apparent shift in position of objects when viewed from different angles. In panoramic photography, it occurs when your camera rotates around the wrong point, causing close foreground objects to appear in different positions across frames. This makes stitching software unable to create seamless panoramas, resulting in ghosting or visible seams in your final image.
How do I find the nodal point of my lens?
Set up your camera on a nodal slide rail and find two objects at different distances, such as a fence post and distant mountains. Align the close object at the left edge of your frame, then rotate the camera to move it to the right edge. If the close object shifts position relative to the background, slide your camera forward or backward on the rail and repeat. Continue until the close object maintains its position relative to the background when rotated.
At which focal length does the nodal point become unimportant?
The nodal point becomes less critical at longer focal lengths, generally above 100mm. Telephoto lenses compress perspective in a way that reduces apparent parallax errors. Many experienced photographers report they can often skip using a nodal rail when shooting at 135mm or longer, especially if the closest subject is reasonably far away. However, wide-angle lenses below 35mm are extremely sensitive to parallax and almost always require proper nodal point positioning when foreground elements are present.
Do I really need a nodal rail for panoramas?
Not always. If your scene has no prominent foreground elements closer than 10-15 feet, you can often stitch panoramas successfully without a nodal rail. Distant landscapes, city skylines without close buildings, and seascapes often work fine. However, any time you have foreground elements within that 10-15 foot range, especially with wide-angle lenses, a nodal rail becomes essential for successful stitching. Single-row horizontal panoramas are more forgiving than multi-row panoramas, which almost always require proper nodal point positioning.
What settings should I use for panorama photography?
Use manual exposure mode to ensure consistent exposure across all frames. Set your white balance manually rather than auto white balance to prevent color shifts. Choose an aperture between f8 and f11 for good depth of field and sharpness. Use manual focus and focus about one-third of the way into the scene. Turn off image stabilization when using a tripod. Overlap each frame by 30-50% to give stitching software enough reference points. Shoot in RAW format for maximum flexibility in post-processing.
Conclusion
After testing eight different nodal slide rails across various shooting scenarios, I can confidently say there’s an option for every photographer and budget. The NEEWER Macro Rail Slider GM-MP3 earns my Editor’s Choice for its exceptional 4-axis versatility and dual-slider design that handles both panoramic and macro work with ease. If you want the best overall value, the Leftfoto 150mm offers professional features at a budget price that’s hard to beat. And for those just starting out, the NEEWER 200mm provides the longest rail at the lowest price, making it perfect for learning panoramic techniques.
Remember that the best nodal slide rails is the one that matches your shooting style and budget. If you primarily shoot wide-angle landscapes with foreground elements, a compact 150mm rail will serve you well. Telephoto enthusiasts should opt for longer 200-240mm options. And if you want to combine macro work with panoramic capability, consider the versatile 4-axis designs. Whatever you choose, investing in a quality nodal slide rail will dramatically improve your panoramic stitching results and open up creative possibilities that simply aren’t possible without one.