When I first picked up a camera and switched from automatic to manual mode, I felt completely overwhelmed. My photos were either too dark or too bright, and I had no idea why. That frustration led me down a path of understanding one of the most fundamental concepts in photography: the exposure triangle. Once it clicked, everything changed.
The exposure triangle is the foundation that separates snapshots from photographs with real creative control. Whether you’re shooting portraits with beautiful background blur, freezing fast-moving action, or capturing stunning landscapes in golden hour light, understanding how these three settings interact will transform your photography. In this guide, I’ll break down each element simply and show you how they work together so you can confidently take control of your camera.
By the end of this article, you’ll have a complete understanding of aperture, shutter speed, and ISO, and you’ll know exactly how to balance them for any shooting situation.
What is the Exposure Triangle?
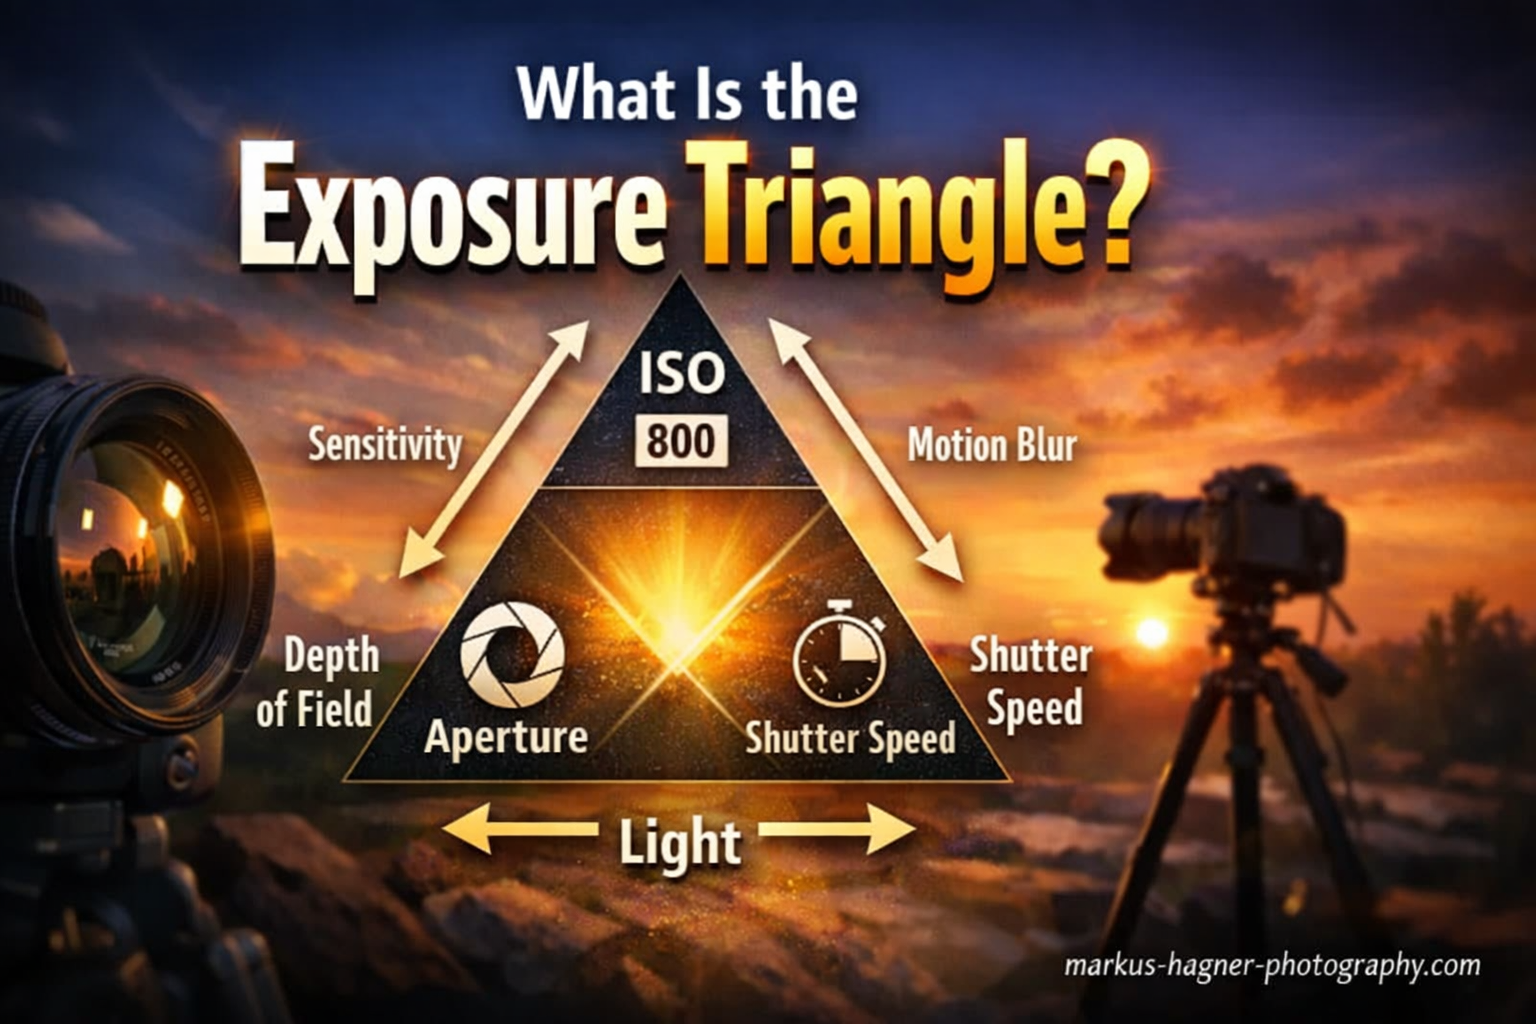
The exposure triangle is a fundamental concept in photography that describes how three camera settings work together to control the amount of light in an image. These three settings are aperture, shutter speed, and ISO. Think of them as three knobs on a mixing board that all affect your final exposure, but each one also changes other aspects of your image in ways that affect creative output.
Aperture controls the size of the lens opening, determining how much light enters through the lens. Shutter speed controls how long your camera’s sensor is exposed to light. ISO controls how sensitive your sensor is to that light. Change one of these settings, and you’ll need to adjust at least one of the others to maintain proper exposure. This is the essence of the exposure triangle.
Why does this matter? Because each setting does more than just affect brightness. Aperture also controls depth of field, which determines how much of your image is in sharp focus. Shutter speed affects whether moving subjects appear frozen or blurred. ISO impacts image quality through noise and grain. Understanding these trade-offs is what gives you creative control over your photographs.
The Three Elements at a Glance
Here’s a quick overview of how each element affects your image:
Aperture – Controls light AND depth of field. A wide aperture (low f-number) lets in more light but creates shallow depth of field with blurry backgrounds. A narrow aperture (high f-number) lets in less light but keeps more of your scene in focus.
Shutter Speed – Controls light AND motion. Fast shutter speeds freeze action, while slow speeds create motion blur. The faster the shutter speed, the less light reaches your sensor.
ISO – Controls light AND image quality. Higher ISO values make your sensor more sensitive to light, but they also introduce digital noise or grain into your images. Lower ISO values produce cleaner images but require more light from other sources.
Mastering the exposure triangle means learning to balance these three elements to get the result you want in any given situation.
Understanding Aperture
Aperture refers to the opening in your lens that allows light to pass through to your camera’s sensor. Think of it like the pupil of your eye – it can open wide to let in more light or close down to let in less. The size of this opening is measured in f-stops, and this is where many beginners get confused.
The F-Stop Scale Explained
The f-stop scale goes like this: f/1.4, f/2, f/2.8, f/4, f/5.6, f/8, f/11, f/16, f/22. Here’s the counterintuitive part that trips up many new photographers: smaller numbers mean a larger opening, and larger numbers mean a smaller opening. So f/1.4 is a very wide opening that lets in lots of light, while f/22 is a tiny opening that lets in very little light.
Each full stop on the scale represents a doubling or halving of the amount of light. Moving from f/5.6 to f/4 doubles the amount of light entering your camera. Moving from f/8 to f/11 halves the light. This relationship is consistent whether you’re talking about aperture, shutter speed, or ISO – doubling the value lets in twice as much light, halving it lets in half as much.
Most lenses have a maximum aperture (the widest opening) somewhere between f/1.2 and f/2.8. Professional “fast” lenses can open to f/1.4 or wider, which is incredibly useful for low-light photography and creating that beautiful background blur effect. Zoom lenses typically have variable maximum apertures that change as you zoom in.
How Aperture Affects Depth of Field?
Beyond controlling light, aperture dramatically affects depth of field – the range of distance in your image that appears acceptably sharp. A wide aperture like f/1.4 or f/2 creates shallow depth of field, meaning only a thin slice of your image will be in focus. This is perfect for portraits where you want your subject sharp but the background beautifully blurred.
A narrow aperture like f/11 or f/16 creates deep depth of field, keeping everything from near to far in sharp focus. This is ideal for landscape photography where you want the foreground flowers and distant mountains all to be tack sharp. The trade-off is that narrow apertures let in less light, requiring slower shutter speeds or higher ISO values.
I remember struggling with this concept early on. I wanted shallow depth of field for portraits but couldn’t figure out why my lens wouldn’t blur the background enough. Then I learned that aperture isn’t the only factor – the distance to your subject, the focal length of your lens, and the size of your camera’s sensor all affect depth of field too.
Common Aperture Mistakes to Avoid
One common mistake is using the absolute widest aperture (like f/1.2 or f/1.4) for every situation. While this lets in maximum light and creates beautiful background blur, it can also cause issues. At very wide apertures, lens sharpness often decreases, and the depth of field becomes so shallow that even small movements can cause your subject’s eyes to go out of focus.
Another mistake is assuming that f/8 or f/11 is always the “correct” aperture for everything. These mid-range apertures do offer a good balance of sharpness and depth of field for many situations, but they’re not magic numbers. Sometimes you need f/2.8 for a dim church wedding, and sometimes you need f/16 to get everything sharp from front to back in a landscape.
Understanding Shutter Speed
Shutter speed controls how long your camera’s sensor is exposed to light. It’s measured in seconds or fractions of seconds – for example, 1/1000 second is extremely fast, while 30 seconds is extremely slow. The faster the shutter speed, the less time light has to reach your sensor, so less light gets in. Slower shutter speeds let in more light but introduce the possibility of motion blur.
The shutter speed scale includes full stops like 1/1000, 1/500, 1/250, 1/125, 1/60, 1/30, 1/15, 1/8, 1/4, 1/2, 1 second, and so on. Each full stop either doubles or halves the amount of light. Moving from 1/125 to 1/60 doubles the exposure time and lets in twice as much light.
Motion Blur vs. Frozen Action
Shutter speed is your primary tool for controlling motion in your photographs. Fast shutter speeds like 1/1000 second or faster freeze motion, making moving subjects appear completely still. This is essential for sports photography, wildlife shots, or any situation where you want to capture a decisive moment without any blur.
Slow shutter speeds create motion blur, where moving objects appear smeared across the frame. This can be creative – think of silky waterfall photos made with 1-second exposures, or light trails from cars at night. But slow shutter speeds can also ruin photos when you don’t want blur, like handheld shots where camera shake or subject movement creates unwanted softness.
The minimum shutter speed you need depends on several factors. For handheld photography without image stabilization, a good rule of thumb is to use a shutter speed at least as fast as 1/(focal length). So if you’re shooting with a 50mm lens, you want at least 1/50 second. With a 200mm telephoto, you’d want 1/200 second or faster. Modern image stabilization can extend this, allowing sharp handheld shots at significantly slower speeds.
The Reciprocal Rule and Handheld Shooting
The reciprocal rule is a helpful starting point for avoiding camera shake when shooting handheld. If you’re using a 100mm lens, aim for at least 1/100 second. If you’re at 50mm, try for 1/50 second. This isn’t a hard limit – many photographers with steady hands can push it, and image stabilization helps significantly – but it’s a reliable guideline for beginners.
When shooting moving subjects, you generally need even faster shutter speeds. For walking people, 1/125 to 1/250 second usually works. For running athletes or fast action, 1/500 to 1/1000 second is better. For very fast subjects like birds in flight or race cars, 1/2000 second or faster might be necessary. The faster the subject is moving toward or across your camera, the faster your shutter speed needs to be.
One technique that helped me understand shutter speed better was deliberately photographing the same moving subject at different speeds. Seeing how a running dog transforms from a frozen pose at 1/1000 second to a blur of motion at 1/30 second made the concept click in a way that reading about it never could.
Long Exposure Photography
Long exposure photography uses very slow shutter speeds, typically from several seconds to several minutes, to create unique visual effects. This technique can turn choppy water into glass-like smoothness, make crowds of tourists disappear from busy landmarks, or capture star trails across the night sky.
To achieve long exposures in daylight, you’ll need neutral density (ND) filters. These dark filters mount on the front of your lens and reduce the amount of light entering the camera, allowing for much longer exposures even in bright conditions. Without ND filters, your aperture would need to be nearly closed (like f/22) to achieve long exposures in daylight, which can introduce diffraction and reduce sharpness.
Long exposures require a sturdy tripod since any camera movement during the exposure will ruin the image. A remote shutter release or your camera’s self-timer helps avoid camera shake when pressing the button. You’ll also want to turn off any image stabilization when the camera is mounted on a tripod, as it can actually cause slight movement when it detects no motion.
Understanding ISO
ISO measures how sensitive your camera’s sensor is to light. The term comes from film photography standards, where different film stocks had different light sensitivities. In digital photography, ISO controls the amplification of the signal from your sensor. Higher ISO values make the sensor more sensitive to light, allowing you to shoot in darker conditions, but this comes at a cost to image quality.
The ISO scale typically runs like this: 100, 200, 400, 800, 1600, 3200, 6400, and beyond. Like aperture and shutter speed, each full stop on the ISO scale doubles or halves the sensitivity. Moving from ISO 400 to ISO 800 doubles the sensor’s sensitivity, giving you one more stop of light.
Image Noise and Grain
When you increase ISO to capture more light, you’re essentially amplifying the signal from your sensor. But this amplification also amplifies random electrical interference, which manifests as noise or grain in your images. At low ISO values like 100 or 200, images appear smooth and clean. At high ISO values like 6400 or above, you typically see visible noise that can degrade image quality.
The amount of noise you get at high ISO values depends on your camera. Newer cameras with larger sensors typically perform better at high ISOs because they have larger photosites that capture more light. Full-frame cameras generally handle high ISO better than APS-C cameras, which in turn handle it better than compact cameras with tiny sensors. Professional cameras can often produce usable images at ISO 12800 or higher, while budget cameras might struggle beyond ISO 1600.
Modern noise reduction algorithms in cameras and editing software have improved significantly, but they can’t completely eliminate the effects of high ISO. Some photographers actually embrace grain as a creative effect, reminiscent of high-speed film. Others shoot in RAW and carefully apply noise reduction in post-processing to find the right balance between detail and noise.
When to Raise Your ISO?
There are situations where raising ISO is the right choice, even if it introduces some noise. If you’re shooting handheld in low light and can’t open your aperture wider or slow your shutter speed further without introducing camera shake or motion blur, increasing ISO gives you the exposure you need. The slight noise in a sharp photo is usually preferable to a blurry photo with less noise.
Action and sports photographers often need fast shutter speeds, sometimes 1/4000 second or faster. In dim indoor lighting or overcast conditions, this might require ISO values of 3200, 6400, or higher. Wildlife photographers photographing in dense forest shade face similar challenges. The key is understanding that some noise is acceptable when the alternative is missing the shot entirely.
When lighting is good, like bright sunshine or using flash, always start with the lowest native ISO your camera offers – typically 100 or 200. This gives you the cleanest possible images with maximum dynamic range. Only raise ISO when conditions demand it, and try to find the lowest ISO that allows you to get the shot.
Native ISO vs. Extended ISO
Most cameras have a “native” ISO range where the sensor performs optimally, usually from 100 up to 25600 or 51200. These are the ISO values where you get the cleanest images. Extended ISO values below 100 (like 50) or extremely high values above the native maximum are achieved through software processing and typically produce lower quality results.
When shopping for cameras, pay attention to the native ISO range rather than the extended range. A camera that “goes” to ISO 204800 might actually produce terrible images at that setting. But a camera with clean output at ISO 12800 gives you real flexibility in low-light situations. Many modern cameras produce excellent results through ISO 3200 or even 6400, making them highly capable for various lighting conditions.
How Aperture, Shutter Speed, and ISO Work Together?
Now that you understand each element individually, it’s time to learn how they work together. The exposure triangle is called a triangle because these three elements are interconnected – change one, and you must adjust at least one of the others to maintain the same exposure. This is both the challenge and the creative opportunity of manual photography.
The Bucket Analogy
One of the best analogies for understanding exposure is the bucket. Imagine you’re filling a bucket with water. The amount of water in the bucket after a certain time depends on three factors: how big the opening is (aperture), how long you let the water run (shutter speed), and how thirsty the bucket is (ISO, or sensitivity).
Wider bucket opening (wide aperture) fills the bucket faster. Longer you let water run (slower shutter speed) fills the bucket more. A thirstier bucket (higher ISO) “collects” water more efficiently. To end up with the same amount of water (proper exposure), you can trade off these factors – more of one means you need less of the others.
This analogy helps explain why photographers make specific choices. If you want shallow depth of field (wide aperture), you might need faster shutter speed or lower ISO to compensate. If you want to freeze action (fast shutter speed), you might need wider aperture or higher ISO. If you need maximum image quality (low ISO), you need more light from aperture or shutter speed. Every choice involves trade-offs.
The Exposure Value (EV) System
Exposure values (EV) provide a standardized way to measure exposure. A given combination of aperture, shutter speed, and ISO that produces the same exposure all have the same EV. For example, f/2.8 at 1/125 second at ISO 400 might produce the same exposure as f/4 at 1/60 second at ISO 400, or f/2.8 at 1/250 second at ISO 800.
Understanding this relationship helps you make intelligent adjustments when conditions change. If you move from shade into bright sunlight and your image is suddenly overexposed, you can close down aperture, speed up shutter speed, or lower ISO – or some combination – to bring your exposure back into range. The specific adjustments you make depend on which creative effects you want to preserve.
Priority Order: Which Setting to Change First?
One common question is which setting to adjust first when you need to change your exposure. The answer depends on your priorities for the shot. Different photographers have different approaches, but here’s a logical workflow:
First, consider what matters most for your specific shot. If you’re shooting a portrait and want that beautiful background blur, start by setting your aperture. If you’re photographing sports and need to freeze the action, start with your shutter speed. If you’re in a situation where image quality is paramount, like a landscape in good light, start with the lowest ISO.
After setting your priority setting, adjust the other two to achieve proper exposure. With practice, this process becomes intuitive and fast. Many photographers develop their own routines and preferences. Some always set aperture first since it has the most significant creative impact. Others start with ISO, keeping it as low as possible, then set aperture for the desired depth of field, then adjust shutter speed. Find what works for you.
Balancing All Three Elements
The art of the exposure triangle lies in finding the right balance for your specific situation. There’s rarely a single “correct” exposure – many combinations can produce properly exposed images with different creative results. The key is understanding what each setting does so you can make informed choices.
Here’s an example: you’re shooting a portrait in relatively dim indoor lighting. You want shallow depth of field, so you set f/2.8. You want to freeze any slight movement, so you want at least 1/125 second. That combination at ISO 400 might give you proper exposure, or you might need ISO 800 or 1600 to get there. The higher you go with ISO, the more noise you’ll have to deal with in post-processing.
Maybe you decide that some noise is acceptable and push to ISO 3200. Or maybe you decide to open wider to f/1.8 or f/1.4 to let in more light, even though it reduces depth of field slightly. Or you decide that a little motion blur is acceptable and drop to 1/60 second, using a tripod or stabilizing technique. Every choice involves compromises, and the “right” choice depends on your priorities for that specific image.
Practical Photography Scenarios
Let’s apply everything we’ve learned to some common shooting scenarios. Understanding the theory is important, but seeing how it works in practice is where it really comes together.
Portrait Photography
For classic portrait photography, you typically want shallow depth of field to separate your subject from the background. This means using a wide aperture, typically between f/1.4 and f/2.8. The specific aperture depends on how much background blur you want and how forgiving your focus accuracy is.
In daylight, your shutter speed will naturally be fast, which is great for preventing any blur from subject movement. Your ISO can typically stay at 100 or 200 for maximum image quality. In indoor or shaded conditions, you might need to raise ISO to 800, 1600, or higher to maintain your desired aperture and shutter speed combination.
If you’re photographing someone who’s moving or you need to capture a quick expression, bump your shutter speed to 1/250 second or faster. If you’re doing a more posed portrait with a stationary subject in good light, 1/125 second or even 1/60 second can work fine, especially with image stabilization. The key is testing and adjusting based on your specific situation.
Landscape Photography
Landscape photography typically calls for deep depth of field to keep everything from foreground to background sharp. This means using narrow apertures, generally between f/8 and f/16. There’s a sweet spot around f/8 or f/11 where most lenses are sharpest, and going too narrow (f/22 or beyond) can actually reduce sharpness due to diffraction.
In bright daylight, f/8 to f/16 at ISO 100 typically allows for fast shutter speeds, which is good for keeping any moving elements in your scene sharp. At dawn, dusk, or in forest shade, you might need to open up to f/5.6 or wider, or raise your ISO. For long exposure landscapes with moving water or clouds, you’ll need a tripod and possibly ND filters.
Using a tripod opens up possibilities for very slow shutter speeds, which can create that dreamy, silky water effect. With your camera on a tripod at low ISO, you can expose for seconds or even minutes. This requires either very dark conditions or ND filters in daylight. The creative possibilities are endless, but they all require understanding how aperture, shutter speed, and ISO interact.
Action and Sports Photography
Freezing fast action requires fast shutter speeds. For general sports photography, 1/1000 second is often a good starting point. For very fast action like professional sports or wildlife, you might need 1/2000, 1/4000, or even faster. The faster your subject is moving, the faster your shutter speed needs to be.
Fast shutter speeds let in less light, so you’ll often need to compensate with wider apertures and higher ISO values. If you’re shooting outdoors in sunlight, wide apertures like f/2.8 combined with ISO 400 or 800 typically work well. In indoor sports venues with poor lighting, you might need ISO 3200, 6400, or higher.
Many action photographers use aperture priority mode (Av or A) rather than full manual. They set their aperture to control depth of field, and let the camera automatically set shutter speed. Some cameras have minimum shutter speed settings that will automatically raise ISO if the light drops below your chosen threshold. But understanding the exposure triangle helps you make better decisions even when using automatic modes.
Low Light and Night Photography
Low light photography tests your understanding of the exposure triangle like nothing else. When light is limited, you have to make difficult choices between noise, blur, and depth of field. There’s often no perfect solution, just the best compromise for your specific situation.
If you have a tripod, you can use very slow shutter speeds to gather enough light at low ISO values, producing clean images with minimal noise. This works great for static subjects like cityscapes or architectural photography. Without a tripod, you’ll need to raise ISO and potentially open your aperture wider to get sharp handheld shots.
For handheld night photography, I often suggest starting with your minimum practical shutter speed (accounting for the reciprocal rule and any image stabilization), then opening your aperture as wide as it will go, then raising ISO only as high as needed. This approach maximizes your chances of getting a sharp image while keeping noise as manageable as possible. Modern cameras handle high ISO so well that some noise is absolutely acceptable when the alternative is a blurry, unusable photo.
Frequently Asked Questions
What is the exposure triangle and how does it work?
The exposure triangle is a fundamental photography concept that shows how three camera settings – aperture, shutter speed, and ISO – work together to control the amount of light in an image. Aperture controls the lens opening size, shutter speed controls how long light hits the sensor, and ISO controls sensor sensitivity. Changing one setting requires adjusting the others to maintain proper exposure, and each setting also affects creative aspects like depth of field and motion blur.
How does ISO interact with aperture and shutter speed in the exposure triangle?
ISO is one of the three pillars of the exposure triangle that controls how sensitive your camera’s sensor is to light. Higher ISO values make the sensor more sensitive, allowing you to shoot in darker conditions, but this comes at the cost of increased image noise. When you raise ISO, you can use faster shutter speeds or narrower apertures while maintaining the same exposure. Conversely, lowering ISO requires more light from either wider aperture or slower shutter speed.
How do shutter speed, aperture, and ISO work together?
These three settings work together through a relationship of trade-offs. Each full stop change in any setting affects exposure equivalently – doubling your shutter speed has the same effect on light as doubling your ISO or opening your aperture by one stop. To maintain proper exposure when changing one setting, you must adjust at least one of the others in the opposite direction. For example, if you want faster shutter speed for action photography, you’ll need either wider aperture or higher ISO to compensate for less light.
What are the 4 pillars of photography?
While the exposure triangle is the most commonly cited concept, some photographers refer to four pillars that include composition as the fourth element. The traditional three pillars of the exposure triangle are aperture, shutter speed, and ISO. Adding composition makes it four pillars of photography. However, in discussions specifically about camera exposure settings, the exposure triangle remains the fundamental framework.
Conclusion
The exposure triangle is the foundation of creative photography. Understanding how aperture, shutter speed, and ISO work together gives you complete control over your images. No longer will you be at the mercy of your camera’s automatic modes. Instead, you’ll be able to make intentional choices that create the exact look you want.
Remember that there’s rarely one “correct” exposure. Many combinations of aperture, shutter speed, and ISO can produce properly exposed images. What matters is understanding the trade-offs and choosing the settings that achieve your creative vision. Want shallow depth of field? Prioritize aperture. Need to freeze action? Focus on shutter speed. Shooting in low light where noise is inevitable? Keep ISO as low as practical.
The best way to really understand the exposure triangle is through practice. Take your camera out and deliberately shoot the same scene at different settings. Try f/2.8 at 1/500 second at ISO 400, then f/8 at 1/60 second at ISO 400, then compare the results. See how changing one setting forces you to adjust the others. This hands-on experience will teach you more than any article ever could.
Start with the basics, be patient with yourself, and remember that every professional photographer once struggled with exactly the same concepts. The exposure triangle becomes second nature with practice, and then you’ll have the freedom to focus on the creative aspects of photography instead of technical confusion.