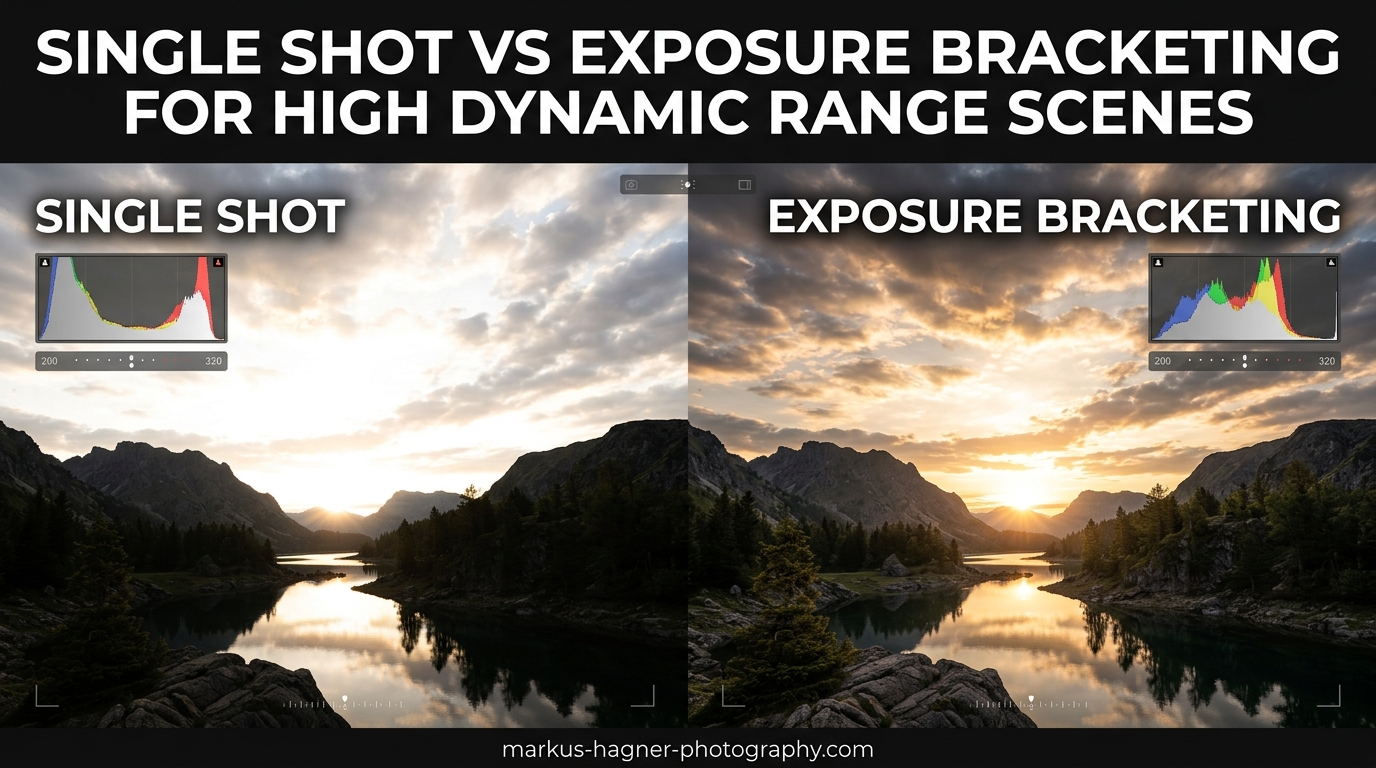
Capturing scenes with extreme contrast remains one of photography’s persistent challenges. Whether you’re shooting a sunrise with bright sky and dark foreground, or an interior with windows streaming sunlight, the question of single shot vs exposure bracketing for high dynamic range scenes comes up constantly. I’ve spent years testing both approaches, and the answer isn’t as simple as picking one over the other.
Modern cameras have made incredible strides in dynamic range. Sensors now capture 14 to 15 stops of light, making single exposures more viable than ever. Yet many professional landscape photographers still bracket their exposures religiously. Why? Because image quality involves more than just dynamic range—it’s about noise, detail, and how much you can push your files in post-processing.
In this comparison, I’ll break down when single shot HDR works beautifully, when exposure bracketing is genuinely necessary, and how to make the right decision in the field. You’ll learn to read histograms with confidence, set up efficient workflows for both methods, and understand the real image quality differences that matter for your photography.
Understanding Dynamic Range and Why It Matters
Dynamic range refers to the span between the darkest shadows and brightest highlights a camera can record while maintaining detail. Our eyes perceive roughly 20+ stops of dynamic range, but even the best camera sensors capture around 14 to 15 stops. This fundamental mismatch creates the challenge every photographer faces when confronting high contrast scenes.
Think about a typical sunrise scenario. The sky might be 10 stops brighter than your foreground rocks. If you expose for the foreground, your sky blows out to white. Expose for the sky, and your foreground becomes a dark silhouette. This is where the single shot vs exposure bracketing decision becomes critical.
Reading Your Camera’s Histogram
The histogram is your most valuable tool for evaluating dynamic range in the field. This graph shows the distribution of tones from pure black (left) to pure white (right). When you see data pushed against either edge, you’re losing detail—clipped highlights on the right, blocked shadows on the left.
Here’s what to look for when deciding if a scene exceeds your camera’s capabilities:
- Highlight clipping: A spike against the right edge means blown highlights that no amount of post-processing can recover
- Shadow blocking: Data crushed against the left indicates lost shadow detail
- Wide distribution: A histogram spanning edge to edge suggests a high dynamic range scene that may need bracketing
- Gaps in the middle: Large empty spaces between data clusters indicate extreme contrast
I check my histogram after every significant exposure. The LCD image can be misleading, especially in bright outdoor conditions. Trust the histogram—it never lies about what your sensor actually captured.
Real-World Scene Dynamic Range Examples
Not every scene requires special handling. Understanding typical dynamic ranges helps you anticipate when you’ll need to bracket:
- Overcast day: 6-8 stops—easily handled in a single exposure
- Open shade: 8-10 stops—single shot works well
- Sunrise/sunset with foreground: 12-16 stops—often requires bracketing
- Interior with window light: 14-18 stops—bracketing usually necessary
- Backlit subject with bright background: 10-14 stops—depends on your exposure strategy
These numbers vary based on specific conditions, but they provide a useful framework. When I’m scouting locations, I mentally categorize scenes by their likely dynamic range, which helps me prepare the right approach before the light gets good.
The Sensor Limitation Reality
Even with modern sensors boasting 14-15 stops of dynamic range, there’s a catch. That headline number represents the total range, but image quality degrades significantly as you approach the extremes. Shadow areas contain more noise, less accurate color, and reduced detail compared to midtones.
Pushing a single exposure three or more stops in post-processing reveals this limitation clearly. The shadows become gritty, colors shift, and fine detail gets lost to noise reduction. This is why photographers who demand maximum quality—including those printing large or selling their work—often prefer bracketing even when their camera could theoretically handle the scene in one shot.
Single Shot Approach: Capturing High Dynamic Range in One Exposure
The single shot approach leverages your camera’s native dynamic range to capture high contrast scenes in one exposure. With modern sensors and careful technique, this method works remarkably well for many situations. I’ve captured countless landscape images using single exposures that would have required bracketing just a decade ago.
How Modern Sensors Handle High Dynamic Range
Today’s full-frame mirrorless cameras from Sony, Nikon, Canon, and others deliver impressive dynamic range performance. Base ISO ratings (typically ISO 64 or ISO 100) provide the maximum 14-15 stops of range. The key is understanding that this capability exists primarily in the highlights—you have tremendous latitude to recover bright areas, but shadows remain the limiting factor.
This asymmetry informs the single shot strategy. Rather than trying to capture everything in one perfect exposure, you optimize for highlight preservation and recover shadows in post. Modern RAW files tolerate 4-5 stops of shadow recovery with acceptable quality, though noise becomes increasingly visible beyond 3 stops.
The ETTR Technique (Expose to the Right)
Expose to the Right represents the foundational technique for single shot HDR. The principle is straightforward: push your exposure as bright as possible without clipping highlights, then pull it back in post-processing. This maximizes signal-to-noise ratio and captures the cleanest possible shadow data.
Here’s my ETTR workflow for challenging scenes:
- Set your camera to display RGB histograms, not just luminance
- Take a test exposure and examine all three color channels
- Increase exposure until the rightmost channel nearly touches the edge
- Back off slightly if any clipping appears
- Verify with blinkies (highlight warnings) enabled
The resulting image will look too bright on your LCD. Don’t worry—you’ll normalize it in post. What matters is that you’ve captured maximum data with minimal noise.
RAW File Latitude and Post-Processing
RAW files provide the flexibility that makes single shot HDR viable. Unlike JPEGs, which bake in processing and discard data, RAW files retain all information your sensor captured. Modern RAW processors like Lightroom, Capture One, and DxO can extract remarkable detail from seemingly underexposed images.
The post-processing workflow for single shot HDR typically involves:
- Reducing overall exposure to correct the bright appearance
- Raising shadow values to reveal dark areas
- Applying local adjustments to balance specific regions
- Using graduated filters or luminosity masks for targeted corrections
- Applying noise reduction to shadow areas
I’ve found that single exposures work beautifully when shadow recovery stays under 2-3 stops. Beyond that, noise and color degradation become noticeable, especially in larger prints.
Advantages of Single Shot HDR
The single shot approach offers compelling benefits that explain its popularity:
Speed and Simplicity: One click and you’re done. No bracketing setup, no multiple files to manage, no merging in post. For travel photography, street work, or any situation demanding quick reactions, single shot is unmatched.
No Alignment Issues: With only one frame, ghosting from moving subjects never occurs. People walking through your scene, swaying trees, or flowing water all render naturally without the artifacts that plague merged bracketed exposures.
Smaller File Counts: One RAW file versus three to seven bracketed shots means less storage, faster backups, and simpler organization. Over thousands of images, this adds up significantly.
Handheld Shooting: Without the need for multiple exposures, you can shoot handheld in situations where a tripod would be impractical. This opens up creative possibilities for spontaneous captures.
Limitations of Single Shot HDR
Despite its advantages, single shot has real constraints that become apparent in demanding situations:
Noise in Pushed Shadows: When you recover shadows more than 2-3 stops, noise becomes increasingly visible. This is particularly problematic in blue channel data, which typically contains more noise than red or green channels.
Limited Highlight Recovery: While modern sensors recover highlights well, severely clipped areas cannot be salvaged. If your histogram shows spikes against the right edge, that data is permanently lost.
Color Shift in Deep Shadows: Heavy shadow recovery often introduces color casts that require careful correction. The shadow areas may appear muddy or desaturated compared to properly exposed regions.
Reduced Tonal Gradation: Compressing a high dynamic range scene into a single exposure reduces the number of tonal steps available for smooth gradients. This can result in banding in sky gradients or posterization in subtle tonal transitions.
When Single Shot Works Best
Based on my experience, single shot HDR excels in these situations:
- Scenes with 10-12 stops of dynamic range or less
- When shooting handheld or without a tripod
- Fast-changing light that won’t wait for bracketing sequences
- Images with moving subjects that would cause ghosting
- When storage or processing time is limited
- For web and social media use where ultimate quality matters less
I use single shot for probably 70% of my landscape work. It’s efficient, effective, and produces excellent results for most situations. But for those critical images where maximum quality matters, I still reach for exposure bracketing.
Exposure Bracketing: Capturing Multiple Exposures for Maximum Quality
Exposure bracketing captures multiple images at different brightness levels, then combines them to create a single file with extended dynamic range. This technique has been the gold standard for high dynamic range photography for decades, and despite modern sensor advances, it remains essential for demanding work.
How Exposure Bracketing Works
The concept is straightforward: capture a series of exposures that together cover the entire dynamic range of your scene. A typical three-shot bracket might include an exposure optimized for shadows, one for midtones, and one for highlights. In post-processing, software analyzes these images and combines the best-exposed portions from each into a single, seamlessly merged result.
The key advantage is that each exposure captures its targeted tonal range at optimal quality. Your highlight exposure records bright areas without pushing into noisy shadow territory. Your shadow exposure captures dark regions at a clean ISO without blowing highlights. The merged result contains high-quality data across the entire tonal spectrum.
Recommended Bracketing Settings
After years of experimentation, I’ve settled on settings that work for most situations:
Three exposures at 2-stop intervals: This covers a 12-stop range (4 stops between exposures, capturing 2 stops on each side). For most landscape scenes, this is sufficient. The sequence typically runs -2, 0, +2 EV from your base exposure.
Five exposures at 1-stop intervals: For extremely high contrast scenes like interiors with windows or backlit situations, this provides more granular coverage. The sequence might be -2, -1, 0, +1, +2 EV.
Seven exposures: Rarely necessary, but useful for the most extreme dynamic range situations. I’ve only needed this a handful of times, typically in slot canyons or similar challenging environments.
Many photographers over-bracket, capturing 5-7 exposures when 3 would suffice. This wastes storage and processing time without improving results. Start with 3 exposures at 2-stop intervals and only increase if your histogram shows the scene still exceeds coverage.
Auto Exposure Bracketing (AEB) vs Manual Bracketing
Most cameras offer Auto Exposure Bracketing, which automatically captures a predetermined sequence when you hold the shutter. This is convenient but has limitations:
- AEB Advantages: Fast setup, consistent intervals, reduced chance of bumping the camera between shots
- AEB Limitations: Often limited to 3 or 5 exposures, fixed intervals (usually 1 or 2 stops), may not cover extreme dynamic range
Manual bracketing gives you complete control but requires more attention:
- Manual Advantages: Unlimited exposures, any interval you choose, can adjust for specific scene requirements
- Manual Limitations: Slower, risk of camera movement between shots, requires more concentration in the field
I use AEB for 90% of my bracketing. The convenience outweighs the slight loss of flexibility for most situations. When I need more control, I switch to manual mode.
Advantages of Exposure Bracketing
The benefits of bracketing extend beyond just dynamic range:
Maximum Image Quality: Each tonal region is captured at its optimal exposure, resulting in cleaner shadows, better color accuracy, and more fine detail throughout the image. This is especially visible in large prints.
Extended Dynamic Range: Bracketing can capture 20+ stops of dynamic range, far exceeding any single sensor’s capability. This handles even the most extreme lighting situations.
Flexibility in Post: Having multiple exposures gives you options. You might use all three exposures for maximum range, or just two if one proves unnecessary. You can process the same bracket set differently for various outputs.
Future-Proofing: As processing software improves, you can reprocess older bracket sets with better results. Your captures retain value over time.
Limitations of Exposure Bracketing
Bracketing isn’t without drawbacks:
Tripod Required: For proper alignment, you need a stable camera. Handheld bracketing is possible with high-speed burst modes and alignment software, but results are inconsistent.
Storage Demands: Three to seven RAW files per image adds up quickly. A single landscape session might generate 50-100 bracket sets, consuming significant card space and backup storage.
Post-Processing Time: Merging and processing bracketed exposures takes longer than working with single files. This matters when you’re editing hundreds of images from a trip.
Moving Subject Problems: People, animals, clouds, and foliage moving between exposures create ghosting artifacts. While modern software handles many of these issues, complex motion can still cause problems.
When Bracketing is Essential
I always bracket in these situations:
- Scenes exceeding 14 stops of dynamic range
- Images intended for large prints (20×30 inches and larger)
- Commercial or fine art work where maximum quality is expected
- Interior photography balancing window light with room interiors
- Sunrise and sunset scenes with foreground elements
- Any “once in a lifetime” shot where I can’t afford to compromise
Professional photographers often bracket by default, even when they might not strictly need to. The reasoning is simple: it’s insurance. Storage is cheap; missed opportunities aren’t.
Equipment Recommendations for Bracketing
Successful bracketing requires some basic gear:
- Sturdy Tripod: Essential for alignment. A cheap, wobbly tripod defeats the purpose. Invest in quality that won’t shift between exposures.
- Remote Release or Timer: Eliminates camera shake from pressing the shutter. A 2-second self-timer works in a pinch.
- Fast Memory Cards: High-speed burst bracketing requires cards that can keep up. Slow cards create delays between shots.
- Mirror Lock-Up (DSLR): Reduces vibration from mirror slap. Not relevant for mirrorless cameras.
I’ve bracketed handheld in emergencies using high-speed continuous mode, but I don’t recommend it as standard practice. The alignment software has to work harder, and results are inconsistent.
Head-to-Head Comparison: Single Shot vs Exposure Bracketing
Let’s break down how these approaches compare across key categories. This comparison will help you make informed decisions based on your specific needs.
Image Quality Comparison
| Factor | Single Shot | Exposure Bracketing | Winner |
|---|---|---|---|
| Shadow Noise | Visible when pushed 3+ stops | Clean shadows from properly exposed frame | Bracketing |
| Highlight Detail | Good recovery within limits | Excellent from dedicated highlight exposure | Bracketing |
| Color Accuracy | Can shift in pushed shadows | Consistent across tonal range | Bracketing |
| Fine Detail | Good in midtones, degraded in extremes | Excellent throughout | Bracketing |
| Tonal Gradation | Can show banding in extreme cases | Smooth transitions | Bracketing |
Bracketing wins on pure image quality, especially for demanding applications. However, for web use and small prints, single shot quality is often indistinguishable.
Workflow and Practicality Comparison
| Factor | Single Shot | Exposure Bracketing | Winner |
|---|---|---|---|
| Speed in Field | Instant—one exposure | Slower—multiple exposures required | Single Shot |
| Post-Processing Time | Fast—single file | Slower—merge and blend required | Single Shot |
| Storage Requirements | 1x file size | 3-7x file size | Single Shot |
| Equipment Needed | Camera only | Tripod, remote release recommended | Single Shot |
| Handheld Capability | Excellent | Poor to fair | Single Shot |
Single shot dominates on practicality. If you’re traveling light, shooting spontaneously, or processing large volumes of images, the efficiency is hard to beat.
Scenario-Based Recommendations
This table provides a quick reference, but remember: your specific situation may vary. When in doubt, bracket—it costs nothing to have the option and discard unnecessary files later.My Personal ApproachAfter years of shooting both ways, I’ve developed a hybrid approach that serves most situations:For casual shooting, travel, and quick captures, I shoot single exposures using ETTR technique. This covers 70% of my work efficiently. When I’m specifically working a landscape scene with a tripod, or when the light is exceptional, I bracket automatically. This gives me maximum quality for my best images without burdening every shot with extra files.The decision often comes down to how much the image matters. Is this a snapshot or a portfolio piece? Snapshots get single exposures. Portfolio work gets bracketed.Practical Workflow: How to Choose and ExecuteLet me walk you through my field workflow for making the single shot vs bracketing decision and executing each method effectively.Step-by-Step Histogram Reading GuideBefore deciding which method to use, read your scene’s histogram:
- Set up your camera: Enable RGB histogram display and highlight warnings (blinkies)
- Take a test exposure: Use your best guess for settings
- Examine the luminance histogram: Does data span edge to edge? Are there spikes against either side?
- Check individual color channels: The RGB histograms reveal clipping that luminance might hide
- Look for highlight warnings: Any blinking areas indicate clipped data
- Assess shadow regions: Is the left side of the histogram crushed against the edge?
If the histogram shows clipping on both ends simultaneously, bracketing is necessary. If only one end clips, you might adjust exposure and shoot single. If neither clips, single shot is perfectly adequate.Decision Flowchart: When to BracketUse this decision process in the field:
- Is the scene high contrast? Look for bright sky and dark foreground, or similar extreme differences. If yes, continue. If no, single shot.
- Check the histogram: Does data span more than 12-14 stops? If yes, continue. If no, single shot with ETTR.
- Are there clipping indicators? Blinking highlights or crushed shadows? If yes, continue. If no, single shot.
- Is maximum quality essential? Large print, commercial work, portfolio image? If yes, bracket. If no, consider single shot.
- Do you have a tripod? Bracketing requires stability. If no tripod, single shot or handheld bracket with high burst rate.
- Are subjects moving? People, animals, significant foliage movement? If yes, single shot to avoid ghosting.
This process takes about 10 seconds once you’re practiced. It becomes second nature after a few shoots.Single Shot Workflow StepsWhen you’ve decided on single shot, here’s the optimal workflow:
- Set base ISO: Use your camera’s lowest native ISO (usually 64 or 100)
- Enable ETTR: Expose as bright as possible without clipping
- Check RGB histograms: Ensure no color channel clips
- Capture the image: Use mirror lock-up or electronic shutter for maximum sharpness
- Verify on LCD: The image will look bright—this is correct for ETTR
- In post: Reduce exposure, recover shadows as needed, apply noise reduction to pushed areas
Bracketing Workflow StepsFor exposure bracketing, follow this sequence:
- Mount camera on tripod: Ensure it’s completely stable
- Compose and focus: Lock focus if appropriate
- Set exposure manually: Use manual mode so exposure doesn’t change between shots
- Configure AEB: Set 3 exposures at 2-stop intervals (or your preferred settings)
- Use remote release or timer: Eliminate camera shake
- Fire the bracket sequence: Hold shutter until all exposures complete
- Verify coverage: Check that your brightest exposure protects highlights and darkest captures shadows
- In post: Merge in Lightroom (Photo Merge > HDR) or your preferred HDR software
Post-Processing Tips for Both MethodsFor Single Shot:
- Reduce overall exposure first, then lift shadows
- Apply luminance noise reduction selectively to shadow areas
- Use graduated filters for local adjustments
- Watch for color shifts and correct with HSL adjustments
For Bracketed Exposures:
- Let software auto-align even if you used a tripod
- Choose “Auto Settings” in merge dialog as a starting point
- The merged file will look flat—this is normal and expected
- Apply contrast and local adjustments to taste
- Check for ghosting artifacts and use deghosting if needed
Common Mistakes to AvoidThrough trial and error (mostly error), I’ve learned to avoid these pitfalls:
- Over-bracketing: 3 exposures usually suffice; don’t waste storage on 7
- Under-bracketing: 1-stop intervals often don’t cover enough range; 2 stops is better
- Ignoring the histogram: The LCD image lies; always verify with the histogram
- Bracketing handheld: Unless using very high burst rates, alignment issues will frustrate you
- Clipping highlights in single shot: Blown highlights can’t be recovered; shadows can
- Over-processing HDR: The goal is natural-looking dynamic range, not the “HDR look”
Frequently Asked Questions
| Scenario | Recommended Method | Why |
|---|---|---|
| Travel/Street Photography | Single Shot | Speed and spontaneity matter most |
| Casual Landscape | Single Shot | Modern sensors handle most scenes |
| Fine Art Landscape | Bracketing | Maximum quality for large prints |
| Real Estate/Architecture | Bracketing | Interior/exterior balance requires it |
| Wildlife with High Contrast | Single Shot | Moving subjects don’t work with brackets |
| Golden Hour/Sunrise | Bracketing | Extreme contrast between sky and land |
| Overcast Days | Single Shot | Low contrast easily handled |
| Events/Weddings | Single Shot | Speed and moving subjects |
Frequently Asked Questions
When is exposure bracketing necessary for HDR photography?
Exposure bracketing is necessary when your scene’s dynamic range exceeds your camera sensor’s 14-15 stop capability. Look for histograms showing clipped highlights AND blocked shadows simultaneously. Common scenarios include sunrises with foreground elements, interiors with bright windows, and backlit subjects where you need detail in both bright and dark areas.
How many exposures should I bracket for HDR?
Three exposures at 2-stop intervals (-2, 0, +2 EV) cover most landscape scenes with 12+ stops of dynamic range. For extreme situations like interior photography with windows, use five exposures at 1-stop intervals. Seven or more exposures are rarely necessary and waste storage without improving results.
Do professional photographers use HDR or single exposure?
Most professional landscape photographers use both methods depending on the situation. Many bracket by default for critical work, treating it as insurance for maximum image quality. However, pros also recognize that single exposures work well for many scenes, especially with modern sensors offering 14-15 stops of dynamic range.
Is exposure bracketing still needed with modern cameras?
Modern cameras have reduced but not eliminated the need for bracketing. While sensors now capture 14-15 stops of dynamic range, image quality degrades in pushed shadows. Bracketing still provides cleaner shadows, better color accuracy, and more fine detail—especially important for large prints and commercial work.
What is the difference between HDR and exposure bracketing?
Exposure bracketing is a capture technique where you take multiple photos at different exposures. HDR (High Dynamic Range) is the result—a final image with extended dynamic range. Bracketing enables HDR creation by providing the raw material, but HDR can also be achieved from a single RAW file with extensive processing.
How do I determine if I need to bracket exposures?
Check your histogram after taking a test exposure. If data spans edge to edge with clipping on both highlight and shadow sides simultaneously, bracketing is necessary. Also consider your output needs: images for web may not require bracketing, while large prints benefit from the maximum quality bracketing provides.
Does exposure bracketing improve image quality?
Yes, exposure bracketing improves image quality beyond just dynamic range. Each tonal region is captured at its optimal exposure, resulting in cleaner shadows with less noise, more accurate colors throughout the tonal range, and better fine detail preservation. These benefits are most visible in large prints or when pushing files extensively in post-processing.
When should you use single shot vs bracketing?
Use single shot for low to moderate contrast scenes (under 12 stops), handheld shooting, fast-changing light, moving subjects, or when storage and processing time matter. Use bracketing for extreme contrast scenes, tripod-based landscape work, images destined for large prints, interior photography with windows, and any critical shot where you can’t afford to compromise on quality.
Conclusion: Choosing Your Approach
The single shot vs exposure bracketing for dynamic range scenes debate isn’t about finding a single right answer—it’s about matching your technique to your situation. Modern cameras have made single shot HDR viable for most everyday photography, offering speed and simplicity that’s hard to beat. Yet bracketing remains essential for maximum quality in challenging light.
My recommendation? Master both techniques. Learn to read histograms accurately so you can make informed decisions in the field. Practice ETTR for single exposures. Set up your camera’s AEB function so bracketing becomes second nature when needed. The photographers who get consistently great results are those who adapt their approach to each scene’s demands.
Start with single shot for casual work. When the light gets dramatic, when you’re shooting for large prints, or when the histogram shows extreme contrast, switch to bracketing. Neither method is inherently better—they’re tools for different jobs. Understanding when to reach for each one is what separates competent photographers from great ones.
The next time you’re standing before a stunning sunrise with dark foreground and blazing sky, you’ll know exactly what to do. Check the histogram, assess the situation, and choose the approach that serves your vision. That’s the real skill—not picking one method over the other, but knowing when each one shines.