Nothing ruins a video faster than watching the colors shift from warm to cool between clips. One moment your subject looks natural under warm indoor lighting, and the next they appear blue and sickly in what should be the same scene. This inconsistency happens when white balance settings change during recording, and it is one of the most common problems I see in both amateur and intermediate video work. Learning how to white balance video properly prevents these jarring color shifts between clips and gives your footage a professional, polished look from start to finish.
The solution involves two key strategies: getting white balance right in-camera before you shoot, and knowing how to fix inconsistencies during post-production when they inevitably happen. In this guide, I will walk you through both approaches so you can achieve consistent, accurate colors across all your video projects.
What Is White Balance and Why Does It Matter for Video?
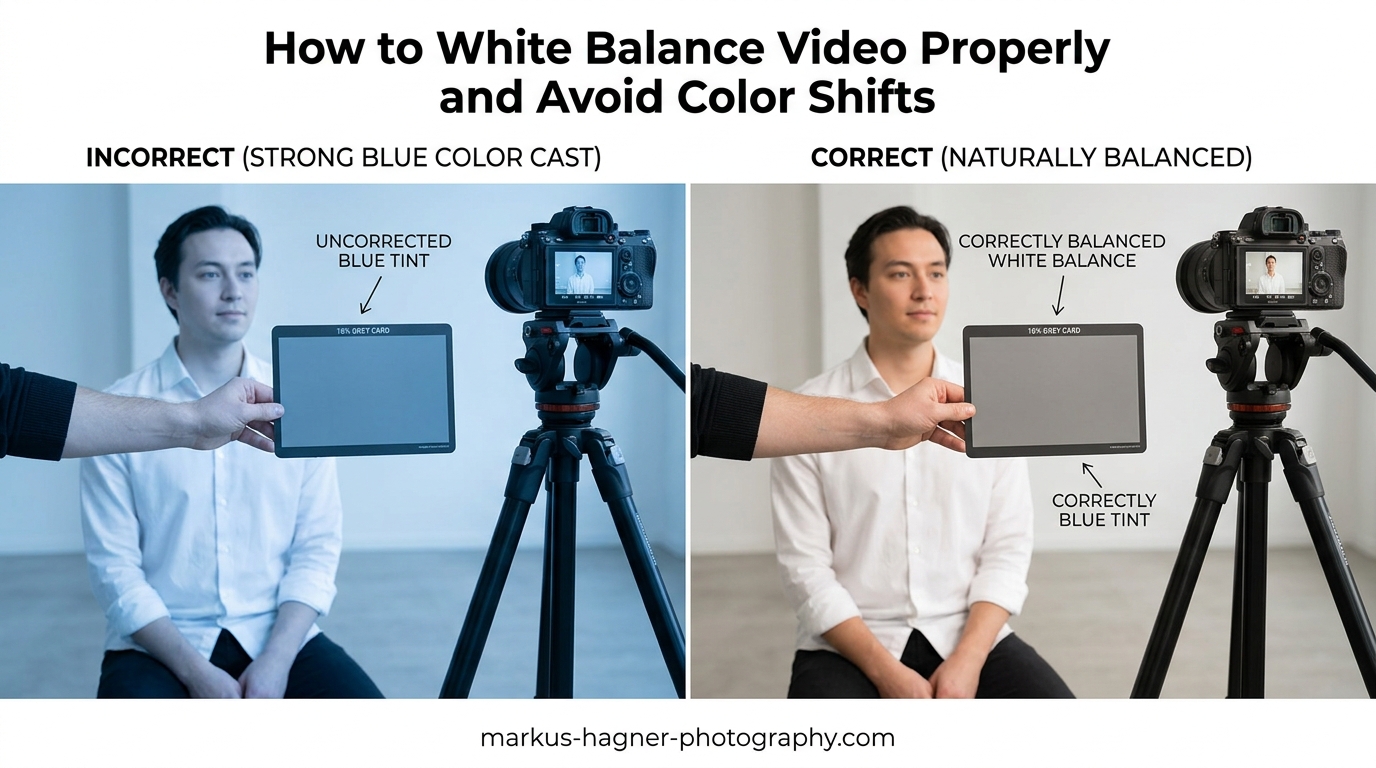
White balance is the process of adjusting colors in your video so that white objects appear truly white, regardless of the light source illuminating them. Different light sources emit different color temperatures, which our eyes naturally compensate for but cameras do not. Without proper white balance, your footage will have a color cast that makes everything look too warm (orange/yellow) or too cool (blue/green).
In video production, white balance matters even more than in photography because viewers watch moving images over time. A single photo with slightly warm tones might pass as a creative choice, but when one video clip looks warm and the next looks cool in the same sequence, it becomes immediately obvious and distracting. This inconsistency signals amateur work and pulls viewers out of the experience.
Skin tones suffer the most from white balance problems. When white balance shifts between clips, faces can appear flushed, pale, or even greenish from one shot to the next. Our eyes are incredibly sensitive to skin tone accuracy, making these shifts particularly noticeable and problematic for interviews, weddings, corporate videos, and any project featuring people.
Understanding Color Temperature and the Kelvin Scale
Color temperature is measured in Kelvin (K), a scale that describes the color characteristics of light. Lower Kelvin values produce warmer, more orange light, while higher values create cooler, more blue light. Understanding this scale is essential for setting white balance correctly because it tells your camera what kind of light it should compensate for.
Here is a practical Kelvin scale reference for common video lighting scenarios:
1,900K – 2,700K: Candlelight and warm household bulbs produce very orange light.
3,000K – 3,200K: Tungsten lights, standard incandescent bulbs, and many studio lights fall in this range.
4,000K – 5,000K: Fluorescent lights and some LED panels, often with a slight green tint.
5,200K – 5,600K: Daylight at midday, electronic flash, and professional daylight-balanced lights.
6,000K – 7,000K: Overcast skies and open shade on sunny days produce cooler, bluer light.
8,000K – 10,000K: Heavy overcast or clear blue sky creates very cool, blue-dominated light.
When you set white balance, you are essentially telling your camera what color temperature your light source is. The camera then shifts the color values to neutralize any color cast from that light source. If you tell your camera you are shooting under 3,200K tungsten light but you are actually in daylight, your footage will appear extremely blue because the camera overcompensates for warmth that is not there.
Setting White Balance In-Camera: Auto, Presets, and Manual
Your camera offers three main approaches to white balance, each with distinct advantages and drawbacks for video work. Choosing the right method depends on your shooting situation and how much control you need over color consistency.
Auto White Balance (AWB): When It Works and When It Fails
Auto white balance analyzes each frame and attempts to determine the correct color temperature automatically. For quick, casual shooting in consistent lighting, AWB can produce acceptable results. The problem is that AWB continuously adjusts during recording, which is exactly what causes color shifts between clips and even mid-shot.
When lighting conditions change even slightly, whether from clouds passing, someone walking through the frame, or a light being switched on, AWB reacts and adjusts the color balance. This creates the dreaded “hunting” effect where colors gradually shift during a shot. For professional video work, I strongly recommend avoiding auto white balance entirely.
White Balance Presets: A Reliable Middle Ground
Most cameras include white balance presets for common lighting scenarios: daylight, shade, cloudy, tungsten, and fluorescent. These presets use fixed Kelvin values that correspond to typical conditions for each light source. Selecting a preset locks the white balance to that value, preventing the shifting that occurs with AWB.
The daylight preset (typically 5,200K to 5,600K) works well for outdoor shooting in sunlight. The tungsten preset (3,200K) is designed for indoor shooting with traditional light bulbs. These presets provide reasonable accuracy without requiring extra equipment or setup time.
However, presets are only approximations. Real-world lighting rarely matches these idealized values exactly. Fluorescent lights, in particular, vary wildly in color temperature and often have green color casts that standard presets cannot correct. For critical work where color accuracy matters, presets may not be precise enough.
Custom White Balance: The Professional Standard
Custom white balance (also called manual white balance) gives you the most accurate and consistent results. This method involves photographing or pointing your camera at a neutral reference target, typically a white or gray card, under your actual shooting conditions. The camera analyzes this reference and creates a white balance setting specifically calibrated to your exact lighting.
Here is how to set custom white balance on most cameras:
Step 1: Place a white balance card or 18% gray card in your scene, positioned where your subject will be and illuminated by the same light.
Step 2: Fill your camera’s frame with the card. You do not need perfect focus, but the card should occupy most of the frame.
Step 3: Navigate to your camera’s custom white balance menu option. This is usually found in the white balance settings or shooting menu.
Step 4: Select the image of your reference card when prompted. The camera will analyze it and calculate the appropriate white balance.
Step 5: Set your white balance mode to the custom setting you just created. Many cameras store this as a “Custom” or “Manual” option.
Once set, this custom white balance remains locked until you change it. This prevents any color shifts during your shoot as long as lighting conditions remain consistent.
Using Gray Cards vs. White Balance Cards
Both gray cards and white cards work for setting custom white balance, but they serve slightly different purposes. An 18% gray card provides a neutral middle gray that is spectrally neutral, meaning it reflects all colors equally. This makes it ideal for both white balance and exposure setting.
White balance cards are specifically designed for color calibration and are often brighter than gray cards. Some videographers prefer them because they reflect more light, making them easier for the camera to read in dim conditions. Whichever you choose, invest in a quality card designed for photography rather than using regular white paper, which often contains optical brighteners that can skew your results.
How to Avoid Color Shifts While Shooting?
Preventing color shifts requires a disciplined approach to white balance throughout your production. The strategies below address the most common causes of inconsistent colors between clips.
Lock Your White Balance Immediately After Setting It
The single most important habit for consistent white balance is locking your setting immediately after you set it. Many cameras have a white balance lock function that prevents accidental changes. If your camera lacks this feature, simply avoid navigating to the white balance menu during your shoot.
Should you lock white balance while recording? Absolutely. Locked white balance prevents the camera from reacting to changes in your scene. When a person wearing a white shirt walks through frame, or when you pan from a darker area to a brighter one, locked white balance maintains consistent colors throughout.
Handling Mixed Lighting Scenarios
Mixed lighting, where different light sources with different color temperatures illuminate your scene, creates one of the biggest white balance challenges. Common examples include daylight streaming through windows mixing with tungsten indoor lights, or LED panels combined with fluorescent ceiling fixtures.
When faced with mixed lighting, you have several options. First, choose which light source is dominant and balance for that. If your subject is primarily lit by window light, balance for daylight and let the tungsten areas appear warm. This often looks natural and can be aesthetically pleasing.
Second, you can gel your lights to match. Adding CTB (color temperature blue) gel to tungsten lights makes them match daylight, while CTO (color temperature orange) gel on daylight-balanced lights matches them to tungsten. This requires more equipment and setup time but produces the cleanest results.
Third, if you cannot control the lighting, shoot in LOG format if your camera supports it. LOG footage captures more color information and gives you significantly more flexibility to correct mixed lighting in post-production.
Matching White Balance Across Multiple Cameras
Multi-camera shoots require extra attention to white balance consistency. Different camera models, even from the same manufacturer, can interpret white balance differently. Two cameras set to the same Kelvin value may still produce slightly different colors.
For multi-camera consistency, use the same custom white balance procedure on all cameras using the same reference card at the same position. Take the extra time to set custom white balance on each camera rather than relying on presets, which vary between camera models.
After your shoot, you will likely still need to fine-tune color matching in post-production. Shoot a color chart or gray card at the beginning of each camera’s footage to give yourself a reliable reference point for matching clips in your editing software.
White Balance Workflow for LOG Footage (SLOG3, C-Log, V-Log)
LOG footage captures a flat, desaturated image designed to preserve maximum dynamic range and color information. Many videographers assume they can ignore white balance when shooting LOG because they will fix it in post. This is a mistake that causes problems later.
Setting proper white balance during LOG recording still matters because it affects how the camera’s sensor captures color information. Starting with reasonably accurate white balance in-camera gives you a neutral baseline for color grading and ensures you capture the best possible color data.
For LOG footage, I recommend setting white balance as close as possible to correct using a gray card, just as you would for standard footage. Some cameras allow you to view a LUT preview while shooting LOG, which helps you judge whether your white balance is in the right range. When you begin color grading, correct white balance to neutral first, then apply your creative color grade on top of that foundation.
Fixing Color Shifts Between Clips in Post-Production
Despite your best efforts, you will sometimes need to correct white balance issues during editing. The approach differs significantly depending on whether you shot in RAW or a compressed format.
RAW Footage: Maximum Flexibility for White Balance
If your camera records RAW video, you have tremendous latitude to adjust white balance in post without quality loss. RAW files store the unprocessed sensor data, meaning white balance is not baked in. You can shift color temperature by thousands of Kelvin and correct significant white balance errors without degrading your footage.
In DaVinci Resolve, Premiere Pro, or Final Cut Pro, RAW footage typically includes a dedicated white balance control in the RAW settings panel. Use the white balance eyedropper tool on a neutral area in your frame, or manually adjust the temperature slider until colors look correct.
Compressed Footage: Working with Baked-In White Balance
Compressed formats like H.264, H.265, and ProRes bake white balance into the video file. You cannot change white balance as freely as with RAW, and aggressive adjustments can introduce banding, noise, or color artifacts. However, you can still make meaningful corrections if the original white balance was reasonably close.
The key is correcting white balance before applying any creative color grading. Establish a neutral baseline first by adjusting temperature and tint until whites appear white and skin tones look natural. Only after achieving this neutral starting point should you apply any creative looks or LUTs.
Order of Operations for Color Correction
Professional colorists follow a specific order of operations that produces the best results:
First: Balance your exposure and contrast to get the overall tonality correct.
Second: Correct white balance to establish neutral colors as your foundation.
Third: Match all clips in your sequence so they have consistent color appearance.
Fourth: Apply any creative color grading or looks on top of your balanced footage.
This order matters because white balance corrections affect your entire color pipeline. If you apply a creative grade first and then try to fix white balance, you will end up fighting against your own work.
Keyframing White Balance for Shifting Conditions
Sometimes lighting genuinely changes during a shot, such as when the sun sets or clouds move rapidly. In these cases, you can keyframe white balance adjustments to follow the changing conditions.
In your color grading software, create a dedicated node or adjustment layer for white balance. Set keyframes at the beginning of the shift and at the end, adjusting the temperature value at each point. The software will interpolate smoothly between these values, creating a gradual transition that follows the lighting change.
This technique requires finesse. Use as few keyframes as possible and check the results carefully to ensure the transition looks natural rather than like a mistake.
Frequently Asked Questions
How to correct white balance in video?
To correct white balance in video, first determine if you are working with RAW or compressed footage. For RAW, use your editing software’s white balance controls to adjust temperature and tint directly on the RAW data. For compressed footage, use color correction tools to adjust temperature, then tint, until whites appear neutral and skin tones look natural. Always correct white balance before applying creative color grades.
Should I lock the white balance while recording a video?
Yes, you should lock white balance while recording video. Locked white balance prevents the camera from adjusting colors mid-shot, which eliminates the color shifts that occur when auto white balance reacts to changes in your scene. Locking ensures consistent colors throughout each clip and makes matching clips in post-production much easier.
Does white balance affect video?
White balance significantly affects video quality and consistency. Incorrect white balance creates color casts that make footage appear too warm (orange) or too cool (blue). Inconsistent white balance between clips causes jarring color shifts that look unprofessional and distract viewers. White balance particularly impacts skin tone accuracy, which viewers notice immediately.
How to accurately set white balance?
To accurately set white balance, use a gray card or white balance card under your shooting conditions. Place the card where your subject will be, fill your frame with it, and use your camera’s custom white balance function to calibrate based on this reference. This method accounts for your specific lighting and produces more accurate results than presets or auto white balance.
Conclusion
Consistent white balance separates professional video from amateur footage. By avoiding auto white balance, setting custom white balance with a reference card, and locking your settings before each shot, you prevent the color shifts that plague most video projects. When issues do arise, correcting white balance in post-production works best when you establish a neutral baseline before any creative grading. Practice these techniques on your next shoot and you will see immediate improvements in your footage quality.