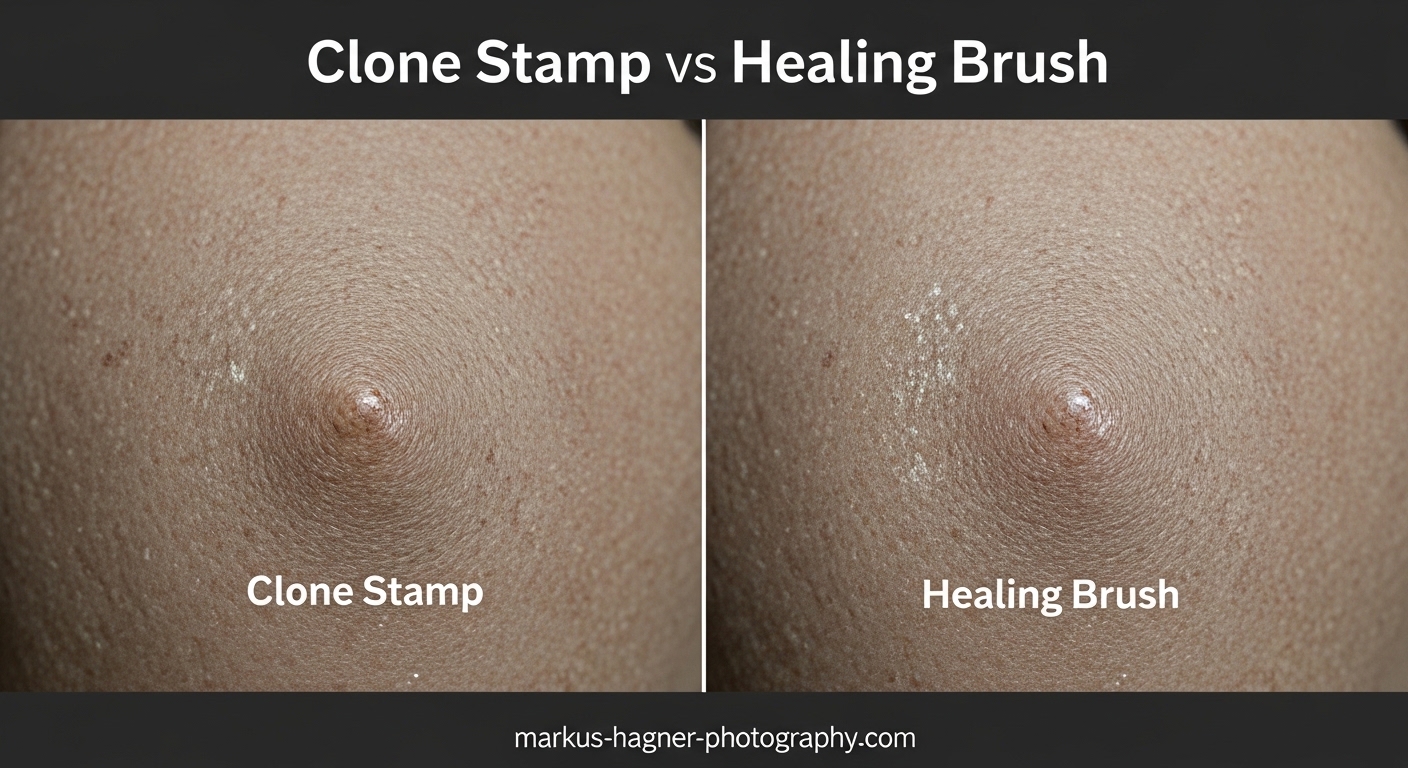
The Clone Stamp copies pixels from one area of your image to another exactly as they are. The Healing Brush does the same sampling, but then blends the sampled texture with the destination’s existing highlights, shadows, and color — giving you a far more natural result in most situations.
I’ve been using both tools in Photoshop for years, and the confusion between them is real. Most tutorials show you how to use each tool but skip the part that actually matters: knowing which one to reach for first, and why the wrong choice leaves your edits looking obvious.
This guide covers how to use the Clone Stamp vs Healing Brush in Photoshop, what each tool actually does under the hood, and the specific scenarios where one wins over the other every time.
The Key Difference Between Clone Stamp and Healing Brush
The Clone Stamp tool is a pure pixel copier. It takes whatever pixels you sample and paints them directly onto the destination area — colors, highlights, shadows, everything. What you sample is exactly what you get.
The Healing Brush tool does the same sampling, but it stops short of painting the pixels outright. Instead, it analyzes the destination area and keeps the existing highlights and shadows while applying only the color and texture from the source. The result blends into the surrounding area much more naturally.
A quick way to think about it: Clone Stamp says “replace everything here with what’s there.” Healing Brush says “take the texture from there, but match the light that’s already here.”
This single difference explains almost every scenario where one tool outperforms the other. Defined edges, strong contrast, and textured surfaces tend to favor the Clone Stamp. Smooth, open areas — like skin — almost always work better with the Healing Brush.
How to Use the Clone Stamp Tool in Photoshop
The Clone Stamp is found in the toolbar on the left side of Photoshop. Press S on your keyboard to select it instantly.
Here’s how to use it step by step:
- Select the Clone Stamp tool by pressing S or clicking the stamp icon in the toolbar.
- Set your brush size using the [ and ] keys, or adjust in the Options bar at the top. Start slightly larger than the area you need to cover.
- Set brush hardness in the Options bar. Use a soft edge (0-30%) for blending into surroundings, or a harder edge (60-80%) for defined surfaces.
- Hold Alt (Windows) or Option (Mac) and click on the area you want to sample from. You’ll see a crosshair cursor appear — this is your source point.
- Release Alt/Option, then move to the area you want to paint over and click or brush over it.
- Watch the crosshair as you paint — it shows exactly where the tool is sampling from in real time.
The Clone Stamp tracks the source point as you move the brush. If you sample from the top-left of a brick pattern, the cloned pixels will shift in exactly the same direction as your brush strokes.
One setting worth understanding is Aligned in the Options bar. When Aligned is checked, the source point follows your brush every time you start a new stroke. When unchecked, the source point resets to your original Alt+click position each time you lift and repaint. For most retouching work, Aligned checked works well. For texture fills, unchecked is often more useful.
How to Use the Healing Brush Tool in Photoshop
The Healing Brush is grouped with the Spot Healing Brush in the toolbar. Press J to select the group, then right-click the icon to choose the Healing Brush specifically.
The steps are very similar to the Clone Stamp:
- Select the Healing Brush by pressing J. Right-click the tool icon to ensure you’ve selected “Healing Brush Tool” and not “Spot Healing Brush Tool.”
- Adjust brush size with [ and ]. Make the brush slightly larger than the blemish or area you’re fixing.
- Set Source to Sampled in the Options bar (this is the default). This tells the tool to use your manual Alt+click sample rather than a pattern.
- Hold Alt (Windows) or Option (Mac) and click on a clean area of skin, texture, or background nearby your target area.
- Paint over the problem area. The Healing Brush will blend the sampled texture with the lighting and color of the destination.
- Build up gradually if needed — short strokes give you more control than long drag-overs.
You’ll notice the Healing Brush shows a preview that initially looks like the Clone Stamp. The blending happens when you release the mouse. This is normal — Photoshop calculates the blend after you’ve finished each stroke.
Keep your source point close to the area you’re healing. Sampling from too far away introduces color or lighting differences that make the blend obvious.
When to Use the Clone Stamp vs Healing Brush in Photoshop
This is the question that actually matters. Here’s how I break it down after years of retouching both portraits and landscapes.
Use the Clone Stamp When:
- You’re working near defined edges. If you need to remove something close to a hard line — the edge of a building, a horizon, or a fence post — the Healing Brush will smear the edge as it tries to blend. The Clone Stamp respects boundaries.
- You need to duplicate an object. Want to copy a tree branch to fill a gap, or repeat a pattern? The Clone Stamp does this faithfully. The Healing Brush would distort the duplication.
- You’re working on highly textured surfaces. Rough brick, stone, bark, fabric — the Clone Stamp preserves exact texture detail without blending it into something it shouldn’t match.
- The source and destination are very different in tone. If you’re sampling from a lighter area and painting into a darker one, the Healing Brush will produce a muddy middle-ground. The Clone Stamp paints what you chose.
- You’re repairing film scans or old photos. Precise placement matters more than blending when restoring fine detail.
Use the Healing Brush When:
- You’re retouching skin. Skin has variable highlights, shadows, pores, and tones all at once. The Healing Brush blends the texture from your source while preserving the natural lighting on the face. Clone Stamp on skin almost always looks patchy.
- Removing blemishes, spots, or minor distractions. Small imperfections in open areas of an image — a dust spot on a sky, a pimple, a small scratch — disappear cleanly with the Healing Brush.
- The surrounding area is consistent in tone. A blue sky, smooth wall, or gradient background is exactly where the Healing Brush shines. It has consistent lighting data to blend into.
- You want seamless results with minimal effort. For anything in an open, unobstructed area, the Healing Brush will look more natural with less trial and error.
The edge rule is the one I come back to most often: if there’s a hard edge nearby, use Clone Stamp. If you’re in the middle of a smooth, open area, use Healing Brush.
Spot Healing Brush and Patch Tool: When You Need Something Else
The Clone Stamp and Healing Brush aren’t the only retouching tools in Photoshop. Two others are worth knowing.
Spot Healing Brush
The Spot Healing Brush (also under J) works like the Healing Brush but without the manual sampling step. You simply paint over the problem area, and Photoshop uses its content-aware algorithm to automatically select a source from the surrounding pixels.
It’s faster for quick blemish removal on uncomplicated areas. The trade-off is you have no control over where it samples from — which makes it unreliable near edges or in areas with complex textures. Use it for fast clean-ups on smooth surfaces, and switch to the regular Healing Brush when results look off.
Patch Tool
The Patch Tool is best for covering larger areas. You draw a selection around the problem area, then drag that selection to a clean source area. Photoshop blends the patch into the destination similarly to the Healing Brush.
I reach for the Patch Tool when removing a large object — a power line across a sky, a distracting sign, or a person in the background. The Healing Brush can work for this too, but the Patch Tool’s selection-based approach gives you better control over exactly what source area you’re using.
Content-Aware Fill
Content-Aware Fill (Edit menu) goes a step further — it analyzes the entire image to reconstruct missing areas. It’s not a brush tool, but it’s worth knowing as part of your retouching toolkit. Use it for removing large, complex objects when the Patch Tool or Healing Brush aren’t giving clean results.
Common Mistakes to Avoid with Clone Stamp and Healing Brush
These are the issues that come up most often in the Photoshop community, and fixing them usually takes less than a minute once you know what to look for.
Smudged or Messy Edges
This is the most common complaint with the Healing Brush. If you’re healing near a hard edge — say, the hairline in a portrait, or the edge of a doorframe — the tool tries to blend both sides of the edge, creating a smear. The fix is simple: switch to the Clone Stamp for any work within a few pixels of a defined boundary.
Results That Look Like a Copy-Paste
With Clone Stamp, repeating the same source point too many times creates an obvious repeated pattern. This is called “tiling” and it’s immediately noticeable in textures like grass, skin, or fabric. The fix is to resample frequently — press Alt and click a new area every few strokes so you’re pulling from slightly different source points each time.
The Source Point Resets Unexpectedly
A common frustration: you Alt+click to set your source, paint a couple of strokes, then notice the tool seems to have lost its source point. This usually happens when the Aligned option is unchecked — lifting the brush resets back to the original Alt+click spot. Check whether Aligned is on or off and decide based on what your task needs.
Healing Brush Acting Like Clone Stamp
This one trips up a lot of people. The Healing Brush preview during painting looks identical to the Clone Stamp — you won’t see the blending happen until you release the mouse. If the final result still looks like a direct copy, check that your Source is set to “Sampled” (not Pattern) in the Options bar, and that you’re not sampling from an area too different in tone from your destination.
Working Directly on Your Background Layer
Any retouching directly on the Background layer is permanently destructive. If you need to undo something three steps later, you may find yourself stuck. The non-destructive tips in the next section cover how to avoid this — it’s one habit that will save you hours over time.
Pro Tips for Non-Destructive Editing
By default, both the Clone Stamp and Healing Brush edit your existing layer directly. That means any mistake is baked in once you flatten or save.
To work non-destructively, create a new empty layer above your image layer before you start retouching. Then, in the Options bar, change the Sample setting from “Current Layer” to “Current and Below” (or “All Layers”). Now your Clone Stamp and Healing Brush strokes paint onto the new layer while sampling from all layers beneath it.
This keeps your original image untouched. You can erase individual strokes, lower the opacity of the retouching layer, or throw it away entirely and start over. It’s one of the best habits to build early in Photoshop.
Is Clone Stamp destructive editing by default? Yes — like most tools in Photoshop, it edits pixels directly on the active layer unless you take steps to separate your work. The same applies to the Healing Brush. Working on a dedicated retouching layer makes both tools fully non-destructive.
Keyboard Shortcuts Reference for Retouching Tools
Knowing these shortcuts speeds up your workflow significantly. I keep these memorized because reaching for the mouse to switch tools breaks concentration mid-retouch.
- S — Select Clone Stamp tool
- J — Select Healing Brush / Spot Healing Brush group
- Shift + J — Cycle through Healing Brush, Spot Healing Brush, Patch Tool, Red Eye Tool
- Alt + click (Windows) / Option + click (Mac) — Set sample/source point for Clone Stamp or Healing Brush
- [ — Decrease brush size
- ] — Increase brush size
- Shift + [ — Decrease brush hardness
- Shift + ] — Increase brush hardness
- Ctrl + Z (Windows) / Cmd + Z (Mac) — Undo last stroke
- Ctrl + Alt + Z / Cmd + Option + Z — Step back through multiple history states
The most useful shortcut habit: use [ and ] constantly to resize your brush to just slightly larger than each target area. A brush that’s too large creates obvious circular blending artifacts.
Frequently Asked Questions
What is the difference between the healing brush and the Clone Stamp tool?
The Clone Stamp tool copies pixels from the source area exactly as they are — including color, highlights, and shadows — and paints them onto the destination. The Healing Brush does the same sampling but blends the source texture with the existing highlights and shadows at the destination, producing a much more natural result in most situations.
When would you use the Clone Stamp tool?
Use the Clone Stamp when working near defined edges or hard boundaries, when duplicating an object or pattern precisely, when retouching highly textured surfaces like brick or stone, or when the source and destination areas differ significantly in tone. The Clone Stamp is also the better choice for photo restoration work where precise pixel placement matters more than blending.
Is using Clone Stamp destructive editing?
Yes, by default the Clone Stamp edits pixels directly on the active layer, which is destructive. To work non-destructively, create a new empty layer above your image and set the Sample option in the Options bar to Current and Below. Your Clone Stamp strokes will paint onto the new layer while sampling from layers beneath it, leaving the original image completely untouched.
What size should your brush be when using the Clone Stamp, Healing Brush, and Spot Healing Brush?
A good rule of thumb is to make your brush slightly larger than the area you’re retouching. For small blemishes or spots, a brush 10-20% larger than the blemish gives clean results. For larger areas, size up accordingly. Keeping the brush close to the target size prevents large circular blending artifacts. Use the [ and ] keys to resize on the fly as you work.
What is the difference between the Healing Brush, Clone Stamp, and Content-Aware Fill?
The Clone Stamp copies pixels directly from a manually sampled source. The Healing Brush samples from a chosen source but blends the result with the destination’s lighting and shading. Content-Aware Fill is an automated process that analyzes the entire image and reconstructs the selected area using surrounding pixels — no manual source selection needed. Content-Aware Fill is best for large object removal; the Clone Stamp and Healing Brush give more hands-on control for precise retouching.
Final Thoughts on Clone Stamp vs Healing Brush
Learning when to use the Clone Stamp vs Healing Brush in Photoshop comes down to one core question: does the area you’re working in have defined edges or smooth open space?
Near an edge, go with the Clone Stamp. In open, consistent-toned areas, the Healing Brush will give you a cleaner result with less effort. For quick single-click fixes on smooth areas, the Spot Healing Brush handles it automatically. For removing larger objects, reach for the Patch Tool or Content-Aware Fill.
The biggest thing that separates competent retouching from sloppy retouching isn’t which tool you pick — it’s how often you resample, how well you match your source to your destination, and whether you’re working non-destructively so you can refine your work freely. Build those habits and both tools become significantly more effective.