You set up your tripod under a dark sky, point your camera at the Milky Way, and snap a 30-second exposure. But when you zoom in on your LCD screen, the stars look like little dashes instead of sharp points. Sound familiar? This frustrating experience happens to almost every astrophotographer starting out.
The good news is there’s a simple formula that can help you avoid this problem: the 500 Rule. This quick calculation tells you the maximum shutter speed you can use before stars start to trail due to Earth’s rotation. In this guide, I’ll show you exactly how to use the 500 Rule for sharp star photography, when it works (and when it doesn’t), and what to do if your stars still trail.
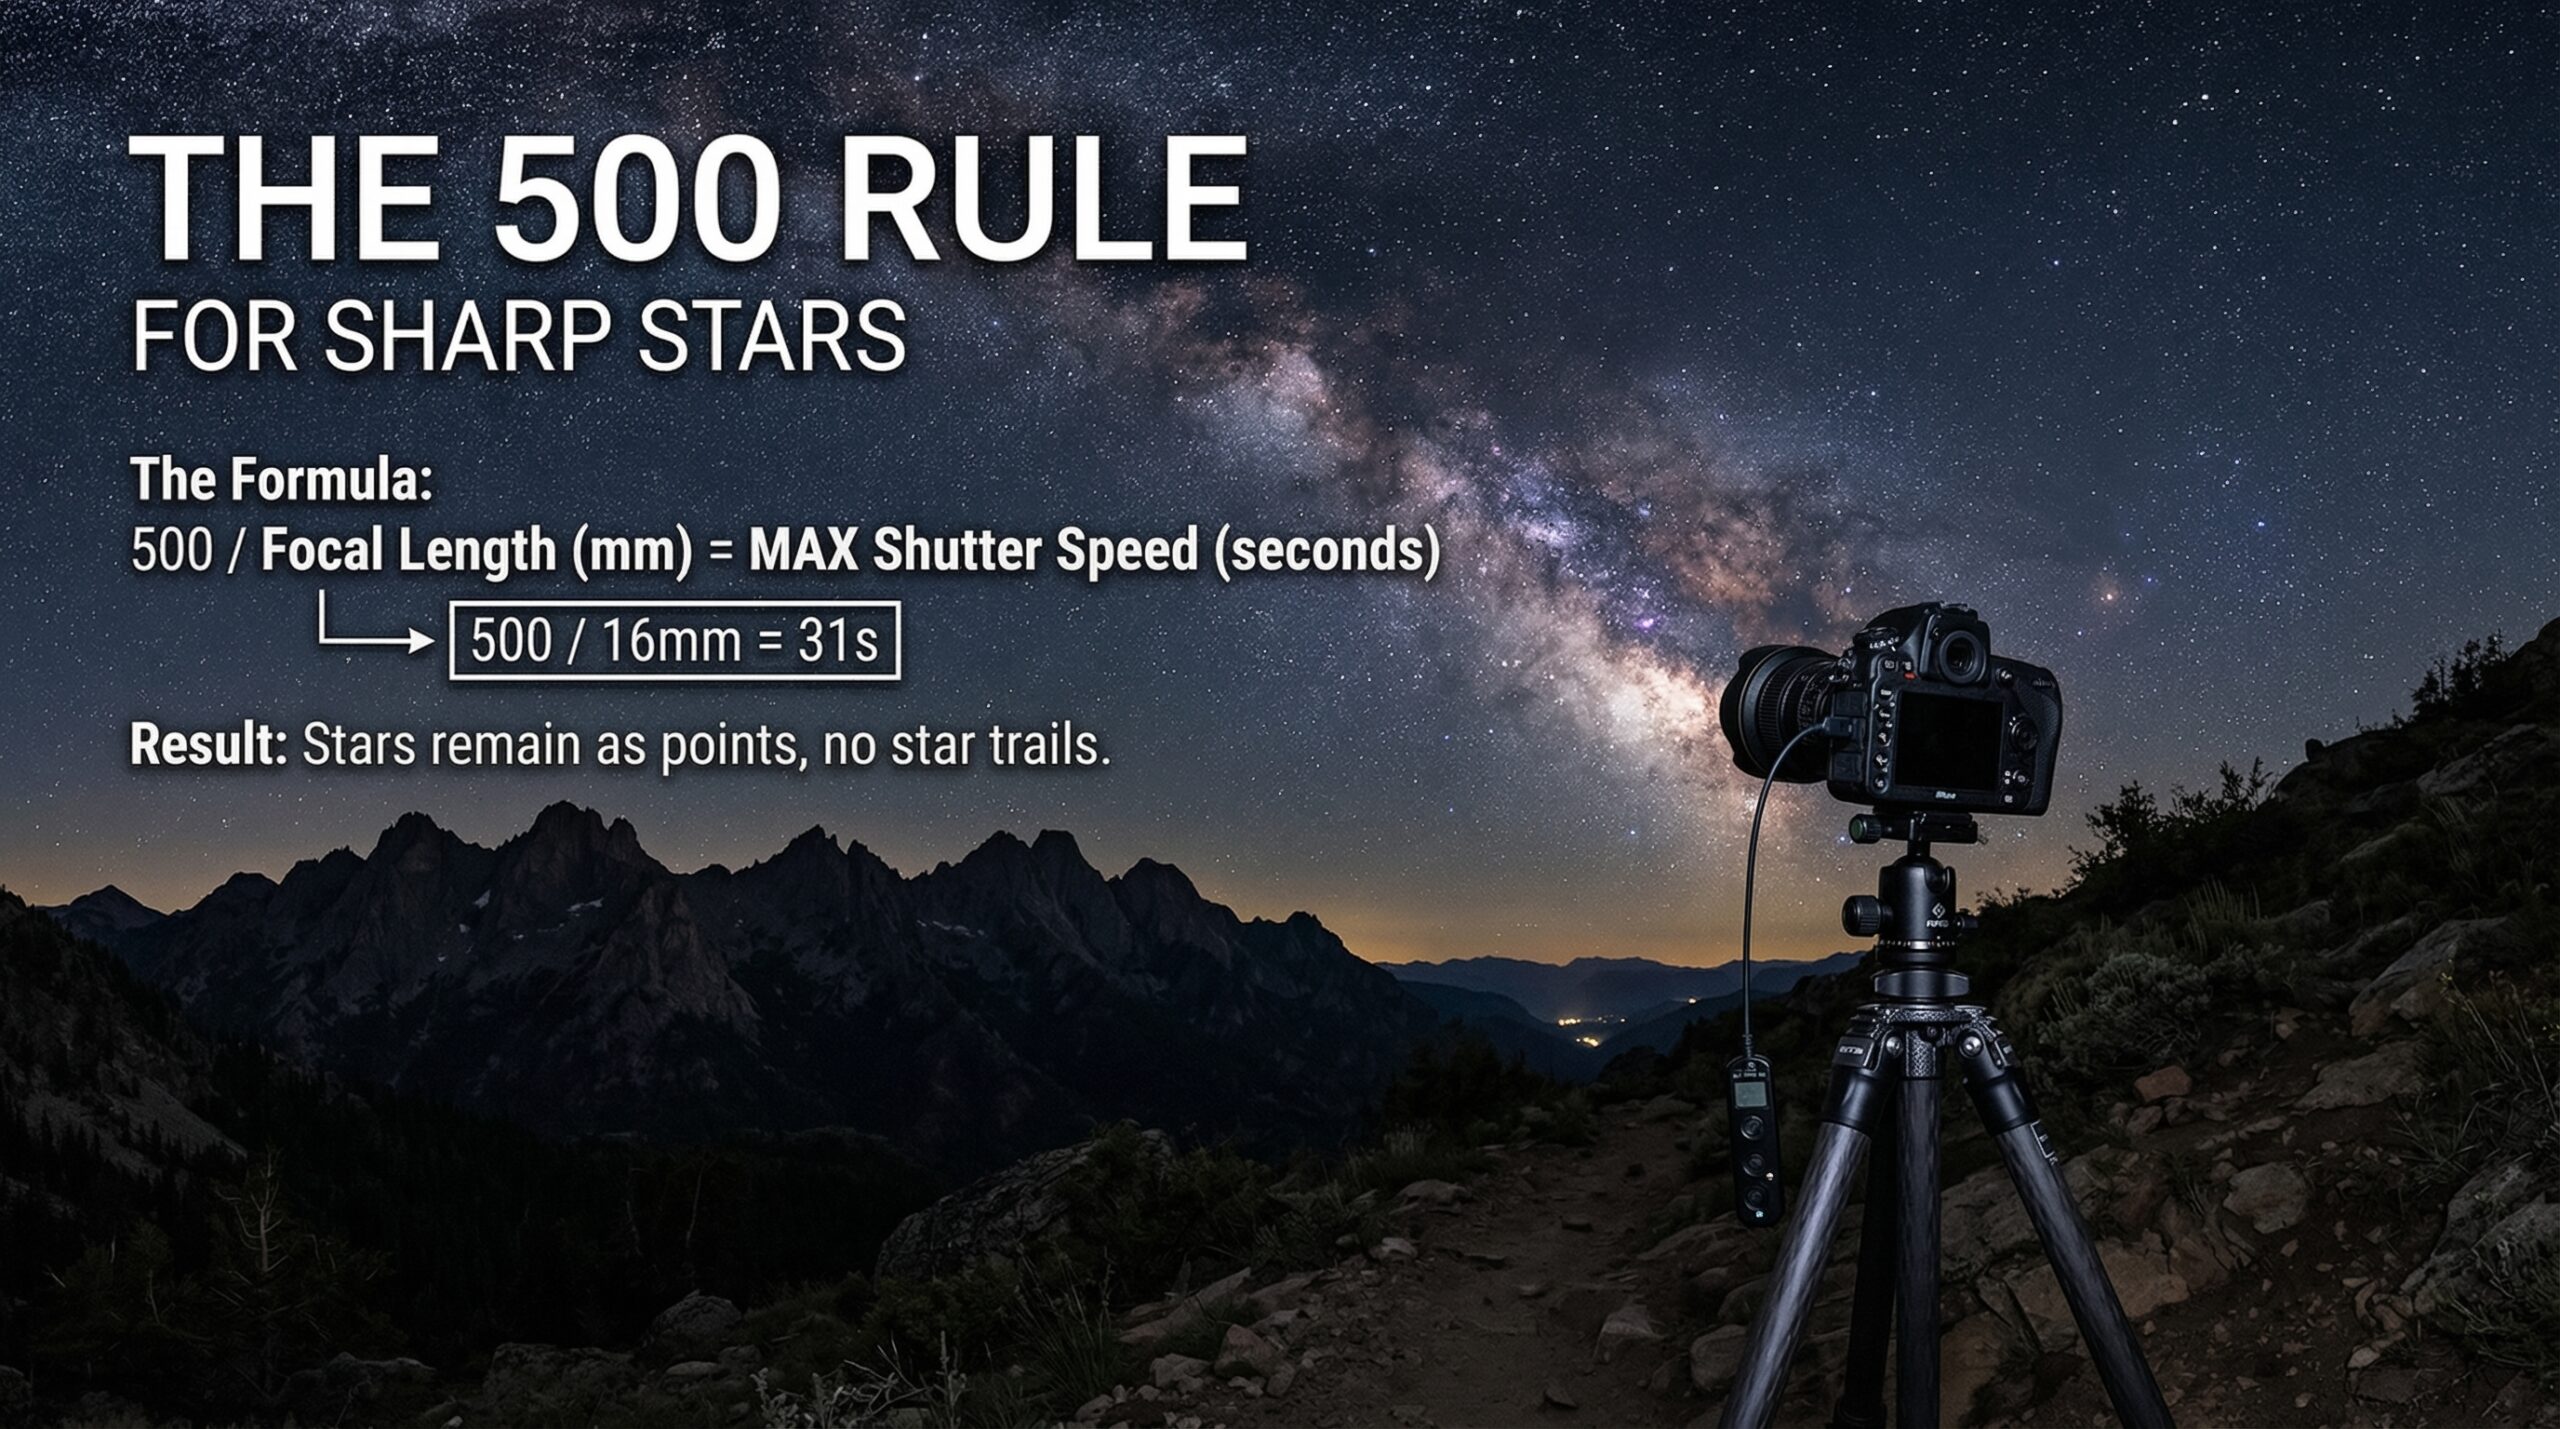
What is the 500 Rule in Photography?
The 500 Rule is a simple formula astrophotographers use to calculate the maximum exposure time before stars begin to trail in a photograph. It gives you a starting point for your shutter speed when shooting the night sky without a star tracker.
Here’s the basic formula:
500 ÷ Focal Length = Maximum Shutter Speed (in seconds)
For example, if you’re using a 20mm lens on a full frame camera, you would calculate: 500 ÷ 20 = 25 seconds. This means you can expose for up to 25 seconds before stars start showing visible trails.
The rule was originally developed for 35mm film cameras, which is why it uses the number 500. Film had lower resolution than modern digital sensors, so stars appeared sharp even with slightly longer exposures. Today’s high-megapixel cameras can reveal trailing that film simply couldn’t resolve.
Why does this matter? Because Earth rotates on its axis, completing one rotation every 24 hours. This means the stars appear to move across the sky at about 15 degrees per hour. Even during a relatively short 20-second exposure, this movement is enough to turn pinpoint stars into short streaks if your shutter speed is too long.
How to Calculate the 500 Rule
Calculating the 500 Rule takes just a few seconds once you understand the process. Here’s how I do it in the field:
Step 1: Note your focal length. Look at your lens and find the focal length you’re shooting at. If you’re using a zoom lens, this is the number on your lens barrel (like 14mm, 24mm, or 35mm).
Step 2: Divide 500 by that number. Simple division gives you your maximum shutter speed in seconds.
Step 3: Round down to the nearest whole number. If you get 23.8 seconds, use 23 seconds to be safe.
Let me walk through a few common examples:
With a 14mm lens: 500 ÷ 14 = 35.7 seconds, so use 35 seconds maximum.
With a 24mm lens: 500 ÷ 24 = 20.8 seconds, so use 20 seconds maximum.
With a 35mm lens: 500 ÷ 35 = 14.3 seconds, so use 14 seconds maximum.
With a 50mm lens: 500 ÷ 50 = 10 seconds, so use 10 seconds maximum.
I keep a quick reference chart saved on my phone for field use. Here’s a handy shutter speed reference for common focal lengths on full frame cameras:
- 14mm lens: 35 seconds
- 16mm lens: 31 seconds
- 20mm lens: 25 seconds
- 24mm lens: 20 seconds
- 28mm lens: 17 seconds
- 35mm lens: 14 seconds
- 50mm lens: 10 seconds
Notice that wider lenses give you longer usable shutter speeds. This is why most astrophotographers prefer ultra-wide angle lenses for Milky Way photography. A 14mm lens lets in significantly more light with 35 seconds of exposure compared to just 10 seconds with a 50mm lens.
500 Rule for Full Frame Cameras
Full frame cameras have sensors that are the same size as a 35mm film frame (approximately 36mm x 24mm). Because of this, the 500 Rule calculation is straightforward: just divide 500 by your focal length.
Full frame cameras are popular for astrophotography for several reasons. The larger sensor captures more light, which means cleaner images at high ISO settings. You also get the full field of view from your lenses, making wide-angle shots truly wide.
Here are some real-world examples using popular full frame setups:
If you’re shooting with a 14mm f/1.8 lens (a favorite among astrophotographers), your calculation is 500 ÷ 14 = 35 seconds. I typically back this down to 30 seconds just to be safe, especially if I plan to make large prints.
With a 20mm f/1.4 lens, you get 500 ÷ 20 = 25 seconds. This is still plenty of time to gather light for a well-exposed Milky Way shot.
Using a 24mm f/1.4 lens? You’re looking at about 20 seconds maximum (500 ÷ 24 = 20.8).
One thing I’ve noticed from shooting with various full frame cameras is that higher resolution sensors (40+ megapixels) sometimes show slight trailing even when following the 500 Rule exactly. If you’re shooting with a high-resolution body like a Sony A7R series or Nikon Z7, consider using the 400 Rule instead for critical work.
500 Rule for Crop Sensor Cameras
Here’s where many photographers get tripped up. If you’re using a crop sensor camera (APS-C or Micro Four Thirds), you need to account for the crop factor in your calculation.
The modified formula for crop sensors is:
500 ÷ (Focal Length × Crop Factor) = Maximum Shutter Speed
First, let’s clarify the crop factors for common sensor sizes:
- Nikon, Sony, Fujifilm, and Pentax APS-C: 1.5x crop factor
- Canon APS-C: 1.6x crop factor
- Micro Four Thirds (Olympus, Panasonic): 2.0x crop factor
The most common mistake I see beginners make is forgetting to apply the crop factor entirely. They calculate 500 ÷ 24 = 20 seconds, set their shutter to 20 seconds, and then wonder why their stars are trailing on their APS-C camera.
Let’s work through an example. Say you’re using a 24mm lens on a Nikon APS-C camera (1.5x crop factor):
First, calculate your equivalent focal length: 24mm × 1.5 = 36mm equivalent.
Then apply the 500 Rule: 500 ÷ 36 = 13.9 seconds, so use about 13 seconds.
See the difference? Without the crop factor, you’d use 20 seconds and end up with trailing stars. With the correct calculation, you’d use 13 seconds and get sharp stars.
Here’s a comparison chart showing how crop factor affects your maximum shutter speed with a 24mm lens:
- Full Frame (24mm): 500 ÷ 24 = 20 seconds
- Nikon APS-C (24mm × 1.5): 500 ÷ 36 = 13 seconds
- Canon APS-C (24mm × 1.6): 500 ÷ 38.4 = 13 seconds
- Micro 4/3 (24mm × 2.0): 500 ÷ 48 = 10 seconds
This is why wide-angle lenses are even more important for crop sensor cameras. You need that extra field of view to compensate for the reduced maximum exposure time.
Factors That Affect Your Results
The 500 Rule is a helpful guideline, but it’s not a guarantee. Several factors can cause your stars to trail even when you follow the formula correctly.
Megapixel Count and Sensor Resolution
Higher resolution sensors reveal more detail, including star trailing that lower resolution sensors simply can’t resolve. The 500 Rule was developed when most cameras captured 10-16 megapixels. Today’s 40, 50, or even 60 megapixel cameras show trailing that would have been invisible on older equipment.
I learned this the hard way with my first high-resolution body. Images looked sharp on the camera’s LCD, but when I opened them on my computer and zoomed to 100%, I could clearly see the stars were elongated. Now I automatically reduce my shutter speed by 20-25% when shooting with high-resolution sensors.
Direction You’re Facing
The direction you point your camera affects how quickly stars appear to move across your frame. Stars near the celestial equator (an imaginary line that circles the sky above Earth’s equator) move faster than stars near the poles.
If you’re photographing near Polaris (the North Star), stars appear to rotate slowly around it. But if you’re shooting toward the southern sky where the Milky Way core rises, stars move more quickly across your frame.
What does this mean practically? If you’re photographing near the celestial equator, you may need to reduce your shutter speed by a few seconds compared to the basic 500 Rule calculation. Some photographers use 400 or even 300 when shooting in these directions.
Pixel Pitch Considerations
Pixel pitch (the size of each pixel on your sensor) also plays a role. Smaller pixels packed densely on a sensor will show trailing more readily than larger pixels. This is why cameras with fewer but larger pixels often perform better for astrophotography, even if they have lower overall resolution.
Full frame cameras typically have larger pixels than crop sensor cameras at the same megapixel count, which is another reason they’re preferred for night sky work.
Print vs. Web Use
Consider your final output. If you’re only sharing images on social media or websites where they’ll be viewed at small sizes, slight trailing won’t be visible. But if you plan to make large prints, even tiny trails become obvious when enlarged.
For prints, I always use a more conservative rule (like the 400 Rule) and zoom in to 100% to verify my stars are truly round before calling a shoot successful.
The Rule is a Starting Point
After years of shooting astrophotography, I’ve come to view the 500 Rule as a starting point rather than an absolute. It gets you in the right ballpark, but you should always verify your results and adjust if needed.
My current workflow is to calculate the 500 Rule, then back off by 3-5 seconds. If the rule says 25 seconds, I’ll shoot at 20 or 21 seconds. This gives me a safety margin that almost always produces sharp stars.
The NPF Rule: A More Accurate Alternative
If you want a more precise calculation than the 500 Rule offers, the NPF Rule is worth learning about. NPF stands for N (aperture), P (pixel pitch), and F (focal length). It was developed specifically for modern digital sensors and accounts for factors the simpler 500 Rule ignores.
The full NPF formula is more complex:
NPF Rule = (35 × N + 30 × P) ÷ F
Where N is your aperture, P is your pixel pitch in micrometers, and F is your focal length.
I know, that’s a lot more math than most of us want to do in the field. The good news is that apps like PhotoPills calculate this automatically for you. You simply enter your camera and lens, and it gives you the exact maximum shutter speed.
Why NPF is More Accurate
The NPF Rule accounts for your sensor’s pixel size and your aperture setting. Both of these affect how star trailing appears in your final image. Smaller pixels show trailing sooner, and wider apertures can create a different depth of field that affects how stars render.
In my testing, the NPF Rule consistently produces sharper stars than the 500 Rule, especially with high-resolution cameras and longer focal lengths.
300 and 400 Rule Variations
Before you dive into the NPF formula, there’s a simpler approach many photographers use: just use a different number in the same formula.
The 400 Rule: 400 ÷ focal length = maximum shutter speed. This is more conservative and works well for high-megapixel cameras.
The 300 Rule: 300 ÷ focal length = maximum shutter speed. Even more conservative, often used by photographers who want guaranteed sharp stars for large prints.
Think of these as your “safe” settings. You might get slightly noisier images from the shorter exposures, but your stars will be sharp.
Which Rule Should You Use?
Here’s my recommendation based on your situation:
Use the 500 Rule if you have a lower resolution camera (under 24 megapixels) and you’re sharing images primarily online.
Use the 400 Rule if you have a mid-range resolution camera (24-36 megapixels) or want a safety margin.
Use the 300 Rule if you have a high-resolution camera (40+ megapixels) or plan to make large prints.
Use the NPF Rule if you want maximum precision and don’t mind using an app like PhotoPills to calculate it.
Practical Tips for Sharp Star Photography
Understanding the theory is important, but putting it into practice is where you’ll really learn. Here are the practical tips I’ve picked up from years of shooting astrophotography.
Field Workflow
When I arrive at a location, here’s my workflow for getting sharp stars:
First, I calculate my maximum shutter speed using the appropriate rule for my setup. I usually start with the 400 Rule as my baseline.
Next, I take a test shot at that shutter speed with my other settings dialed in (typically wide open aperture and ISO 3200-6400).
Then I zoom in on the LCD to 100% magnification and scroll around to check several stars. I’m looking for perfectly round stars, not ovals or dashes.
If I see any trailing, I reduce my shutter speed by 2-3 seconds and shoot again. I repeat this until my stars are sharp.
Finally, once I’ve confirmed sharp stars, I lock in my settings and focus on composition and capturing the shots I want.
Common Beginner Mistakes
The biggest mistake I see is forgetting the crop factor on APS-C or Micro Four Thirds cameras. Always multiply your focal length by your crop factor before dividing.
Another common error is not zooming in to check results. Stars often look sharp on the small LCD screen but reveal trailing when viewed on a computer. Get in the habit of zooming to 100% while you’re still in the field.
Using too long a shutter speed “just to be safe” with light gathering is another mistake. It’s better to increase your ISO slightly and keep your shutter speed conservative than to capture a noisy image with sharp stars than a cleaner image with trailing stars. You can reduce noise in post-processing, but you can’t fix trailing stars.
The Tripod Factor
A sturdy tripod is non-negotiable for astrophotography. Even a tiny amount of camera shake will ruin your stars. Make sure your tripod is on solid ground, extend the thick leg sections first, and avoid extending the center column if possible.
I also use a 2-second timer or a remote shutter release to eliminate any vibration from pressing the shutter button.
When to Consider a Star Tracker
If you find yourself constantly limited by the 500 Rule, it might be time to consider a star tracker. These devices rotate your camera to match Earth’s rotation, allowing you to use much longer exposures (minutes instead of seconds) without star trailing.
Star trackers require more setup time and a polar alignment, but they open up possibilities for deeper sky photography and cleaner images from the longer exposures at lower ISOs.
What is the 500 rule for shutter speed?
The 500 rule calculates maximum shutter speed by dividing 500 by your focal length. For a 20mm lens: 500 ÷ 20 = 25 seconds maximum exposure. Adjust for crop sensors by multiplying focal length by crop factor first.
What is the 300 rule in photography?
The 300 rule is a more conservative version that divides 300 by your focal length. Many photographers use this for high-megapixel cameras (40MP+) to prevent trailing. For a 20mm lens: 300 ÷ 20 = 15 seconds.
What is the 400 rule in photography?
The 400 rule divides 400 by your focal length. It’s a middle ground between the 500 and 300 rules, often used as a safer starting point for modern cameras. For a 20mm lens: 400 ÷ 20 = 20 seconds.
Why do my stars still trail using the 500 rule?
High-resolution sensors, direction you’re facing (celestial equator vs poles), and crop factor miscalculations are common causes. Try the 400 or 300 rule instead, or use the NPF rule for more accuracy with modern high-megapixel cameras.
How do I calculate the 500 rule for crop sensor cameras?
Multiply your focal length by the crop factor first, then divide 500 by that result. For a 24mm lens on a 1.5x crop sensor: 500 ÷ (24 × 1.5) = 500 ÷ 36 = 13.8 seconds, so use about 13 seconds.
Conclusion
The 500 Rule gives you a quick, practical starting point for capturing sharp stars in your astrophotography. Divide 500 by your focal length (accounting for crop factor), and you’ll be in the right ballpark. But remember that this rule is a guideline, not a guarantee.
Modern high-resolution sensors, the direction you’re facing, and your intended output all affect whether your stars will truly be sharp. When in doubt, use a more conservative rule like the 400 or 300, and always zoom in to verify your results while you’re still in the field.
The best way to master the 500 Rule is to get out and practice. Take test shots, check your stars at 100% magnification, and adjust as needed. After a few nights under the stars, calculating your maximum shutter speed will become second nature, and you’ll consistently capture the sharp, pinpoint stars that make astrophotography so rewarding.