Precision editing separates good photos from great ones. When I first started using range masks in Lightroom, my landscape images transformed from flat captures to dynamic, layered compositions. Range masks let you target specific brightness levels or colors within your adjustments, giving you control that used to require complex Photoshop work.
In this guide, you will learn exactly how to use both luminance and color range masks in Lightroom. I will walk you through the step-by-step process, share real-world examples from my own editing workflow, and help you troubleshoot common issues that trip up most photographers.
Whether you want to enhance a sky without affecting the foreground, isolate skin tones for targeted adjustments, or create subtle tonal transitions, range masks in Lightroom are the tool you need.
What Are Range Masks in Lightroom?
Range masks are a refinement tool within Lightroom’s masking system. They allow you to limit where an adjustment applies based on luminance (brightness) or color values. Instead of carefully painting a mask by hand, you let Lightroom analyze your image and automatically select the tones or colors you specify.
There are two main types of range masks available:
Luminance Range Masks: These select portions of your image based on brightness values. You can target shadows, midtones, or highlights independently. This is perfect for enhancing a bright sky while leaving a dark foreground untouched.
Color Range Masks: These select areas based on color. You sample a specific color using the eyedropper tool, and Lightroom creates a mask that includes only similar colors. This works well for adjusting blue skies, green foliage, or skin tones without affecting other elements.
Range masks matter because they eliminate the tedious brushwork that used to define precision editing. Before range masks, creating smooth transitions between adjusted and unadjusted areas required hours of careful painting and refinement. Now, you can achieve the same results in seconds.
The technology works by analyzing each pixel in your masked area. For luminance masks, Lightroom checks the brightness value and includes or excludes it based on your range settings. Color masks work similarly but evaluate hue instead of brightness.
How to Use Luminance Range Masks in Lightroom
Luminance range masks are my go-to tool for landscape photography. They excel at separating bright skies from darker foregrounds, allowing me to enhance each independently without creating harsh edges or halos.
Here is when to reach for luminance masks:
- Enhancing sky contrast and drama
- Brightening shadows in specific tonal ranges
- Reducing highlight intensity in bright areas
- Creating subtle dodge and burn effects
- Applying noise reduction to shadows only
Step-by-Step Instructions for Luminance Range Masks
Follow these steps to create a luminance range mask:
Step 1: Open the Masking Panel
In Lightroom Classic, press the M key or click the Masking icon below the histogram. This opens the new masking interface introduced in late 2021.
Step 2: Create a Base Mask
Choose a gradient filter, radial gradient, or adjustment brush as your starting point. Draw your mask over the general area you want to adjust. Do not worry about precision yet.
Step 3: Add a Luminance Range
Click the Add button within the mask panel and select Range: Luminance from the dropdown menu. A new luminance range mask will be added to your existing mask.
Step 4: Adjust the Range Slider
You will see a range slider with two handles. The left handle sets the lower brightness boundary, and the right handle sets the upper boundary. Drag these to isolate the tonal range you want to affect.
For a sky adjustment, move the left handle toward the right to exclude darker foreground tones. The mask overlay will show exactly which areas are selected.
Step 5: Fine-Tune with the Eyedropper
Click the eyedropper tool and sample a specific tone in your image. This automatically adjusts the range slider to center on that brightness value. Shift-click to sample multiple tones and expand the range.
Step 6: Adjust Smoothness
The smoothness slider controls how gradually the mask transitions between selected and unselected areas. Lower values create harder edges, while higher values produce softer, more natural transitions. I typically use values between 50 and 75 for landscape work.
Step 7: Apply Your Adjustments
Now adjust your exposure, contrast, highlights, shadows, or any other settings. The changes will only affect the luminance range you selected.
Understanding the Range Slider
The range slider can feel confusing at first. Think of it as a window that only lets certain brightness levels through. Everything inside the window gets adjusted. Everything outside stays untouched.
The histogram displayed above the slider shows the tonal distribution of your masked area. This visual feedback helps you understand which tones are present and where to position your range.
For example, if you are targeting a bright sky, you will see the histogram skewed toward the right. Set your range to cover only that right portion to isolate the highlights.
How to Use Color Range Masks in Lightroom
Color range masks shine when you need to target specific colors without affecting others. I use them frequently for enhancing blue skies, warming up golden hour light, or adjusting skin tones in portraits.
Here is when color range masks work best:
- Enhancing specific colors like blue skies or green foliage
- Adjusting skin tones without affecting background colors
- Shifting color temperature in selected areas
- Reducing color casts in specific parts of an image
- Creating stylized color grading effects
Step-by-Step Instructions for Color Range Masks
Follow these steps to create a color range mask:
Step 1: Open the Masking Panel
Press M or click the Masking icon below the histogram to open the masking interface.
Step 2: Create a Base Mask
Start with a linear gradient, radial gradient, or brush mask covering the general area you want to adjust.
Step 3: Add a Color Range
Click Add and select Range: Color from the dropdown. This adds a color range refinement to your mask.
Step 4: Sample Your Target Color
Click the eyedropper tool and click on the color you want to select in your image. Lightroom will create a mask that includes similar colors. The color preview box shows you the selected hue.
For more precise selection, shift-click multiple areas to expand the color range. This is useful when a sky contains varying shades of blue.
Step 5: Adjust the Color Range Slider
The amount slider controls how much color variation is included. Lower values restrict the mask to colors very close to your sample. Higher values include a broader range of similar colors.
Start with a lower value and increase it gradually while watching the mask overlay. Stop when you have included all your target areas without bleeding into unwanted colors.
Step 6: Refine with Smoothness
The smoothness slider works the same as with luminance masks. Higher values create softer transitions between selected and unselected colors.
Step 7: Apply Your Adjustments
Make your color adjustments using the HSL panel, temperature slider, or any other controls. Changes will only affect the colors within your range.
Color Mask Tips for Portraits
For skin tone adjustments, sample multiple areas of the face to capture the full range of skin tones. Use a lower amount value to avoid selecting background colors. I often combine color range masks with AI subject masks for the most accurate skin selection.
Practical Examples: When to Use Each Type
Understanding the theory helps, but seeing real applications makes it click. Here are specific scenarios from my editing workflow.
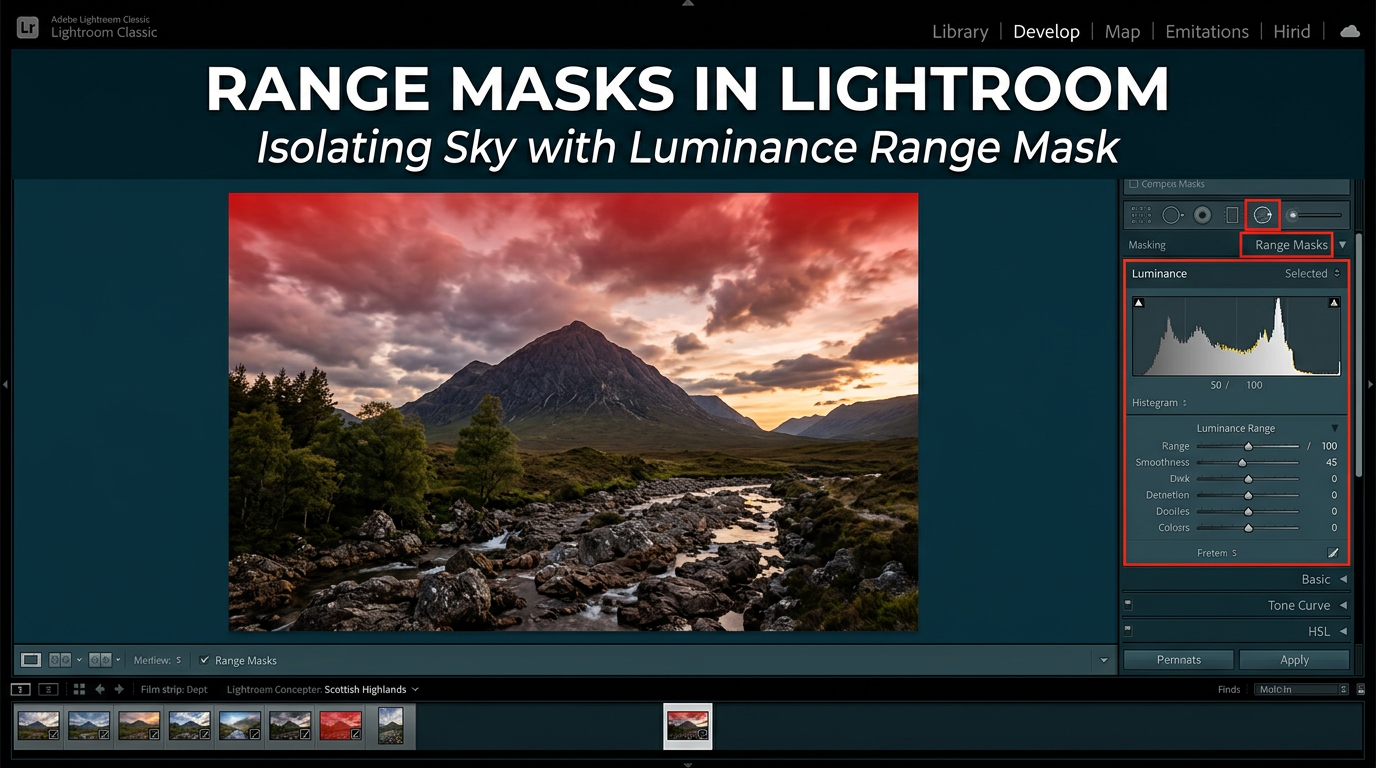
Sky Enhancement with Luminance Masks
A common landscape editing challenge involves brightening a foreground without blowing out the sky, or adding drama to clouds while maintaining detail. Luminance range masks solve this elegantly.
I start with a linear gradient over the sky portion of the image. Then I add a luminance range mask and sample the brightest cloud tones. This ensures my contrast and clarity adjustments affect only the clouds, not the darker blue sky. The result is dramatic clouds without an overprocessed look.
Selective Color Adjustments
When editing autumn foliage, I often want to enhance the warm oranges and reds without affecting green leaves that have not turned yet. A color range mask lets me sample the fall colors and boost their saturation independently.
The same technique works for blue hour photography. I can enhance the deep blues in the sky while leaving city lights and warm tones untouched.
Combining Both for Complex Edits
Sometimes one type of range mask is not enough. I frequently combine luminance and color range masks for complex selections.
For a portrait against a bright sky, I might use an AI subject mask to select the person, then add a color range mask to isolate skin tones. This gives me precise control over skin adjustments without affecting hair, clothing, or the background.
Advanced Techniques for Range Masks
Once you master the basics, these advanced techniques will take your editing further.
Combining Multiple Range Masks
You can stack multiple range masks on a single adjustment. For example, add both a luminance range and a color range to the same gradient mask. Lightroom will only affect pixels that meet both criteria.
This works exceptionally well for isolating bright blue skies. The luminance mask excludes dark areas, while the color mask excludes non-blue tones. The intersection creates a highly precise selection.
Using Range Masks with AI Masks
AI masks like Select Subject or Select Sky provide excellent starting points. Add range masks as refinements to make them even more precise.
I use this combination for portrait work constantly. Select Subject handles the general shape, then a color range mask isolates skin tones for targeted adjustments.
Creating Presets with Range Masks
You can save masks containing range masks as presets. This speeds up your workflow for common tasks.
Create a sky enhancement mask with your preferred luminance range settings. Save it as a preset. Now you can apply the same mask structure to any landscape photo with one click.
Note that the actual range settings may need adjustment for each image, but having the structure in place saves time.
Mask Intersections for Ultimate Precision
Use the Intersect Mask option to create highly specific selections. Start with a broad AI mask, then intersect it with a range mask to narrow down to exactly what you want.
This technique is invaluable for complex images where simple additive masks cannot achieve the precision you need.
Tips and Troubleshooting for Range Masks
Even experienced users encounter issues with range masks. Here are solutions to the most common problems.
Common Mistakes to Avoid
Setting ranges too wide: If your range slider encompasses most of the histogram, you are not getting the precision benefit. Tighten your ranges for more targeted adjustments.
Ignoring the smoothness slider: Low smoothness values create harsh edges that look unnatural. Most images benefit from smoothness values of 50 or higher.
Not using the mask overlay: Always toggle the mask overlay on (press O) to see exactly what is selected. Visual feedback prevents surprises.
Why Your Mask Might Select the Entire Image
If your luminance range seems to select everything, check your range slider positions. If both handles are at the extreme ends, no refinement occurs. Narrow the range to exclude unwanted tones.
For color masks, verify your amount slider is not set too high. High values include too many similar colors, effectively selecting the entire image.
Interface Changes in Newer Lightroom Versions
Adobe reorganized the masking interface in Lightroom Classic 11.0. Range masks moved from the old filter panel to the new dedicated masking workspace.
If you cannot find range masks, look for the Add button within the masking panel rather than searching the filter dropdowns. The functionality remains the same, just accessed differently.
Keyboard Shortcuts for Efficiency
- Press M to open the masking panel
- Press O to toggle the mask overlay
- Press Shift+O to cycle overlay colors
- Hold Shift while clicking to sample multiple tones
Frequently Asked Questions
How do you mask the Luminance range in Lightroom?
To mask the luminance range in Lightroom, open the Masking panel (press M), create a base mask using a gradient, radial, or brush tool, then click Add and select Range: Luminance. Adjust the range slider to isolate specific brightness levels, use the eyedropper to sample target tones, and fine-tune smoothness for natural transitions. The mask overlay shows exactly which areas are selected.
How does Luminance range work?
Luminance range works by analyzing the brightness value of each pixel within your masked area. When you set a range, Lightroom includes only pixels that fall within those brightness boundaries. Pixels darker than your lower boundary or brighter than your upper boundary are excluded from the adjustment. This allows precise targeting of shadows, midtones, or highlights without affecting other tonal regions.
Which masking methods are available with the range mask command in Lightroom?
Lightroom offers two main range mask methods: Luminance Range and Color Range. Luminance Range selects pixels based on brightness values (shadows, midtones, highlights). Color Range selects pixels based on color similarity to a sampled hue. Both methods can be added to any existing mask type including gradients, radial gradients, and brush masks, and can be combined for even more precise selections.
What is range masking?
Range masking is a Lightroom feature that refines selective adjustments based on specific luminance or color values. Instead of painting precise masks by hand, you set parameters that tell Lightroom which tones or colors to include. The software automatically creates the mask based on your criteria, saving time and producing natural-looking results. Range masks work as refinements applied to existing masks like gradients or brushes.
Conclusion
Range masks in Lightroom have become essential tools in my editing workflow. They provide precision that used to require Photoshop, all within Lightroom’s faster, non-destructive environment.
Luminance range masks excel at tonal separation for landscapes and architectural work. Color range masks give you surgical control over specific hues. Combined, they unlock editing possibilities that transform ordinary photos into extraordinary images.
Start with the basics. Master each type individually. Then experiment with combining them and creating presets for your most common adjustments. Your photos will thank you.