Every photographer and designer has experienced that sinking feeling when they realize an edit cannot be undone. You scale an image down, then need it larger again, only to discover the quality has degraded beyond recovery. Smart Objects in Photoshop solve this problem by preserving your original image data no matter how many transformations you apply. In this guide, I will show you exactly how to use Smart Objects in Photoshop for a flexible editing workflow that keeps your options open from start to finish.
After working with Photoshop for over 15 years, I have learned that Smart Objects are not just a nice feature to have. They are essential for any professional workflow where image quality matters. Whether you are creating mockups, compositing multiple images, or simply want the freedom to change your mind later, Smart Objects give you that flexibility without sacrificing quality.
By the end of this article, you will understand what Smart Objects are, how to create them using multiple methods, and practical workflows you can start using immediately. I will also cover the limitations and when you might want to avoid Smart Objects entirely. Let’s dive in.
What Are Smart Objects in Photoshop?
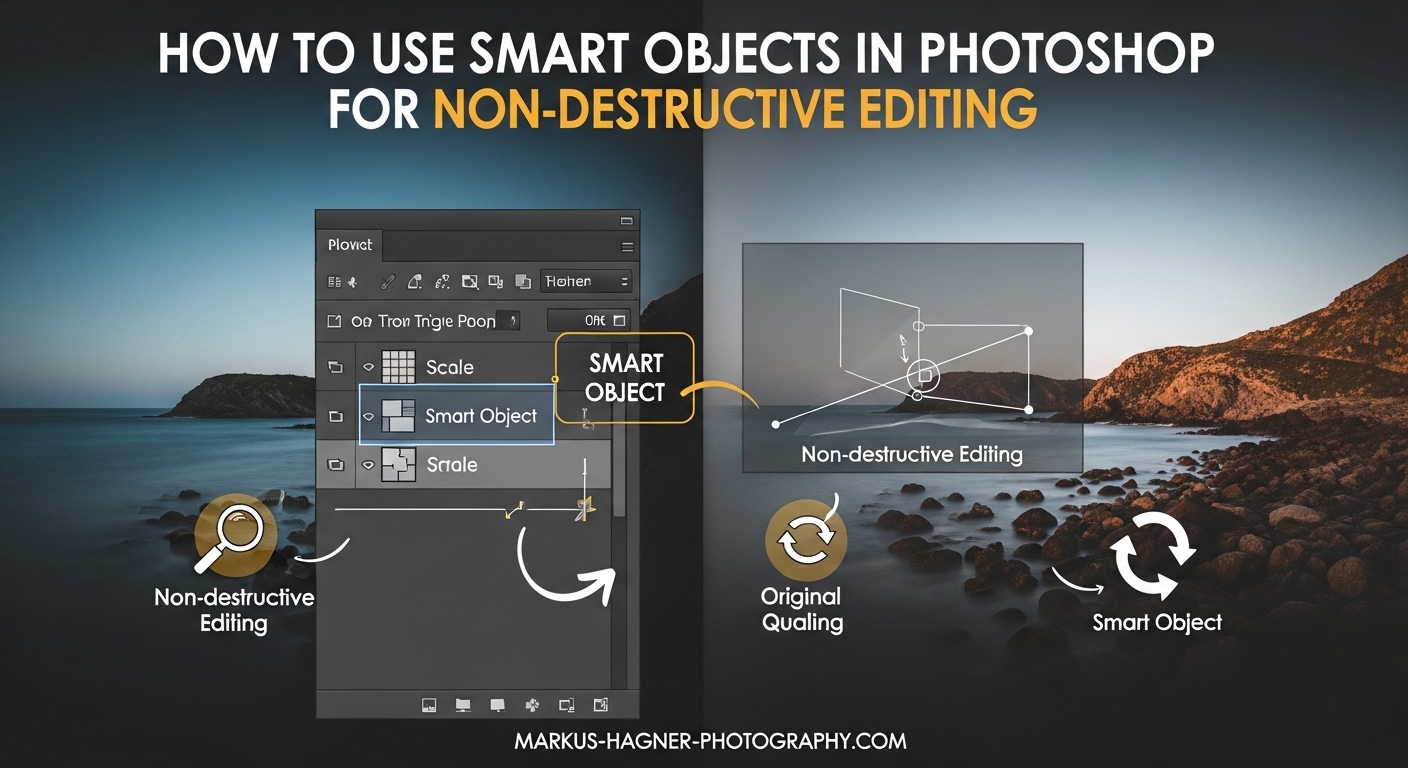
Smart Objects are a special type of layer in Photoshop that contains image data from raster or vector images while preserving the original source content and enabling non-destructive editing. Think of a Smart Object as a protective container that holds your original image data safe from permanent changes.
Here is an analogy that helped me understand the concept when I first started. Imagine you have a photograph printed on paper. With a regular layer in Photoshop, every edit you make is like drawing directly on that photograph with permanent marker. Once you draw something, it is there forever. A Smart Object, on the other hand, is like placing that same photograph inside a clear plastic sleeve. You can write on the sleeve, apply stickers, even stretch and distort it. But when you remove the sleeve, your original photograph remains completely untouched.
The technical explanation is that Smart Objects store the original pixel or vector data within a container layer. When you transform a Smart Object by scaling, rotating, or warping it, Photoshop references the original data rather than resampling the pixels. This means you can scale an image down to 10% of its original size, then back up to 100%, and lose zero quality in the process.
Smart Objects vs Regular Layers: Key Differences
Understanding the difference between Smart Objects and regular layers is crucial for knowing when to use each. Here is a comparison that shows the key distinctions:
Regular Layers: When you transform a regular layer, Photoshop permanently resamples the pixels. If you scale down then scale back up, the quality degrades. You can paint directly on regular layers, use the healing brush, and apply pixel-level edits freely. Regular layers keep file sizes smaller.
Smart Objects: Transformations reference the original data, so quality is always preserved. You cannot paint directly on Smart Objects without rasterizing them first. All filters applied become Smart Filters that can be edited or removed at any time. File sizes increase because Photoshop stores the original data separately.
How to Create Smart Objects in Photoshop
Creating Smart Objects in Photoshop is straightforward, and there are several methods you can use depending on your workflow. I will walk you through each method so you can choose the one that works best for your situation.
Method 1: Convert an Existing Layer to a Smart Object
This is the most common method when you already have an image open in Photoshop that you want to convert.
Step 1: Select the layer you want to convert in the Layers panel.
Step 2: Right-click on the layer and choose “Convert to Smart Object” from the context menu.
Step 3: Look for the small icon in the bottom-right corner of the layer thumbnail. This icon indicates the layer is now a Smart Object.
Alternatively, you can use the menu: Layer > Smart Objects > Convert to Smart Object. Or use the keyboard shortcut I use most often: Ctrl+Shift+Alt+S (Windows) or Cmd+Shift+Option+S (Mac).
Method 2: Place an Image as an Embedded Smart Object
When you want to bring an external image into your document as a Smart Object, use this method.
Step 1: Go to File > Place Embedded.
Step 2: Navigate to and select the image file you want to place.
Step 3: The image appears in your document with a transform bounding box. Position and scale as needed, then press Enter or click the checkmark to confirm.
The placed image automatically becomes a Smart Object. This is the method I use most often when compositing multiple images into a single composition.
Method 3: Place an Image as a Linked Smart Object
Linked Smart Objects reference an external file rather than embedding the data in your Photoshop document. This keeps file sizes smaller and allows you to update the source file independently.
Step 1: Go to File > Place Linked.
Step 2: Select the image file you want to link.
Step 3: Position and scale the image, then confirm the placement.
When the linked source file is modified and saved in another application, Photoshop will alert you that the linked Smart Object has been modified. You can then update it to reflect the changes. This is particularly useful when working with teams or when you need to use the same asset across multiple documents.
Method 4: Open a File as a Smart Object
You can also open files directly as Smart Objects from within Photoshop.
Step 1: Go to File > Open As Smart Object.
Step 2: Select your file and click Open.
The file opens as a new document with the image already converted to a Smart Object. This is useful when you know from the start that you want to work non-destructively with a particular image.
Method 5: Open Camera RAW Files as Smart Objects
For photographers working with RAW files, this method is particularly valuable because it preserves your RAW editing capabilities.
Step 1: Open your RAW file in Camera RAW.
Step 2: Make your initial adjustments as needed.
Step 3: Hold Shift and the Open Image button changes to Open Object. Click it.
Your RAW file opens as a Smart Object in Photoshop. The key benefit here is that you can double-click the Smart Object thumbnail at any time to return to Camera RAW and adjust your settings. This is how I work with all my photography projects that require additional editing beyond what Camera RAW provides.
Key Benefits of Using Smart Objects
Now that you know how to create Smart Objects, let’s explore why you would want to use them. The benefits extend far beyond simple quality preservation.
Non-Destructive Editing: The Foundation of Professional Workflows
Non-destructive editing means making changes to an image without permanently altering the original data. Smart Objects are fundamental to non-destructive workflows because they protect your source content.
When I edit photos professionally, I always assume I might need to make changes later. A client might request a different crop, or I might realize the color balance needs adjustment. With Smart Objects, I can make these changes without starting over from scratch. Every transformation, filter, and adjustment remains editable.
Consider a real example from my work. I recently created a composite image for a product campaign. The client wanted to see multiple variations with different background colors and lighting effects. Because I built the entire composition using Smart Objects, I could swap backgrounds, adjust filter settings, and even replace product images without redoing any work. What could have been hours of rework took minutes.
Preserve Image Quality Through Unlimited Transformations
The most practical benefit of Smart Objects is quality preservation during transformations. Here is what happens with regular layers versus Smart Objects when you scale an image:
Regular Layer: Scale down to 50% and Photoshop throws away half the pixels. Scale back up to 100% and Photoshop invents new pixels through interpolation. The result is a blurry, degraded image.
Smart Object: Scale down to 50% and Photoshop references the original data to display the image at 50%. Scale back up to 100% and Photoshop references the original data again. Zero quality loss because the original pixels were never modified.
This benefit compounds when you apply multiple transformations. Rotate, scale, skew, warp, and then rotate again. With a Smart Object, each transformation references the pristine original data. I have worked on projects where I transformed the same Smart Object dozens of times with no quality degradation whatsoever.
Smart Filters: Editable and Maskable Filter Effects
When you apply a filter to a Smart Object, it becomes a Smart Filter. This is one of my favorite features because it completely changes how I approach creative effects.
Smart Filters appear below the Smart Object layer in the Layers panel, complete with their own visibility toggles and blend mode options. You can double-click any Smart Filter to reopen its dialog and adjust settings. You can also apply a filter mask to control where the filter effect is visible.
Here is a practical example. Let’s say you apply a Gaussian Blur to soften a background. With a regular layer, that blur is permanent once applied. With a Smart Object, you can later decide the blur is too strong, double-click to reduce it, or even mask it away from certain areas. I use this constantly when adding effects like sharpening, noise, or stylized looks to my images.
Linked Instances: Update Once, Change Everywhere
When you duplicate a Smart Object within the same document, you create linked instances. Edit one instance and all duplicates update automatically.
This is incredibly powerful for design work. Imagine creating a website mockup with navigation buttons. You design one button as a Smart Object, then duplicate it across the page. When the client wants to change the button color, you edit one Smart Object and every button updates instantly. I have saved countless hours using this technique on interface designs and templates.
To create a linked instance, simply duplicate your Smart Object layer using Ctrl+J (Windows) or Cmd+J (Mac). Or drag the layer to the New Layer icon in the Layers panel. Both methods create linked duplicates.
RAW File Preservation for Photographers
For photographers, opening RAW files as Smart Objects provides a workflow that combines the power of Camera RAW with the flexibility of Photoshop editing.
When you open a RAW file as a Smart Object, the RAW data is preserved inside the Smart Object container. Double-clicking the Smart Object thumbnail reopens Camera RAW, where you can adjust exposure, white balance, tone curves, and all other RAW settings. These adjustments are non-destructive and fully reversible.
This means your Photoshop workflow becomes an extension of your RAW processing rather than a separate step. I use this approach for all my professional photography work because it gives me maximum flexibility. If I decide an image is too warm after working on it for an hour, I simply double-click the Smart Object and adjust the white balance in Camera RAW. No need to start over or apply correction layers.
Practical Smart Object Workflows
Understanding the theory is important, but seeing how Smart Objects work in real projects makes the benefits tangible. Let me walk you through several practical workflows I use regularly.
Mockup Design Workflow
Product mockups are one of the most common uses for Smart Objects, and for good reason. The Smart Object mechanism is perfect for placing artwork into realistic contexts.
Here is my typical mockup workflow:
Step 1: Open your mockup template file. Most mockup templates are designed with Smart Objects already in place.
Step 2: Locate the Smart Object layer that represents the customizable area. This might be labeled something like “Your Design Here” or “Edit Me.”
Step 3: Double-click the Smart Object thumbnail to open its contents in a new window.
Step 4: Paste or place your artwork into this window. Position it as needed.
Step 5: Save and close the Smart Object window. Your artwork automatically appears in the mockup with all perspective, lighting, and surface effects applied.
This workflow is so efficient that I can create dozens of mockup variations in the time it would take to manually distort and shade a single piece of artwork. Mockup templates have become an essential part of my client presentation workflow.
Photo Compositing with Smart Objects
When creating photo composites, Smart Objects provide flexibility that regular layers cannot match. Every element remains independently editable throughout the entire process.
My compositing workflow typically looks like this:
Step 1: Create a new document at your target resolution.
Step 2: Place each element as a Smart Object using File > Place Embedded.
Step 3: Position and scale each element. Do not worry about getting it perfect because you can adjust later.
Step 4: Apply layer masks to blend elements together. Masks work normally with Smart Objects.
Step 5: Apply color adjustments using adjustment layers clipped to each Smart Object.
Step 6: Add Smart Filters like Gaussian Blur for depth effects or sharpening for focal elements.
The beauty of this approach is that I can refine any element at any stage. If the scale of a foreground element needs adjustment, I simply select it and transform it again. No quality loss, no starting over. I have worked on complex composites with 50+ elements, each a Smart Object, and made final adjustments to elements I placed hours earlier.
Creating Reusable Design Templates
Smart Objects are ideal for creating templates you can reuse across projects. Once you set up a template with Smart Objects, updating it for new content takes seconds.
Consider a social media post template. You design the layout once with Smart Objects for the main image, logo, and any other variable elements. When you need to create a new post, you simply open each Smart Object, replace the content, and save. The positioning, styling, and effects remain consistent.
I maintain a library of templates for common project types. Business cards, YouTube thumbnails, Instagram posts, and presentation slides all exist as templates with Smart Object placeholders. This consistency saves time and ensures brand coherence across all my work.
Working with Repeatable Design Elements
Many designs contain repeating elements like icons, patterns, or decorative graphics. Smart Objects make managing these elements efficient.
Create your element once as a Smart Object, then duplicate it wherever needed. Because duplicates are linked instances, updating the original updates every copy. This is useful for:
Icon sets: Design your icon style once, duplicate for each variation, and update globally if needed.
Pattern elements: Create seamless patterns where editing one tile updates the entire pattern.
Textured overlays: Apply the same texture across multiple areas and adjust it once.
I recently designed a presentation with consistent iconography across 30 slides. By using linked Smart Objects, I could refine the icon style throughout the project by editing a single source file. Every slide updated automatically.
Advanced Smart Object Techniques
Once you are comfortable with basic Smart Object workflows, these advanced techniques will help you work even more efficiently.
Nested Smart Objects: Smart Objects Within Smart Objects
You can place a Smart Object inside another Smart Object, creating nested containers. This technique offers powerful organizational benefits for complex projects.
Think of nested Smart Objects like those Russian nesting dolls. The outer Smart Object contains an inner Smart Object, which might contain another, and so on. Each level preserves its own original data.
I use nested Smart Objects when building complex compositions. For example, I might create a Smart Object containing a product shot with its own adjustment layers and Smart Filters. Then I place that Smart Object into a larger composition. The product remains fully editable at both levels. I can adjust the product in isolation or adjust its placement in the overall composition.
To nest Smart Objects, simply select an existing Smart Object and convert it to a Smart Object again. Or place a document containing Smart Objects into another document as a Smart Object.
New Smart Object via Copy: Breaking the Link
Normally, duplicating a Smart Object creates a linked instance that updates when the original changes. But sometimes you want an independent copy that can be modified separately.
To create an unlinked copy, use Layer > Smart Objects > New Smart Object via Copy. This creates a new Smart Object with its own internal data. Edit one and the other remains unchanged.
I use this when I need variations of the same element. For example, creating multiple versions of a logo with different color treatments. Each version starts from the same source but can be modified independently.
Editing Smart Object Contents
To edit the contents of a Smart Object, double-click its thumbnail in the Layers panel. This opens the source content in a new document tab or window.
For raster Smart Objects, this opens a PSB (Photoshop Large Document) file containing the pixel data. Make your changes, then save and close. The Smart Object in your main document updates to reflect the changes.
For vector Smart Objects placed from Illustrator, double-clicking opens the source file in Illustrator. Edit the vector artwork, save, and return to Photoshop to see the updated Smart Object.
This workflow enables true round-trip editing between Photoshop and Illustrator. I use it constantly when combining vector logos and graphics with photographic content.
Linked vs Embedded Smart Objects: Choosing the Right Option
Understanding when to use linked versus embedded Smart Objects helps you optimize your workflow and file management.
Embedded Smart Objects store all data within your Photoshop file. The document is self-contained and portable. File sizes are larger, but you will not encounter missing assets. Use embedded Smart Objects for finished work or when sharing files with others.
Linked Smart Objects reference external files. File sizes remain smaller, and you can edit the source file independently. Multiple Photoshop documents can reference the same linked Smart Object. Use linked Smart Objects for assets that change frequently or when working on collaborative projects.
I typically use linked Smart Objects during active project development, then convert to embedded before archiving or delivering final files. To convert linked to embedded, select the Smart Object and choose Layer > Smart Objects > Embed Linked.
When NOT to Use Smart Objects: Limitations and Considerations
Smart Objects are powerful, but they are not appropriate for every situation. Understanding their limitations helps you make informed decisions about when to use them.
File Size Considerations
Smart Objects increase file sizes because Photoshop stores the original source data in addition to the visible layer. For documents with many high-resolution Smart Objects, file sizes can become substantial.
I have worked on documents exceeding 2GB due to multiple Smart Objects from high-resolution source files. This is manageable on modern hardware but can cause issues on older systems or when sharing files.
Performance with Many Smart Objects
Documents containing numerous Smart Objects may perform slower than those with regular layers. Each Smart Object requires additional memory and processing, particularly during transformations.
On my workstation with 64GB of RAM, this is rarely an issue. But on my laptop with 16GB, I notice slower performance with documents containing dozens of Smart Objects. Consider your hardware when deciding how many Smart Objects to include in a single document.
When You Need Direct Pixel Editing
Smart Objects cannot be edited at the pixel level directly. You cannot use tools like the Brush, Clone Stamp, or Healing Brush on a Smart Object without rasterizing it first.
If your workflow requires extensive retouching or painting, work with regular layers until those edits are complete. Then convert to a Smart Object for transformations and filters. Alternatively, apply retouching inside the Smart Object by double-clicking to edit its contents.
Troubleshooting Common Smart Object Issues
Here are solutions to issues I encounter frequently:
“Smart Object not directly editable” error: This occurs when you try to use a pixel-editing tool on a Smart Object. Either rasterize the layer (Layer > Rasterize > Smart Object) or edit the contents by double-clicking the thumbnail.
Linked Smart Object missing: If a linked Smart Object shows a warning icon, the source file has moved or been renamed. Right-click the Smart Object and choose Resolve Missing Asset to locate the file.
Cannot transform Smart Object: Some transformations are limited by the content. Very large Smart Objects may have transformation limits. Try transforming in smaller increments.
Frequently Asked Questions
What is the downside of using a lot of smart objects in Photoshop?
The main downsides of using many Smart Objects are increased file sizes and potential performance slowdowns on older hardware. Each Smart Object stores its original source data separately, which can bloat file sizes significantly. Documents with dozens of high-resolution Smart Objects may run slowly, particularly during transformations. For most users with modern hardware, these tradeoffs are worth the flexibility Smart Objects provide.
How to make a smart object editable in Photoshop?
To edit a Smart Object’s contents, double-click the Smart Object thumbnail in the Layers panel. This opens the source content in a new window where you can make pixel-level edits, apply adjustments, or modify the content. Save and close this window when finished, and the Smart Object in your main document will update automatically. Note that you cannot edit Smart Objects directly with tools like the Brush or Clone Stamp without opening their contents first.
What are the limitations of a smart object?
Smart Objects have several limitations: you cannot paint or retouch directly on them, they increase file sizes, they may slow performance with many instances, some filters are not available as Smart Filters, and linked Smart Objects can become disconnected if source files move. Additionally, Smart Objects cannot contain layer effects that would normally affect layers below them in the stack.
Why is smart object not directly editable?
Smart Objects are not directly editable because they are designed to preserve original image data. When you convert a layer to a Smart Object, Photoshop encapsulates the pixel data in a protective container. This prevents accidental permanent changes but also means pixel-level tools like brushes and healing tools cannot modify the data directly. To edit a Smart Object, you must open its contents by double-clicking the thumbnail, which allows you to modify the source while maintaining non-destructive behavior in your main document.
Conclusion
Smart Objects in Photoshop provide the foundation for a truly flexible editing workflow. By preserving your original image data inside protective containers, they enable unlimited transformations without quality loss, editable filter effects through Smart Filters, and efficient workflows through linked instances and nested structures.
The key is knowing when Smart Objects serve your needs and when regular layers are more appropriate. Use Smart Objects for elements that might need transformation, filters, or future updates. Use regular layers when you need direct pixel editing or want to minimize file sizes.
I encourage you to start incorporating Smart Objects into your workflow gradually. Convert layers to Smart Objects before transforming them. Place external images using Place Embedded instead of copy-paste. Open your RAW files as Smart Objects to preserve editing flexibility. These small changes compound over time into a significantly more professional and flexible workflow.
With practice, working with Smart Objects becomes second nature. You will wonder how you ever worked without them.