You’ve captured the perfect sunrise scene, but your histogram tells a different story. Blown-out highlights in the sky. Crushed shadows in the foreground. Your camera’s dynamic range couldn’t handle the extreme contrast. This is where learning how to blend multiple exposures manually in Photoshop using layer masks transforms your photography.
Manual exposure blending gives you complete control over the final image. No more over-processed HDR look. No more sacrificing highlights for shadows or vice versa. Just natural, balanced images that match what your eyes saw.
In this guide, I’ll walk you through the exact process I’ve used for over 15 years of landscape and real estate photography. You’ll learn to blend bracketed exposures seamlessly using layer masks, with techniques that work in any version of Photoshop.
What Is Exposure Blending and Why You Need It
Exposure blending combines multiple images taken at different exposure values to capture a wider dynamic range than any single shot can record. Think of it as HDR photography done right, without the artificial tone mapping that creates that telltale HDR look.
Modern cameras have improved dynamic range, but they still can’t match the human eye. A sunrise scene might have 10+ stops of light variation between the brightest sky and deepest shadow. Your camera captures maybe 6-8 stops effectively. Something has to give.
That’s where exposure blending saves the day. You shoot multiple exposures, then combine the best parts of each. Properly exposed sky from one image. Well-detailed foreground from another. The result looks completely natural because you’re just revealing data that already exists in your bracketed shots.
Landscape photographers rely on this technique for golden hour scenes. Real estate photographers need it for balancing bright windows with dark interiors. Architectural photographers use it for exterior shots with deep shadows. Any high-contrast situation becomes manageable with exposure blending.
Before You Start: What You Need
Successful exposure blending starts in the field, not in Photoshop. Let me break down exactly what you need before we dive into the editing process.
A tripod is non-negotiable. Your images must align perfectly. Even pixel-level misregistration creates ugly artifacts when blending. If you’re shooting handheld, you can try alignment tools in Photoshop, but results will never match tripod-based shots. I’ve tested both methods extensively, and the difference is dramatic.
Shoot at least 3 exposures. I recommend a standard bracket: one exposure at 0 EV, one at -2 EV for the highlights, and one at +2 EV for the shadows. Some scenes need 5 or even 7 shots, but 3 covers most situations. More exposures give you more options, but also more work in post.
Shoot in RAW format. RAW files contain significantly more data for shadows and highlights compared to JPEG. When you’re pushing exposures to their limits, that extra data makes the difference between smooth gradients and banding. I’ve recovered 3+ stops of usable detail from RAW shadows that would have been lost in JPEG.
Use aperture priority or manual mode. You want consistent depth of field across all exposures. Let the shutter speed vary between shots, never the aperture. Auto ISO should be off to maintain consistent noise levels. These settings ensure your exposures only differ in brightness, not other characteristics.
Minimize motion in your scene. Wind-blown trees, moving water, clouds, people, cars all create problems when blending. The more movement between exposures, the more ghosting artifacts you’ll see. Sometimes this is unavoidable, but faster shutter speeds and continuous shooting modes help reduce the issue.
How to Blend Multiple Exposures Manually in Photoshop Using Layer Masks
Now let’s get into the step-by-step process. I’ll walk you through the exact workflow I use, with keyboard shortcuts and tips I’ve learned through thousands of blended images.
Step 1: Load and Stack Your Bracketed Exposures
Open Photoshop and go to File > Scripts > Load Files into Stack. This powerful command automatically imports all your bracketed exposures as layers in a single document.
In the dialog box, click Browse and select all your bracketed images. Check the boxes for “Attempt to Automatically Align Source Images” and “Create Smart Object.” The alignment option is crucial even when using a tripod, as microscopic movements can occur between shots.
Photoshop will load each image as a separate layer, stacked from darkest at the bottom to lightest at the top. The order matters for the technique we’re using, so verify your layers: darkest exposure (-2 EV or similar) at the bottom, middle exposure (0 EV) in the middle, brightest exposure (+2 EV) at the top.
Pro tip: If you’re working from Lightroom, select your images and right-click > Edit In > Open as Layers in Photoshop. This skips the stacking script and sends them directly as layered layers.
Step 2: Verify Alignment and Check Layers
Zoom in to 100% and check critical areas like edges between sky and land, architectural lines, and any detailed textures. Toggle the visibility of each layer on and off to ensure nothing shifts between exposures.
If you see any misalignment, go to Edit > Auto-Align Layers and select “Auto” as the projection method. Photoshop will analyze and realign your layers using sophisticated algorithms. I’ve found this fixes minor alignment issues in 95% of cases.
For severely misaligned images, you might need manual alignment using the Move tool with lower opacity, but this is rare when shooting on a tripod. Handheld shots are another story—hence my emphasis on tripod use earlier.
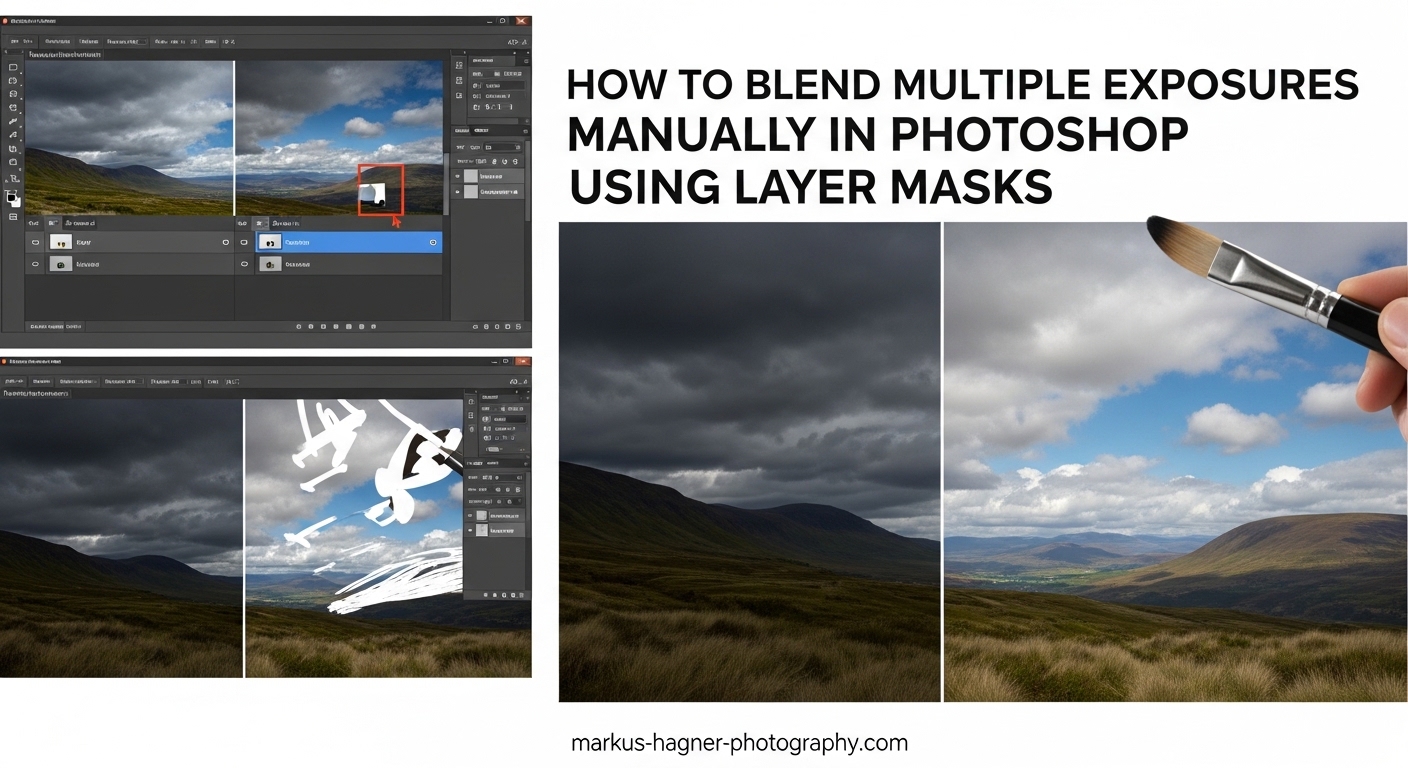
Step 3: Understand Layer Mask Basics
Layer masks are the secret weapon of exposure blending. A layer mask is essentially a grayscale overlay attached to a layer that determines where that layer is visible (white) or hidden (black). Shades of gray create partial transparency.
Think of it this way: white reveals, black conceals. When you paint with a white brush on a layer mask, you’re revealing that layer in those areas. Paint with black, and you’re hiding it. Gray creates semi-transparency based on brightness—50% gray is 50% transparent.
This non-destructive approach means you never actually delete pixels. You’re just hiding and revealing them. If you make a mistake, paint back over it. Want to change something completely? Delete the mask and start fresh. Your original image data stays intact.
For exposure blending, we’ll paint with black on the upper layer’s mask to reveal the properly exposed areas from layers below. Sky from the dark exposure, foreground from the bright exposure, all seamlessly blended through careful brush work.
Step 4: Create Your Initial Layer Mask
Select your brightest exposure layer (the top one). Click the Layer Mask icon at the bottom of the Layers panel—it looks like a rectangle with a circle inside. This adds a white layer mask to your layer, which means the entire layer is currently visible.
Press D on your keyboard to set your foreground and background colors to black and white (default for masking). Press X to swap between foreground and background. For this technique, you’ll mostly be painting with black.
Select the Brush tool (B) and choose a soft-edged brush. The hardness should be set to 0% for smooth transitions. Size your brush appropriately—large brushes for broad areas like sky, smaller brushes for detailed transitions around trees or buildings.
Lower your brush opacity to 50-70% to start. This builds up the effect gradually and prevents harsh edges. You can always paint over the same area multiple times to increase the effect. This non-destructive approach is why layer masks are so powerful.
Step 5: Paint in the Best Exposures
Now comes the artistry. With your layer mask selected and black as your foreground color, paint over areas where you want to reveal the layer below. For the brightest exposure layer, this means painting over the sky to reveal the properly exposed sky from your middle or dark exposure layer.
Work systematically. Start with broad strokes, then refine edges. Paint with black on the bright layer’s mask to reveal darker tones below. If you go too far, switch to white paint to bring back the bright layer.
For a typical landscape, I’ll paint the entire sky area on the brightest layer’s mask, revealing the properly exposed highlights from the dark exposure. Then I might create another mask on the middle layer to reveal shadow detail from the bright exposure in the foreground.
Use your keyboard shortcuts: [ to decrease brush size, ] to increase brush size. Shift+[ decreases brush hardness, Shift+] increases it. These become second nature with practice and dramatically speed up your workflow.
Step 6: Refine Edges and Blend Zones
The transition zones between exposures are where most blends fail. Harsh lines look obviously fake. Smooth, gradual transitions look natural. The key is in how you handle the areas where exposures meet—horizon lines, treelines, building edges.
Lower your brush opacity to 20-30% for edge refinement. Use smaller brush sizes and paint multiple strokes rather than one heavy stroke. Build up the blend gradually. Zoom in close to check your work, then zoom out to see the overall effect.
For complex edges like trees or buildings against the sky, try this technique: paint with black at 100% opacity well into the detailed area, then switch to a soft brush at 30% opacity and paint along the edge. This creates a tighter mask while maintaining smooth transitions.
If you see halos—bright or dark bands along edges—your mask is too soft or too hard in that area. Adjust your brush hardness and opacity until the halo disappears. Sometimes painting with gray (lower opacity) in the problem area solves this.
Step 7: Final Adjustments and Color Matching
Once you’re satisfied with your blend, you might notice slight color differences between exposures. This is normal—different exposures can shift color temperature slightly. The brightest exposure often looks warmer, while the darkest looks cooler.
For minor color shifts, try this: create a Color Balance adjustment layer clipped to the top layer (Alt/Option-click between layers to clip). Adjust the midtones and shadows to match the color temperature across your blend.
For more significant color differences, you might need selective color adjustments on specific areas. I’ve found that adjusting the saturation of the blended areas by 5-10% often creates better color harmony across exposures.
Finalize your image with overall adjustments: curves for contrast, vibrance for color punch, targeted sharpening on the important areas. But keep these adjustments global so they affect the entire blended image uniformly, preserving the natural look you’ve created.
When you’re happy, save your work as a PSD with layers intact. You might want to revisit and tweak later. Then save your final version as a TIFF or high-quality JPEG for output.
Alternative Blending Methods Compared
The basic layer mask painting technique I just taught you is the foundation, but it’s not the only way to blend exposures. Let me compare three popular methods so you can choose the right one for your situation.
Basic Layer Mask Painting: This is what we just covered. Maximum control, intuitive process, works with any number of exposures. Best for complex scenes with irregular boundaries. Downside? Can be time-consuming for large areas or many exposures. I use this method for about 70% of my blends.
Apply Image Command: A more automated approach that uses luminosity data to create masks. Go to Image > Apply Image, select the layer you want to mask, and choose “Multiply” as the blending mode. This automatically creates a mask based on brightness values. Faster than hand-painting for simple sky/foreground blends, but less control. Great for beginners or quick edits. Works best with just two exposures.
Luminosity Masks: Advanced technique that creates precise selections based on tonal ranges. You can select just the brights, darks, or midtones of an image. Incredibly powerful for natural blends, especially with complex scenes. The learning curve is steeper, and many photographers use paid plugins like Lumenzia ($70) or Raya Pro ($80) to speed up the process. However, you can create luminosity masks manually with Photoshop’s channels panel. I use luminosity masks for about 20% of my work, particularly for challenging light.
Which method should you start with? Master the basic painting technique first. It teaches you the fundamentals of how masks work and gives you complete control. Once you’re comfortable, explore Apply Image for speed, then graduate to luminosity masks when you need precision. Each has its place in your toolkit.
Pro Tips for Natural-Looking Blends
After blending thousands of exposures, I’ve learned some techniques that separate professional results from obvious HDR. These tips will help your blends look completely natural.
Don’t over-blend. Not every image needs 5 exposures perfectly balanced. Sometimes 3 shots are plenty. Over-blending creates that plastic, tone-mapped HDR look that everyone recognizes. If your shadows are as bright as your highlights, you’ve gone too far. Preserve some contrast and depth.
Match your brush size to the transition. Broad open areas like sky to water can handle larger brushes with soft edges. Detailed areas like trees against sky need smaller brushes and more careful work. Adapting your brush approach to each transition zone creates more natural results.
Check at multiple zoom levels. I toggle between 50%, 100%, and “fit to screen” constantly. Details that look fine zoomed out might reveal problems at 100%. Conversely, pixel-level concerns often disappear at normal viewing sizes. Trust your eyes at print or screen viewing sizes, not at 300% magnification.
Preserve natural contrast. Your eye expects shadows to be darker than highlights. Don’t fight this. I aim for shadow brightness about 2-3 stops darker than the brightest highlights. This maintains the illusion of depth and dimension that flat HDR images often lose.
Subtlety beats drama every time. The best exposure blends are the ones nobody notices. They just look like perfect captures. If someone looks at your image and thinks “nice HDR,” you’ve failed. If they think “amazing light,” you’ve succeeded. Natural light has character—preserve it rather than flattening everything out.
How to Blend 3 or More Exposures
Most tutorials focus on blending just two exposures, but real-world scenes often need more. Sunrise, sunset, interior real estate shots—these regularly require 3, 5, or even 7 bracketed images for optimal results.
The process is essentially the same as two-exposure blending, just with more layers. Stack all your exposures from darkest at the bottom to lightest at the top. Create layer masks for each layer except the bottom one. Paint on each mask to reveal the best-exposed areas from the layers below.
Here’s my workflow for 5 exposures: start with the darkest exposure as your base. Add a layer mask to the next darkest layer and paint black to reveal only the deepest shadows that need it. Move to the middle exposure mask and paint to reveal midtone shadows and dark foreground. Continue up through the brighter exposures, each time revealing only the specific tonal range that layer improves.
This selective approach means each exposure contributes exactly what it’s best at. No single layer tries to do too much. The result is cleaner, with fewer artifacts and more natural transitions between tonal ranges.
For more than 3 exposures, organization becomes crucial. Name your layers clearly: “Dark (-2),” “Medium (0),” “Bright (+2),” etc. Color-code layers if that helps. Complex blends with 5+ layers can get confusing fast, so stay organized from the start.
Troubleshooting Common Exposure Blending Issues
Even experienced photographers encounter problems when blending. Let me address the most common issues and how to fix them.
Ghosting: Those double images or strange halos around moving objects. Ghosting happens when elements move between exposures. Prevention is best—use faster shutter speeds, shoot in burst mode. But if you have ghosting in post, try manually painting it out on the layer mask. Use the Clone Stamp tool on the affected layer to copy static areas over ghosted ones. For difficult cases, Photoshop’s deghosting in the HDR Pro automation can help, though I find manual work gives better results.
Color shifts: When your sky looks one temperature and your foreground another. Different exposures can have different color casts. I fix this with selective color adjustments. Create a Hue/Saturation or Color Balance adjustment layer clipped to the problematic layer. Adjust until the color matches. Sometimes simply reducing saturation by 5-10% in the blended areas creates harmony.
Halos: Bright or dark bands along transition zones, usually around the horizon or edges. Halos come from masks that are either too soft or too hard. If the halo is bright, your mask is too soft—paint with white on the mask to sharpen the transition. If the halo is dark, the mask is too hard—paint with black at a lower opacity to soften the edge. The key is finding the right brush hardness for each transition zone.
Misaligned layers: When details don’t line up between exposures. Even with Auto-Align, some images shift. For minor misalignment, try manually nudging layers with the Move tool (V) and arrow keys. For serious issues, you might need to transform one layer slightly (Edit > Transform > Scale or Rotate). Worst case, exclude the problematic exposure and work with what you have.
Banding in gradients: Visible steps where smooth transitions should be, especially in skies. Banding happens when pushing adjustments too far. Reduce the intensity of your blend slightly. Add a tiny bit of noise (Filter > Noise > Add Noise) at 1-2% to break up the bands. Working with 16-bit files instead of 8-bit also helps significantly with banding issues.
Noisy shadows: Revealing the darkest exposure can introduce shadow noise. This is particularly problematic with high ISO files or heavy pushes. Apply targeted noise reduction to just the shadow areas. I use the Camera Raw filter as a smart filter, then mask it to affect only shadows. Sometimes a slight gaussian blur on the shadow layer mask (Filter > Blur > Gaussian Blur, set to 1-2 pixels) creates smoother transitions without needing as much shadow detail.
When Not to Use Exposure Blending
Exposure blending isn’t always the answer. Sometimes it creates more problems than it solves. Let me share when I skip this technique entirely.
Fast-moving subjects: Wildlife, sports, street photography with people—anything in motion makes blending nearly impossible. The ghosting issues outweigh the dynamic range benefits. In these cases, I’d rather expose for the most important part of the scene and accept clipped highlights or shadows.
Subtle contrast: Not every scene needs blending. If your histogram fits comfortably within the sensor’s range, forcing multiple exposures creates unnecessary work. I see photographers over-bracket scenes that a single exposure could handle. Check your histogram in the field—if it’s not clipping significantly, one shot is enough.
Time constraints: Blending takes time. Simple lifestyle shots, travel snapshots, or situations where you need quick turnaround might not justify the effort. Not every image needs to be a portfolio piece. Know when to blend and when to move on.
Flat, overcast light: Low-contrast scenes don’t benefit from exposure blending. The whole point is handling high dynamic range. If the light itself is flat, adding exposures won’t create drama that doesn’t exist in the scene. In fact, blending flat light often makes images look even flatter.
Real Estate Photography: A Special Case
Real estate photographers might be the heaviest users of exposure blending. Interior shots with bright windows present extreme dynamic range challenges. The difference between a dimly lit room and bright daylight outside can exceed 12 stops.
For real estate, I typically use 5 exposures spaced 1 EV apart: -2, -1, 0, +1, +2. This gives me excellent window detail at -2 EV while preserving interior shadow detail at +2 EV. The middle exposures capture the midtones.
The workflow is similar to landscape blending, but I pay extra attention to edges around windows. Clean transitions between interior and window views make or break real estate images. I often spend more time on window edge masking than any other part of the blend.
Real estate also demands realistic color. Over-saturated or heavily tone-mapped images turn off potential buyers. Subtle, natural-looking blends that show the property accurately perform better than dramatic HDR-looking shots. This isn’t fine art—it’s commercial photography with specific goals.
Speed matters in real estate photography. When you’re editing 30+ shots from a single property, you can’t spend an hour on each image. The Apply Image technique I mentioned earlier is valuable here—it’s faster than hand-painting every window. Many real estate photographers use specialized HDR software like Aurora HDR for batch processing, then manually blend only the most challenging shots.
Frequently Asked Questions About Exposure Blending
How do I manually blend layers in Photoshop?
To manually blend layers in Photoshop, stack your images as layers with the darkest at bottom and lightest at top. Add a white layer mask to the top layer, then paint with black at 50-70% opacity using a soft brush to reveal the layer below. Lower opacity builds gradual transitions for natural-looking blends.
How many exposures do I need for blending?
Three exposures are sufficient for most scenes: one at 0 EV (normal exposure), one at -2 EV for highlight detail, and one at +2 EV for shadow detail. Extreme high-contrast scenes like sunrise or interior real estate shots may benefit from 5 or 7 bracketed exposures spaced 1 EV apart for smoother transitions.
Can I blend exposures handheld without a tripod?
While Photoshop’s Auto-Align Layers can fix minor misalignment, handheld exposure blending rarely matches tripod-based quality. Micro-movements between shots create artifacts that are difficult to fix completely. For serious work, a tripod is essential investment. If you must shoot handheld, use faster shutter speeds and continuous shooting mode to minimize movement between frames.
What’s the difference between Apply Image and Luminosity Masks?
Apply Image is a single command that quickly creates a basic luminosity mask using a dialog box. Luminosity Masks are a more advanced system that creates precise selections based on specific tonal ranges (brights, darks, midtones). Apply Image is faster and simpler for basic blends, while Luminosity Masks offer greater control and precision for complex scenes. Many photographers start with Apply Image and graduate to Luminosity Masks as their skills advance.
How do I avoid getting an HDR look when blending?
Avoid the HDR look by preserving natural contrast between shadows and highlights. Don’t lift shadows to match highlight brightness—keep shadows 2-3 stops darker than highlights for depth. Use lower brush opacity (20-50%) when painting masks for gradual transitions. Subtlety is key: the best blends are unnoticed. Limit yourself to 3 exposures when possible, and resist the urge to make everything evenly bright.
Conclusion: Mastering Exposure Blending for Natural Results
Learning how to blend multiple exposures manually in Photoshop using layer masks opens up creative possibilities that in-camera capture alone can’t achieve. High-contrast scenes become manageable. Sunrise and sunset shots retain detail in both sky and land. Real estate interiors show both window views and room details.
The key is practice and patience. Your first few blends might show halos or color mismatches. That’s normal. Each image teaches you something new. Over time, you’ll develop an instinct for brush size, opacity, and transition zones. You’ll learn to see the image not as it is, but as it could be with optimal dynamic range.
Start simple with two exposures and basic painting. Master the fundamentals before moving to luminosity masks or complex multi-exposure blends. The skills transfer directly—the advanced techniques just build on what you’ve already learned.
I recommend downloading sample bracketed images to practice with before applying these techniques to your important work. Many photography websites offer free practice files specifically for exposure blending. Work through the process until it becomes second nature.
The payoff is images that capture scenes the way your eyes experienced them. Natural contrast. Detail throughout the tonal range. No obvious processing artifacts. That’s the goal of manual exposure blending, and it’s absolutely achievable with the techniques you’ve learned in this guide.
Grab those bracketed shots you thought were unusable. Open Photoshop. Start blending. The results will surprise and delight you.