Getting your photos out of Lightroom and onto the right platform requires specific settings for each destination. Export with the wrong resolution or color space, and your carefully edited images might look blurry, washed out, or completely different from what you saw on screen. I have spent years testing Lightroom export settings across every major platform, and I have learned that small adjustments make a huge difference in final quality.
In this guide, I will walk you through exactly how to export photos from Lightroom for web, social media, and print. You will learn the specific pixel dimensions, resolution settings, color spaces, and sharpening options that work best for each scenario. By the end, you will have export presets ready for every situation.
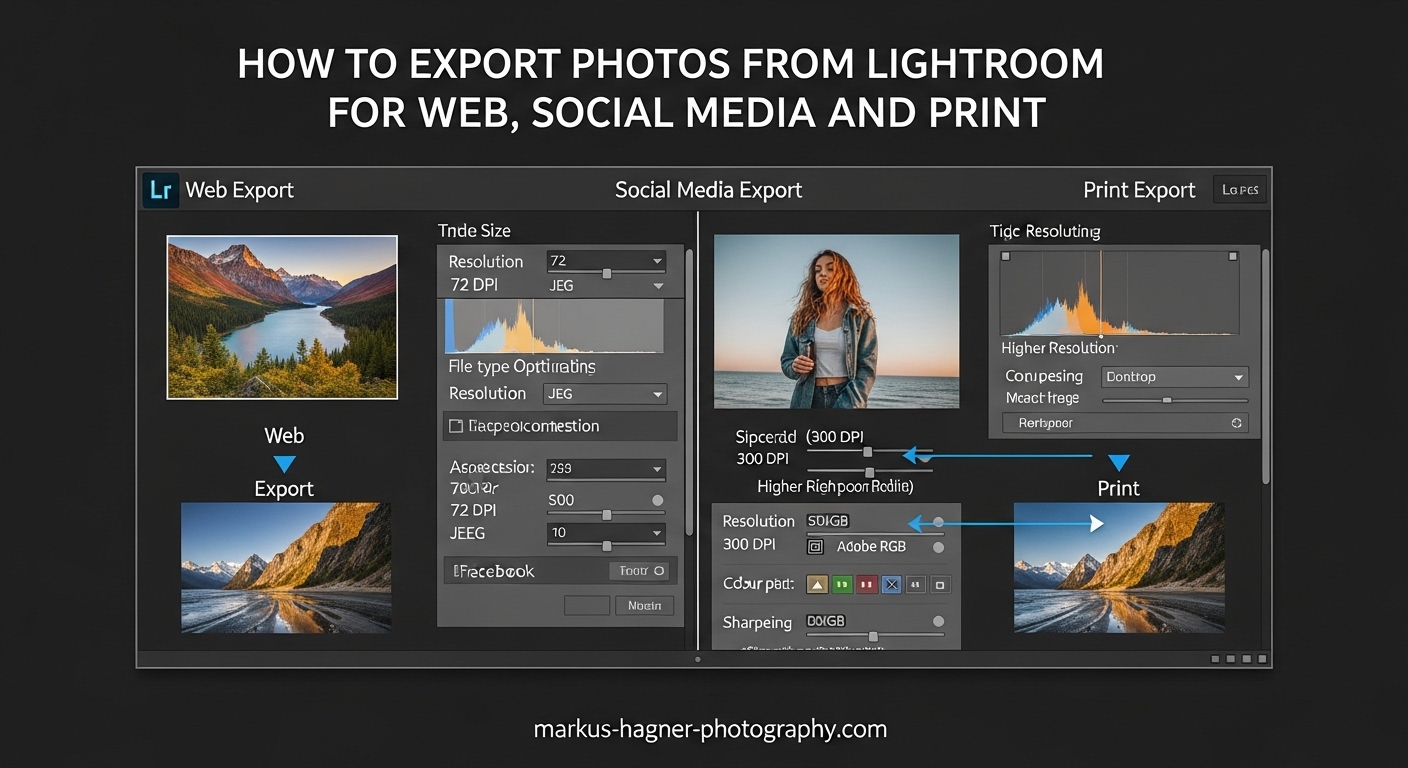
How to Export Photos from Lightroom: The Basics
The Lightroom export process creates new files from your edited photos with all your Develop module adjustments baked in. Your original RAW files stay untouched, which means you can export the same image multiple times with different settings for different purposes.
Accessing the Export Dialog
To start exporting, select one or more photos in the Library module. You can click on individual images or use Ctrl+A (Cmd+A on Mac) to select all photos in a folder or collection. Then open the Export dialog using any of these methods:
Method 1: Go to File > Export > Export in the menu bar.
Method 2: Right-click on a selected photo and choose Export > Export from the context menu.
Method 3: Press Ctrl+Shift+E (Cmd+Shift+E on Mac) for the keyboard shortcut.
Method 4: Click the Export button at the bottom left of the Library module.
The Export dialog opens with multiple panels on the right side. Each panel controls a different aspect of your export settings. Let me break down what each panel does.
Export Location Panel
This panel determines where your exported files end up. Choose “Same folder as original photo” to keep exports organized with your source files, or select “Choose” to specify a custom location. I recommend creating a dedicated “Exports” folder on your desktop for easy access.
Check “Put in subfolder” and name it descriptively like “Instagram Exports” or “Print Ready” to keep different export types separate. The “Add to This Catalog” option imports your exported files back into Lightroom, which I generally avoid to prevent catalog clutter.
File Naming Panel
Consistent file naming helps you stay organized. Choose “Filename” to keep original names, or select “Custom Name” from the dropdown to create a naming template. For client work, I use sequences like “ClientName_Session_001” so files sort correctly on any system.
The “Start Number” field lets you begin sequencing at any number. This is useful when adding new photos to an existing batch.
Quick Reference: Export Settings at a Glance
Before diving into detailed settings for each use case, here is a quick reference table showing the key differences between export scenarios:
| Use Case | Resolution | Dimensions | Color Space | Sharpening | Format |
|---|---|---|---|---|---|
| Instagram Feed | 72 ppi | 1080px short edge | sRGB | Screen – Standard | JPEG 85% |
| Instagram Stories | 72 ppi | 1080x1920px | sRGB | Screen – Standard | JPEG 85% |
| 72 ppi | 2048px long edge | sRGB | Screen – Standard | JPEG 85% | |
| Web/Portfolio | 72 ppi | 1500-2000px long edge | sRGB | Screen – Low | JPEG 80% |
| Print (Small) | 300 ppi | Full size | sRGB | Print – Glossy/Matte | JPEG 100% |
| Print (Large) | 300 ppi | Full size | Adobe RGB | Print – Matte | TIFF/JPEG 100% |
Understanding Lightroom Export File Settings
The File Settings panel controls your exported image format, color space, and quality. These choices directly impact file size, compatibility, and final image appearance.
File Format Options
JPEG: The most versatile format for sharing. Use JPEG for social media, web, and most print applications. It compresses file size while maintaining good quality at settings of 80-100%.
TIFF: Uncompressed or losslessly compressed format ideal for print labs that request maximum quality. Files are significantly larger but preserve every detail.
PSD: Photoshop’s native format. Choose this only if you plan to continue editing in Photoshop after export.
DNG: Digital Negative format for exporting RAW files. Use this when delivering editable files to clients or archiving original captures.
PNG: Supports transparency but creates larger files than JPEG. Use for graphics with transparent backgrounds or when compression artifacts are unacceptable.
For 95% of my exports, I use JPEG. The quality is excellent, compatibility is universal, and file sizes remain manageable.
Color Space Selection
Color space determines the range of colors your exported file can display. Lightroom offers three options:
sRGB: The safest choice for web and social media. All browsers and devices support sRGB, ensuring consistent colors everywhere. Use this for Instagram, Facebook, websites, and consumer print labs.
Adobe RGB: Wider color gamut than sRGB. Use for professional print labs that specifically request it, or when printing on wide-gamut printers. Images may look muted on non-color-managed displays.
ProPhoto RGB: The widest gamut, matching Lightroom’s internal color space. Only use this when delivering files to other professional editing applications. Never use for web or social media.
My rule: sRGB for everything unless a print lab specifically asks for Adobe RGB.
JPEG Quality Settings
The quality slider ranges from 0-100%. Here is what I recommend for different scenarios:
100%: Maximum quality, largest file size. Use for print or when quality is paramount.
85-90%: Excellent quality with smaller files. Perfect for social media and client proofs.
80%: Very good quality, optimized for web. Ideal for website images where load speed matters.
Below 70%: Visible compression artifacts start appearing. Avoid for photography.
Limit File Size To
This option caps your export file size, which is crucial for web optimization. For SEO-friendly website images, I limit files to 250KB-500KB. Lightroom automatically adjusts JPEG quality to hit your target size.
Lightroom Export Settings for Social Media
Social platforms compress your images after upload. The right export settings minimize quality loss while meeting platform requirements. Each platform has optimal dimensions that display without additional resizing.
Instagram Export Settings
Instagram displays images at 1080 pixels wide and applies aggressive compression. Exporting at the right size prevents Instagram from resizing your photos and adding its own compression artifacts.
Instagram Feed (Square):
Set “Resize to Fit” to “Short Edge” and enter 1080 pixels. Resolution should be 72 pixels per inch. Choose JPEG format at 85% quality with sRGB color space. Enable “Sharpen For: Screen” with “Standard” amount.
Instagram Feed (Portrait):
Use “Short Edge” at 1080 pixels with the same settings. Your image height will be 1350 pixels for the 4:5 aspect ratio that Instagram displays without cropping.
Instagram Feed (Landscape):
Set “Long Edge” to 1080 pixels. The height becomes 566 pixels for the 1.91:1 landscape ratio. Note that landscape images display smaller on mobile screens.
Instagram Stories:
Stories require 1080×1920 pixels (9:16 aspect ratio). Set width to 1080 and height to 1920 using the “Dimensions” resize option. This fills the entire screen without letterboxing.
After exporting, I transfer files to my phone using AirDrop on Mac or Google Drive on Windows. Never text photos to yourself, as messaging apps compress images heavily.
Facebook Export Settings
Facebook handles larger images better than Instagram. Export at 2048 pixels on the long edge to avoid Facebook’s compression while maintaining excellent quality.
Settings: Resize to “Long Edge” at 2048 pixels, 72 ppi resolution, JPEG format at 85% quality, sRGB color space, Sharpen For Screen at Standard amount.
Facebook’s compression kicks in around 2048 pixels. Exporting larger does not improve quality and may trigger heavier compression. Stick to 2048 for optimal results.
For cover photos, export at exactly 820×312 pixels. Facebook will not resize your image, ensuring the sharpest possible display.
Pinterest Export Settings
Pinterest favors vertical images that stand out in feeds. The optimal aspect ratio is 2:3, with 1000 pixels wide by 1500 pixels tall performing best.
Settings: Resize to “Width” at 1000 pixels (height becomes 1500 for 2:3 ratio), 72 ppi, JPEG at 85% quality, sRGB color space, Sharpen For Screen at Standard.
Pinterest does not compress as heavily as other platforms, so your images retain excellent quality when properly sized.
LinkedIn Export Settings
LinkedIn displays professional content, so image quality matters. The platform supports images up to 7680×4320 pixels, but 1200 pixels on the long edge works well for most posts.
Settings: Resize to “Long Edge” at 1200 pixels, 72 ppi, JPEG at 85% quality, sRGB color space, Sharpen For Screen at Standard.
For profile photos, export at exactly 400×400 pixels. Banner images should be 1584×396 pixels.
Twitter/X Export Settings
Twitter compresses images aggressively. Export at the maximum display size of 1200 pixels to minimize quality loss.
Settings: Resize to “Long Edge” at 1200 pixels, 72 ppi, JPEG at 85% quality, sRGB color space, Sharpen For Screen at Standard.
Twitter crops images to 16:9 in feeds. Keep important content centered or use that aspect ratio when exporting specifically for Twitter.
Transferring Exported Photos to Your Phone
Once you export photos from Lightroom, getting them to your phone for posting requires the right method to preserve quality.
Best Options:
AirDrop (Mac/iPhone): Fastest and maintains full quality. Right-click your exported file, select Share > AirDrop, and choose your device.
Google Drive or Dropbox: Upload from computer, then download on your phone. Quality remains intact.
Lightroom Mobile Sync: If you use Lightroom CC, sync your collection and export directly from the mobile app.
Avoid:
Email or text messaging compress images severely. Facebook Messenger and WhatsApp also apply heavy compression.
Lightroom Export Settings for Web and SEO
Website images need to balance quality with file size. Large files slow down your site, hurting both user experience and SEO rankings. Google recommends keeping images under 500KB when possible.
Optimal Web Export Settings
For portfolio websites, blogs, and online galleries, use these settings:
Resize to “Long Edge” at 1500-2000 pixels depending on your site layout. Resolution of 72 ppi is standard for web display. Choose JPEG format with “Limit File Size To” checked and set to 250KB-500KB.
Always use sRGB color space to ensure consistent colors across all browsers and devices. Enable Sharpen For Screen at Low amount to add subtle sharpening without overdoing it.
SEO-Friendly File Naming
Search engines read your file names. Use descriptive names that include relevant keywords.
Bad: IMG_2847.jpg or DSC_0093.jpg
Good: sunset-beach-photography-california.jpg or wedding-ceremony-venue-name.jpg
Use hyphens between words, keep names lowercase, and include location or subject information when relevant.
Metadata Considerations
Metadata adds file size but provides important information. For web exports, I recommend including copyright and contact information while removing camera settings.
In the Metadata panel, choose “Copyright and Contact Info Only” to protect your work without bloating file size. Remove location data if privacy is a concern.
Image Sizing for Websites
Match your export dimensions to your website’s display size. Exporting larger than needed wastes bandwidth and slows load times.
Check your theme’s maximum content width and export images at that width. Most modern themes use 1200-1600 pixel content widths. If your theme displays images at 800 pixels wide, exporting at 2000 pixels just wastes bandwidth.
For full-width hero images, export at 1920-2560 pixels wide to accommodate high-resolution displays.
Lightroom Export Settings for Print
Print requires higher resolution and different sharpening than screen display. Getting these settings right means the difference between a crisp print and a soft, disappointing result.
Resolution for Print
Print resolution is measured in pixels per inch (ppi). The standard for high-quality prints is 300 ppi.
Set resolution to 300 ppi for all prints up to 16×20 inches. For larger prints viewed from greater distances, 240-300 ppi works well. Never go below 180 ppi for prints.
Important: Increasing resolution in export does not add detail. If your original image is 3000×2000 pixels, exporting at 300 ppi gives you a 10×6.7 inch print. You cannot upsample to print larger without quality loss.
Print File Format and Quality
For most prints, JPEG at 100% quality produces excellent results. File sizes are manageable and quality is indistinguishable from TIFF for photographic content.
Use TIFF with no compression when your print lab specifically requests it, or when files will undergo additional processing before printing. TIFF files are significantly larger but preserve maximum quality.
Color Space for Print
Consumer print labs (Costco, Walmart, online services) expect sRGB files. Their printers are calibrated for sRGB input.
Professional print labs may request Adobe RGB for wider color gamut. Check your lab’s specifications before exporting.
Never send ProPhoto RGB files to a print lab unless they specifically request it. Colors will likely print incorrectly.
Output Sharpening for Print
Printing softens images slightly, so Lightroom offers print-specific sharpening to compensate. Choose “Sharpen For: Matte Paper” or “Glossy Paper” based on your print surface.
Matte Paper: Apply Standard or High sharpening. Matte papers absorb ink and benefit from more aggressive sharpening.
Glossy Paper: Apply Low or Standard sharpening. Glossy papers retain more sharpness and can look over-sharpened easily.
Canvas prints need High sharpening due to the textured surface.
Image Sizing for Specific Print Sizes
When exporting for specific print dimensions, check “Resize to Fit” and select “Width and Height” or “Dimensions” from the dropdown.
For an 8×10 print, set width to 10 inches and height to 8 inches at 300 ppi. This gives you 3000×2400 pixels, the exact resolution needed.
For uncropped prints, uncheck “Resize to Fit” and export at full resolution. Your print lab will handle sizing.
Print Lab Requirements
Different labs have specific requirements. Here are common specifications:
WHCC (White House Custom Colour): sRGB, JPEG at maximum quality, 300 ppi for prints up to 20×30.
Miller’s Professional Imaging: sRGB or Adobe RGB accepted, JPEG recommended, 300 ppi.
MPix: sRGB, JPEG, 300 ppi.
Costco Photo Center: sRGB only, JPEG, 300 ppi.
Always check your lab’s website for current specifications before exporting large batches.
Advanced Export Features and Workflows
Lightroom offers several features to speed up your export workflow and maintain consistency across projects.
Creating Export Presets
Instead of entering settings every time, save them as presets. After configuring all your export settings, click the “Add” button in the Presets panel on the left side of the Export dialog.
Name your preset descriptively like “Instagram Feed Portrait” or “Print Lab WHCC.” The preset saves all your settings including file format, sizing, sharpening, and metadata.
I have presets saved for every platform I use. This ensures consistency and saves time on every export.
Using Export with Previous
For quick exports using your last settings, select your photos and press Ctrl+Alt+Shift+E (Cmd+Option+Shift+E on Mac). This bypasses the Export dialog entirely and exports immediately using your previous settings.
This is incredibly useful when you just exported several images and need to export more with identical settings.
Multi-Batch Export
Lightroom Classic supports exporting the same images to multiple destinations simultaneously. Set up multiple export presets in the Export dialog, then check the boxes for each destination.
Use this to create Instagram, Facebook, and full-resolution exports in a single operation. The time savings add up quickly when processing large batches.
Watermarking During Export
Protect your work by adding watermarks during export. In the Watermarking panel, check “Watermark” and select a saved watermark or create a new one.
Simple watermarks with your name or logo in a corner are less intrusive than large center watermarks. Adjust opacity to 50-70% for visibility without overwhelming the image.
Metadata Settings
The Metadata panel controls what information travels with your exported files. Options include:
All Metadata: Includes camera settings, lens info, GPS data, keywords, and copyright. Useful for archival purposes.
Copyright and Contact Info Only: Protects your work without sharing technical details. Good for client delivery.
Remove All Metadata: Strips everything including copyright. Use only when specifically required.
For most exports, “Copyright and Contact Info Only” provides the right balance of protection and file size efficiency.
Common Export Problems and Solutions
Even with correct settings, export issues can arise. Here are solutions to the most common problems I encounter.
Exported Photos Look Blurry
Blurry exports usually result from incorrect sizing or missing output sharpening. Make sure you are exporting at appropriate dimensions for your target platform. Always enable output sharpening for your destination (Screen or Print).
If photos look sharp in Lightroom but soft after export, check that you are viewing exports at 100% magnification. Viewing at other magnifications can make sharp images appear soft.
Colors Look Different After Export
Color shifts typically come from color space mismatches. If your exported photos look different in a web browser, you probably exported in Adobe RGB or ProPhoto RGB instead of sRGB. Re-export using sRGB color space.
If colors look different in another application, that program may not be color-managed. Use sRGB for maximum compatibility.
File Size Too Large
Large files slow uploads and may exceed platform limits. Reduce JPEG quality to 80-85%, enable “Limit File Size To” with your target size, or reduce image dimensions. For web use, keeping files under 500KB is a good target.
Export Settings Not Saving
If your settings reset between exports, you are not using presets. Create and save presets for your common scenarios. Click “Add” in the Presets panel after configuring your settings.
Frequently Asked Questions
How do I export photos from Lightroom for social media?
Select your photos, press Ctrl+Shift+E (Cmd+Shift+E on Mac) to open Export. For Instagram, set short edge to 1080 pixels, 72 ppi, JPEG at 85% quality, sRGB color space, and Sharpen For Screen at Standard. For Facebook, use 2048 pixels long edge with the same settings. Always transfer files via AirDrop or cloud storage, not messaging apps.
How do I export photos from Lightroom for a website?
Export with long edge at 1500-2000 pixels (match your site’s content width), 72 ppi resolution, JPEG format with file size limited to 250-500KB. Use sRGB color space and Low screen sharpening. Name files descriptively with hyphens for SEO benefits.
How should I export photos from Lightroom for printing?
Export at 300 ppi resolution for prints up to 16×20 inches. Use JPEG at 100% quality or TIFF for maximum quality. Select sRGB color space for consumer labs, or Adobe RGB if your professional lab requests it. Enable Sharpen For Print with Matte or Glossy setting based on your paper choice.
What is the best image export for Web?
The best web export balances quality and file size. Use JPEG format at 80-85% quality, sRGB color space, 72 ppi resolution, and dimensions matching your website’s display size. Enable file size limiting to 250-500KB for optimal loading speed without visible quality loss.
How do I export photos from Lightroom without losing quality?
Export at full resolution without resizing, use JPEG at 100% quality or TIFF format, and keep the same color space as your editing. For maximum quality preservation, use 16-bit TIFF with no compression. Note that these settings create very large files unsuitable for web or social media.
Why do my exported photos look different than in Lightroom?
Color differences usually result from using Adobe RGB or ProPhoto RGB instead of sRGB. Web browsers and most applications assume sRGB, so other color spaces display incorrectly. Always export web and social media images in sRGB. For print, ensure your lab’s color space matches your export settings.
Conclusion
Learning how to export photos from Lightroom correctly transforms your workflow. With the right settings for each platform, your images will look their best whether displayed on Instagram, published on your website, or printed for clients.
The key takeaways: use 72 ppi and sRGB for everything digital, 300 ppi for print, and always enable output sharpening matched to your destination. Create presets for every scenario you use regularly, and you will never struggle with export settings again.
Start by saving three presets today: one for Instagram, one for web, and one for print. Future you will thank present you every time you export.