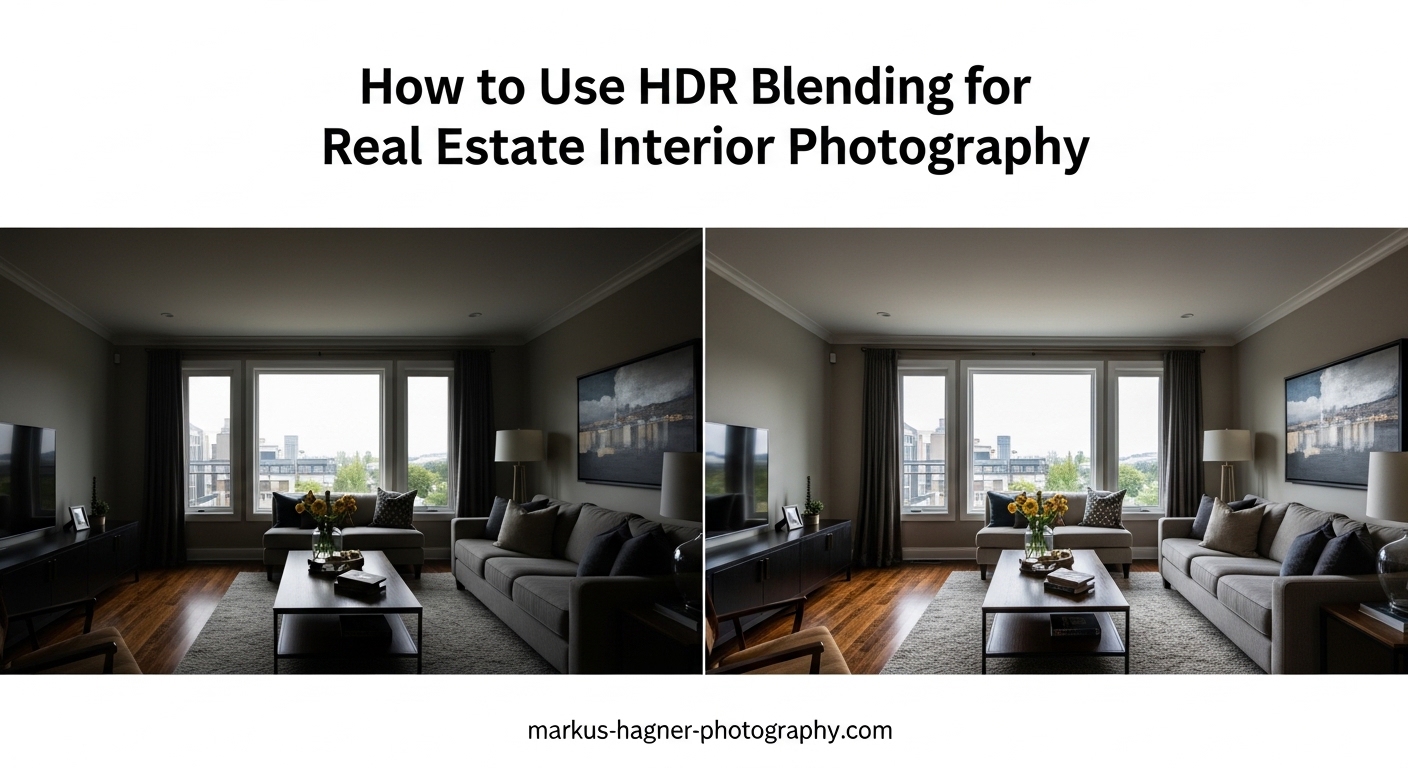
Walk into any beautifully staged home and your eyes instantly adjust to see both the warm interior lighting and the bright outdoor view through the windows. But point your camera at that same scene, and you get a frustrating choice: either the room looks perfect while the windows are blown-out white, or the window view is visible while the interior sits in shadow. This is the dynamic range challenge that makes real estate interior photography so tricky, and exactly why HDR blending has become an essential technique for property photographers in 2026.
In this guide, I will walk you through exactly how to use HDR blending for real estate interior photography, from the equipment you need to the camera settings that deliver consistent results. You will learn a complete shooting workflow, multiple editing approaches, and troubleshooting tips that address the real problems photographers face when trying to balance interior lighting with exterior window views.
Whether you are photographing your first property listing or looking to speed up your existing HDR workflow, this tutorial covers everything you need to capture professional-quality interior photos that show homes exactly as they appear in person.
What Is HDR Blending and Why Does It Matter for Real Estate?
HDR blending combines multiple photos of the same scene taken at different exposure levels into a single image with balanced lighting throughout. The technique captures details in both the brightest highlights (like sunny windows) and darkest shadows (like corners and hallways) that a single exposure simply cannot record.
Here is why this matters: the human eye perceives a dynamic range of roughly 20 stops of light. Most cameras capture only 10-14 stops in a single exposure. When you photograph a room with windows, you are asking the camera to record a scene that often exceeds 15 stops of brightness difference between the darkest interior corner and the brightest patch of sky outside.
HDR blending solves this by taking bracketed exposures, typically 3, 5, or 7 shots at different brightness levels, and merging them into one final image. The software selects the best-exposed portions from each frame, creating a photo that more closely matches what your eyes actually see when standing in the room.
The Dynamic Range Problem in Real Estate Interiors
Real estate photography faces a unique challenge that other photography genres rarely encounter. You are almost always shooting toward windows, which means bright exterior light competes with dimmer interior lighting. A single exposure forces you to choose between properly exposing the room (leaving windows as white rectangles) or exposing for the window view (making the interior look like a cave).
Neither option serves your client well. Potential buyers want to see the interior details AND understand what the view looks like from inside. MLS photos that show blown-out windows make properties feel smaller and less inviting, while dark interiors fail to showcase the actual living space.
HDR Blending vs Exposure Blending: What Is the Difference?
While often used interchangeably, these terms describe slightly different approaches. HDR blending typically refers to automated software merging that creates a 32-bit high dynamic range file, often with tone mapping applied. Exposure blending usually means manually or semi-automatically combining exposures to produce a natural-looking 16-bit or 8-bit result without the sometimes artificial HDR appearance.
For real estate work, exposure blending through tools like Enfuse or Lightroom HDR merge tends to produce more natural results that avoid the oversaturated, cartoon-like look associated with stereotypical HDR photography. Most professional real estate photographers prefer natural-looking results that accurately represent the property rather than dramatic artistic effects.
Equipment You Need for HDR Real Estate Photography
The good news is that HDR real estate photography does not require expensive specialized gear. However, having the right equipment makes the process significantly easier and more consistent. Here is what I recommend based on years of property photography work.
Camera Requirements
Any modern DSLR or mirrorless camera with manual exposure controls and Auto Exposure Bracketing (AEB) will work for HDR real estate photography. The AEB feature is essential because it lets you capture multiple exposures with a single shutter press, ensuring all frames align perfectly.
Look for a camera that supports at least 3-shot AEB with 2 EV spacing, though 5 or 7 shot bracketing gives you more flexibility for challenging lighting. Most cameras from Canon, Nikon, Sony, Fujifilm, and Panasonic manufactured in the past decade include these capabilities.
Full-frame sensors generally handle noise better at higher ISOs and provide wider angle options, but crop-sensor cameras work perfectly fine for real estate HDR work. The key is shooting in RAW format to preserve maximum dynamic range and editing flexibility.
Tripod: Non-Negotiable for HDR Work
A sturdy tripod is absolutely essential for HDR photography. Because you are merging multiple exposures, any camera movement between frames will cause alignment problems, ghosting, and blurry results. Even the steadiest hands cannot hold a camera perfectly still for 3-7 consecutive shots.
For real estate work, I recommend a tripod that reaches at least 6 feet tall without extending the center column. You will often shoot from elevated positions to capture more floor space and avoid shooting directly into furniture. A ball head with independent panning control makes composing interior shots much faster.
Carbon fiber tripods reduce weight for transporting through multi-story properties, but aluminum models offer similar stability at lower cost. Either works well as long as the tripod feels solid with your camera mounted.
Wide-Angle Lens for Interior Spaces
Real estate interiors demand wide-angle lenses to capture entire rooms in single frames. For full-frame cameras, 16-35mm or 17-40mm zoom lenses provide excellent coverage. Crop-sensor shooters should look for 10-20mm or 10-24mm equivalents.
Avoid going wider than 14mm full-frame equivalent unless absolutely necessary. Ultra-wide focal lengths distort room proportions and make spaces feel unnatural. The goal is representing the property accurately, not creating dramatic perspectives that mislead potential buyers.
Prime lenses often offer sharper results and less distortion than zooms, but zoom lenses provide the flexibility to quickly adjust composition as you move through a property. Both approaches work well for HDR real estate photography.
Helpful Accessories
A remote shutter release or cable release eliminates any camera shake from pressing the shutter button. Many cameras allow smartphone apps or built-in intervalometers for hands-free shooting. These tools are inexpensive but make a noticeable difference in sharpness.
A bubble level that mounts to the camera hot shoe helps keep vertical lines straight. Tilted walls and leaning doorframes scream amateur photography and require correction in editing. Getting the camera level during shooting saves significant post-processing time.
Some photographers use circular polarizing filters to reduce window reflections and enhance sky detail in exterior views. These work well for specific situations but add another variable to manage. Start without filters and add them once you are comfortable with the basic HDR workflow.
Camera Setup and Settings for HDR Real Estate Photography
Consistent camera settings are the foundation of reliable HDR results. When every shot uses the same exposure decisions, your editing workflow becomes faster and more predictable. Here are the settings I use for virtually all interior HDR work.
ISO: Keep It Low
Set your ISO to the lowest native value for your camera, typically ISO 100 or ISO 200. Higher ISO values introduce noise that becomes visible in shadow areas when you boost exposure during editing. Since you are already capturing multiple exposures to handle dynamic range, there is no reason to raise ISO.
Some cameras have extended low ISO settings like ISO 50 or ISO 64. These can reduce dynamic range slightly, so stick with the native base ISO for best results. If you need a slower shutter speed, use a narrower aperture rather than higher ISO.
Aperture: Sweet Spot for Sharpness
For real estate interiors, aperture settings between f/8 and f/11 provide the best balance of depth of field and lens sharpness. This range keeps both foreground furniture and background walls in acceptable focus while avoiding the softness that occurs at very small apertures like f/16 or f/22.
Wide-angle lenses typically perform best around f/8. Test your specific lens at different apertures to find its sweet spot. Consistency matters more than perfection here. Choose one aperture setting and use it for all interior shots to simplify your workflow.
White Balance: Manual Control
Auto white balance produces inconsistent results as you pan around a room with different light sources. Mixed lighting from windows, overhead fixtures, and lamps creates color temperature variations that look unprofessional in a photo series.
Set white balance manually based on the primary light source. For rooms with significant window light, try Daylight (5500K) or Cloudy (6500K). For interiors lit primarily by artificial lights, match the bulb type (Tungsten around 3200K, Fluorescent around 4000K). You can fine-tune during editing if you shoot RAW, but starting with consistent in-camera white balance speeds up processing.
Shoot in RAW Format
RAW files capture significantly more dynamic range and color information than JPEGs. For HDR photography, this extra data is invaluable during editing. RAW files allow you to recover highlight details, adjust white balance, and reduce noise without degrading image quality.
Set your camera to capture RAW files, or RAW+JPEG if you need quick preview versions. The larger file sizes are worth the editing flexibility, especially when bracketing means you will be storing 3-7 files per final image.
Configuring Auto Exposure Bracketing (AEB)
AEB automatically captures multiple exposures at different brightness levels with each shutter press. For most real estate interiors, 5 exposures at 1 EV or 2 EV intervals provide sufficient coverage to handle bright windows and shadowy corners.
Start with these AEB settings for real estate HDR:
– 3 exposures at +2, 0, -2 EV for average contrast scenes
– 5 exposures at +2, +1, 0, -1, -2 EV for high contrast (bright windows)
– 7 exposures at +3, +2, +1, 0, -1, -2, -3 EV for extreme contrast situations
Set your camera to continuous shooting mode so all bracketed frames capture with a single shutter hold. Combine this with a remote release or self-timer to eliminate any camera movement during the sequence.
Exposure Mode: Manual or Aperture Priority
Manual mode gives you complete control and ensures consistent exposures across similar scenes. Set aperture, shutter speed, and ISO based on your metering, then lock these in for the entire room.
Aperture Priority mode with AEB also works well. The camera adjusts shutter speed for each bracketed frame while maintaining your chosen aperture. This approach adapts automatically as you move between rooms with different lighting levels.
Whichever mode you choose, the middle exposure should capture the interior correctly. The darker exposures will preserve window highlights, while brighter exposures will reveal shadow details.
How to Shoot HDR Bracketed Photos for Real Estate Interiors?
Now that your camera is configured, here is the exact workflow I use when photographing real estate interiors with HDR blending.
Step 1: Assess the Room and Choose Your Composition
Before setting up your tripod, walk through the room and identify the key features that need to appear in your shot. Look for the primary selling points: fireplaces, built-in shelving, interesting architectural details, or connections to other spaces.
Choose camera positions that showcase these features while minimizing distractions. Avoid shooting directly into bathroom mirrors or capturing your own reflection in windows. Plan 2-4 angles per room to provide comprehensive coverage without redundancy.
Step 2: Set Up Your Tripod and Level the Camera
Position your tripod on a stable surface, not on thick carpet that might shift during shooting. Extend legs fully before raising the center column for maximum stability. Height around chest level typically works well, though elevating slightly higher helps capture more floor space.
Use your bubble level or camera’s electronic level to ensure the camera is perfectly horizontal. Vertical lines should appear straight, not converging toward the ceiling. This attention to detail separates professional real estate photos from amateur snapshots.
Step 3: Meter the Scene for Your Base Exposure
Switch to spot metering and take readings from middle-toned areas of the room, such as furniture, walls, or flooring. Avoid metering directly from windows or deep shadows. Your goal is finding an exposure that captures the interior correctly.
Check your histogram after taking a test shot. The middle exposure should show most data clustered in the middle of the graph, with some room on either side for the bracketed exposures to capture. If the histogram is heavily pushed to either edge, adjust your base exposure before enabling AEB.
Step 4: Configure and Shoot Your Bracketed Sequence
Enable your AEB settings and switch to continuous shooting mode. Frame your composition, ensure the camera is stable, then trigger the shutter. Hold steady until all bracketed frames have captured. With 5 exposures, this typically takes 1-2 seconds.
Review your images on the LCD, zooming in to check that the darkest exposure shows detail in window areas while the brightest exposure reveals shadow information. If either end is clipped, adjust your bracketing range or base exposure and reshoot.
Step 5: Move to Your Next Angle and Repeat
For efficiency, capture all angles from one tripod position before moving. Once you have shot your planned compositions from position one, relocate the tripod and repeat the process. Working systematically through a property keeps you organized and ensures complete coverage.
Most standard residential properties require 15-30 final HDR images. Plan your angles to tell the story of the home, moving from exterior to entry, living spaces, kitchen, bedrooms, and bathrooms. Include wide establishing shots and tighter detail shots of special features.
Indoor vs Outdoor Considerations
Interior HDR work focuses on balancing window brightness with room illumination. Exterior HDR shots face a different challenge: capturing sky detail while maintaining proper exposure for the building and landscaping.
For exteriors, 3 exposures at 2 EV spacing usually suffice since the dynamic range between sky and ground is less extreme than interior window situations. Shoot exteriors during the golden hour when possible, or on overcast days when the sky is naturally less bright.
Twilight shots present unique opportunities for real estate HDR. The warm interior lights contrasting with cool blue evening sky create dramatic but natural-looking images. Use longer shutter speeds and higher bracket counts to capture the full tonal range of these scenes.
HDR Editing Workflow: How to Merge and Process Your Photos
After capturing your bracketed exposures, the editing phase combines them into polished final images. Several software options exist, each with different strengths for real estate HDR work.
HDR Software Options for Real Estate
Lightroom Classic includes built-in HDR merge that produces natural results with minimal effort. The workflow integrates seamlessly with the rest of Lightroom’s editing tools, making it ideal for photographers who already use Lightroom for cataloging and basic adjustments.
Photomatix Pro has been the industry standard for HDR processing for over 15 years. It offers extensive control over tone mapping and exposure blending, with specific presets designed for real estate photography. Many professional real estate photographers consider Photomatix essential for its consistency and natural-looking output.
Photoshop’s HDR Pro feature provides robust merging capabilities with 32-bit output options. The results integrate well with Photoshop’s extensive editing tools for detailed retouching and compositing work.
Enfuse, available as a Lightroom plugin or standalone tool, specializes in exposure blending rather than tone-mapped HDR. It produces extremely natural results that avoid the artificial HDR look. Many real estate photographers prefer Enfuse for its straightforward approach.
Aurora HDR and Luminar Neo offer AI-assisted HDR processing with one-click enhancement options. These modern tools have gained popularity in 2026 for their speed, though they may require more manual adjustment to achieve natural real estate results compared to dedicated exposure blending software.
Lightroom HDR Merge Workflow
Select your bracketed exposures in Lightroom, then choose Photo > Photo Merge > HDR. Lightroom analyzes the images and presents preview options including Auto Align, Auto Settings, and Deghosting. Enable Auto Align even if you used a tripod, as slight movements can occur.
Deghosting handles any moving elements between frames, such as ceiling fans, people, or swaying plants. Medium deghosting works well for most real estate scenes. Preview the result to ensure no artifacts remain.
Lightroom creates a DNG file containing the merged HDR data. Apply your standard real estate preset or manually adjust exposure, highlights, shadows, whites, and blacks to achieve a balanced look. Most interiors benefit from slight highlight reduction and shadow lifting.
Photomatix Pro Process
Export your bracketed RAW files to Photomatix or use the Lightroom plugin. Select Exposure Blending for natural results rather than Tone Mapping for artistic effects. Photomatix offers several blending methods: Highlights and Shadows, Automatic, or Intensive.
For real estate work, the Highlights and Shadows method typically produces the most natural window rendering. Adjust the blending strength to control how dramatically the exposures combine. Keep adjustments subtle to avoid the oversaturated HDR look that buyers find off-putting.
Photomatix includes color correction tools specifically designed for mixed lighting situations common in real estate. Use these to neutralize color casts from different light sources before finalizing your image.
Achieving Natural-Looking Results
The most common mistake in HDR real estate photography is over-processing. Resist the temptation to boost saturation, clarity, and contrast dramatically. The goal is accurate property representation, not dramatic artistic interpretation.
Watch for these warning signs of over-processed HDR:
– Oversaturated colors, especially blues in window views
– Halos around windows and architectural edges
– Unnatural color shifts in shadow areas
– Excessive local contrast that looks gritty
– Interior brightness that exceeds what the eye perceives
Compare your processed image to what you remember seeing in person. If the result looks dramatically different, reduce your adjustments until the photo matches reality.
Handling Window Views
Window views remain the biggest challenge in HDR real estate photography. Even with 5 or 7 exposures, extremely bright exteriors may not capture with full detail. Several techniques address this problem.
For moderate window brightness, standard HDR blending captures adequate exterior detail. Expose your darkest bracket specifically for the window view, then let the software blend it with properly exposed interior frames.
For extremely bright windows, consider the flambient technique, which combines flash-lit exposures with ambient brackets. The flash exposure provides interior illumination independent of window brightness, giving you more control over the final balance.
Hand-blending window pulls offers precise control for critical shots. This technique involves manually masking window areas from darker exposures into your final image using Photoshop layers. While time-consuming, it produces the most accurate window rendering for challenging situations.
Batch Processing for Efficiency
Real estate photographers often deliver 20-50 images per property, making efficiency essential. Both Lightroom and Photomatix support batch processing that applies consistent settings across multiple HDR merges.
Create a preset or template based on your best results, then apply it to similar scenes. Living rooms, kitchens, and bedrooms typically require similar processing, so batch applying your adjustments saves significant editing time.
Review batch-processed images for anomalies before delivery. Each property presents unique lighting challenges that may require individual attention despite your best automation efforts.
Common HDR Problems and How to Fix Them
Even with proper technique, HDR real estate photography presents challenges. Here are solutions to the most common problems photographers encounter.
HDR Results Are Too Dark
If your merged HDR images consistently appear dark, your base exposure is probably set too low. The middle exposure in your bracket should correctly expose the interior at approximately the brightness your eye perceives. Adjust your metering technique to prioritize mid-tones in the room rather than averaging the entire scene including bright windows.
In editing, the issue often stems from insufficient shadow lifting. Increase the shadows and blacks sliders while monitoring for noise introduction. If noise appears, your base exposure needs adjustment rather than aggressive shadow recovery.
Ghosting and Alignment Issues
Ghosting occurs when objects move between bracketed frames or when the camera shifts slightly. Most HDR software includes deghosting tools that analyze frames and select pixels from single exposures for moving areas.
Prevent ghosting by ensuring tripod stability, using remote shutter releases, and shooting quickly to minimize time between frames. Turn off ceiling fans before shooting interiors. For exteriors, avoid bracketing on windy days when trees and plants move significantly.
Color Casts from Mixed Lighting
Real estate interiors often combine daylight from windows with tungsten, LED, or fluorescent artificial lighting. This creates color temperature differences that appear as orange, blue, or green tints in different image areas.
Address color casts during shooting by turning off unnecessary artificial lights when window light dominates. In editing, use local color correction tools to neutralize specific areas. Some HDR software includes automatic color detection that identifies and corrects mixed lighting situations.
Inconsistency Across a Property Shoot
Varying results between rooms make photo sets look unprofessional. Establish a consistent workflow for exposure settings, white balance choices, and editing adjustments. Use the same HDR merge settings for similar scenes throughout a property.
Review your images as a set before delivery. Adjust any outliers to match the overall tone and brightness of the collection. Consistent results build client trust and create more effective property marketing.
Frequently Asked Questions About HDR Real Estate Photography
What is HDR blending in real estate photography?
HDR blending is a technique that combines multiple photos of the same interior scene taken at different exposure levels into a single image. This process captures details in both bright highlights (like windows) and dark shadows (like corners) that a single exposure cannot record, resulting in photos that more accurately represent what the human eye sees when viewing a property in person.
How many exposures do you need for HDR real estate photography?
Most real estate interiors require 3 to 5 exposures for effective HDR blending. Use 3 exposures at +2, 0, and -2 EV for average contrast scenes, or 5 exposures at +2, +1, 0, -1, and -2 EV for high-contrast situations with bright windows. Extreme contrast may require 7 exposures, though this is rarely necessary for typical residential properties.
What is the best HDR software for real estate photography?
Photomatix Pro is widely considered the best dedicated HDR software for real estate due to its natural exposure blending results and real estate-specific presets. Lightroom Classic offers excellent built-in HDR merge that integrates well with existing workflows. Enfuse produces extremely natural results preferred by many professionals. The best choice depends on your workflow preferences and desired level of control.
What camera settings are best for real estate HDR photography?
Set ISO to 100 or 200 (lowest native value), aperture between f/8 and f/11 for optimal sharpness and depth of field, and shoot in RAW format. Use manual white balance matched to your primary light source. Enable Auto Exposure Bracketing (AEB) for 3-5 exposures at 1-2 EV intervals. Always use a tripod and remote shutter release to eliminate camera movement between frames.
How to get window views to show in HDR real estate photos?
Capture dark bracketed exposures specifically for window detail, typically 2-3 EV below your base exposure. Ensure your HDR merge includes these darker frames so the software can select properly exposed window areas. For extremely bright windows, consider the flambient technique combining flash with ambient brackets, or hand-blend window pulls using Photoshop layers for precise control over exterior visibility.
What is the difference between HDR and exposure blending?
HDR typically refers to automated software merging that creates a 32-bit high dynamic range file with tone mapping applied, which can produce dramatic artistic effects. Exposure blending combines exposures to create natural-looking 16-bit or 8-bit results without tone mapping artifacts. For real estate photography, exposure blending through tools like Enfuse or Lightroom HDR merge generally produces more natural, accurate property representations.
Conclusion
HDR blending transforms real estate interior photography by solving the fundamental challenge of capturing bright windows and properly exposed interiors in the same frame. With the right equipment, consistent camera settings, and a systematic shooting workflow, you can produce professional-quality property photos that accurately represent homes to potential buyers.
The key to success lies in restraint during editing. Natural-looking results that match what the eye sees in person will always serve your clients better than dramatic HDR effects. Start with 5 exposures at 2 EV spacing, merge using Lightroom or Photomatix with subtle adjustments, and refine your technique based on the results you achieve.
Practice this workflow on your own home or willing friends’ properties before taking on paid assignments. Each property presents unique lighting challenges, but the fundamentals of how to use HDR blending for real estate interior photography remain consistent. Master these techniques and you will deliver images that help properties sell faster while building your reputation for quality work in 2026.