Slow-motion video has an undeniable visual magic. When done right, it reveals moments your eyes would otherwise miss—the perfect splash of water, the graceful arc of an athlete’s leap, or the delicate flutter of a hummingbird’s wings. I’ve spent years shooting everything from extreme sports to nature documentaries, and I’ve learned that great slow motion isn’t just about cranking up your frame rate. It’s about understanding the delicate balance between frame rate, shutter speed, and lighting.
In this guide, I’ll walk you through exactly how to shoot slow-motion video and what frame rate to use for different situations. Whether you’re using a professional cinema camera or the smartphone in your pocket, I’ll share the techniques that separate amateurish footage from truly captivating slow motion. By the end, you’ll know how to calculate slow-motion percentages, avoid common pitfalls, and create footage that looks smooth and professional.
What is Slow Motion and How Does It Work?
Slow motion is a filmmaking technique that makes action appear to move more slowly than real time. It works by recording at a higher frame rate than your playback frame rate, then playing those extra frames back at normal speed. This simple principle—called overcranking—creates the illusion of slowed movement.
Here’s how it works: if you record at 120 frames per second (fps) but play back at 30 fps, you’re showing four times as many frames per second. This stretches time, making the action play at 25% of its original speed. The higher your recording frame rate compared to your timeline frame rate, the more dramatic the slow-motion effect.
The technique has been around since silent film days but has become accessible to everyone with modern cameras and smartphones. Understanding the technical foundation helps you make better creative decisions when shooting slow motion.
Frame Rates Explained: What You Need to Know
Frame rate determines how many individual images your camera captures each second. Standard playback frame rates include 24 fps (cinematic), 30 fps (broadcast standard), and 60 fps (smooth TV-like motion). For slow motion, you need to shoot at much higher rates.
Here’s a breakdown of common slow-motion frame rates and their effects:
60 fps: This gives you 2x slow motion when played back at 30 fps (50% speed). It’s perfect for smooth motion and subtle slow-motion effects in sports or action footage.
120 fps: At 4x slow motion (25% speed when played at 30 fps), 120 fps is my go-to for most slow-motion work. It captures moderate action beautifully—think skateboard tricks, product drops, or dramatic reveals.
240 fps: Delivering 8x slow motion (12.5% speed), 240 fps creates stunning extreme slow motion. Use this for water droplets, explosions, or capturing details in fast-moving subjects.
480 fps and 960 fps: These ultra-high frame rates provide super slow motion for scientific observation or artistic effect. Most smartphones and action cameras offer these modes, though often at reduced resolution.
You’ll notice a trade-off between frame rate and resolution. Many cameras can shoot 4K at 60 fps but drop to 1080p at 120 fps or higher. Some even limited to 720p at extreme frame rates. Always check your camera’s specifications before planning your shoot.
What Frame Rate to Use for Slow Motion
Choosing the right frame rate depends on your subject, lighting conditions, and creative goals. Here’s my practical advice based on real-world shooting experience.
For general use, I recommend 120 fps as your starting point. It provides enough slow-motion effect for most situations while maintaining good image quality and requiring reasonable lighting. If your camera offers 4K at 60 fps but only 1080p at 120 fps, consider whether resolution or slow-motion intensity matters more for your project.
Different subjects require different approaches. Use 60 fps for everyday action that needs subtle smoothing. Move to 120 fps for dramatic action scenes, product videos, and nature footage. When you need to show incredible detail—water splashes, breaking glass, fast-moving wildlife—240 fps or higher becomes essential.
The relationship between motion blur and realistic appearance plays a crucial role. Higher frame rates with proper shutter speeds create natural-looking motion blur. If your footage looks choppy or stuttery, you’re likely using the wrong shutter speed or frame rate for your subject.
The 180-Degree Shutter Rule for Slow Motion
The 180-degree shutter rule states that your shutter speed should be double your frame rate. If you shoot at 120 fps, set your shutter speed to 1/240th of a second. This creates the natural motion blur we see with our eyes.
Shutter speed determines how long each frame is exposed to light. Faster shutter speeds reduce motion blur but can make movement look stuttery or unnatural. Slower shutter speeds increase blur and make motion look smoother, but too much blur looks muddy.
At high frame rates like 120 fps or 240 fps, maintaining the 180-degree rule becomes challenging. Your shutter speed at 240 fps would be 1/480th of a second—extremely fast. This means you need lots of light, or you’ll have to raise your ISO high enough to introduce noise.
Sometimes you’ll need to break this rule. In low light, you might use a slower shutter speed than double your frame rate. This adds more motion blur but prevents noisy, grainy footage. The key is understanding when to stick to the rule and when to bend it based on your shooting conditions.
How to Calculate Slow-Motion Percentage
Calculating how slow your footage will appear is straightforward. Divide your recording frame rate by your timeline frame rate. The result tells you how many times slower than real time your footage will play.
The formula is simple: Recording FPS ÷ Timeline FPS = Slow-motion multiplier
For example, shooting 120 fps and editing in a 24 fps timeline gives you: 120 ÷ 24 = 5x slow motion, or 20% of real-time speed. Here are common calculations:
60 fps → 30 fps timeline = 2x slow motion (50% speed)
120 fps → 30 fps timeline = 4x slow motion (25% speed)
120 fps → 24 fps timeline = 5x slow motion (20% speed)
240 fps → 30 fps timeline = 8x slow motion (12.5% speed)
240 fps → 24 fps timeline = 10x slow motion (10% speed)
When planning your shoot, think in reverse. If you want your footage to play at 25% speed in a 30 fps timeline, you need to shoot at 120 fps. This calculation helps you choose the right frame rate before you start filming.
Step-by-Step: How to Shoot Slow Motion Video
Here’s my proven workflow for shooting professional-quality slow-motion footage:
Step 1: Choose Your Frame Rate
Start by deciding how slow you want your final footage to appear. For moderate slow motion, use 120 fps. For extreme slow motion, bump up to 240 fps or higher. Remember the resolution trade-offs at higher frame rates.
Step 2: Set Your Shutter Speed
Apply the 180-degree shutter rule. For 120 fps, set your shutter to 1/240th of a second. For 240 fps, use 1/480th of a second. This creates natural motion blur. If your camera shows shutter angle instead of speed, set it to 180 degrees.
Step 3: Adjust Aperture and ISO for Proper Exposure
With your fast shutter speed, you might notice your footage looks dark. Open your aperture wider (lower f-number) to let in more light. If that’s not enough, increase your ISO, but be careful—high ISO introduces noise and grain.
Step 4: Add Lighting if Needed
High frame rates combined with fast shutter speeds need lots of light. If you’re shooting indoors or in low light, add artificial lighting. LED panels work great—they’re bright, adjustable, and don’t get hot like traditional lights.
Step 5: Use Stabilization
Slow motion amplifies camera shake. Use a tripod for static shots or a gimbal for moving shots. Handheld slow motion often looks jittery and unprofessional. A good stabilization system is worth the investment.
Step 6: Record Your Footage
Start recording before your action begins and continue for a few seconds after it ends. This gives you editing flexibility. Watch your camera’s temperature—some cameras overheat when recording high frame rates for extended periods.
Step 7: Import to Editing Software
Import your footage into your editing program. Most professional software like Adobe Premiere Pro, Final Cut Pro, or DaVinci Resolve will automatically interpret your high frame rate footage correctly.
Camera Settings and Technical Considerations
Getting great slow-motion footage requires attention to several technical details beyond frame rate.
Shutter speed recommendations vary by frame rate. At 60 fps, use 1/120th of a second. At 120 fps, dial in 1/240th of a second. For 240 fps, you’ll need 1/480th of a second. These speeds create proper motion blur but demand plenty of light.
ISO and aperture work together to achieve correct exposure. Open your aperture as wide as possible (lowest f-number) while maintaining your desired depth of field. Then adjust ISO to brighten the image if needed. Modern cameras handle ISO 1600-3200 well, but older models may show significant noise above ISO 800.
Lighting becomes critical at high frame rates. Fast shutter speeds mean each frame gets less light exposure. You might need two to four times more light than normal video recording. Position lights close to your subject or use high-output LED panels to maintain proper exposure without pushing ISO too high.
Stabilization needs increase dramatically with slow motion. A small camera shake that goes unnoticed at normal speed becomes a major distraction in slow motion. Invest in a quality tripod or gimbal system.
Storage considerations matter too. High frame rate footage creates larger files. A minute of 4K 60 fps video might use 1GB, while the same duration at 120 fps could use 2GB. Bring extra memory cards and plan for longer transfer times during post-production.
Editing Slow-Motion Footage
Editing slow-motion footage gives you several techniques to control playback speed and smoothness.
Reinterpreting footage is the simplest method. Right-click your clip in Premiere Pro or Final Cut Pro and select “Modify” or “Interpret Footage.” Set the frame rate to match your timeline (usually 24 or 30 fps). Your clip will play back in slow motion based on the frame rate difference.
Speed ramps let you create gradual slow-motion effects. Start at normal speed, then smoothly ramp down to slow motion before ramping back up. This technique works especially well for action sequences or product reveals.
Optical flow and frame blending help smooth out playback when you need even slower motion than your frame rate provides. These interpolation methods analyze frame-to-frame motion and create intermediate frames, effectively increasing your frame rate digitally.
Frame blending combines information from adjacent frames to reduce stutter. When enabled in your editing software, it helps mask the gaps between frames for smoother slow motion, especially when you’ve pushed your footage past its natural limits.
Timeline frame rate matters for final output. Most projects use 24 fps for cinematic look or 30 fps for broadcast/streaming standard. Set this before you start editing so all your slow-motion calculations work correctly.
Tips for Smooth Slow-Motion Footage
Creating smooth, professional-looking slow motion requires attention to detail and avoiding common pitfalls.
Use proper shutter speed according to the 180-degree rule. This creates natural motion blur that looks realistic to viewers. Faster shutter speeds reduce blur but can make motion look stuttery and unnatural.
Ensure adequate lighting before you start shooting. High frame rates with fast shutter speeds need significantly more light than standard video. Test your setup before critical shots.
Stabilize your camera properly. Slow motion exaggerates camera movement, making handheld footage look shaky and unprofessional. Use a tripod for static shots or a quality gimbal for moving shots.
Choose appropriate frame rates for your subject. 60 fps works for subtle smoothing, 120 fps for most action, and 240 fps+ for extreme slow motion. Using too high a frame rate for your subject wastes storage and can look unnatural.
Common Slow-Motion Mistakes and How to Avoid Them
Avoid these frequent errors that plague beginner slow-motion videographers:
Too-high shutter speed creates unnatural motion with no blur. While sharp, this looks fake and jarring. Stick to the 180-degree shutter rule unless you have specific creative reasons to deviate.
Insufficient light forces high ISO settings that introduce noise and grain. Your footage looks digital and unprofessional. Add lighting or use a camera with better low-light performance.
Not accounting for storage needs leaves you without enough card space for your shoot. High frame rate footage eats storage quickly. Bring extra cards and clear them between shots.
Ignoring audio sync causes problems when slowing down footage. Audio recorded at normal speed won’t sync with slowed video. Plan to add music or sound effects in post-production rather than relying on recorded audio.
Shooting without stabilization generates unusable footage. The camera shake that looks minor at normal speed becomes extreme in slow motion. Always stabilize your shots.
Slow-Motion Use Cases and Recommended Frame Rates
Different subjects and situations call for different frame rates. Here’s what I’ve learned works best:
60 fps: Perfect for smoothing normal action and subtle slow-motion effects. Use for sports footage where you want slight slowdown during key moments, or for making handheld footage look more stable and professional.
120 fps: My workhorse frame rate for most slow-motion projects. Ideal for action sports, product videos, nature footage, and dramatic reveals. It provides noticeable slow motion while maintaining good image quality and manageable file sizes.
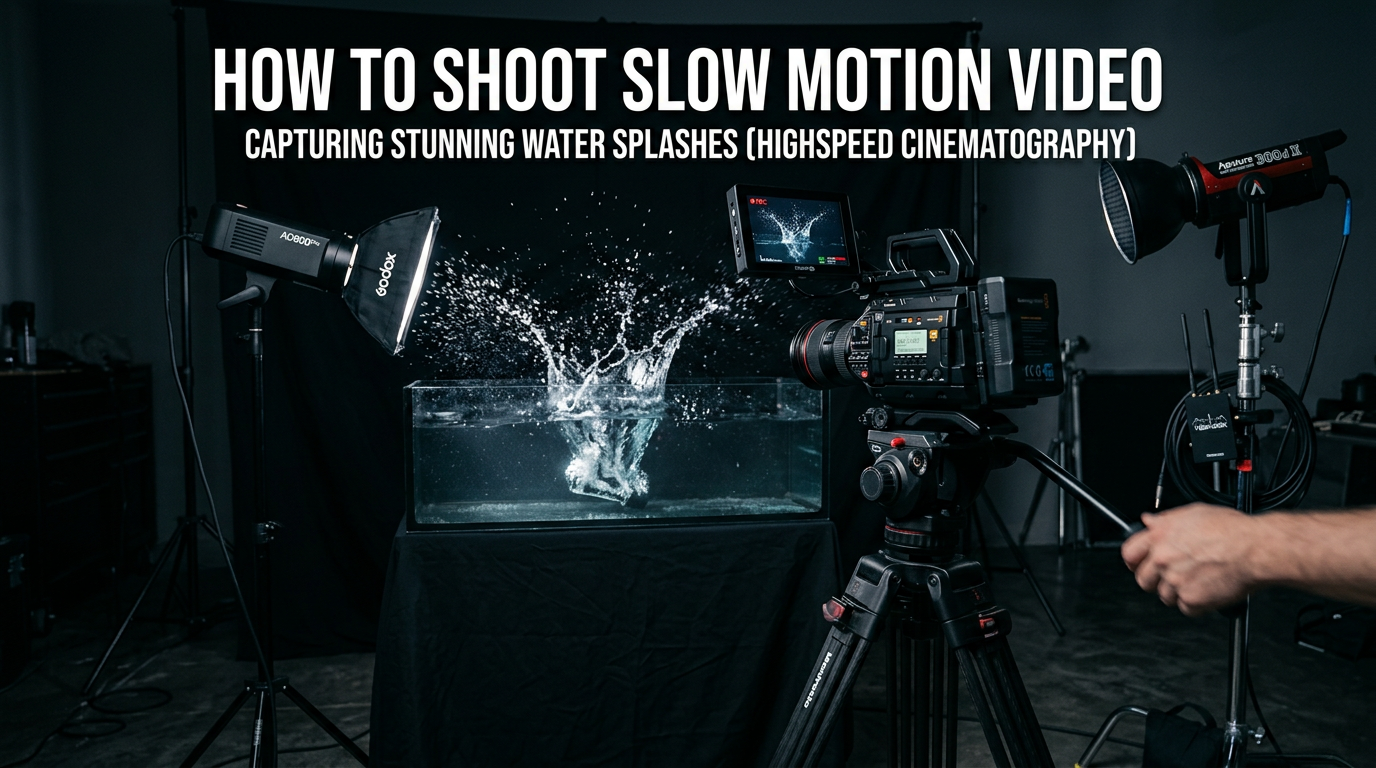
240 fps: When you need to show incredible detail in fast action. Use for water splashes, breaking objects, explosions, hummingbirds in flight, or any moment where you want to see what the naked eye misses.
480 fps and 960 fps: These super slow-motion modes create stunning visual effects but often at reduced resolution. Great for artistic projects, scientific observation, or adding extreme drama to specific moments in your video.
Match your frame rate to your subject. Action sports look great at 120 fps, while water droplets need 240 fps or higher. Consider your final delivery format too—social media often works better with slightly faster slow motion than cinema screens.
FAQ
What frame rate to shoot for slow motion?
For most slow-motion work, shoot at 120 fps. This gives you 4x slow motion when played back at 30 fps (25% speed). For subtle slow motion, use 60 fps. For extreme slow motion, use 240 fps or higher. The higher the frame rate compared to your playback frame rate, the more dramatic the slow-motion effect.
What does 120 and 240 mean in slowmo?
The numbers indicate how many frames per second your camera records. 120 fps means 120 frames captured each second. When played back at the standard 30 fps, this creates 4x slow motion (25% speed). 240 fps creates 8x slow motion when played at 30 fps (12.5% speed). Higher numbers mean more slow-motion effect.
Should I shoot in 24fps or 30fps?
For cinematic slow motion, shoot at 120 fps and edit in a 24 fps timeline. This gives you 5x slow motion (20% speed) with a classic film look. For broadcast or online video, shoot at 120 fps and edit in 30 fps for 4x slow motion (25% speed). 24 fps looks more cinematic; 30 fps looks smoother for sports and action.
How to make a 30fps video slow motion?
You cannot create true slow motion from 30 fps footage without it looking choppy. True slow motion requires shooting at higher frame rates (60 fps, 120 fps, 240 fps). However, you can use optical flow or frame blending effects in editing software like Adobe Premiere Pro to artificially create intermediate frames and simulate slow motion from 30 fps footage.
Conclusion
Slow-motion video transforms ordinary moments into extraordinary visual experiences. You now understand how frame rates work, why shutter speed matters, and how to calculate slow-motion percentages. The 180-degree shutter rule isn’t just a technical requirement—it’s the key to natural-looking motion blur.
Start with 120 fps for most projects and experiment from there. Pay attention to lighting, stabilize your shots, and choose frame rates appropriate for your subject. With practice, you’ll develop an instinct for when slow motion adds impact and when it distracts.
Now grab your camera, dial in those settings, and start creating slow-motion footage that captivates your audience. The technical details matter, but your creative vision matters more. Use slow motion deliberately to enhance your storytelling, and your videos will stand out from the crowd.