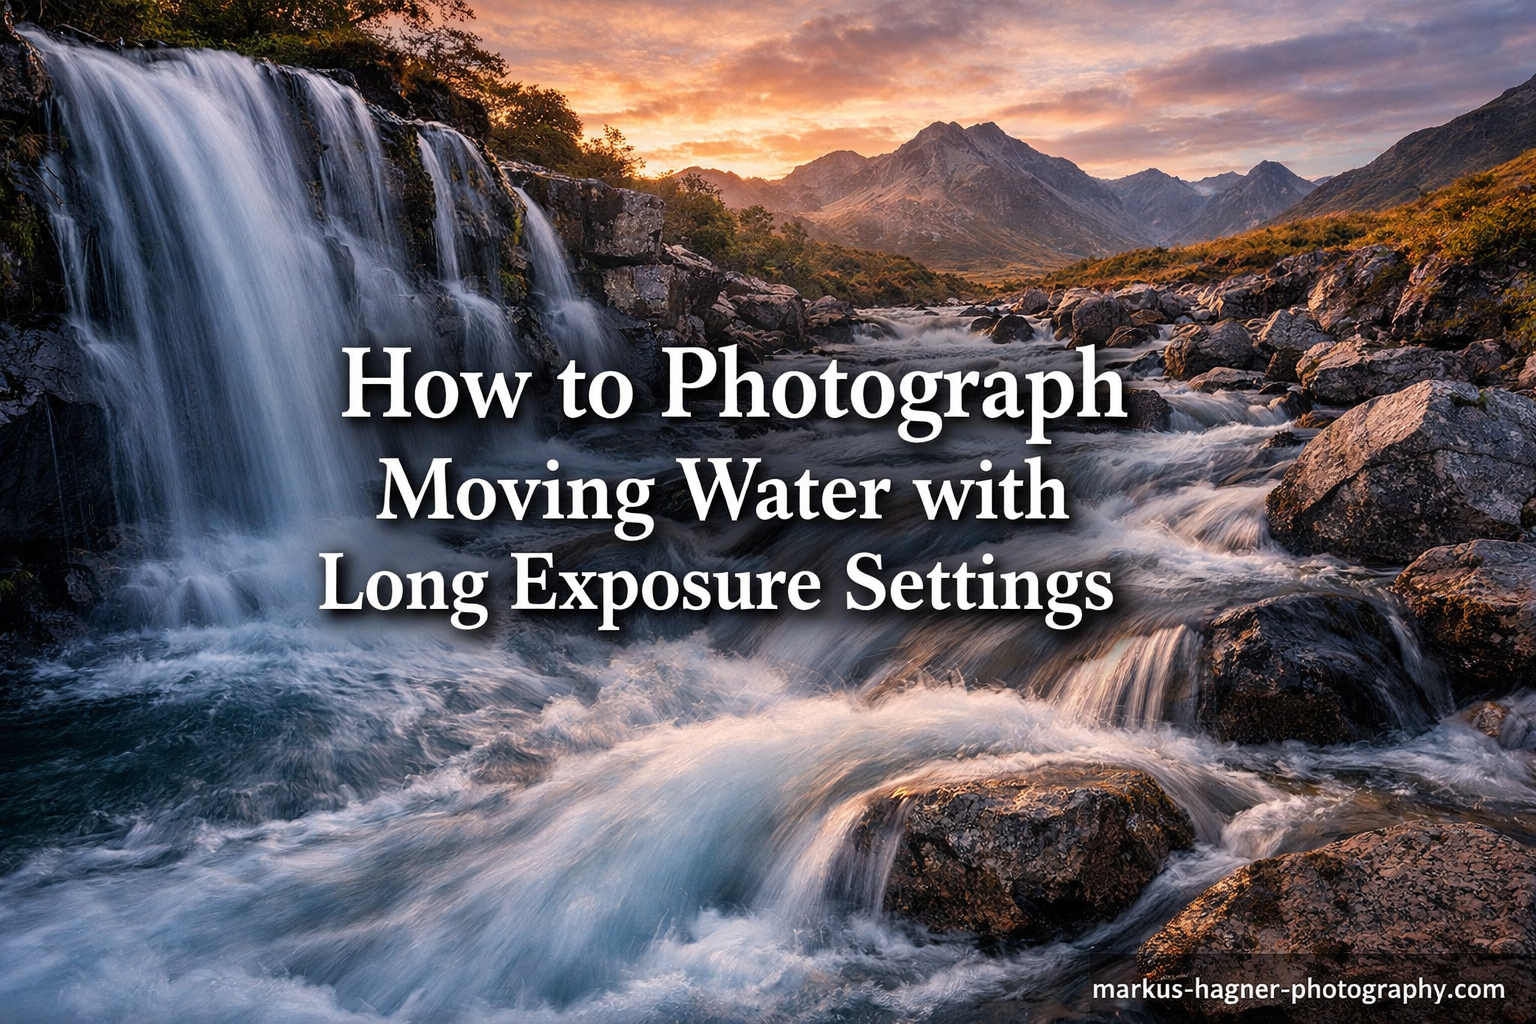
Long exposure photography transforms chaotic, moving water into silky smooth, dreamlike flows that add drama and artistic flair to your landscape images. When you photograph moving water with long exposure settings, you capture motion over time rather than freezing a single moment. This creates those mesmerizing waterfall shots you have seen in magazines and on social media.
In this guide, I will walk you through everything you need to know about long exposure water photography. You will learn the exact camera settings that work, the essential gear required, and the step-by-step process I use in the field. Whether you are shooting waterfalls, streams, or ocean waves, these techniques will help you capture stunning images.
How to Photograph Moving Water with Long Exposure Settings In 2026?
The key to photographing moving water with long exposure settings is using a slow shutter speed to capture the water’s movement over time. You will need a sturdy tripod to keep your camera completely still, and typically an ND filter to control light during daytime shooting. Most successful waterfall and flowing water shots use shutter speeds between 0.5 and 30 seconds depending on the effect you want.
Essential Gear for Long Exposure Water Photography
Before heading out, you need to pack the right equipment. Long exposure photography requires specific gear that goes beyond your camera and lens. Here is what I never leave home without.
A Sturdy Tripod
Your tripod is the foundation of every long exposure shot. Any camera movement during a multi-second exposure will ruin your image. I recommend a carbon fiber or aluminum tripod with a solid ball head that can handle your camera weight plus any lens you might use.
Make sure the legs can be secured tightly, and extend them fully to test stability before attaching your camera. I always push down gently on the tripod with my hand to check for any wobble before I start shooting.
Neutral Density (ND) Filters
ND filters are darkened pieces of glass that screw onto your lens and reduce the amount of light reaching your sensor. They are essential for daytime long exposure photography because they allow you to use slow shutter speeds without overexposing your image.
I carry three strengths in my bag: ND8 (3-stop) for dim conditions, ND64 (6-stop) for general use, and ND1000 (10-stop) for bright midday shooting. A variable ND filter can also work, though they sometimes cause cross-pattern issues at extreme settings.
Circular Polarizer
A circular polarizer serves two purposes for water photography. It reduces reflections and glare off the water surface, revealing what is beneath. It also acts as a mild ND filter, typically cutting 1-2 stops of light.
I always mount the polarizer first, then stack the ND filter on top if needed. Rotate the polarizer while looking through your viewfinder to find the angle that eliminates the most reflections.
Remote Shutter Release
Pressing the shutter button with your finger introduces camera shake, especially during longer exposures. A remote shutter release, cable release, or even your camera’s self-timer function solves this problem.
If you do not have a remote, use your camera’s 2-second self-timer. This gives the camera time to settle after you press the button. For exposures longer than 30 seconds, you will need a remote with bulb mode capability.
Understanding Camera Settings for Water Photography
Your camera settings determine how smooth the water appears and how well exposed your image turns out. Here is the breakdown of each setting and how to use it effectively.
Shutter Speed: The Most Critical Setting
Shutter speed controls how long your sensor collects light and how much motion appears in the water. Different speeds create different effects:
- 1/15 to 1/2 second: Slight motion blur, retains some texture in water
- 1/2 to 2 seconds: Silky smooth effect, good for fast-moving waterfalls
- 2 to 10 seconds: Very smooth, milky appearance
- 10 to 30 seconds: Dreamlike, foggy water effect
- 30+ seconds: Minimal water detail, ethereal look
I typically start with 2 seconds and adjust from there. If the water looks too frozen, I slow down the shutter. If it looks too smeared and loses all character, I speed it up. Every waterfall flows differently, so there is no one perfect setting.
Aperture: Finding the Sweet Spot
For landscape water photography, I set my aperture between f/8 and f/11. This range provides excellent depth of field to keep both foreground and background sharp while avoiding diffraction that softens images at smaller apertures like f/16 or f/22.
Some photographers recommend f/22 for the slowest possible shutter speed without filters. I avoid this because the diffraction at f/22 noticeably reduces image sharpness. Use an ND filter instead and stay at f/8 or f/11.
ISO: Keep It Low
Always shoot at your camera’s base ISO, typically ISO 100. Higher ISO settings add noise and reduce dynamic range, neither of which helps your image quality. Since you are using a tripod, there is no reason to increase ISO.
Some newer cameras have expanded ISO settings below 100. I avoid these too, as they often reduce dynamic range. Stick to the native base ISO for the cleanest files.
Shooting Mode: Manual or Aperture Priority
I shoot in manual mode for complete control over my exposure. This lets me dial in the exact shutter speed I want for the water effect, then adjust other settings to match.
Aperture priority mode also works. You set the aperture and ISO, and the camera chooses the shutter speed. This is faster but gives you less creative control over the water’s appearance.
Focus Technique
Switch to manual focus for long exposure work. Autofocus can hunt in low light or with ND filters attached. I focus on a static element in the scene, like a rock or tree, using live view at maximum magnification.
Once focused, I tape down the focus ring with gaffer tape or mark the position so I do not accidentally bump it. Double-check focus after attaching filters, as heavy ND filters can sometimes shift the focal plane slightly.
Best Conditions and Timing for Water Photography
The quality of light dramatically impacts your results. Here is when to shoot and what conditions to look for.
Golden Hour Magic
The hour after sunrise and before sunset provides the best light for waterfall and stream photography. The low-angle sun creates warm tones and adds dimension to the scene. The lower light levels also mean you can use slower shutter speeds without heavy ND filters.
I arrive at my location at least 30 minutes before golden hour begins. This gives me time to scout compositions, set up my gear, and be ready when the light turns magical.
Overcast Days
Cloudy, overcast days are actually ideal for waterfall photography. The soft, diffused light eliminates harsh shadows and blown highlights on white water. You can shoot all day long without worrying about contrast issues.
Rainy days work too, though you will need to protect your gear. The wet conditions often make colors more saturated and add atmosphere to forest scenes with streams.
Avoid Midday Sun
Bright midday sun creates high contrast, blown highlights on water, and harsh shadows. If midday is your only option, seek out waterfalls in deep shade or canyons where the sun cannot reach directly.
Watch for Wind
Wind is the enemy of long exposure photography. While your water becomes silky smooth, any wind-blown leaves, grass, or trees will blur. Check the weather forecast before heading out. Calm mornings after still nights are usually best.
If wind is unavoidable, I take multiple exposures. One for the water with a long exposure, and another faster exposure for the stationary elements. I blend these in post-processing.
Step-by-Step Shooting Process
Here is my exact workflow when photographing moving water. Follow these steps for consistent results.
Step 1: Scout Your Location
Walk around and look for compelling compositions before setting up. Consider foreground elements, leading lines, and how the water flows through your frame. I look for rocks, fallen logs, or interesting vegetation to anchor the composition.
Step 2: Set Up Your Tripod
Position your tripod on stable ground. Avoid loose rocks or slippery surfaces. Extend the legs fully and lock them securely. I push down on the tripod to test stability before attaching my camera.
Step 3: Compose Your Shot
Mount your camera and compose through the viewfinder or live view. Use the rule of thirds or look for natural leading lines. I pay attention to where the water enters and exits my frame.
Step 4: Focus Manually
Switch to manual focus and focus on a static element. Use live view zoomed in for precision. Once focused, lock it down and consider taping the focus ring.
Step 5: Attach Filters
Mount your circular polarizer first and rotate it to minimize reflections. Then add your ND filter if needed. Do this carefully to avoid shifting your focus or composition.
Step 6: Set Your Camera Settings
Set ISO to 100, aperture to f/8 or f/11, and choose your shutter speed based on the water flow. Start with 2 seconds and adjust from there.
Step 7: Capture and Review
Use your remote shutter release or self-timer to take the shot. Review the image on your LCD, checking both the histogram and the water’s appearance. Adjust shutter speed as needed and shoot again.
Photographing Different Types of Moving Water
Each water scenario requires slightly different approaches. Here is how to handle the most common situations.
Waterfalls
Waterfalls offer the most dramatic long exposure opportunities. Fast-falling water smooths out quickly, so even 1/2 second can create a silky effect. For tall waterfalls with lots of volume, try 2-5 seconds.
I position myself at an angle rather than straight on. This shows the water’s depth and movement across the frame rather than just a flat sheet of white. Look for foreground rocks or pools to add interest.
Streams and Rivers
Streams often flow more gently than waterfalls, requiring longer exposures to smooth out. I use 5-15 seconds for small creeks. Look for sections with small rapids or cascades where the water breaks over rocks.
Rivers work best where they flow over rocks or create small rapids. Smooth, flat sections of river do not create interesting long exposure effects. Find the turbulence.
Ocean Waves and Seascapes
Seascapes require the longest exposures. Ocean waves move fast but cover large areas. I typically use 10-30 seconds to smooth out the water completely.
Include rocks, piers, or other stationary elements for contrast against the smooth water. Incoming and outgoing waves create different patterns, so watch the rhythm and time your exposure.
Rain
Long exposure rain photography creates streaking lines that add mood to urban and forest scenes. Use 1-2 second exposures and shoot toward a dark background so the raindrops show up.
Common Mistakes and How to Avoid Them In 2026?
After years of shooting waterfalls and streams, I have made every mistake possible. Here are the most common errors and how to prevent them.
Images Too Bright (Overexposure)
This is the number one problem beginners face. Your camera tells you the image is too bright, or everything looks washed out. You need a stronger ND filter or need to wait for lower light. Shooting at midday without proper filtration almost always causes this.
Check your histogram after each shot. If the graph is pushed against the right edge, you are overexposed. Add a stronger ND filter or reduce your ISO if possible.
Blurry Trees and Vegetation
Wind blowing leaves and branches creates blur during long exposures. The water looks perfect, but everything else is smeared. Check for wind before you start shooting. If it is breezy, take separate exposures and blend them later.
Camera Shake
Pressing the shutter button causes micro-movements that blur your image. Always use a remote release or the self-timer. Even touching the tripod during the exposure can cause problems.
Lost Water Texture
Exposures that are too long create featureless white blobs where the waterfall should be. The water loses all character and interest. Reduce your shutter speed to retain some texture and detail in the flow.
Forgetting the Polarizer
Without a polarizer, you get bright reflections off the water surface that distract from your composition. The polarizer reveals what is beneath the surface and adds depth to your image. Always check that it is rotated correctly.
Long Exposure Water Photography with Smartphones
You do not need a DSLR or mirrorless camera to create silky water effects. Modern smartphones can capture impressive long exposure images.
iPhone Long Exposure Mode
Recent iPhones include a Long Exposure effect in the Photos app. Take a Live Photo, then swipe up and select Long Exposure from the effects menu. The phone blends the frames captured during the Live Photo into a smooth exposure.
This works best for moderately moving water. Fast waterfalls may still look slightly frozen. You need to keep the phone very steady or mount it on a small tripod.
Android Options
Many Android phones include a Long Exposure or Light Trail mode in the native camera app. Look in the More or Modes section of your camera app. Samsung phones often call this Pro mode with manual shutter control.
Third-Party Apps
Apps like Slow Shutter Cam (iOS) and Camera FV-5 (Android) give you manual control over shutter speed. These require a tripod but produce results nearly as good as dedicated cameras.
Smartphone long exposure has limitations. You cannot use physical ND filters easily, and dynamic range suffers in high-contrast scenes. But for casual shooting and social media sharing, the results are impressive.
Frequently Asked Questions
How do you take long exposure moving water?
To take long exposure photos of moving water, mount your camera on a sturdy tripod and use a slow shutter speed between 0.5 and 30 seconds. Use ISO 100 and an aperture between f/8 and f/11. Attach an ND filter if shooting in bright conditions to prevent overexposure. Use a remote shutter release or self-timer to avoid camera shake. Focus manually on a static element in the scene before taking the shot.
What shutter speed should I use for moving water?
The ideal shutter speed depends on the water’s speed and your desired effect. Use 1/15 to 1/2 second for slight motion blur, 1/2 to 2 seconds for silky smooth waterfalls, 2 to 10 seconds for a milky appearance, and 10 to 30 seconds for an ethereal fog-like effect. Start with 2 seconds and adjust based on your results. Faster flowing water requires shorter exposures than slow-moving streams.
Do I need an ND filter for waterfall photography?
ND filters are essential for waterfall photography in bright conditions. Without one, you cannot use slow enough shutter speeds during daylight without overexposing your image. An ND8 (3-stop) or ND64 (6-stop) filter works for most situations. For bright midday sun, use an ND1000 (10-stop) filter. In deep shade or during golden hour, you may not need a filter at all.
How do I avoid blurry trees in long exposure water shots?
Wind blowing trees and vegetation causes blur during long exposures. Check weather conditions before shooting and choose calm days. Shoot early morning when wind is typically lighter. If wind is unavoidable, take two exposures: one with a fast shutter speed for sharp vegetation, and one with a long exposure for smooth water. Blend these images in post-processing software.
Can you do long exposure on iPhone?
Yes, iPhones can capture long exposure water photos using the Live Photo feature. Take a Live Photo of moving water, then open the photo and swipe up to access effects. Select Long Exposure to convert the Live Photo into a smooth long exposure image. For best results, mount your iPhone on a tripod or rest it against a stable surface to prevent camera movement.
Why are my long exposure images too bright?
Long exposure images appear too bright when too much light reaches the sensor during the extended shutter opening. This commonly happens when shooting in daylight without an ND filter. To fix this, add a stronger ND filter to reduce light, shoot during darker conditions like golden hour or overcast days, use a smaller aperture like f/16, or lower your ISO to the minimum setting.
Conclusion
Learning how to photograph moving water with long exposure settings opens up a world of creative possibilities in your landscape photography. The combination of a sturdy tripod, the right filters, and proper camera settings allows you to transform ordinary water scenes into extraordinary images.
Remember that practice makes perfect. Start with the settings I have shared here, then experiment to develop your own style. Some photographers prefer slightly faster shutter speeds that retain water texture, while others love the dreamy look of 30-second exposures. There is no single right answer.
The next time you visit a waterfall, stream, or beach, pack your tripod and ND filters. Arrive during golden hour or on an overcast day. Follow the step-by-step process outlined in this guide, and you will come home with images that capture the magical, flowing quality of moving water.