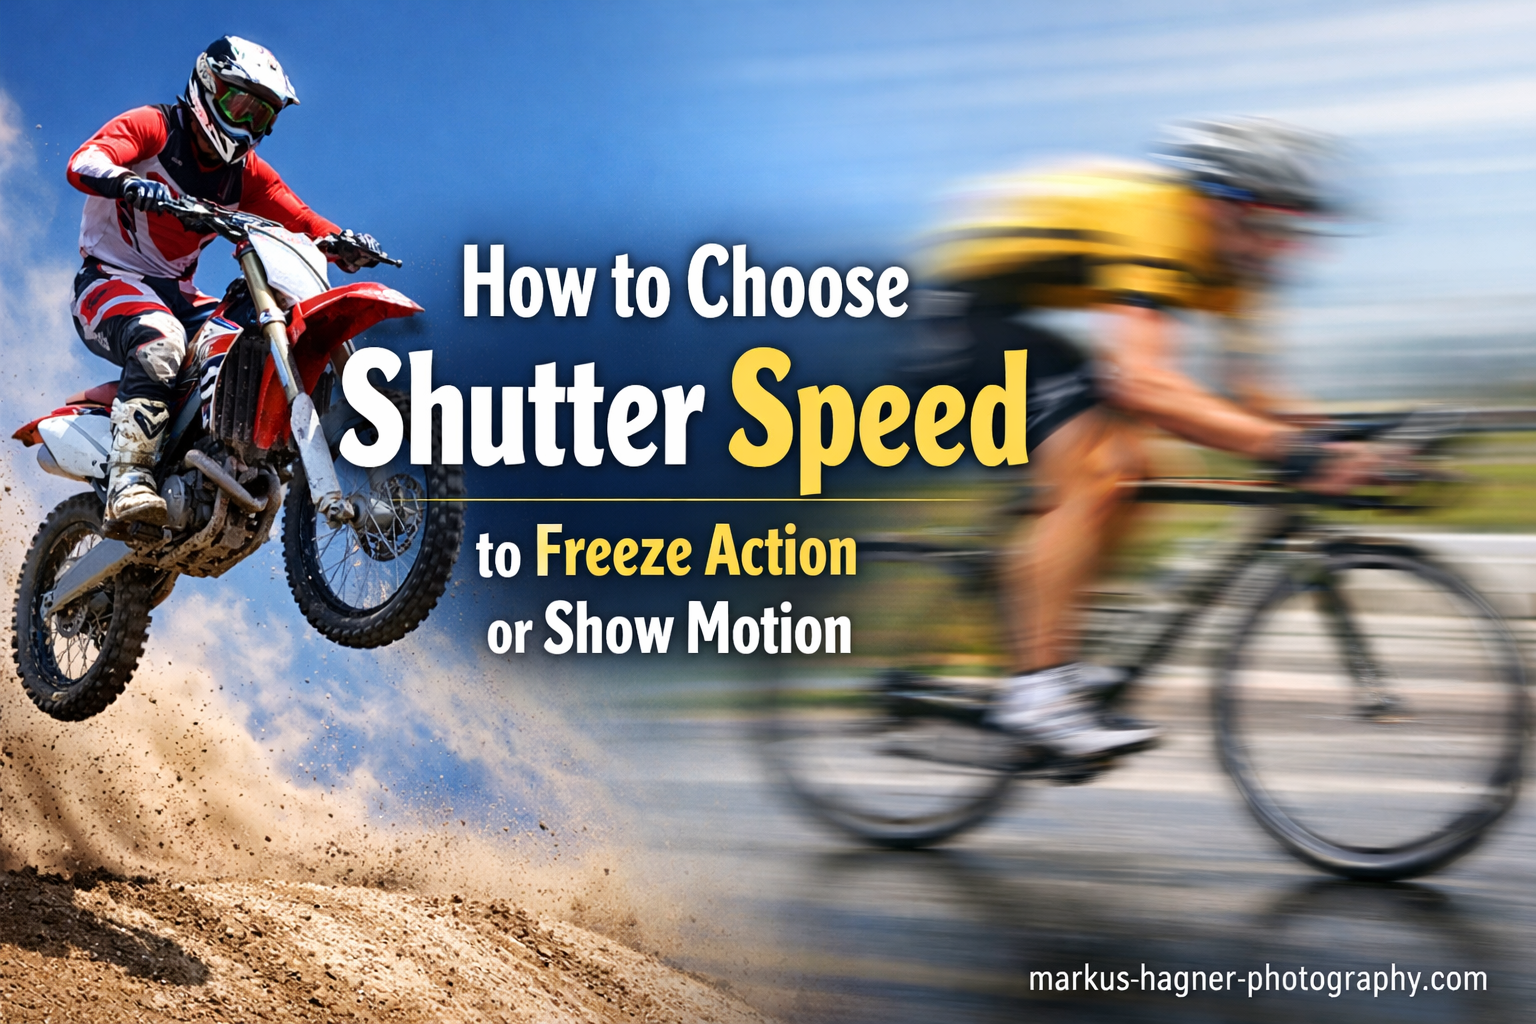
Understanding how to choose the right shutter speed to freeze action vs show motion transformed my photography more than any other technical skill. For years I shot in auto mode, hoping my camera would somehow know whether I wanted a razor-sharp bird in flight or a silky waterfall. It never did. The moment I learned to control shutter speed deliberately, my photos started telling the stories I actually wanted to tell.
Use 1/1000 second or faster to freeze action, and 1/30 second or slower to show motion blur. That’s the short answer. But knowing when to use each setting, and how to handle the exposure trade-offs, requires understanding a few key principles that I’ll break down in this guide.
After photographing everything from racing cars to flowing rivers over the past decade, I’ve developed a practical framework for choosing shutter speed. Whether you’re capturing your kid’s soccer game or experimenting with creative long exposures, you’ll learn exactly which settings to use and why they work.
What Is Shutter Speed? A Simple Explanation
Shutter speed is the length of time your camera’s shutter stays open when you take a photo. Think of it like blinking, but in reverse. When you press the shutter button, the camera opens a curtain (the shutter), lets light hit the sensor, then closes it again. How long that curtain stays open determines two things: how bright your image is, and how motion appears.
A fast shutter speed, like 1/2000 second, opens and closes almost instantly. A slow shutter speed, like 1/4 second, stays open long enough for you to actually hear it. Most cameras display shutter speed without the fraction bar, so 1/500 appears as 500, 1/60 as 60, and so on. Speeds longer than one second show as whole numbers with quotation marks: 2″ means 2 seconds.
Your shutter speed range depends on your camera, but most modern cameras offer speeds from 1/4000 or 1/8000 second at the fast end, down to 30 seconds at the slow end. Bulb mode lets you keep the shutter open indefinitely for extremely long exposures.
How Shutter Speed Fits into the Exposure Triangle
Shutter speed is one third of the exposure triangle, alongside aperture and ISO. These three settings work together to control brightness. When you make the shutter speed faster (letting in less light), you need to compensate by opening the aperture wider or raising the ISO to maintain proper exposure.
This trade-off matters because aperture affects depth of field, and ISO affects image noise. There’s no free lunch in photography. Freezing action at 1/2000 in dim light might force you to use ISO 6400, which introduces visible grain. Understanding these relationships helps you make informed compromises.
Mechanical vs Electronic Shutter
Most cameras offer both mechanical and electronic shutter options. A mechanical shutter uses physical curtains that open and close. An electronic shutter reads the sensor data without any moving parts. Electronic shutters can achieve faster speeds (up to 1/32,000 second on some cameras) and work silently, but they can produce distortion with fast-moving subjects due to rolling shutter effects.
For most motion photography, I prefer mechanical shutter. The distortion from electronic shutters can make propellers look bent and tennis balls look oval. Switch to electronic shutter when you need absolute silence or speeds faster than your mechanical shutter allows.
How to Freeze Action with Fast Shutter Speeds In 2026?
Fast shutter speeds freeze motion because the exposure happens so quickly that your subject doesn’t move appreciably across the frame during that tiny fraction of a second. A sprinter moving at 25 mph travels about 0.4 inches in 1/1000 second. That’s not enough to create blur. But the same sprinter travels 8 inches in 1/30 second, which creates visible blur.
The key insight I learned the hard way is that subject speed within the frame matters more than the actual speed of your subject. A cheetah running 60 mph in the distance requires a slower shutter speed than a child running 10 mph right in front of you. The closer the subject, the faster it moves across your sensor.
Subject Speed Within Frame: The Cardinal Principle
This concept changed everything for me. Imagine your camera sensor as a window. A bird flying past 10 feet away crosses that window much faster than the same bird flying at 100 feet, even though the bird’s actual speed hasn’t changed. The closer subject creates more “pixel movement” during your exposure.
Three factors affect subject speed within your frame:
Subject’s actual speed: A race car needs a faster shutter than a walking person.
Distance to subject: Closer subjects move across more pixels in the same time.
Focal length: Telephoto lenses magnify movement just like they magnify the subject. A 400mm lens shows four times as much movement as a 100mm lens.
Direction of Travel Matters
How your subject moves relative to your camera dramatically affects the shutter speed needed. A car driving toward you at 60 mph requires a much slower shutter speed than the same car driving across your frame at the same distance. Head-on or tail-away movement creates minimal blur because the subject’s position in the frame changes slowly. Perpendicular movement (across the frame) requires much faster shutter speeds.
I learned this shooting my daughter’s soccer games. Players running toward me stayed reasonably sharp at 1/500. But players sprinting across the field from left to right? Those shots needed 1/1000 or faster.
Recommended Shutter Speeds for Freezing Common Subjects
Here are the minimum shutter speeds I’ve found reliable for freezing motion, based on typical shooting distances:
1/250 to 1/500: Walking people, casual sports, slow wildlife, kids playing.
1/500 to 1/1000: Running people, soccer, basketball, moderate-speed wildlife, birds swimming.
1/1000 to 1/2000: Fast sports (football, hockey, tennis), running dogs, birds in flight at moderate distance.
1/2000 to 1/4000: Race cars from a distance, fast birds close up, water splashes.
1/4000 to 1/8000: Cars and motorcycles at close range, extremely fast action.
Add one to two stops (double the speed) when subjects move perpendicular to your camera rather than toward or away from you.
How to Show Motion with Slow Shutter Speeds In 2026?
Slow shutter speeds create motion blur by keeping the shutter open long enough for your subject to move across the frame during the exposure. This blur can convey speed, energy, and the passage of time in ways that frozen images cannot. The challenge is creating intentional blur while keeping your composition stable.
There are two main approaches: blurring the subject while keeping the background sharp (requires a tripod or panning), and blurring everything for abstract effects (long exposures). Both techniques open creative possibilities that simply aren’t available with fast shutter speeds.
The Panning Technique
Panning lets you show motion while keeping your subject relatively sharp. You track the moving subject with your camera during the exposure, so the subject stays in roughly the same position in the frame while the background blurs into streaks. It takes practice, but the results are worth it.
Here’s my panning process:
Step 1: Set your camera to Shutter Priority mode (S or Tv) and choose a speed between 1/30 and 1/125, depending on subject speed. Start with 1/60.
Step 2: Position yourself where subjects will pass parallel to your position (perpendicular to your line of sight).
Step 3: Plant your feet firmly and rotate your upper body to follow the subject. Keep both hands on the camera.
Step 4: Start tracking before you press the shutter. Follow the subject smoothly, maintaining the same rotation speed.
Step 5: Press the shutter while continuing to pan. Don’t stop when you hear the click. Follow through like a golf swing.
Step 6: Review your results and adjust. If the subject is too blurred, speed up the shutter. If the background isn’t blurred enough, slow it down.
Long Exposure Motion Blur
Long exposures with a tripod create beautiful blur effects for subjects like water, clouds, and people. Waterfalls become silky ribbons. Ocean waves turn into mist. Crowds of people can disappear entirely, leaving only architecture. These effects require shutter speeds from 1/4 second to several seconds.
The problem is daylight. Even at ISO 100 and f/22, a sunny day might only get you to 1/30 second. This is where neutral density (ND) filters become essential. An ND filter acts like sunglasses for your lens, reducing light without affecting color. A 6-stop ND filter can turn that 1/30 into a full second of exposure time.
Camera Shake and the Reciprocal Rule
When using slower shutter speeds handheld, camera shake becomes your enemy. Even tiny hand vibrations create blur that ruins images. The reciprocal rule provides a guideline for the slowest handheld shutter speed you can safely use: divide 1 by your focal length.
With a 50mm lens, the slowest handheld speed is approximately 1/50 second. With a 200mm lens, it’s 1/200 second. This rule assumes good technique and no coffee. I add an extra stop of safety because I’d rather have a slightly higher ISO than a blurry photo.
Image stabilization (IS, VR, or IBIS) helps significantly. Modern stabilization systems add 3 to 5 stops of handholdability. A 100mm lens that normally requires 1/100 second might be sharp at 1/13 second with good stabilization. But remember: stabilization only helps with camera shake, not subject movement.
Step-by-Step Decision Framework: How to Choose the Right Shutter Speed In 2026?
After years of shooting, I’ve developed a simple decision framework that helps me choose the right shutter speed quickly. This approach works whether I’m photographing sports, wildlife, or creative long exposures.
Ask These Three Questions
Question 1: What story am I telling?
Do you want the viewer to feel the explosive energy of frozen action, or the flowing movement of blur? A basketball player frozen at the peak of a jump tells a different story than the same player with blurred limbs mid-dunk. Decide on the emotional impact before worrying about technical settings.
Question 2: How fast is my subject moving across the frame?
Consider actual speed, distance, and direction. A subject moving toward you needs less speed than one crossing the frame. A close subject needs more speed than a distant one. When in doubt, use a faster speed than you think you need.
Question 3: What are my exposure constraints?
Check your light. Can you achieve your target shutter speed while maintaining acceptable ISO and aperture? If freezing action requires 1/2000 but that forces ISO 12,800, you might need to reconsider or add light.
The Decision Flow
If you want to freeze action and your subject is moving moderately fast (running, cycling):
Start at 1/1000. Check your exposure. If ISO is above 6400 and aperture is wide open, you need more light or a slower shutter.
If you want to show motion blur with a static background:
Use a tripod. Start at 1/15 for walking speed subjects, 1/4 for faster subjects, and several seconds for water and clouds.
If you want to show motion blur while keeping the subject sharp:
Use panning technique. Start at 1/60 and adjust based on results.
If you’re handheld without a specific creative goal:
Use the reciprocal rule minimum plus one stop for safety.
Shutter Priority vs Manual Mode
Shutter Priority mode (S or Tv) lets you set the shutter speed while the camera automatically adjusts aperture. This works well when the light is consistent and you want to lock in a specific motion effect. I use it for sports and wildlife when I need to maintain 1/1000 or faster.
Manual mode with Auto ISO gives you more control. You set both shutter speed and aperture, letting the camera adjust ISO to maintain exposure. This keeps your depth of field consistent while ensuring your motion effect. I prefer this approach in changing light.
Avoid Shutter Priority in rapidly changing light. The camera might choose apertures you don’t want, like f/22 (diffraction issues) or f/2.8 (too shallow depth of field for your subject).
Shutter Speed Settings Reference Table
Here’s a comprehensive reference guide I keep in my camera bag. These are starting points, not absolute rules. Adjust based on your specific situation and artistic intent.
SUBJECT TYPE | FREEZE MOTION | SHOW MOTION | NOTES
Walking person | 1/250 | 1/15 (tripod) | Blur at 1/15 for ghost effect
Running person | 1/500-1/1000 | 1/30 (pan) | Pan direction of movement
Cycling | 1/1000 | 1/30-1/60 (pan) | Faster if close, slower if distant
Soccer/Football | 1/1000-1/2000 | 1/60-1/125 (pan) | Add speed for cross-frame movement
Basketball | 1/500-1/800 | N/A | Indoor light often limits speed
Tennis | 1/1000-1/2000 | 1/60 (pan) | Ball requires 1/2000+
Baseball pitch | 1/2000+ | N/A | Bat swing needs 1/2500+
Running dog | 1/800-1/1250 | 1/60 (pan) | Unpredictable direction
Bird in flight | 1/2000+ | 1/60-1/125 (pan) | Depends on bird size and distance
Car (highway speed) | 1/2000+ | 1/30-1/60 (pan) | Distance affects speed needed
Race car | 1/2000-1/4000 | 1/125-1/250 (pan) | Use electronic shutter for 1/8000+
Water splashes | 1/2000+ | N/A | Individual drops freeze at 1/4000+
Waterfall | 1/250 (freeze) | 1/4-2 seconds (silky) | ND filter needed for daytime
Ocean waves | 1/500 (crash) | 1/4-4 seconds (mist) | Long exposures need tripod
Light trails | N/A | 5-30 seconds | Use Bulb mode and remote
Stars | 15-25 seconds | N/A | Longer creates star trails
Star trails | N/A | 15+ minutes | Stack multiple shorter exposures
Practical Applications and Creative Techniques
Let me share specific techniques I’ve used across different photography genres. These go beyond basic shutter speed selection into creative territory.
Sports Photography
Sports demand fast shutter speeds, but the exact speed depends on the sport and your position. From the sidelines, players running across the field need 1/1000 minimum. From the end zone, players running toward you stay sharp at 1/500. I’ve found that 1/1250 gives me consistent results for most field sports without requiring extreme ISO settings.
For peak action moments, like a basketball player at the top of a jump, you can use slightly slower speeds because vertical motion creates less blur than horizontal. A player jumping straight up is momentarily stationary at the peak, giving you a fraction of a second where even 1/500 works.
Wildlife and Bird Photography
Birds in flight are among the most challenging subjects. Small birds move erratically and require 1/2000 or faster. Larger birds like herons and eagles move more predictably and can be sharp at 1/1000-1/1600. The key is anticipating the bird’s path and starting your tracking early.
For wildlife on the ground, consider your distance. A deer 50 yards away needs less shutter speed than one 10 yards away. I start at 1/800 for walking mammals and adjust based on results. Running animals typically need 1/1250 or faster.
Waterfall and Water Photography
Water offers two distinct looks. Fast shutter speeds freeze individual droplets and show the power of a crashing wave. Slow shutter speeds turn water into silky, ethereal flows. Both have their place.
For the classic silky waterfall look, I aim for 1/2 to 2 seconds. This requires a tripod and usually an ND filter in daylight. I use a 6-stop ND filter for most waterfall work, which gets me into that sweet spot range. Without a filter, shoot during golden hour or in shaded areas.
To freeze crashing waves, I use 1/1000 or faster. The chaos of splashing water looks dramatic when frozen, showing details invisible to the naked eye. For ocean mist, try 1/4 to 1 second with a tripod.
Light Trails and Night Photography
Light trails from cars, stars, or any moving light source require long exposures on a tripod. For car trails, I use 10-30 seconds depending on traffic density. The longer the exposure, the more complete your trails will be. Bulb mode with a remote shutter release gives you unlimited exposure time.
For star photography without trails, keep exposures under 25 seconds with wide-angle lenses. Longer exposures will show the earth’s rotation as star trails. The 500 rule helps: divide 500 by your focal length to get maximum shutter speed (500 / 24mm = 20 seconds).
Flash and Shutter Speed Combinations
Here’s a technique most photographers never explore: combining flash with slow shutter speeds for creative effects. Flash freezes motion instantly, regardless of your shutter speed. This means you can create a sharp flash-lit subject against a blurred ambient background.
The technique works like this: Set your shutter speed slower than normal (1/30 to 1/60), let ambient light create blur from motion, then fire your flash at the end of the exposure. The flash creates a sharp “ghost” while the blur shows movement. Most cameras call this “second curtain sync” or “rear curtain sync.”
I’ve used this for dance photography, creating sharp subjects with motion trails behind them. The key is timing. First curtain sync fires the flash at the beginning of the exposure, creating a sharp image followed by blur (subject appears to move backward). Second curtain sync fires at the end, creating natural-looking trails behind the subject.
Common Mistakes and Troubleshooting
Let me address the problems I hear about most often from photographers struggling with shutter speed.
My Photos Are Too Dark When I Use Fast Shutter Speeds
This is the most common complaint. When you increase shutter speed, you reduce the light reaching the sensor. You must compensate by opening the aperture wider, raising the ISO, or adding light. In Shutter Priority mode, the camera tries to compensate automatically, but it may hit limits. If your aperture is already wide open and ISO is maxed out, your only options are adding light (flash, reflectors) or accepting a darker exposure.
My Photos Are Blurry Even at Fast Shutter Speeds
If you’re using 1/1000 or faster and still getting blur, the issue isn’t shutter speed. Check your focus first. Many cameras default to shutter/AF-ON priority settings that fire even when focus isn’t locked. Also verify your lens isn’t front-focusing or back-focusing. Finally, cheap filters and dirty lenses can create softness that looks like blur.
My Long Exposures Are Overexposed
In bright conditions, even your smallest aperture and lowest ISO might not get you to slow shutter speeds. A 6-stop or 10-stop ND filter solves this problem. Without one, shoot during golden hour, blue hour, or overcast days. You can also try the “hat trick” for very long exposures: cover the lens with a black card or hat during part of the exposure.
I Can’t Handhold at the Reciprocal Rule Speed
The reciprocal rule assumes good technique. Improve your handheld stability by tucking elbows into your body, supporting the lens from underneath with your left hand, and gently squeezing the shutter rather than jabbing it. Also, consider that the rule was developed for 35mm film. Crop sensors and high-resolution cameras magnify shake, so add a stop of safety.
Frequently Asked Questions
What is the best shutter speed to freeze motion?
For most action subjects, 1/1000 second or faster reliably freezes motion. Walking people freeze at 1/250, running athletes at 1/500-1/1000, and fast sports like soccer or basketball at 1/1000-1/2000. Extremely fast subjects close to the camera, like race cars or birds in flight, may require 1/2000 to 1/4000. The key factors are your subject’s actual speed, distance from camera, and direction of travel relative to your lens.
What shutter speed should I use to stop motion?
Use 1/500 second as a starting point for general motion stopping. Increase to 1/1000 for fast movement like running or cycling, and 1/2000 or faster for sports, wildlife, and vehicles. Subjects moving across your frame (perpendicular to your lens) require faster speeds than subjects moving toward or away from you. When in doubt, use a faster speed than you think you need, as slight motion blur is harder to fix than a slightly higher ISO.
What shutter speed freezes a bullet?
Freezing a bullet in flight requires approximately 1/1,000,000 second, which is beyond the capability of standard camera shutters. However, you can freeze bullet-like motion using high-speed flash instead of shutter speed. A speedlight’s flash duration can be as short as 1/20,000 to 1/50,000 second at low power, which freezes even extremely fast subjects. This technique works in dark environments where only the flash illuminates the subject.
What is the reciprocal rule in photography?
The reciprocal rule states that to avoid camera shake when handholding, your shutter speed should be at least the reciprocal of your focal length. With a 50mm lens, use 1/50 second or faster. With a 200mm lens, use 1/200 second or faster. This rule assumes full-frame cameras. For crop sensors, multiply by your crop factor. Image stabilization adds 3-5 stops of leeway, but remember that stabilization only helps with camera shake, not subject movement.
Conclusion
Learning how to choose the right shutter speed to freeze action vs show motion opens creative possibilities that transform your photography. The settings I’ve shared here, from 1/1000 for freezing sports to several seconds for silky waterfalls, come from years of experimentation and plenty of failed shots. Start with these guidelines, then adjust based on your specific situation.
Remember that shutter speed is just one part of the exposure triangle. Every decision you make affects your other settings. Fast shutter speeds in low light force high ISOs. Slow shutter speeds in bright light require ND filters. Understanding these relationships helps you make quick decisions in the field.
My best advice: practice deliberately. Set aside time to photograph the same moving subject at different shutter speeds. Compare the results. Once you’ve internalized how 1/500 differs from 1/2000 for your typical subjects, choosing the right setting becomes instinctive. That’s when photography stops being technical and becomes truly creative.