Choosing the right RAW processing software shapes how your final images look. After spending countless hours editing in both Capture One and Lightroom across thousands of photos, I’ve discovered that each program handles RAW files differently. The color science, detail extraction, and overall workflow vary significantly between them. This guide walks you through exactly how to process RAW files in each software so you can decide which fits your photography style better.
Whether you’re a studio photographer considering a switch from Lightroom or a beginner wondering which software to invest in, this comparison will show you the practical differences. I’ll cover step-by-step workflows for both programs, highlight where each excels, and help you understand which RAW processor matches your needs in 2026.
Understanding RAW Processing: The Foundation
RAW files contain unprocessed data directly from your camera’s sensor. Unlike JPEGs, which have processing baked in by the camera, RAW files give you complete control over how the final image looks. This flexibility comes with a trade-off: you need software to interpret that raw data.
Here’s where things get interesting. Different RAW processors use different algorithms to convert sensor data into visible images. This process, called demosaicing, affects everything from color accuracy to detail sharpness. Adobe and Capture One have developed their own approaches over decades, and the results show.
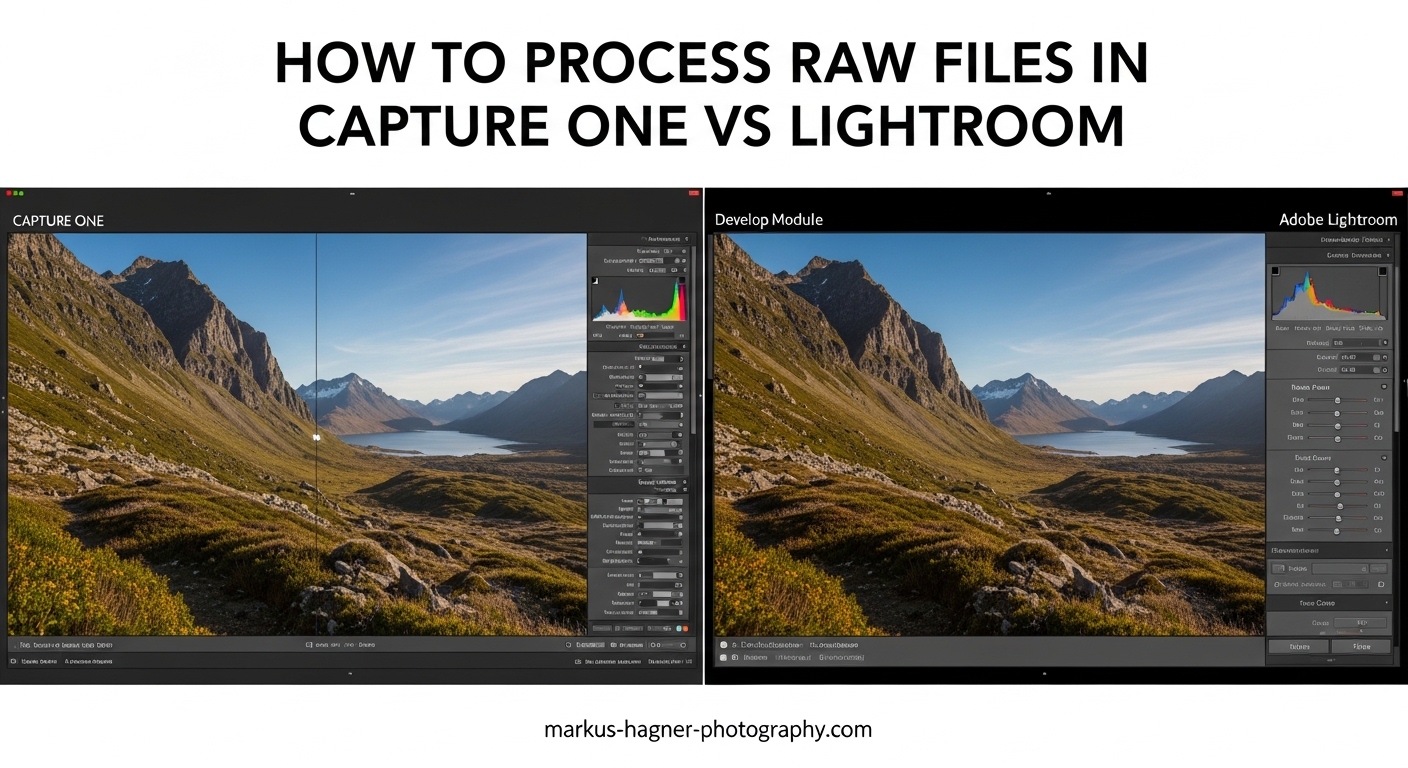
When you open the same RAW file in both programs with default settings, you’ll see different results. Capture One typically produces images with more contrast and saturation out of the box. Lightroom’s default render tends to be flatter, giving you more room to make adjustments. Neither approach is wrong—they’re just different starting points for your editing workflow.
What Affects RAW Processing Results?
Several factors influence how your RAW files render in each program:
Color science: Each company has spent years developing color profiles for different camera brands. Capture One was originally designed for Phase One medium format backs, which explains its emphasis on color accuracy. Adobe supports a wider range of cameras but sometimes takes longer to perfect profiles for newer models.
Demosaicing algorithms: The mathematical approach to interpreting Bayer pattern data (or X-Trans for Fujifilm) affects detail and noise patterns. Some photographers notice Lightroom can produce “waxy” skin tones with Fuji files, while Capture One renders them more naturally.
Default sharpening and noise reduction: Both programs apply some processing by default. Understanding these baseline differences helps you adjust your workflow accordingly.
Capture One vs Lightroom: Overview and Philosophy
Before diving into workflows, understanding the history and design philosophy of each program helps explain their differences. Capture One started as software for Phase One’s professional medium format cameras. Lightroom was Adobe’s answer to photographers who wanted RAW processing without the complexity of Photoshop.
Capture One’s Professional Studio Heritage
Capture One was built for commercial and studio photographers who demand precision. Its tethering capabilities are legendary among product and fashion photographers. The program uses a layer-based editing system that gives you fine control over every adjustment.
The Sessions workflow in Capture One reflects its studio origins. Each session contains its images, adjustments, and output recipes in a single folder structure. This approach works exceptionally well for project-based work like commercial shoots or weddings.
Capture One offers both perpetual licensing and subscription options. For photographers who prefer owning their software, this flexibility matters. The perpetual license typically costs more upfront but can be more economical over several years.
Lightroom’s Ecosystem Approach
Lightroom takes a different approach with its catalog-based system. All your images live in one massive database, searchable and organizable through collections and smart albums. This works well for photographers who shoot diverse subjects and want everything in one place.
The Adobe Photography Plan bundles Lightroom with Photoshop and cloud storage. This integration is powerful—if you need pixel-level editing, sending a file to Photoshop is seamless. Lightroom’s mobile apps also sync with your catalog, letting you cull and edit on the go.
Adobe has invested heavily in AI features recently. The AI-powered masking, denoise, and portrait tools have changed how many photographers work. These features alone keep some users loyal to Lightroom despite its limitations.
Sessions vs Catalogs: The Fundamental Difference
This distinction shapes your entire workflow:
Capture One Sessions: Think of sessions as project containers. Each session has its own database, making it portable and self-contained. You can move a session folder to another computer, and everything works. This appeals to photographers who work on discrete projects or collaborate with teams.
Lightroom Catalogs: One catalog typically holds your entire photo library. While you can create multiple catalogs, most users stick with one for simplicity. The catalog stores all your edits, keywords, and collections. Backing up this single file protects years of work.
How to Process RAW Files in Capture One: Step-by-Step Workflow
Let me walk you through my complete Capture One workflow from import to final export. This process has evolved over years of shooting portraits, products, and landscapes.
Step 1: Importing Images and Creating a Session
Start by creating a new session (File > New Session). Give it a descriptive name and choose a location. Capture One will create a folder structure with subfolders for Captures, Output, Selects, and Trash. This organization keeps everything tidy.
When importing, you have two options: copy images into the session folder or reference them from their current location. For project-based work, I copy them in. For personal travel photos, I reference the existing folder structure.
During import, apply metadata presets and initial adjustments if needed. I always apply a base color profile and lens correction during import. This saves time on every image.
Step 2: Culling and Rating
Capture One’s culling tools are excellent. Press and hold the Select button to quickly mark images. The Viewer mode lets you compare similar shots side by side. I use the star rating system for quality (1-5 stars) and color tags for workflow status (red for reject, green for selected).
One advantage over Lightroom: Capture One generates previews faster. When you’re reviewing 2,000 images from a wedding, this speed adds up. The keyboard shortcuts for rating are customizable, so you can set them to match your muscle memory.
Filter your view to show only unrated images initially. This prevents re-reviewing images you’ve already processed. Use the filter bar to show only specific ratings or color tags as you work through the set.
Step 3: Basic Adjustments
Open your first selected image and start with the Base Characteristics panel. Choose your ICC profile—Capture One offers camera-specific profiles that mimic different looks. I typically start with the standard profile and adjust from there.
The Exposure tool in Capture One gives you more control than Lightroom’s basic panel. You can adjust exposure, contrast, brightness, and saturation independently. The High Dynamic Range tool recovers highlights and opens shadows without the halos you sometimes see in Lightroom.
White balance works differently too. Capture One’s white balance picker is more precise, and you can set multiple white balance readings across different layers. This helps when mixed lighting affects your image.
Step 4: Color Editing with Layers
Here’s where Capture One shines. The color editor offers three levels of control: Basic, Advanced, and Skin Tone. The Advanced tab lets you target specific color ranges and adjust hue, saturation, and lightness independently.
Create a new layer for color work. This non-destructive approach lets you adjust or remove color edits later. The color wheel interface shows exactly which colors you’re affecting.
For skin tones, switch to the Skin Tone tab. Click on skin in your image, and Capture One identifies the color range. The Smoothness slider adjusts how uniform skin appears without looking artificial.
Step 5: Local Adjustments and Masking
Capture One’s masking tools are more sophisticated than Lightroom’s legacy tools (though Lightroom’s AI masks have narrowed this gap). Draw masks manually, use the gradient tool, or paint with automatic edge detection.
The layers system here works like Photoshop. Each layer contains its own adjustments and mask. I typically use separate layers for background adjustments, subject enhancement, and local exposure corrections.
Note the limitation: Capture One allows 16 layers per image. For most work, this is plenty. Complex composites might require workarounds or exporting to Photoshop for finishing.
Step 6: Export with Process Recipes
Capture One’s export system uses “Process Recipes”—presets that define file format, size, color space, and output location. Set up recipes for different delivery requirements: web-sized JPEGs, full-resolution TIFFs for print, and DNG exports for backup.
Batch export is straightforward. Select your images, choose your recipe, and process. Capture One exports in the background while you continue editing. The output folder structure matches your session, keeping everything organized.
For client delivery, I create a recipe that adds a subtle watermark and outputs to a Client folder. This automation saves repetitive tasks on every project.
How to Process RAW Files in Lightroom: Step-by-Step Workflow
Now let’s walk through the equivalent process in Lightroom. While the steps seem similar, the execution and feel differ significantly from Capture One.
Step 1: Importing and Catalog Management
Lightroom opens to your catalog. Click Import to bring in new images. The import dialog previews your source and lets you choose between Copy, Move, or Add. I typically Copy to my organized folder structure, keeping originals intact.
Apply Develop presets during import to establish your baseline look. Lightroom’s preset system is more extensive than Capture One’s styles—you’ll find thousands of third-party presets online. Apply metadata and keywords at this stage too.
The catalog stores everything: your edits, virtual copies, collections, and keywords. Back up your catalog regularly using the built-in backup scheduler. I back up weekly and keep multiple generations of backups.
Step 2: Culling and Organization
Lightroom’s Library module handles culling. The Survey view (N key) lets you compare similar images and pick the best. Flag as Pick (P) or Reject (X), then filter to show only picks. I find this faster than star ratings for initial selection.
After flagging, apply star ratings to your picks. Use Collections to group related images—these are like albums that can contain the same photo in multiple collections without duplicating files. Smart Collections auto-populate based on criteria you define.
For large shoots, use the People view to identify faces. Lightroom’s face detection works well and makes finding portraits by subject easier later.
Step 3: Basic Panel Adjustments
Switch to the Develop module for editing. The Basic panel handles most global adjustments. Lightroom’s order of operations matters: work from top to bottom. Start with white balance, then exposure, then work down through the tonal adjustments.
The Profile dropdown at the top affects your starting point significantly. Camera Matching profiles attempt to replicate your camera’s JPEG look. Adobe Color provides a neutral starting point. For Fujifilm cameras, the Camera Calibration profiles include film simulations.
Texture, Clarity, and Dehaze are unique to Adobe. Texture enhances medium-frequency detail without affecting edges. Clarity adds local contrast for a punchy look. Dehaze cuts through atmospheric haze in landscape photos.
Step 4: Color Grading and HSL
Lightroom’s color tools differ from Capture One’s approach. The HSL panel adjusts Hue, Saturation, and Luminance for eight color ranges. Target specific colors by clicking the target icon and dragging in your image.
The Color Grading panel (formerly Split Toning) handles shadows, midtones, and highlights separately. This three-way color wheel system mirrors video editing workflows and works well for cinematic looks.
Vibrance and Saturation sit in the Basic panel. Vibrance protects already-saturated colors while boosting muted tones—useful for skin tones. Saturation affects everything equally and can quickly look unnatural.
Step 5: Masks and Local Adjustments
Lightroom’s masking received a major update with AI-powered tools. Click the Mask button to access Select Subject, Select Sky, Select Background, and more. These AI masks work remarkably well and save considerable time.
For manual control, use the Brush, Linear Gradient, and Radial Gradient tools. The Brush tool now includes AI edge detection that improves accuracy around complex edges like hair. Combine multiple masks in a single adjustment for complex effects.
The Range Mask feature refines selections based on luminance or color. After drawing a gradient, limit it to only the bright sky or only the green foliage. This precision approaches what Capture One offers with its layers.
Step 6: Export Presets and Options
Export in Lightroom uses presets similar to Capture One’s recipes. Define your output settings once, then apply them to any selection. Common exports include web-sized JPEGs, full-resolution files, and prints.
The Export dialog offers more options than Capture One: sharpening for screen or print, metadata handling, and watermarking. I strip sensitive metadata for client files and include it for archive exports.
Publish Services connect directly to platforms like SmugMug, Flickr, or your own FTP server. These services sync automatically, managing online galleries from within Lightroom.
Side-by-Side Comparison: Key Differences in RAW Processing
Having walked through both workflows, let’s examine the actual image quality differences. These comparisons come from processing identical files in both programs.
Color Rendering Comparison
Capture One’s default color rendering typically appears more saturated and contrasty. Many photographers describe it as having a “commercial” look straight out of the gate. Lightroom’s defaults are flatter, requiring more adjustment to reach a similar look.
For skin tones, opinions vary by camera brand. Sony shooters often prefer Capture One’s skin rendering. Canon users sometimes find Lightroom more flattering. Fujifilm photographers overwhelmingly favor Capture One, especially for the X-Trans sensor’s color reproduction.
Color accuracy in controlled environments favors Capture One. Its ICC profile system produces consistent results across different lighting conditions. Lightroom’s profiles have improved significantly but still vary more between camera models.
Detail Extraction and Sharpening
Both programs extract excellent detail from RAW files, but the approach differs. Capture One’s sharpening uses a three-slider system: Amount, Radius, and Threshold. This granularity lets you target sharpening precisely.
Lightroom’s sharpening combines Amount, Radius, Detail, and Masking. The Masking slider (hold Alt while dragging) shows exactly which edges receive sharpening. This visual feedback helps prevent over-sharpening smooth areas.
At 100% crop, differences emerge. Capture One often shows slightly better fine detail in foliage and fabric textures. Lightroom sometimes applies a slight smoothing that reduces micro-contrast but can help with noise in high-ISO images.
Noise Reduction Capabilities
This is where Lightroom has pulled ahead recently. The AI-powered Denoise feature analyzes your image and reduces luminance and color noise intelligently. It works as a first step before any other adjustments, producing remarkably clean results.
Capture One’s noise reduction is capable but traditional. It uses luminance and color noise sliders without AI analysis. For moderate noise, both programs perform well. For extreme noise from high-ISO shooting, Lightroom’s AI Denoise often produces cleaner results.
That said, Capture One’s approach gives you more manual control. You can apply noise reduction on a layer, masking it to affect only problem areas. This precision helps when noise varies across the image.
Dynamic Range Handling
Highlight recovery and shadow lifting reveal interesting differences. Capture One’s High Dynamic Range tool separates highlight recovery from shadow opening. The results often look more natural, with less risk of halos around high-contrast edges.
Lightroom handles extreme dynamic range well. The Highlights and Shadows sliders recover impressive amounts of data. However, pushing them to extremes can introduce artifacts and unnatural tonal transitions.
For landscape photography with dramatic skies, both programs perform admirably. Capture One might edge ahead for the most challenging scenes, but the difference requires pixel-peeping to notice.
Fuji X-Trans Processing: A Special Case
Fujifilm’s X-Trans sensor uses a different color filter array than the standard Bayer pattern. This unique design affects how RAW processors handle the data, and opinions differ strongly on which program handles it better.
Capture One is widely considered superior for Fuji X-Trans files. The detail rendering shows more fine texture, especially in foliage and fabric. Colors often match Fuji’s film simulations more closely. Many Fuji shooters switched from Lightroom specifically for these reasons.
Lightroom’s X-Trans processing has improved over the years, but some photographers still notice “wormy” artifacts in fine detail at high magnifications. The AI Denoise has helped close the gap for high-ISO Fuji files.
If you shoot Fujifilm, test both programs with your camera. The differences are most visible in landscape and detailed scene work. Portrait photographers might find either program works fine.
Workflow Efficiency Comparison
Beyond image quality, practical workflow considerations matter for daily use. Let’s compare how each program handles common tasks.
Import Speed Comparison
Capture One typically generates previews faster during import. The program builds 1:1 previews efficiently, meaning less waiting when you zoom into images. For photographers shooting thousands of frames per event, this speed matters.
Lightroom’s import speed varies based on preview settings. Building 1:1 previews during import significantly extends import time. Many users choose Standard previews for speed, then build 1:1 previews as needed during editing.
In my testing with identical file sets, Capture One imports and generates previews about 20-30% faster. Your results may vary based on hardware and file sizes.
Batch Processing Capabilities
Both programs handle batch adjustments well. Capture One’s Copy Adjustments feature lets you apply settings from one image to many. The Apply to All Selected option syncs settings instantly.
Lightroom’s Sync button works similarly. You choose which settings to synchronize across selected images. The Previous button applies the last image’s settings to the current photo—useful when editing a sequence shot under identical conditions.
For complex batches, Lightroom’s Auto Sync feature applies changes to all selected images in real-time as you adjust. Capture One requires an explicit Apply command. Both approaches work; preference depends on your editing style.
Tethering Comparison
This is Capture One’s clear strength. Its tethered shooting capabilities are far superior to Lightroom’s. The live view is more responsive, camera control more comprehensive, and the overlay features more precise.
Studio photographers particularly value Capture One’s tethering. You can create overlays for precise composition matching, apply adjustments in real-time as shots come in, and control camera settings remotely. The Filmstrip shows recent captures for immediate review.
Lightroom offers basic tethering for supported cameras. It works for simple studio setups but lacks the polish and features serious studios require. Many Lightroom users turn to capture software like Capture One just for tethering, then export for final editing.
Organization and DAM Features
Lightroom excels at digital asset management. The catalog handles massive libraries (100,000+ images) with robust search, smart collections, and face recognition. Keywords and metadata are deeply integrated into the workflow.
Capture One’s catalog feature has improved significantly. It now handles large libraries competently, though search speed still trails Lightroom for very large catalogs. The Sessions approach provides an alternative organization method that some prefer for project-based work.
For photographers who need serious DAM capabilities—keyword hierarchies, location data, and complex search queries—Lightroom holds the edge. For project-focused workflows, Capture One’s flexibility might suit you better.
Which Software Should You Choose? Recommendations by Use Case
After working extensively with both programs, here are my recommendations based on photography type and workflow needs.
Best for Studio Photography
Capture One wins for studio work. The tethering capabilities alone justify the choice for commercial and product photographers. The color tools provide the precision needed for accurate color matching, and the layers system handles complex compositing elegantly.
If you photograph products, fashion, or anything requiring precise color reproduction, Capture One should be your primary RAW processor. The investment pays off in consistent, professional results.
Best for Wedding and Event Photography
Lightroom often works better for high-volume event work. The catalog system manages thousands of images efficiently. AI-powered masking speeds up portrait editing. The mobile app integration lets you cull and share images during the event.
That said, some wedding photographers prefer Capture One for the color rendering on skin tones. The sessions workflow can be adapted to event work with proper setup. Test both with your specific camera and shooting style.
Best for Landscape Photography
Both programs serve landscape photographers well. Lightroom’s panorama and HDR merge tools are convenient for in-program compositing. The Dehaze feature handles atmospheric conditions effectively.
Capture One excels at color grading landscapes. The color editor’s precision helps target specific foliage tones, sky colors, and earth tones. The High Dynamic Range tool handles challenging exposures naturally.
Consider your typical scene complexity and how much color work you do. Heavy color graders might prefer Capture One; those who merge panoramas frequently might lean toward Lightroom.
Best for Fujifilm Shooters
Capture One is the overwhelming choice for Fujifilm photographers. The X-Trans processing quality difference is noticeable, especially in fine detail and skin tone rendering. Many Fuji users describe it as “finally seeing what my camera can do.”
Lightroom has improved its Fuji processing, and the AI Denoise helps with high-ISO files. But for the best straight-out-of-camera RAW conversion from Fujifilm files, Capture One remains the superior choice.
FAQ
Can Capture One edit RAW files?
Yes, Capture One is a professional RAW processor designed specifically for editing RAW files from virtually any digital camera. It offers advanced color editing, layers-based adjustments, and superior tethering capabilities. Capture One is known for its excellent color science and is particularly favored by studio photographers and Fujifilm users.
Is it better to edit in Camera Raw or Lightroom?
Camera Raw and Lightroom share the same processing engine, so image quality is identical. The difference lies in workflow: Lightroom adds catalog management, collections, and organizational tools that Camera Raw lacks. For most photographers, Lightroom provides a more complete workflow solution, while Camera Raw works well for those who prefer a file-browser approach or primarily use Photoshop.
How does Lightroom handle RAW files differently?
Lightroom uses Adobe’s own demosaicing algorithms and color profiles to interpret RAW data. It applies a flatter default rendering compared to Capture One, giving photographers more latitude for adjustments. Lightroom processes RAW files through its non-destructive editing system, storing instructions rather than modifying the original file. It supports virtually every camera model and offers AI-powered features like Denoise that process RAW data before other adjustments.
Is DXO Pure RAW better than Lightroom?
DXO Pure RAW excels at noise reduction and lens correction, often producing cleaner results than Lightroom’s standard noise reduction. However, DXO Pure RAW is designed as a pre-processor rather than a complete editing solution. Many photographers use it alongside Lightroom, processing files through DXO first for noise reduction, then finishing edits in Lightroom. Lightroom’s newer AI Denoise has narrowed this gap significantly in 2026.
Which produces better image quality, Capture One or Lightroom?
Image quality differences are subtle and often depend on camera brand. Capture One generally produces better default color rendering and handles Fujifilm X-Trans files superiorly. Lightroom offers excellent AI-powered noise reduction and handles a wider range of cameras. For most images, both programs can achieve comparable results with proper adjustments. The choice often comes down to workflow preference and specific camera compatibility.
Is Capture One worth the extra cost over Lightroom?
Capture One is worth the investment if you need superior tethering, prefer its color editing workflow, or shoot Fujifilm cameras. Studio photographers and commercial shooters often find the additional cost justified by faster, more precise workflows. For hobbyists or photographers who primarily need organization and basic editing, Lightroom’s lower subscription cost and Photoshop integration may provide better value.
Can I use both Capture One and Lightroom together?
Yes, many photographers use both programs in their workflow. A common approach uses Lightroom for cataloging and organization while processing critical images in Capture One. You can export TIFFs from Capture One and import them into Lightroom for DAM. This hybrid workflow takes advantage of each program’s strengths but requires managing files across both applications.
Can I migrate my Lightroom catalog to Capture One?
Capture One can import Lightroom catalogs, but the migration has limitations. Basic adjustments like exposure and white balance transfer reasonably well, but complex edits, masks, and AI adjustments do not. You’ll need to re-edit images in Capture One after migration. Many photographers recommend starting fresh in Capture One rather than migrating, treating it as an opportunity to develop new editing approaches.
Conclusion
Both Capture One and Lightroom process RAW files excellently—your choice depends on workflow preferences and specific needs. Capture One excels for studio work, tethered shooting, and Fujifilm users who want the best X-Trans rendering. Its layer-based editing and color tools provide professional-grade precision.
Lightroom shines for photographers who want comprehensive organization, Photoshop integration, and AI-powered tools. The catalog system handles massive libraries efficiently, and the subscription includes more than just RAW processing software.
My recommendation: download both trials and process the same set of your own images. Notice which interface feels more intuitive, which default rendering matches your vision, and which workflow speeds your process. The best RAW processor is the one you’ll actually use consistently in 2026 and beyond.