You can capture sharp macro photos with your smartphone by getting within 1-4 inches of your subject, locking focus before shooting, keeping perfectly still, using natural light, and editing for sharpness afterward. I have tested these techniques with both iPhone and Android phones, and they consistently produce crisp close-up images without expensive gear.
Smartphone macro photography opens up a hidden world of detail that most people never notice. The tiny veins in a leaf, the texture of a butterfly wing, or the crystalline structure of a snowflake become stunning works of art when captured up close. But here is the challenge: getting sharp results at such extreme magnification is tricky.
Blurry photos frustrated me for months when I started. I would get close to a flower, tap the screen, and end up with a smudgy mess. After hundreds of failed attempts and plenty of practice, I discovered the specific techniques that make the difference between soft, unusable shots and tack-sharp macro photos.
In this guide, I will share everything I learned about smartphone macro photography. You will understand why your photos turn out blurry, which equipment options actually work, the exact camera settings to use, and a complete troubleshooting system for fixing common problems. Whether you use an iPhone with built-in macro mode or an Android phone with a clip-on lens, these techniques will help you capture professional-quality close-up photos.
What is Smartphone Macro Photography?
Smartphone macro photography captures extreme close-up images using your phone’s camera, revealing intricate details invisible to the naked eye. Traditional macro photography requires specialized DSLR lenses that can cost hundreds of dollars. Modern smartphones have changed that equation entirely.
The key difference between regular close-up photos and true macro shots lies in magnification. A genuine macro image shows your subject at life-size (1:1 ratio) or larger on your sensor. When you photograph a small insect and it fills your phone screen, you are seeing macro magnification in action.
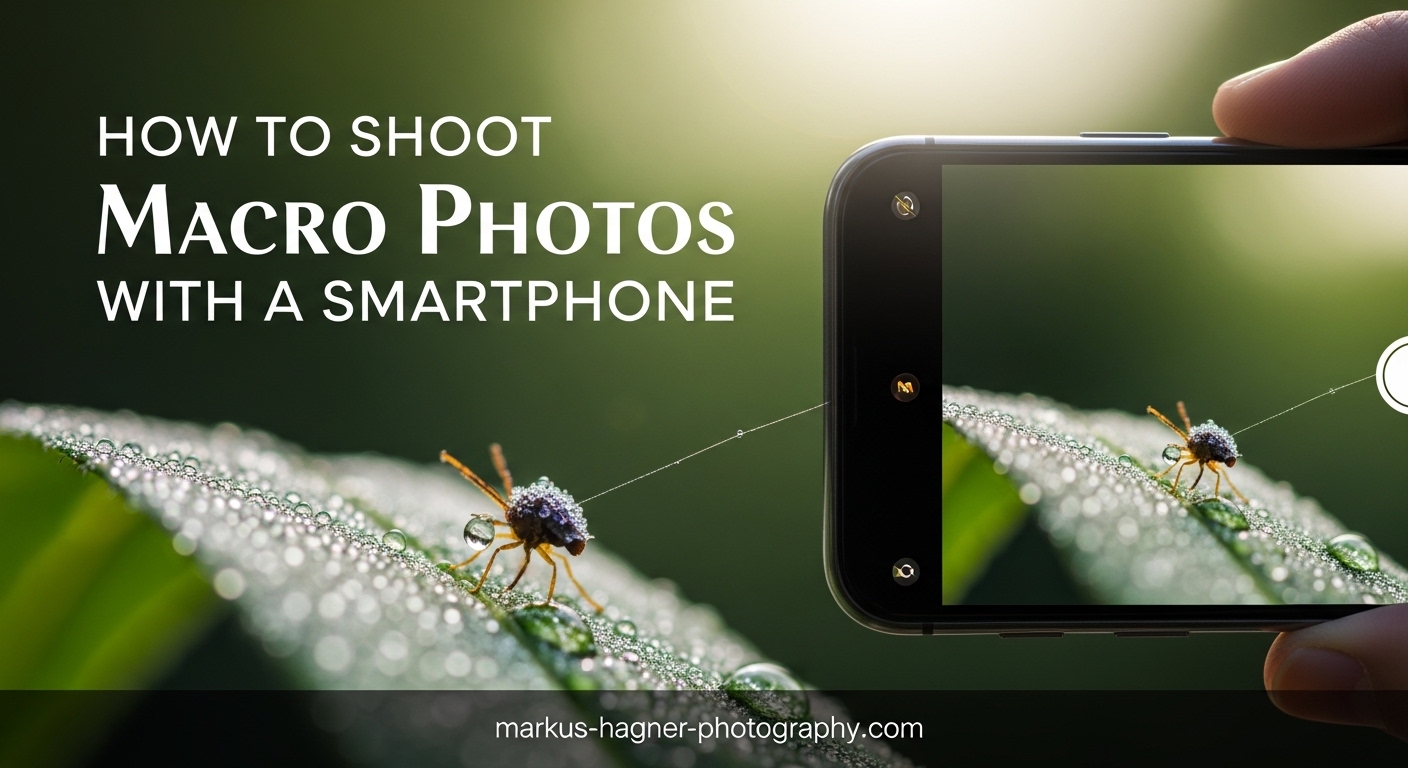
Smartphones achieve macro photography through several methods. Some newer phones like the iPhone 13 Pro and later include dedicated macro modes that automatically switch on when you get close to a subject. Other phones rely on clip-on lens attachments that screw onto or clip over your existing camera lens. You can even use Portrait mode as a pseudo-macro technique for certain subjects.
Depth of field behaves differently in macro photography than in regular shots. At close distances, your depth of field shrinks dramatically. You might have only a few millimeters of sharp focus while everything else blurs into soft bokeh. This shallow depth of field creates the dreamy, artistic look that makes macro photos so appealing. It also makes achieving sharp focus more challenging.
The good news is that smartphone sensors are actually well-suited for macro work. Their small size naturally provides deeper depth of field than full-frame cameras, meaning more of your subject stays in focus. With the right techniques, your phone can produce macro photos that rival dedicated camera setups.
Essential Equipment for Sharp Macro Photos
You do not need expensive gear to start shooting macro photos with your smartphone. I have captured sharp close-up images using nothing but my phone’s built-in camera. That said, a few affordable accessories can dramatically improve your results.
Built-in Macro Mode
If you own an iPhone 13 Pro or later, a Samsung Galaxy S21 Ultra or newer, or certain other flagship phones, you already have macro capabilities built in. These phones use their ultra-wide lenses with minimum focus distances of just 2-3 centimeters. When you approach a subject closely, the phone automatically switches to macro mode.
The advantage of built-in macro is convenience. You always have it with you, no extra gear required. The disadvantage is limited control. You cannot adjust the magnification level, and some phones apply heavy processing that can reduce sharpness.
Clip-on Macro Lenses
External macro lenses attach to your phone using a clip or a case. They come in different magnification levels, typically 7x, 10x, 15x, and even 21x. I recommend starting with a 10x lens, which provides strong magnification while remaining versatile enough for various subjects.
Quality matters enormously with clip-on lenses. Cheap $10 lenses often produce soft corners and chromatic aberration (color fringing). Mid-range options from brands like Moment, Olloclip, or Xenvo deliver sharper results with better edge-to-edge quality. Expect to spend $30-80 for a decent macro lens.
DIY Macro Lens Alternatives
Before buying a lens, try the water drop technique. Place a small drop of water directly on your phone’s camera lens. The water acts as a tiny magnifying lens, creating macro magnification for free. This works surprisingly well, though you need to be careful not to damage your phone.
Another option is salvaging a lens from an old laser pointer or DVD player. These small lenses can produce macro effects when held in front of your phone camera. The results are not as consistent as a proper clip-on lens, but they cost nothing if you have the materials.
Portrait Mode as a Macro Alternative
Portrait mode creates a shallow depth of field effect similar to macro photography. While it does not provide true magnification, it can produce beautiful close-up images of larger subjects like flowers or food. I have used this technique extensively when I wanted a macro-like look without getting extremely close.
The limitation is that Portrait mode works best at distances of 8-12 inches, not the 1-4 inches needed for true macro. It also relies on software processing, which sometimes creates unnatural edge detection around complex subjects.
Camera Settings for Macro Photography
Getting sharp macro photos requires understanding how to control your smartphone camera settings. The default automatic mode often fails at close distances because it hunts for focus and applies settings that reduce sharpness.
Focus Control
Autofocus struggles at macro distances. Your phone’s camera expects subjects to be at least a foot away, so when you get within inches, the focus system often fails to lock on. The solution is manual focus or focus lock.
On most phones, tap and hold on your subject to activate AF Lock (focus lock). This prevents the camera from refocusing between shots. For even better control, use a manual camera app like Halide (iOS) or Open Camera (Android) that lets you adjust focus distance manually with a slider.
Burst Mode for Moving Subjects
Insects, flowers swaying in the wind, and water droplets all move during shooting. Burst mode captures multiple frames per second, increasing your chances of getting one perfectly sharp shot. I use burst mode for nearly every macro subject that is not completely stationary.
To activate burst mode on iPhone, hold down the shutter button. On most Android phones, swipe the shutter button to the side or enable burst mode in settings. Later, you can select the sharpest frame from the burst sequence.
ISO and Shutter Speed
High ISO introduces noise that destroys detail in macro photos. Keep your ISO as low as possible, ideally between 32 and 100 on most phones. This might require slower shutter speeds, which means you need to stabilize your phone.
Shutter speed matters for both camera shake and subject movement. For handheld macro shots, try to maintain at least 1/60 second shutter speed. For moving subjects like insects, you need 1/250 or faster to freeze motion. Using burst mode helps compensate when you cannot achieve fast shutter speeds.
RAW vs JPEG
Shooting in RAW gives you significantly more control over sharpness during editing. RAW files contain all the data from your sensor, while JPEGs discard information during compression. For macro photography where detail matters, RAW is worth the extra file size.
Not all phones support RAW capture by default. You may need a third-party app like Halide, Lightroom Mobile, or ProCamera to enable RAW shooting. The editing flexibility is worth the learning curve.
Recommended Apps for Macro Photography
The default camera app on most phones lacks the manual controls needed for optimal macro results. I recommend these apps based on extensive testing:
Halide (iOS) offers excellent manual focus control with focus peaking that highlights in-focus areas. Lightroom Mobile (iOS and Android) provides RAW capture and integrated editing. Open Camera (Android) is a free option with full manual controls. ProCamera (iOS) includes macro-specific shooting modes.
Composition Techniques for Stunning Macro Shots
Sharp focus means nothing if your composition is boring. Macro photography reveals patterns and details that create natural visual interest, but thoughtful composition elevates good photos to great ones.
Choosing the Right Subject
Flowers and insects are classic macro subjects for good reason. They offer intricate details, interesting textures, and natural color. But do not limit yourself. I have captured compelling macro photos of everyday objects: the texture of a paper towel, frost on a window, bubbles in sparkling water, or the weave of fabric.
Look for subjects with strong textures, interesting patterns, or unexpected details. A rusty hinge, a cracked piece of glass, or the edge of a coin all become fascinating when viewed up close. Train yourself to see the miniature world around you.
Finding the Right Focus Distance
Every macro setup has a specific focus distance where sharpness peaks. Too close, and your camera cannot focus at all. Too far, and you lose the magnification that makes macro special. Finding this sweet spot takes practice.
Start by positioning your phone about 4 inches from your subject. Slowly move closer while watching the focus on your screen. When the image snaps into sharpest focus, stop moving. Memorize this distance for your particular setup. With a 10x clip-on lens, my sweet spot is approximately 2 inches from subject to lens.
Angle Selection and Background Control
The angle you choose dramatically affects your macro photos. Shooting straight down at a flower flattens it. Shooting from the side reveals depth and dimension. Getting low and shooting upward can create dramatic lighting and unusual perspectives.
Background matters as much as subject in macro photography. A cluttered background distracts from your subject. Move around to find an angle where the background is simple and complementary. The shallow depth of field in macro naturally blurs backgrounds, but you can enhance this effect by positioning your subject farther from background elements.
The Rule of Thirds in Macro
Standard composition rules apply to macro photography. Placing your focal point off-center using the rule of thirds creates more dynamic images than centering everything. Most camera apps can display a grid overlay to help with placement.
That said, rules exist to be broken. Sometimes a centered, symmetrical composition works perfectly for macro subjects like a flower’s center or a insect’s face. Trust your eye and experiment with different placements.
Lighting Mastery for Macro Photography
Light can make or break a macro photo. At extreme close-up distances, even small lighting mistakes become obvious. Understanding how to work with natural and artificial light transforms your results.
Natural Light Best Practices
Overcast days provide ideal lighting for macro photography. Clouds act as a giant diffuser, softening light and eliminating harsh shadows. Bright sunlight creates contrast problems and can blow out highlights on reflective surfaces.
The golden hour, that period shortly after sunrise and before sunset, produces warm, directional light that adds dimension to macro subjects. Low-angle light emphasizes texture and creates gentle shadows that reveal surface details.
I prefer shooting macro during the first two hours after sunrise. The light is soft, the air is still, and insects are less active, making them easier subjects. Early morning dew on flowers and leaves adds an extra element of interest.
Indoor Lighting Solutions
You do not need to wait for perfect outdoor conditions. Indoor macro photography works well with simple lighting setups. A window with indirect sunlight provides soft, even illumination. Position your subject close to the window and use a white reflector (even a piece of paper) on the opposite side to fill shadows.
For more controlled lighting, small LED panels or even a desk lamp with a diffuser can work. The key is avoiding direct, harsh light. Diffuse any artificial source through tracing paper, a white cloth, or a dedicated diffuser.
Backlighting Techniques
Positioning your light source behind your subject creates dramatic backlighting effects. This works particularly well with translucent subjects like flower petals, leaves, or insect wings. The light shining through reveals internal structures and creates a glowing effect.
To achieve backlighting outdoors, shoot toward the sun with your subject between you and the light source. A lens hood or your hand shading the lens prevents flare. Indoors, position a light behind your subject or place your subject on a light table.
How to Stabilize Your Phone for Sharp Results?
Camera shake is the number one cause of blurry macro photos. At high magnifications, even microscopic movement destroys sharpness. Mastering stability separates amateur results from professional-looking shots.
Handheld Techniques
You can capture sharp macro photos handheld, but it requires proper technique. Tuck your elbows against your body to create a stable platform. Hold your breath while shooting. Use both hands on your phone, with one hand supporting the bottom and the other steadying the top.
Bring your phone to your subject rather than reaching toward it. Extended arms introduce wobble. Keep your hands close to your body for maximum stability. I also find that resting my phone against a finger placed near the subject provides a makeshift support point.
Tripod Options
A small tripod designed for smartphones provides the ultimate stability. Look for a tripod with a phone mount that allows precise positioning. Flexible tripods like GorillaPods can wrap around branches or grip onto surfaces, offering creative mounting options.
For macro work, you need a tripod that positions your phone very close to the ground. Many standard tripods cannot get low enough. A tabletop tripod or a ground-level tripod adapter solves this problem.
Timer Mode and Voice Activation
Even with a tripod, pressing the shutter button introduces shake. Use your phone’s timer (2-3 seconds) so you can press the button and then let go before the photo captures. Voice activation, available on most phones, lets you trigger the shutter by saying a command without touching the device.
Dealing with Wind and Moving Subjects
Wind creates constant movement in outdoor macro subjects like flowers and leaves. Choose calm days when possible. If you must shoot in wind, create a windbreak using your body or a portable diffuser. You can also gently hold the subject still with one hand while shooting with the other.
For insects and other living subjects, patience is essential. Approach slowly and avoid sudden movements. Let the subject settle before shooting. Burst mode captures multiple frames quickly, giving you options when the subject briefly holds still.
Troubleshooting Common Macro Photography Problems (2026)
Even with perfect technique, macro photos sometimes turn out soft or blurry. Here is my troubleshooting system for diagnosing and fixing common issues.
Why Are My Macro Photos Blurry?
The most common cause is camera shake. At macro distances, any movement gets magnified along with your subject. Review your technique: are you holding the phone steady, using burst mode, or bracing against something? If blur persists handheld, try a tripod.
Incorrect focus distance causes blur too. If your photos are consistently soft, you might be too close or too far from your subject. Experiment with distance until you find the sweet spot where your lens focuses sharpest.
Slow shutter speed creates motion blur even with good technique. Check your settings. If your shutter speed drops below 1/60 second handheld, increase ISO slightly or add more light to enable faster speeds.
Focus Hunting Solutions
When your phone’s autofocus constantly searches without locking on, switch to manual focus or use AF Lock. Tap and hold on your subject until the focus box pulses and says “Locked.” Some phones also offer a macro focus mode specifically designed for close distances.
If focus still struggles, try focusing on something at the same distance but with more contrast or texture. Then reposition to your actual subject without changing focus. This focus-and-recompose technique often succeeds where direct focus fails.
Depth of Field Too Shallow
In macro photography, depth of field shrinks to millimeters. Sometimes only a sliver of your subject appears sharp while everything else blurs. To increase depth of field, back up slightly and crop in post-processing. You lose some resolution but gain focus depth.
Focus stacking offers a more advanced solution. Capture multiple photos with different focus points, then blend them together in an app like Helicon Focus or Photoshop. Some smartphone apps can perform focus stacking automatically, though results vary.
Quick Troubleshooting Checklist
When a macro photo turns out blurry, run through this checklist: Is your phone stable? Are you at the correct focus distance? Is your subject moving? Is your shutter speed fast enough? Is your ISO too high (causing noise that looks like blur)? Is your lens clean? Answering these questions usually identifies the problem.
Post-Processing Tips for Sharper Macro Photos
Even perfectly captured macro photos benefit from editing. Post-processing enhances sharpness, corrects color, and brings out the details that make macro images pop.
Best Editing Apps
Snapseed (free on iOS and Android) offers excellent sharpening tools and is easy to use. Lightroom Mobile provides more advanced controls and works seamlessly if you shoot RAW. VSCO offers beautiful presets that work well for nature macro photography.
For sharpening specifically, I use Lightroom Mobile’s Texture and Clarity sliders. Texture enhances fine details without over-sharpening edges. Clarity adds local contrast that makes details pop. Both adjustments should be applied moderately to avoid an artificial look.
Sharpening Workflow
Start your editing with basic adjustments: exposure, contrast, and white balance. Then address sharpness. Apply the Texture slider first, typically +10 to +25 for macro photos. Add Clarity sparingly, usually +5 to +15. Finish with the Sharpening tool, using a small radius (0.5-1.0) and moderate amount.
Always view your image at 100% when sharpening. This shows you the actual pixel-level detail. Sharpening looks different at lower zoom levels, and you might overdo it without realizing.
Focus Stacking for Smartphones
If you captured multiple shots at different focus distances, you can blend them for extended depth of field. Dedicated apps like Helicon Focus and CombineZP handle this automatically. The process works best when your subject remains perfectly still between shots, making it ideal for stationary subjects like flowers or products.
Frequently Asked Questions
How do I take sharp macro photos with my phone?
To capture sharp macro photos with your smartphone, get within 1-4 inches of your subject, lock focus by tapping and holding on the screen, keep your phone perfectly still using both hands with elbows tucked, use burst mode to capture multiple frames, shoot in natural overcast light, and apply gentle sharpening during post-processing. The combination of proper focus distance, stability, and good lighting produces consistently sharp results.
Do I need a macro lens for my phone?
No, you do not need a macro lens to shoot macro photos with your smartphone. Many newer phones like iPhone 13 Pro and later include built-in macro modes using the ultra-wide camera. You can also use Portrait mode for macro-like effects on larger subjects, or try DIY alternatives like a water drop on your lens. However, a quality clip-on macro lens (10x magnification, $30-80) provides the most consistent results and creative control.
What are the best settings for phone macro photography?
For sharp macro photos, use these settings: ISO 32-100 (keep it low to reduce noise), shutter speed of at least 1/60 second handheld or faster for moving subjects, locked focus or manual focus, burst mode enabled, and RAW format if available. Use a manual camera app like Halide or Lightroom Mobile for full control. In good lighting, your phone will achieve these settings automatically once you lock focus.
How do I get better focus in macro photography?
Improving focus in macro photography requires getting to the correct distance first. Start 4 inches from your subject and slowly move closer until the image snaps into focus. Use AF Lock by tapping and holding on your subject. For best results, switch to manual focus with a camera app that offers focus peaking, which highlights in-focus areas in real time. Take multiple shots and select the sharpest one.
What is the best distance for macro photography with phone?
The optimal distance depends on your setup. Built-in macro modes on phones like iPhone work best at 2-3 centimeters (about 1 inch). Clip-on macro lenses typically need 1-2 inches between lens and subject. Finding the sweet spot requires practice: start further away and slowly move closer while watching focus until the image appears sharpest. Mark this distance mentally for future shots.
How do I stabilize my phone for macro shots?
Stabilize your phone by tucking elbows against your body, holding with both hands, and bringing the phone to the subject rather than extending your arms. Use burst mode to capture multiple frames and select the sharpest. For maximum stability, use a smartphone tripod with a timer or voice activation to avoid shake from pressing the shutter. Ground-level tripods work best for macro subjects close to the floor.
What lighting is best for smartphone macro photography?
Overcast natural light provides the best results for macro photography because clouds diffuse harsh sunlight and eliminate shadows. Golden hour (shortly after sunrise or before sunset) adds warm, dimensional light. Indoors, position subjects near a window with indirect light and use a white reflector to fill shadows. Avoid direct sunlight, which creates harsh contrast and can blow out highlights on close-up subjects.
Can you take professional macro photos with a phone?
Yes, smartphones can capture professional-quality macro photos. Modern phones offer sufficient resolution, manual controls, and capable sensors for macro work. Professional results require proper technique: correct focus distance, stable shooting, good lighting, and thoughtful editing. Many photographers share smartphone macro photos in galleries and competitions. The limitation is less about equipment and more about mastering the specific techniques macro photography demands.
Start Capturing Stunning Macro Photos Today
Smartphone macro photography rewards practice and patience. The techniques in this guide, from proper focus distance and stabilization methods to lighting strategies and editing workflows, give you everything needed to capture sharp, professional-quality close-up photos without expensive equipment.
Start with stationary subjects like flowers or household objects to master the basics. Focus on getting consistently sharp results before tackling more challenging subjects like insects. Use burst mode liberally, shoot in RAW when possible, and apply gentle sharpening during editing.
The miniature world is waiting to be discovered. Your smartphone is already capable of revealing it. Now go explore and capture the hidden details all around you.