You already have everything you need to create stunning indoor portraits. No reflectors, no softboxes, no expensive lighting equipment required. Your window is one of the most beautiful light sources available, and learning to use it will transform your photography.
Over the past decade, I have shot hundreds of portraits using nothing but window light. From family sessions in cramped apartments to professional headshots in home offices, window light has never let me down. The soft, directional quality you get from a simple window rivals what many photographers spend thousands trying to recreate with artificial lighting.
In this guide, I will show you exactly how to use window light for beautiful indoor portraits without any gear. You will learn which windows work best, how to position your subject for different effects, the camera settings that deliver consistent results, and how to troubleshoot common problems. By the end, you will be able to walk into any room with a window and create professional-looking portraits.
Understanding Window Light for Indoor Portraits
Window light is simply natural daylight that enters a room through a window opening. What makes it special is how the glass and any window treatments naturally diffuse the light, creating a soft quality that flatters skin and adds dimension to faces. Unlike direct sunlight, which creates harsh shadows, window light wraps around your subject gently.
The quality of window light depends on several factors: the size of the window, the direction it faces, the time of day, and whether direct sun is hitting it. Large windows provide softer light because the light source appears bigger relative to your subject. Small windows create more directional, contrastier light with sharper shadow edges.
Window light is directional, which is what gives your portraits depth and dimension. Light coming from one side of your subject creates shadows that define facial features. This is fundamentally different from flat, even lighting that makes faces look two-dimensional. The directional nature of window light is what makes indoor portraits look professional rather than snapshot-like.
One reason window light flatters skin tones so well is its color temperature. Natural daylight falls in the 5000-6500K range, which renders skin accurately without the color casts you get from household bulbs. When you shoot with window light, you avoid the greenish tint from fluorescent lights or the orange glow from tungsten bulbs that can make skin look unhealthy.
Choosing the Right Window
Not all windows are created equal for portrait photography. The direction your window faces dramatically affects the quality and consistency of light throughout the day. Understanding this helps you pick the best window in any space.
North-facing windows are often considered ideal for portraits because they receive indirect light all day. The sun never shines directly through them, so you get consistent, soft light from morning to evening. This consistency makes north-facing windows perfect for beginners who want predictable results without worrying about timing.
South-facing windows present more challenges because they receive direct sunlight for much of the day. Direct sun streaming through creates harsh shadows and high contrast. However, on overcast days or when clouds diffuse the sun, south-facing windows can work beautifully. You can also wait until the sun moves to a different angle or use sheer curtains to soften the light.
East-facing windows provide lovely warm light in the morning when the sun rises. This light has a golden quality that many photographers love for its flattering warmth. Plan your sessions for morning hours if using an east window. By afternoon, east windows receive only indirect light.
West-facing windows work best in the afternoon and early evening. The light here also tends toward warm tones as the sun sets. If you shoot in late afternoon, west windows can give you that golden hour quality indoors.
Window Selection Checklist
When scouting for the best window in any room, consider these factors: size (larger is generally softer), direction (north for consistency, east/west for warmth), whether direct sun is hitting it, and what reflective surfaces are nearby. A large window with indirect light near a white wall is nearly perfect for portraits.
The Three Main Window Light Positions
How you position your subject relative to the window completely changes the look of your portrait. Each position creates a different mood and emphasizes different qualities. Understanding these three positions gives you creative control over your window light portraits.
Front Window Light
Front lighting places your subject facing directly toward the window with you, the photographer, between the subject and the light source. The light hits your subject’s face evenly from the front, minimizing shadows and creating a clean, bright look.
This position works beautifully for high-key portraits where you want a light, airy feeling. Front lighting flatters subjects with strong features because it softens everything evenly. The lack of strong shadows makes skin appear smoother and minimizes texture.
For front-lit window portraits, I typically position my subject about 3 to 4 feet from the window. Too close and the light becomes too bright and contrasty. Too far and you lose that beautiful window light quality as other light sources in the room start competing.
Camera settings for front window light: ISO 400-800, aperture f/2.8-f/4, shutter speed 1/200-1/250. These settings assume a reasonably bright window. Adjust ISO up if your window receives less light.
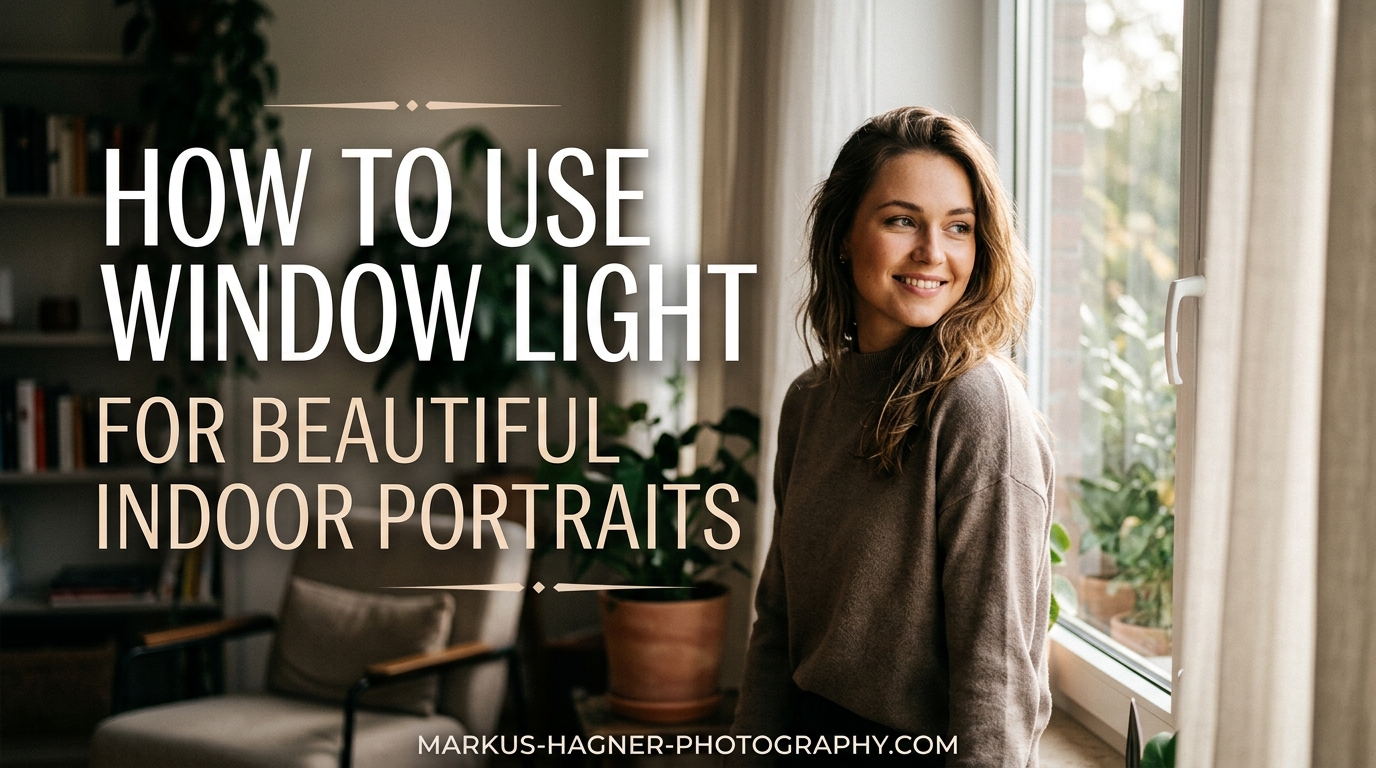
Side Window Light (90 Degrees)
Side lighting is my go-to position for dramatic, dimensional portraits. Position your subject at a 90-degree angle to the window so light hits one side of their face while the other falls into shadow. This creates the classic Rembrandt lighting pattern that painters have used for centuries.
The shadow side of the face adds depth and dimension that front lighting cannot achieve. You can control the drama by adjusting how much the subject turns toward or away from the window. More turn toward the light brightens the shadow side. More turn away deepens it.
For the most flattering side-lit portraits, have your subject turn their face slightly toward the window. This puts a catchlight in both eyes while maintaining the dimensional shadows. The triangle of light under the eye on the shadow side is the signature of Rembrandt lighting.
Camera settings for side window light: ISO 400-800, aperture f/2-f/2.8, shutter speed 1/160-1/200. The wider aperture helps gather light from the window while the slightly slower shutter still prevents camera shake. Meter for the highlight side of the face and let shadows fall where they may.
Back Window Light (Contre Jour)
Backlighting your subject with window light creates a dreamy, ethereal quality that many photographers love. Position your subject between you and the window so the light comes from behind them. This creates a bright halo effect around their hair and shoulders.
The challenge with backlit window portraits is exposure. Your camera’s meter will want to expose for the bright window, leaving your subject in silhouette. For portraits, you typically want to expose for your subject’s face and let the window blow out to pure white. This creates a high-key effect that feels natural and airy.
Backlighting works especially well for subjects with light or translucent hair. The light shining through creates a beautiful glow around their head. It also minimizes skin texture and any blemishes since the light is not directly illuminating the face.
Camera settings for back window light: ISO 800-1600, aperture f/1.8-f/2.8, shutter speed 1/125-1/160. You need higher ISO because you are exposing for the relatively darker subject while bright window light floods the scene. Use exposure compensation of +1 to +2 stops or meter in spot mode on the subject’s face.
Camera Settings for Window Light Portraits
Getting your camera settings right for window light removes frustration and lets you focus on your subject. While every situation differs slightly, these guidelines will get you in the right ballpark quickly.
ISO Settings
Start with ISO 400-800 for most window light situations. If your window receives indirect north light, you might need ISO 800-1600. If you have bright east or west window light, ISO 200-400 might suffice. The goal is to keep ISO as low as possible while maintaining a usable shutter speed.
Aperture Choices
For portraits, I generally recommend apertures between f/1.8 and f/4. Wider apertures like f/1.8 create beautiful background blur that separates your subject from distractions. If you want more of the background in focus, stop down to f/4 or f/5.6. Aperture also controls how much light reaches your sensor, so adjust accordingly.
Shutter Speed Guidelines
Keep your shutter speed at 1/125 or faster to avoid camera shake when shooting handheld. If you are using a longer focal length like 85mm or 105mm, aim for 1/200 or faster. Slower shutter speeds introduce blur that ruins sharpness in portraits.
Why Manual Mode Works Best
Window light can confuse automatic metering because of the extreme brightness range between window and room. Manual mode gives you consistent exposure as your subject moves slightly. Set your exposure once for the lighting position you are using, then leave it alone. Your results will be more consistent than any auto mode.
White Balance for Window Light
Set your white balance to Daylight (around 5200-5600K) for window light portraits. This renders skin tones naturally. If your room has other light sources turned on, turn them off to avoid mixed color temperatures. Mixed lighting creates color casts that are difficult to fix in editing.
Metering Tips
Use spot metering when you want precise control. Meter on your subject’s face, not the bright window. In evaluative or matrix metering, your camera tries to balance the entire scene including the window, often underexposing your subject. Spot metering on the face ensures proper subject exposure regardless of the bright window.
Using Your Environment as Natural Reflectors
Here is the key to truly zero-gear window light photography: your environment already contains reflectors. You just need to recognize and use them. This approach is what separates photographers who need equipment from those who can create beautiful images anywhere.
White walls are excellent reflectors. Position your subject near a white wall opposite the window and that wall will bounce light back into the shadow side of their face. The closer they stand to the wall, the more fill light you get. This naturally softens shadows without any reflector disc.
Light-colored floors work the same way. Light bouncing up from a pale wood floor or white rug fills in under-eye shadows that can make people look tired. This is why standing your subject on a light-colored rug or near light flooring improves window light portraits.
Ceilings also reflect window light, especially if they are white or light-colored. Light hitting the ceiling bounces back down, creating soft overhead fill. Rooms with white ceilings generally produce softer window light portraits than rooms with dark ceilings.
Look around any room for reflective surfaces before you start shooting. A white door, light-colored curtains, a pale sofa, even a light-colored shirt your subject is wearing can reflect fill light into shadows. Positioning matters more than equipment.
The best part about environmental reflectors is that they are already there. You do not need to buy, carry, or set up anything. You simply position your subject where the room itself provides the fill you need.
Troubleshooting Common Window Light Problems
Even with the best preparation, window light presents challenges. Here are the most common problems I encounter and how to solve them.
Overexposed Windows, Underexposed Subjects
This is the most common complaint. Your window blows out to white while your subject appears too dark. The solution is to expose for your subject and accept that the window will be pure white. Use spot metering on the face, or dial in positive exposure compensation. A blown-out window often looks intentional and artistic in portraits.
Harsh Shadows from Direct Sun
Direct sunlight streaming through a window creates hard shadows and squinting subjects. Move your subject away from the window or wait until the sun moves off the glass. Sheer curtains or a white sheet over the window diffuses harsh sun into soft, usable light.
Mixed Lighting Color Issues
When household lamps mix with window light, you get strange color casts on your subject. Turn off all indoor lights when shooting window light portraits. This ensures clean, consistent color temperature across your image.
Not Enough Light in the Room
Small windows or overcast days can leave you struggling for light. Raise your ISO to 1600 or higher. Open your aperture to its widest setting. Position your subject closer to the window. If shutter speed drops below 1/125, brace your camera against a wall or furniture to steady it.
Camera Shake from Slow Shutter
When light is limited and your shutter speed drops, camera shake ruins sharpness. Increase ISO before letting shutter speed fall below 1/125. If you must shoot slower, hold your camera against a doorframe or wall. Exhale slowly and squeeze the shutter gently.
Frequently Asked Questions
How to light an indoor portrait?
Find a window with indirect light, preferably north-facing for consistency. Position your subject 2-4 feet from the window at a 90-degree angle for dimensional side lighting. Use manual mode, expose for your subject’s face, and let the window blow out if needed. Turn off all indoor lights to avoid mixed color temperatures.
What is the best direction for window light photography?
North-facing windows provide the most consistent, soft light throughout the day because they never receive direct sun. East-facing windows work best in morning hours with warm light. West-facing windows are optimal for afternoon sessions. South-facing windows can be harsh with direct sun but work well on overcast days.
How do I expose properly for window light without blowing out highlights?
Expose for your subject, not the window. Use spot metering on your subject’s face and let the window highlights clip to white. This creates a natural high-key effect. Trying to preserve window detail while exposing for your subject often results in underexposed, muddy portraits.
What camera settings work best for window light portraits?
Use manual mode with ISO 400-800, aperture f/1.8-f/4, and shutter speed 1/125-1/250. Set white balance to Daylight (5200-5600K). Adjust ISO up for dimmer windows or down for brighter conditions. These settings provide a reliable starting point for most window light situations.
Conclusion
Window light gives you everything you need for beautiful indoor portraits. You now understand how to choose the right window based on direction and time of day. You know the three main lighting positions: front lighting for clean and bright portraits, side lighting for drama and dimension, and backlighting for ethereal high-key effects. You have the camera settings that work reliably and the troubleshooting solutions for common problems.
The key insight is this: your environment already provides what you need. White walls, light floors, and reflective surfaces bounce fill light into shadows naturally. You never need reflectors or modifiers to create professional window light portraits. The best photographers do not rely on equipment. They learn to see and use the light that already exists.
Practice these techniques in your own space. Find your best window, try each lighting position, and note the results. Shoot at different times of day and observe how the light changes. Within a few sessions, window light will feel intuitive. You will walk into any room and immediately see where to position your subject for beautiful results.
Start with side lighting at 90 degrees to the window. This position delivers the most consistently flattering results and teaches you to see how directional light shapes faces. Once side lighting feels natural, experiment with front and back positions. Your window is waiting. Go create something beautiful.