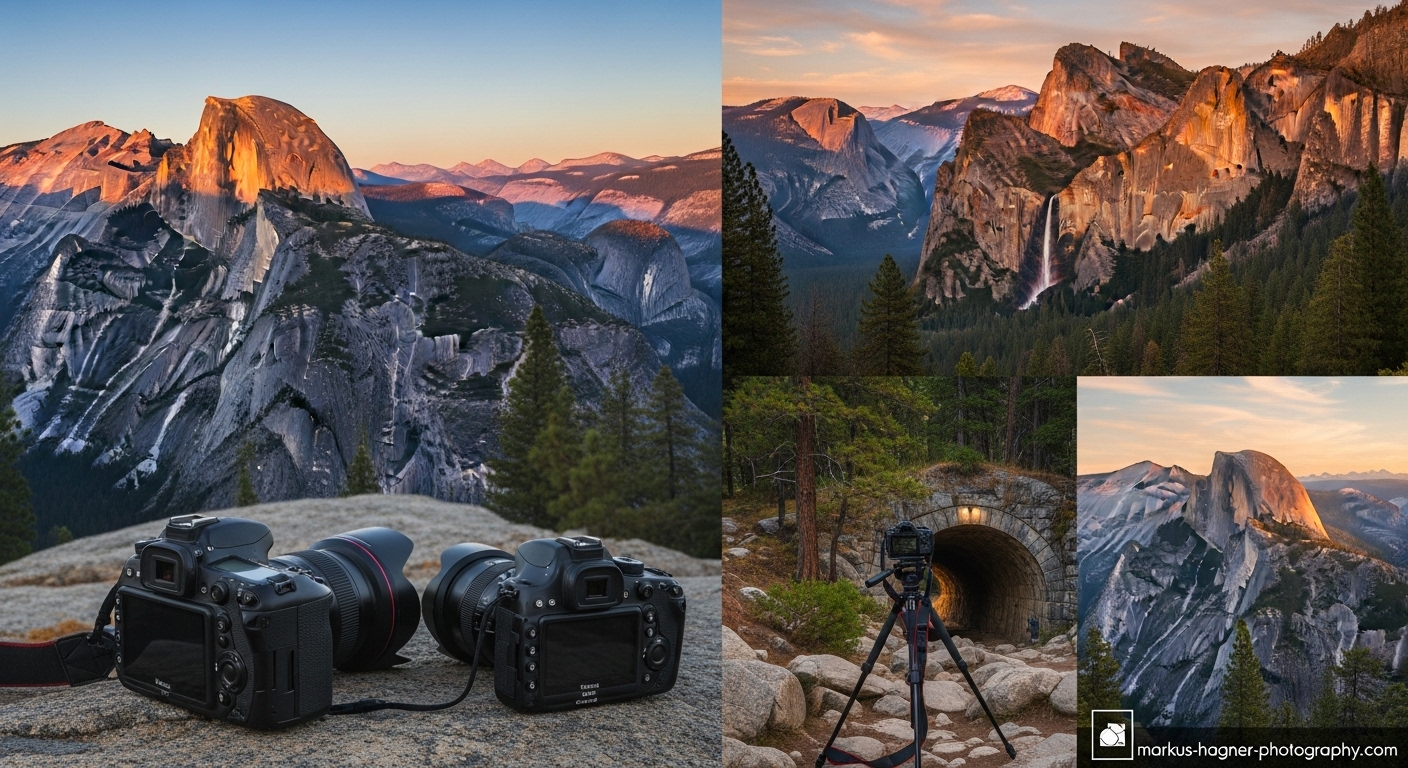
I’ve spent countless hours exploring Yosemite National Park with my camera in hand, and let me tell you – this place never gets old. As someone who’s visited Yosemite in every season and at every time of day, I’m excited to share my absolute favorite photo spots that will make your Instagram followers jealous and your portfolio shine.
Yosemite isn’t just another national park – it’s a photographer’s paradise that offers everything from towering granite cliffs to cascading waterfalls, from ancient sequoias to pristine alpine lakes. Whether you’re a seasoned pro or just starting your photography journey, these 15 spots will give you the shots you’ve been dreaming of.
Why Yosemite is a Photographer’s Dream
I remember my first trip to Yosemite like it was yesterday. I arrived before sunrise, camera gear packed and ready, and when I saw that first light hit Half Dome… well, let’s just say I was hooked. What makes Yosemite so special for photography is the incredible diversity of landscapes all in one place.
The park offers:
- Iconic granite formations that create dramatic silhouettes
- Waterfalls that flow year-round (though they’re most spectacular in spring)
- Alpine lakes with perfect reflections
- Ancient sequoias that make you feel tiny
- Diverse wildlife opportunities
- Four distinct seasons each offering unique photographic possibilities
But here’s the thing – timing is everything in Yosemite. I’ve learned through trial and error (and plenty of missed shots) that knowing when and where to be can make all the difference between a good photo and a great one.
Essential Gear for Yosemite Photography
Before we dive into the spots, let me share what I’ve found to be the essential gear for capturing Yosemite’s beauty:
Camera Equipment:
- A full-frame or APS-C DSLR/mirrorless camera (I use both depending on the situation)
- Wide-angle lens (16-35mm) for those expansive landscapes
- Telephoto lens (70-200mm or longer) for wildlife and compressed landscapes
- Sturdy tripod (non-negotiable for sunrise/sunset shots)
- Circular polarizer filter for cutting glare on water and enhancing skies
- Neutral density filters for long exposure water shots
- Extra batteries (cold drains them fast in winter)
- Plenty of memory cards (trust me, you’ll need them)
Non-Camera Essentials:
- Headlamp for early morning/late evening shoots
- Weather-appropriate clothing (layers are key)
- Comfortable hiking shoes
- Water and snacks
- Park map (cell service is spotty)
Now, let’s get to the good stuff – the 15 best photo spots that will make your Yosemite photography unforgettable.
1. Tunnel View
Location: Wawona Road (Highway 41) at the east entrance of the Wawona Tunnel
Best Time: Sunrise, sunset, and during clearing storms
Difficulty: Easy (parking lot access)
Why It’s Special: This is THE classic Yosemite shot that everyone knows, but there’s a reason it’s so popular.
I’ve probably shot Tunnel View at least 50 times, and I still get excited every time I visit. The view encompasses Half Dome, El Capitan, and Bridalveil Fall all in one frame – it’s like Yosemite’s greatest hits in a single composition.
Pro Tips:
- Arrive at least 45 minutes before sunrise to claim your spot (it gets crowded!)
- Use a wide-angle lens (16-24mm) to capture the full scene
- During clearing storms, the clouds create incredible drama
- For something different, try a panoramic stitch
- In winter, the snow-covered trees add magical contrast
Camera Settings I Use:
- Sunrise: f/11, ISO 100, 1/60s (adjust as light changes)
- Sunset: f/13, ISO 100, 1/30s
- Stormy conditions: f/8, ISO 200, 1/125s
2. Glacier Point
Location: Glacier Point Road (closed in winter)
Best Time: Sunset, sunrise (fewer crowds)
Difficulty: Easy (parking lot access)
Why It’s Special: At 7,214 feet, Glacier Point offers a bird’s-eye view of Yosemite Valley that will take your breath away.
Glacier Point is where I bring my friends who have never been to Yosemite – the view never fails to elicit gasps and “wow” moments. From here, you can see Half Dome, Vernal and Nevada Falls, and the entire Yosemite Valley spread out below you like a miniature model.
Pro Tips:
- Sunset is magical when the light hits Half Dome
- For fewer crowds, go for sunrise (you might have the place to yourself!)
- Bring a telephoto lens to compress the valley and create layered depth
- The walk to the point is short but has some stairs – wear good shoes
- Check road status before you go (it’s closed November-May typically)
Camera Settings I Use:
- Sunset: f/16, ISO 100, 1/15s (use tripod!)
- Sunrise: f/11, ISO 100, 1/30s
- Telephoto compression: f/8, ISO 100, 1/125s
3. Taft Point
Location: Glacier Point Road, 2.2-mile round trip hike
Best Time: Sunset
Difficulty: Moderate (easy hike but exposed cliffs)
Why It’s Special: The sheer drop and unfenced views create dramatic, edge-of-the-world photos.
Taft Point is where I go when I want to feel small and insignificant in the best possible way. The 3,000-foot drop to the valley below is not for the faint of heart, but the photos you can capture here are absolutely worth it.
Pro Tips:
- The hike is relatively easy (1.1 miles each way) but allow 2-3 hours total
- Sunset is prime time – the light on El Capitan is incredible
- BE CAREFUL – there are no guardrails
- A wide-angle lens works best for the expansive views
- Consider a foreground subject for scale (a person works well)
Camera Settings I Use:
- Sunset: f/11, ISO 100, 1/30s (tripod essential)
- Golden hour: f/8, ISO 100, 1/125s
- For silhouettes: f/16, ISO 100, 1/250s
4. Valley View
Location: Northside Drive, just after Pohono Bridge
Best Time: Sunrise, early morning
Difficulty: Easy (pullout along the road)
Why It’s Special: Perfect reflections of El Capitan in the Merced River.
Valley View is my go-to spot for those classic Yosemite reflection shots. I’ve spent many early mornings here, sipping coffee and waiting for the perfect light to hit El Capitan and reflect in the calm waters of the Merced River.
Pro Tips:
- Arrive early (before 6 AM in summer) for the calmest water
- Use a polarizer to cut glare and enhance reflections
- A telephoto lens (70-200mm) helps compress the scene
- Try different compositions – both horizontal and vertical work well
- In fall, the changing leaves add beautiful color
Camera Settings I Use:
- Early morning: f/16, ISO 100, 1/15s (tripod required)
- Reflection shots: f/11, ISO 100, 1/30s
- With polarizer: add 1-2 stops of light
5. Yosemite Falls
Location: Multiple viewpoints throughout the valley
Best Time: Spring (peak flow), sunrise, sunset
Difficulty: Easy to moderate depending on viewpoint
Why It’s Special: North America’s tallest waterfall is truly spectacular.
Yosemite Falls is actually three separate falls combined, and at 2,425 feet, it’s one of the tallest waterfalls in the world. I’ve photographed it from every angle imaginable, and each perspective offers something unique.
Pro Tips:
- Spring (April-June) offers the most dramatic water flow
- Lower Falls viewpoint is easily accessible from Yosemite Village
- For the full experience, hike to the top (strenuous but worth it)
- Rainbow potential in the morning mist
- Long exposures create that silky water effect
Camera Settings I Use:
- Lower Falls: f/16, ISO 100, 1/15s for silky water
- Upper Falls: f/11, ISO 100, 1/60s
- Rainbow shots: f/8, ISO 100, 1/125s
6. Half Dome from Cook’s Meadow
Location: Cook’s Meadow loop trail
Best Time: Sunrise, sunset, clearing storms
Difficulty: Easy (flat, paved trail)
Why It’s Special: Iconic Half Dome reflections with wildflowers in spring.
Cook’s Meadow is where I discovered that you don’t need to hike miles to get incredible Yosemite photos. This flat, accessible meadow offers some of the best views of Half Dome, especially when the Merced River creates perfect reflections.
Pro Tips:
- The boardwalk trail is wheelchair accessible
- Spring brings wildflowers that add foreground interest
- Sunrise and sunset both work well here
- Use a polarizer to enhance the reflection
- After rain, the puddles create mini reflection pools
Camera Settings I Use:
- Reflection shots: f/16, ISO 100, 1/15s (tripod)
- General landscape: f/11, ISO 100, 1/60s
- With wildflowers: f/8, ISO 100, 1/125s
7. El Capitan Meadow
Location: Northside Drive across from El Capitan
Best Time: All day, best light morning/afternoon
Difficulty: Easy (roadside meadow)
Why It’s Special: Unobstructed views of the world’s largest granite monolith.
El Capitan Meadow is where I go to watch climbers tackle the sheer face of this massive rock formation. Even if you’re not into climbing photography, the scale and texture of El Cap make for incredible images.
Pro Tips:
- Bring binoculars to spot climbers (they look like tiny dots!)
- A telephoto lens (200mm+) helps capture climber details
- Morning light hits the face beautifully
- In fall, the changing leaves add color contrast
- Consider a time-lapse of climbers ascending
Camera Settings I Use:
- Wide shots: f/11, ISO 100, 1/125s
- Climber details: f/5.6, ISO 200, 1/500s
- Sunset light: f/8, ISO 100, 1/250s
8. Bridalveil Fall
Location: Wawona Road, just past Tunnel View
Best Time: All year, best flow in spring
Difficulty: Easy (short walk to viewpoint)
Why It’s Special: Elegant 620-foot waterfall with rainbow potential.
Bridalveil Fall might be one of the most photographed waterfalls in the world, but there’s a good reason for that. I’ve shot this waterfall in every season, and each time it offers something different.
Pro Tips:
- The trail is paved and accessible to most visitors
- Spring brings the most dramatic water flow
- Morning light creates rainbows in the mist
- Be prepared to get wet (the mist is constant)
- A wide-angle lens captures the full height
Camera Settings I Use:
- Full waterfall: f/11, ISO 100, 1/60s
- Rainbow shots: f/8, ISO 100, 1/250s
- Misty details: f/5.6, ISO 200, 1/500s
9. Sentinel Bridge
Location: Sentinel Bridge, Yosemite Village
Best Time: Sunset
Difficulty: Easy (bridge access)
Why It’s Special: Classic Half Dome reflection shot.
Sentinel Bridge is where I go when I want that postcard-perfect Half Dome reflection. I’ve spent many evenings here, waiting for the perfect light to hit Half Dome and reflect in the Merced River below.
Pro Tips:
- Sunset is prime time for reflections
- The bridge can get crowded – arrive early
- A mid-range zoom (24-70mm) works well
- Try different compositions from various points on the bridge
- In winter, ice patterns add interesting foreground elements
Camera Settings I Use:
- Sunset reflection: f/16, ISO 100, 1/15s (tripod)
- Golden hour: f/11, ISO 100, 1/60s
- Blue hour: f/8, ISO 200, 1/30s
10. Mist Trail to Vernal Fall
Location: Happy Isles trailhead
Best Time: Morning, spring for best flow
Difficulty: Strenuous (steep, wet stairs)
Why It’s Special: Up-close waterfall experience with rainbow potential.
The Mist Trail is not for the faint of heart, but if you’re willing to get wet and climb some serious stairs, the photo opportunities are incredible. I’ve hiked this trail dozens of times, and the misty rainbow shots never get old.
Pro Tips:
- Wear waterproof gear – you WILL get wet
- The stairs are steep and can be slippery
- Morning light creates the best rainbows
- A wide-angle lens captures the power of the falls
- Bring a microfiber cloth for your lens
Camera Settings I Use:
- Rainbow shots: f/8, ISO 100, 1/250s
- Power of the falls: f/11, ISO 100, 1/125s
- Misty atmosphere: f/5.6, ISO 200, 1/500s
Also Read: Big Firmware Updates For Sony A1 A9 III A7S III And A7 IV
11. Mariposa Grove
Location: Wawona Road, near South Entrance
Best Time: Morning, winter for snow
Difficulty: Easy to moderate (boardwalk trails)
Why It’s Special: Ancient giant sequoias that make you feel tiny.
Mariposa Grove is where I go to photograph the giants. Standing next to these ancient trees that have been growing for thousands of years puts everything in perspective. I’ve photographed this grove in every season, and each offers unique opportunities.
Pro Tips:
- The shuttle bus is required in peak season
- Morning light filters beautifully through the trees
- Winter snow creates magical scenes
- A wide-angle lens shows the scale of the trees
- Look for interesting patterns in the bark
Camera Settings I Use:
- Tree portraits: f/8, ISO 100, 1/60s
- Forest scenes: f/11, ISO 100, 1/30s
- Snow-covered trees: f/16, ISO 100, 1/125s
12. Olmsted Point
Location: Tioga Road (closed in winter)
Best Time: Sunset, sunrise
Difficulty: Easy (parking lot access)
Why It’s Special: Unique backside view of Half Dome and Tenaya Canyon.
Olmsted Point offers a completely different perspective of Half Dome that most visitors never see. I love coming here for sunset when the light hits the backside of Half Dome and creates incredible textures and shadows.
Pro Tips:
- Tioga Road is typically closed November-May
- The viewpoint is easily accessible from the parking lot
- Sunset light creates incredible texture on Half Dome
- A telephoto lens helps isolate interesting details
- The glacial polish on the rocks makes great foregrounds
Camera Settings I Use:
- Sunset: f/16, ISO 100, 1/30s (tripod)
- Textures: f/11, ISO 100, 1/60s
- Wide scenes: f/8, ISO 100, 1/125s
13. Tuolumne Meadows
Location: Tioga Road (closed in winter)
Best Time: Sunrise, sunset, summer only
Difficulty: Easy (meadow access)
Why It’s Special: High alpine meadow with Cathedral Peak backdrop.
Tuolumne Meadows is where I escape the summer crowds of Yosemite Valley. At 8,600 feet, this high alpine meadow offers completely different photographic opportunities with its wildflowers, meandering streams, and dramatic mountain backdrop.
Pro Tips:
- Only accessible in summer (July-September typically)
- The meadows are full of wildflowers in July
- Sunrise and sunset both offer beautiful light
- A wide-angle lens captures the expansive views
- Look for reflections in the meandering streams
Camera Settings I Use:
- Meadow scenes: f/11, ISO 100, 1/60s
- Wildflower close-ups: f/5.6, ISO 100, 1/250s
- Sunset: f/16, ISO 100, 1/30s (tripod)
14. Horsetail Fall (Firefall)
Location: El Capitan picnic area
Best Time: Mid-February, sunset
Difficulty: Easy (roadside viewing)
Why It’s Special: The natural “firefall” phenomenon when the setting sun lights up the waterfall.
Horsetail Fall is perhaps Yosemite’s most famous photographic phenomenon, and for good reason. For a few weeks in February, if conditions are perfect, the setting sun hits this seasonal waterfall and makes it glow like lava. I’ve been lucky enough to capture this phenomenon three times, and it’s truly magical.
Pro Tips:
- Only happens in mid-February (typically Feb 17-19)
- Needs clear skies and sufficient water flow
- Arrive HOURS early to claim your spot
- A telephoto lens (200mm+) is essential
- Be prepared for crowds – this is very popular
Camera Settings I Use:
- Firefall: f/11, ISO 100, 1/250s
- Before sunset: f/8, ISO 100, 1/500s
- After sunset: f/8, ISO 200, 1/125s
15. Mirror Lake
Location: Mirror Lake trailhead
Best Time: Sunrise, spring for best reflections
Difficulty: Easy (1-mile round trip)
Why It’s Special: Perfect reflections of Half Dome and surrounding cliffs.
Mirror Lake is exactly what it sounds like – a lake that creates perfect mirror-like reflections. I’ve spent many early mornings here, waiting for the first light to hit Half Dome and reflect in the calm waters.
Pro Tips:
- The lake is more of a pond by late summer
- Spring offers the best water levels and reflections
- The trail is flat and easy for most visitors
- A wide-angle lens captures the full reflection scene
- Look for interesting foreground elements (rocks, logs)
Camera Settings I Use:
- Reflection shots: f/16, ISO 100, 1/15s (tripod)
- Sunrise: f/11, ISO 100, 1/30s
- General scenes: f/8, ISO 100, 1/125s
Seasonal Photography Guide
One thing I’ve learned from photographing Yosemite year-round is that each season offers unique opportunities. Here’s my seasonal breakdown:
Spring (April-June)
Best for: Waterfalls, wildflowers, rushing rivers Top spots: Yosemite Falls, Bridalveil Fall, Mist Trail What to expect: Crowds start building, waterfalls at peak flow, wildflowers in meadows
Summer (July-September)
Best for: High country access, wildflowers, star photography Top spots: Tuolumne Meadows, Olmsted Point, Glacier Point What to expect: Peak crowds, warm weather, Tioga Road open
Fall (October-November)
Best for: Fall colors, fewer crowds, crisp air Top spots: Valley View, Cook’s Meadow, El Capitan Meadow What to expect: Thinning crowds, potential fall colors, cooler temperatures
Winter (December-March)
Best for: Snow scenes, solitude, unique ice formations Top spots: Tunnel View, Valley View, Mariposa Grove What to expect: Fewest crowds, snow-covered landscapes, some roads closed
Also Read: Sony ZV-E10 II And Sony A6900 Rumored Specs
Pro Photography Tips for Yosemite
After years of photographing Yosemite, I’ve picked up some tips that I wish I’d known when I started:
Timing is Everything
- Golden hour (sunrise/sunset) provides the most dramatic light
- Blue hour (just before sunrise/after sunset) offers beautiful soft light
- Clearing storms create incredible atmosphere and drama
- Midday light is harsh but great for waterfalls and forest scenes
Composition Secrets
- Use foreground elements to create depth (rocks, trees, flowers)
- Look for leading lines (rivers, trails, rock formations)
- Include people for scale in grand landscapes
- Try different perspectives (get low, climb high, shoot from unusual angles)
Technical Tips
- Shoot in RAW for maximum editing flexibility
- Use a tripod for sharp images, especially in low light
- Bracket exposures for high dynamic range scenes
- Check your histogram to ensure proper exposure
- Clean your sensor before your trip (those sky shots will show dust!)
Weather Considerations
- Mountain weather changes quickly – always be prepared
- Winter requires special gear for both you and your equipment
- Summer thunderstorms can create dramatic lighting
- Fog and mist add atmosphere but reduce visibility
Frequently Asked Questions
What’s the best time of year to visit Yosemite for photography?
Honestly, there’s no bad time – each season offers something unique. Spring has the best waterfalls, summer opens up the high country, fall has beautiful colors and fewer crowds, and winter offers magical snow scenes. I personally love late April/early May for the perfect combination of waterfalls and manageable crowds.
Do I need a permit for photography in Yosemite?
For regular photography, no permit is needed. However, if you’re planning commercial photography or using models/props, you’ll need a permit. Always check the current regulations on the NPS website before your trip.
What camera equipment is essential for Yosemite?
At minimum, bring a camera with manual controls, a wide-angle lens, a sturdy tripod, and extra batteries. For more versatility, add a telephoto lens, polarizing filter, and neutral density filters. Don’t forget weather protection for your gear!
How do I avoid crowds at popular photo spots?
The secret is timing – go early (before sunrise) or stay late (after sunset). Weekdays are less crowded than weekends. Winter offers the most solitude, though some areas may be inaccessible. Consider hiking further than most people are willing to go.
What are the best photography workshops or tours in Yosemite?
There are several excellent options, including the Ansel Adams Gallery workshops, Yosemite Conservancy field seminars, and private guides like Michael Frye. I’d recommend booking well in advance as these fill up quickly.
How do I photograph the Horsetail Fall firefall?
This requires perfect timing – typically mid-February with clear skies and sufficient water flow. Arrive at least 3-4 hours before sunset to claim your spot. Use a telephoto lens (200mm+) and be prepared for crowds. Check conditions and forecasts carefully before planning your trip.
What’s the best way to get around Yosemite for photography?
Having a car gives you the most flexibility, especially for early morning and late evening shoots. The park shuttle system is excellent but doesn’t run early enough for sunrise photography. Consider renting a car if you’re flying in.
Are there any photography restrictions in Yosemite?
Generally, no, but stay on designated trails and respect wildlife. Some areas may have temporary restrictions during nesting seasons or special events. Always follow Leave No Trace principles and don’t damage vegetation for your shots.
Save This Guide for Your Yosemite Adventure!
I hope this comprehensive guide helps you capture incredible photos during your Yosemite adventure. I’ve poured all my knowledge and experience into these recommendations to help you make the most of your photography trip.
Last updated: May 2026