If you’ve ever spent hours editing a video only to discover the audio slowly drifts out of sync, you know how frustrating it can be. The culprit is often hiding in plain sight: your footage was recorded using variable frame rate (VFR) instead of constant frame rate (CFR). Understanding the difference between these two encoding methods can save you hours of troubleshooting and prevent headaches in your editing workflow.
In this guide, I’ll explain what frame rate actually means, why variable vs constant frame rate matters for video editing, and how to handle VFR footage when you encounter it. By the end, you’ll know exactly how to prevent audio sync issues and choose the right approach for your projects.
What Is Frame Rate (FPS)?
Frame rate, measured in frames per second (FPS), refers to how many individual images a video displays each second. Common frame rates include 24 FPS for cinematic content, 30 FPS for standard video, and 60 FPS for smooth motion in sports or gaming content. Higher frame rates capture more detail in fast-moving scenes but create larger file sizes.
Think of video as a flipbook. Each page is a single frame, and flipping through quickly creates the illusion of motion. The frame rate determines how many pages you flip per second. More pages mean smoother motion but require more storage space and processing power.
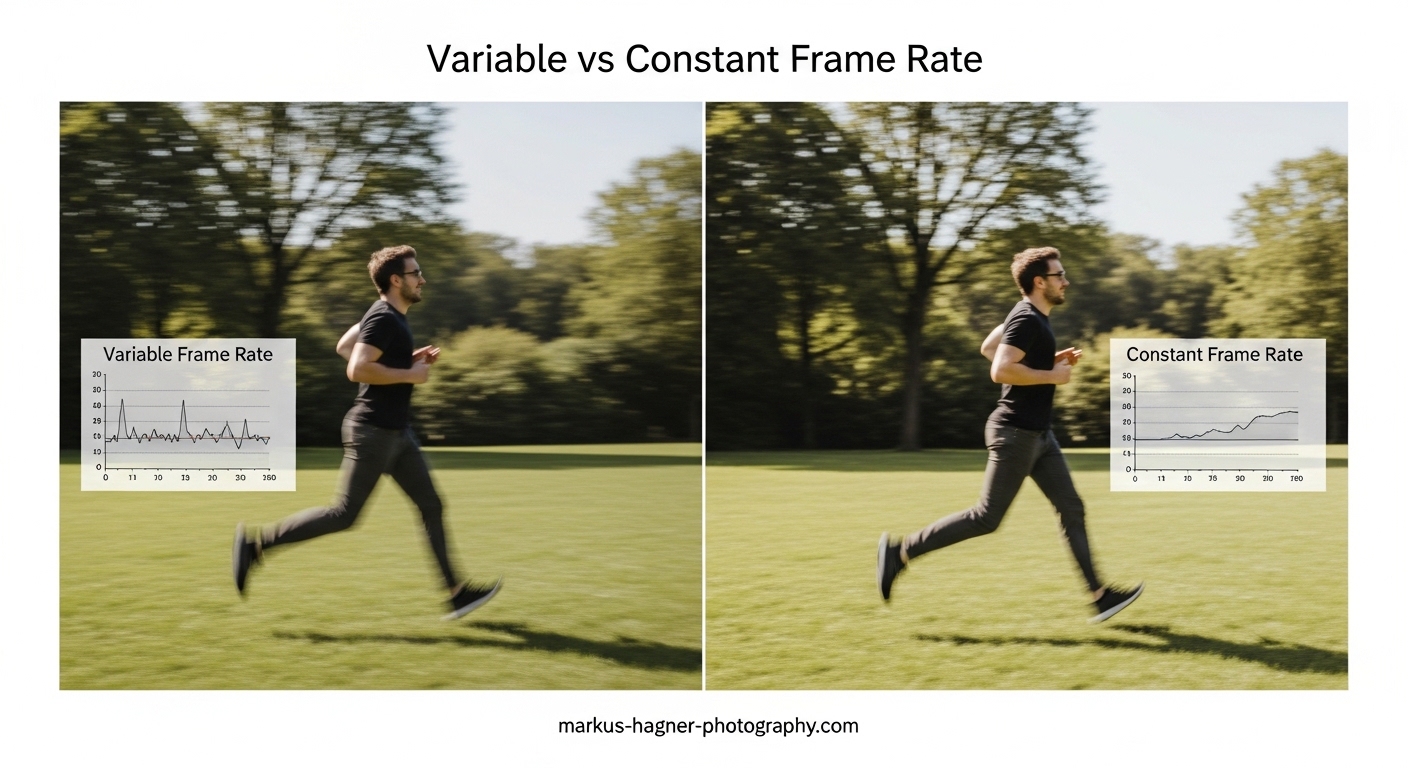
Variable vs Constant Frame Rate: The Key Differences
The fundamental difference lies in consistency. Constant Frame Rate (CFR) maintains exactly the same number of frames every second throughout the entire video. If you record at 30 FPS, every single second contains precisely 30 frames, no more and no less.
Variable Frame Rate (VFR) allows the frame count to fluctuate based on what’s happening in the scene. A static talking head might only need 15 frames in one second, while an action sequence could spike to 60 frames. The encoder adjusts dynamically to save space and bandwidth.
CFR vs VFR Comparison
Here’s how the two methods compare across key factors that matter for video editing:
- Predictability: CFR offers consistent, predictable timing for every frame. VFR timing varies throughout the video.
- File Size: VFR typically produces smaller files by reducing frames in static scenes. CFR maintains consistent file sizes.
- Editing Compatibility: CFR works flawlessly with all editing software. VFR can cause sync issues in many editors.
- Audio Sync: CFR keeps audio perfectly synchronized. VFR often causes audio drift over time.
- Playback Reliability: CFR plays consistently across all devices. VFR may have playback issues on older hardware.
For video editors, this difference is critical. CFR provides the predictable foundation that editing software expects, while VFR introduces timing variables that can throw off your entire timeline.
Why Variable Frame Rate Causes Problems for Editors
The main issue with VFR in editing workflows is audio-video synchronization. When frames arrive at irregular intervals, editing software struggles to maintain proper sync between what you see and what you hear. This manifests as audio that gradually drifts further and further out of alignment with the video.
Here’s why this happens: editing software assumes a consistent frame rate when calculating timing. When you place a VFR clip on a 30 FPS timeline, the software expects 30 frames per second. But if some seconds only contain 20 frames while others contain 40, the software’s timing calculations become increasingly inaccurate as the video progresses.
Timeline Inaccuracies
VFR footage often displays incorrect duration in editing timelines. A clip might show as 5 minutes and 12 seconds when it’s actually 5 minutes and 18 seconds. This discrepancy compounds when you add cuts, transitions, and multiple clips to your project.
Dropped and Duplicated Frames
Some editing software attempts to compensate for VFR by dropping or duplicating frames. This can result in stuttery playback, jerky motion, or missing moments in your final export. You might not notice these issues until after rendering, when it’s too late to fix them easily.
Software Compatibility Problems
Different editing applications handle VFR footage differently. Adobe Premiere Pro claims to support VFR but many users still report sync issues. DaVinci Resolve often warns about VFR and recommends converting first. Free editors like Kdenlive and Shotcut may struggle significantly with variable frame rate content, making editing computationally expensive and unreliable.
Common Sources of VFR Footage
Understanding where VFR footage comes from helps you anticipate and prevent issues before they derail your editing session.
Smartphone Recordings
Modern phones, including iPhones and Android devices like the Google Pixel, often record in VFR by default. The phone’s encoder dynamically adjusts frame rate to save storage space and battery life. This is great for casual users but creates headaches for editors. Many smartphone users discover their footage is VFR only after importing clips into their editing software.
Screen Recordings
Screen capture tools frequently output VFR files because computer screens don’t refresh at perfectly consistent intervals. OBS Studio, NVIDIA ShadowPlay, built-in Windows and Mac screen recorders, and Zoom recordings (unless optimized for third-party editors) all commonly produce VFR footage.
Game Captures
Gaming videos often use VFR because frame rates naturally fluctuate during gameplay based on scene complexity and system load. Recording software captures whatever the game outputs, resulting in variable frame rate files.
Video Conferencing
Zoom, Microsoft Teams, and Google Meet recordings typically use VFR to optimize bandwidth during calls. Zoom offers an “optimize for 3rd party editor” option that produces CFR output, but this must be enabled before recording.
How to Detect Variable Frame Rate in Your Footage
Before you start editing, it’s worth checking whether your footage uses VFR. Several free tools make this quick and easy.
Using MediaInfo
MediaInfo is a free tool available for Windows, Mac, and Linux that displays detailed technical information about video files. After installing MediaInfo, simply drag your video file into the application and look for the “Frame rate mode” field. It will show either “Constant” or “Variable.” This is the most reliable way to detect VFR before importing footage into your editor.
Using HandBrake
If you already have HandBrake installed for video conversion, you can use it to check frame rate mode. Open your video file in HandBrake and look at the summary tab. The frame rate information will indicate whether the source is variable or constant.
Built-in Software Tools
Some video editors display frame rate information in their project panels. DaVinci Resolve shows frame rate details in the media pool. Premiere Pro’s project panel displays frame rate, though it may not explicitly indicate VFR. VLC Media Player can also show frame rate information through its codec information panel.
Visual Indicators
If you notice audio gradually drifting out of sync during playback, timeline duration appearing incorrect, or dropped frames during editing, these are strong indicators your footage uses variable frame rate.
How to Convert VFR to CFR: Step-by-Step Guide
Converting variable frame rate footage to constant frame rate before editing is the most reliable solution. Here are two free methods that work well.
Method 1: Using HandBrake
HandBrake is a free, open-source video transcoder available for Windows, Mac, and Linux. Follow these steps to convert VFR to CFR:
Step 1: Download and install HandBrake from the official website (handbrake.fr).
Step 2: Open HandBrake and drag your VFR video file into the application window.
Step 3: Click the “Video” tab in the settings panel.
Step 4: Find the “Frame Rate (FPS)” section and click the dropdown menu.
Step 5: Select your target frame rate (usually matching your source, such as 30 or 29.97 fps).
Step 6: Important: Change “Variable Frame Rate” to “Constant Frame Rate” in the dropdown.
Step 7: Choose your desired quality settings and output location.
Step 8: Click “Start Encode” to begin conversion.
The conversion process re-encodes your video with consistent frame timing, resolving sync issues before you begin editing.
Method 2: Using Shutter Encoder
Shutter Encoder is another excellent free tool with more codec options than HandBrake:
Step 1: Download Shutter Encoder from shutterencoder.com.
Step 2: Drag your video file into the application.
Step 3: Choose “H.264” or your preferred output codec.
Step 4: In the advanced settings, set frame rate to your target value and ensure it’s set to constant.
Step 5: Enable “Rewrap” if you want to preserve quality, or choose re-encoding for maximum compatibility.
Step 6: Click “Start Function” to convert.
Quality Considerations
Converting VFR to CFR involves re-encoding, which can potentially reduce quality slightly. However, using high-quality settings (such as a lower CRF value in HandBrake, around 18-22) minimizes any visible quality loss. For professional work, consider converting to an intermediate codec like ProRes or DNxHD, which preserves quality better than H.264 for editing purposes.
The quality trade-off is generally worth it for the editing stability you gain. Most editors report minimal to no visible quality difference when using proper conversion settings.
Video Editing Software and VFR Compatibility
Different editing applications handle variable frame rate footage with varying degrees of success. Here’s what to expect from popular editors.
Adobe Premiere Pro
Premiere Pro technically supports VFR footage but still frequently exhibits sync issues. Users report mixed results, with some projects working fine and others experiencing significant audio drift. Adobe recommends converting VFR to CFR for best results, despite the software’s claimed VFR support.
DaVinci Resolve
DaVinci Resolve warns users when VFR footage is detected and strongly recommends converting before editing. The free version handles VFR less gracefully than the Studio version. Many Resolve users make VFR-to-CFR conversion a standard part of their workflow.
Final Cut Pro
Final Cut Pro generally handles VFR footage better than most editors, automatically analyzing and adjusting timing during import. However, audio sync issues can still occur with heavily variable footage. Converting remains the safest approach.
Free Editors (Kdenlive, Shotcut)
Open-source editors often struggle most with VFR footage. Users report that these editors may warn that VFR is “computationally expensive” and can cause crashes or severe performance issues. Converting VFR footage before importing is essentially mandatory for reliable editing in these applications.
When Variable Frame Rate Is Actually Beneficial
Despite the editing challenges, VFR isn’t inherently bad. It serves important purposes in the right contexts.
Streaming and Bandwidth Optimization
For live streaming and video delivery, VFR can significantly reduce bandwidth requirements without sacrificing perceived quality. Streaming platforms often use VFR encoding to deliver smooth video while minimizing data usage.
Storage Efficiency
VFR produces smaller file sizes by reducing frame rates during static or low-motion scenes. This is valuable for archiving or when storage space is limited.
Final Delivery (Not Editing)
The key distinction is that VFR works well for final delivery but causes problems during editing. Once your project is complete and you’re exporting for distribution, VFR encoding is perfectly acceptable and often preferable. The issues only arise when trying to edit VFR source footage.
Best Practices for Frame Rate in Video Editing
Based on professional workflows and forum discussions, here are the recommended practices for handling frame rate in your projects:
- Record in CFR when possible: If your recording software offers the option, always choose constant frame rate.
- Convert VFR footage before editing: Make HandBrake or Shutter Encoder part of your pre-editing workflow.
- Check frame rate before importing: Use MediaInfo to identify VFR footage before it causes problems.
- Use intermediate codecs for editing: Convert to ProRes, DNxHD, or CineForm for optimal editing performance.
- Match project settings to footage: Set your timeline frame rate to match your converted source material.
- Test before committing: Import a short clip first to verify sync before editing an entire project.
Frequently Asked Questions
Which frame rate is best for editing?
Constant frame rate (CFR) is best for editing because it provides the predictable, consistent timing that editing software expects. For the specific FPS value, match your project frame rate to your source footage: 24 FPS for cinematic content, 30 FPS for standard video, and 60 FPS for smooth motion content. The key is maintaining consistency throughout your entire workflow, from recording through editing to export.
What is the difference between variable and constant frame rate?
Constant Frame Rate (CFR) maintains exactly the same number of frames every second throughout the entire video, providing predictable timing that works reliably with all editing software. Variable Frame Rate (VFR) allows the frame count to fluctuate based on scene complexity, with fewer frames in static scenes and more in action sequences. VFR produces smaller file sizes but causes audio sync issues and timeline inaccuracies during editing.
Why use variable frame rate?
Variable frame rate is useful for streaming, bandwidth optimization, and storage efficiency. It reduces file sizes by lowering frame rates during static scenes while maintaining quality during motion. VFR is beneficial for final video delivery and distribution, but should be avoided for source footage intended for editing. Smartphones and streaming platforms commonly use VFR to balance quality with storage and bandwidth constraints.
Should I edit in 30fps or 60fps?
Choose 30 FPS for standard video content like interviews, tutorials, and most YouTube videos. Choose 60 FPS for content with significant motion such as sports, gaming videos, or fast-paced action sequences. The most important factor is matching your timeline frame rate to your source footage frame rate. If you have mixed frame rates in your project, convert everything to match your target output frame rate before editing.
Conclusion
Understanding variable vs constant frame rate is essential knowledge for any video editor. VFR footage from smartphones, screen recordings, and video calls frequently causes audio sync issues, timeline inaccuracies, and software compatibility problems. The solution is straightforward: detect VFR footage using MediaInfo, convert to CFR using HandBrake or Shutter Encoder before editing, and maintain consistent frame rates throughout your project.
For editors asking which frame rate is best, the answer depends on your content, but constant frame rate is always the right choice for the editing phase. Variable frame rate has its place in streaming and final delivery, but should never be your source format for editing workflows.
By making VFR detection and conversion a standard part of your workflow, you’ll eliminate one of the most frustrating problems in video editing and spend more time creating and less time troubleshooting.