Capturing those first precious days with your newborn creates memories that last a lifetime. There is something deeply personal about photographing your baby in your own home, surrounded by familiar blankets, the nursery you prepared, and the natural light that fills your living space. Many parents feel overwhelmed at the thought of taking their own newborn photos, worried they lack the skills or equipment. The truth is, you can create beautiful, professional-looking images with just a window, some basic knowledge, and a commitment to safety.
This guide covers everything you need to know about tips for photographing newborns safely at home with natural light. I will walk you through essential safety protocols, lighting techniques that transform ordinary snapshots into stunning portraits, camera settings that work for newborns, and posing strategies that keep your baby comfortable and secure. Whether you are using a DSLR camera or your smartphone, these techniques will help you capture authentic moments you will treasure forever.
After photographing dozens of newborn sessions and speaking with countless parents about their home photography experiences, I have learned that the best newborn photos come from patience, preparation, and an unwavering focus on safety. Let me share what works and what to avoid so you can confidently create beautiful images of your newest family member.
Essential Safety Guidelines for Newborn Photography
Safety comes first, always. Before we discuss lighting techniques or camera settings, we need to establish non-negotiable safety rules for newborn photography. A beautiful photo is never worth compromising your baby’s wellbeing. These guidelines apply whether you are a parent taking DIY photos or a photographer learning newborn techniques.
Never Leave Your Baby Unattended
This rule has no exceptions. When your baby is on any surface for photos, even a bed or soft blanket on the floor, stay within arm’s reach at all times. Newborns can startle and move unexpectedly. If you need to step away, even for a few seconds, pick up your baby first. Many photographers use a spotter, someone whose sole job is keeping hands near the baby during posed shots.
Keep Hands On or Near Baby During Poses
Any pose that looks like the baby is balancing, propping themselves up, or in an unusual position should have supporting hands just out of frame. Professional photographers often composite images in post-processing, removing the parent’s hands that were supporting the baby the entire time. What looks like a baby balancing on their own is actually a composite image. Never attempt poses that require digital editing unless you have proper training.
Maintain Proper Room Temperature
Newborns cannot regulate their body temperature like adults can. Keep the room warmer than feels comfortable to you, around 75 to 80 degrees Fahrenheit (24 to 27 degrees Celsius). If you are comfortable in a t-shirt, the room is likely too cold for an unclothed or lightly swaddled baby. Watch for signs your baby is cold: mottled skin, fussiness, or hands and feet that look blueish. A warm baby is a sleepy, cooperative baby.
Protect Baby’s Airway at All Times
The chin should never press into the chest, as this can restrict breathing. When posing baby on their tummy or side, ensure the airway remains clear and open. If baby’s face turns toward the surface they are lying on, gently reposition them. Watch for any signs of distress and stop immediately if you notice labored breathing, color changes, or unusual fussiness.
Avoid Dangerous Poses
Skip any poses you see online that involve hanging, suspending, or putting baby in glass containers, props with hard edges, or positions that look unnatural. Many viral newborn images are composites created by professionals with safety training. The baby was never actually in that position alone. Stick to simple, natural poses that work with your baby’s natural positions and comfort level.
Watch for Circulation Issues
When wrapping or posing baby, check that circulation is not restricted. Fingers and toes should remain pink and warm. If you notice any extremities turning purple or white, reposition immediately. Wraps and swaddles should be snug but not tight enough to restrict blood flow or breathing. Always leave room for baby’s chest to rise and fall naturally.
Keep the Environment Clean and Sanitized
Newborns have immature immune systems. Wash your hands thoroughly before handling baby for photos. Clean any props, blankets, or surfaces baby will touch. If anyone besides parents will help with the session, ensure they are healthy and have washed their hands. Avoid sessions when family members are ill.
Newborn Photography Safety Checklist
Before every session, run through this quick safety check:
1. Room temperature is warm (75-80 degrees F)
2. All props and fabrics are clean and soft
3. Baby is fed and recently changed
4. A spotter or helper is available
5. Camera settings are ready so you can focus on baby
6. No hard objects or sharp edges near baby
7. Hands stay on or near baby during any posed shots
8. Baby’s airway is always clear
9. Never force a pose if baby is uncomfortable
10. Stop immediately if baby shows any distress
Understanding Natural Light for Newborn Photography
Natural light creates the soft, gentle quality that makes newborn photos feel warm and authentic. Unlike flash or artificial lighting, window light wraps around your baby’s features gently, highlighting delicate details without harsh shadows. Understanding how to find and use natural light in your home transforms your photography results.
What Makes Natural Light Perfect for Newborns
Soft, diffused natural light from windows is ideal for newborn photography because it creates gentle shadows that show dimension without harsh contrast. A baby’s skin is delicate and often slightly red or blotchy in the first weeks. Soft natural light minimizes these imperfections while creating that dreamy, ethereal look parents love. Direct sunlight, on the other hand, creates harsh shadows and can be uncomfortable for baby’s sensitive eyes.
Another advantage of natural light is consistency. Once you find a good window and time of day, the light quality remains predictable throughout your session. Flash and artificial lighting require more technical knowledge and can startle babies. Natural light feels organic and peaceful, matching the mood most parents want for newborn images.
Finding the Best Window in Your Home
Walk through your home at different times of day and observe the light. Large windows without direct sunlight streaming through work best. North-facing windows (in the Northern Hemisphere) provide consistent, soft light throughout the day. South-facing windows may get direct sun at certain hours. East-facing windows offer beautiful morning light, while west-facing windows provide warmer afternoon light.
Look for windows where light fills the room softly without creating harsh shadows when you hold your hand in front of it. If you see sharp, dark shadows, the light is too direct. Step back from the window or wait for a different time of day when the sun is not streaming directly in.
Do not overlook unexpected light sources. A sliding glass door, skylight, or even light reflecting off a white wall outside can provide beautiful illumination. The key is finding soft, indirect light that wraps around your subject gently.
Best Time of Day for Newborn Photos
The best time depends on your baby’s schedule and your home’s lighting. Generally, morning hours between 9 AM and 11 AM often provide soft, indirect light and babies tend to be sleepier after their morning feeding. Late afternoon, around 3 PM to 5 PM, can also work well depending on your window direction.
More important than the specific hour is timing your session when baby is fed, changed, and naturally sleepy. A full, comfortable baby will cooperate better and stay calm longer. Many parents find that photographing right after a feeding, when baby is in that milk-coma state, produces the best results.
Midday sun, typically between 11 AM and 2 PM, creates the harshest direct light. If this is when your baby is sleepiest, move farther into the room away from windows or use sheer curtains to diffuse the intensity.
Indirect vs Direct Light
Always use indirect light for newborn photography. Indirect light means the sun is not shining directly through the window onto your subject. Instead, the light bounces off clouds, the ground outside, or other surfaces before entering your window. This diffused quality is what creates those soft, flattering results.
If your only window gets direct sunlight, wait for a cloudy day, photograph earlier or later in the day when the sun is at a different angle, or hang sheer white curtains to diffuse the light. You can also position baby farther from the window, into the room’s shadow area, where light is softer.
Cloudy days are actually ideal for newborn photography. The cloud layer acts as a giant diffuser, creating even, soft light from any direction. Do not cancel your session if the weather turns overcast. Embrace it.
Seasonal Lighting Considerations
Light changes dramatically throughout the year. In winter, the sun stays lower in the sky, creating longer periods of soft, indirect light but also fewer daylight hours overall. You may need to schedule sessions earlier in the day. Summer brings higher, harsher sun during midday hours but extends your available shooting time into evening.
Spring and fall often provide the most balanced lighting conditions. Pay attention to how trees and foliage affect your window light as seasons change. A window that was perfect in winter might be shaded by leaves in summer, which could be either helpful or problematic depending on your needs.
Lighting Angles and Techniques
The angle at which light hits your baby dramatically changes the mood and quality of your photos. Understanding lighting angles helps you create dimension, highlight features, and avoid unflattering shadows. Let me break down the main lighting positions and when to use each.
Side Lighting: The Go-To Technique
Position your baby at a 45 to 90 degree angle from the window for the most flattering results. With the baby’s head closer to the window than their feet, light flows across their face and body, creating gentle shadows that show dimension. This angle highlights facial features, creates catchlights in the eyes (those appealing reflections), and adds depth to your images.
Side lighting works for nearly every newborn pose. It is forgiving, creates beautiful skin tones, and allows you to position baby comfortably while still achieving professional-looking results. If you are unsure which lighting angle to use, start with side lighting at 45 degrees.
The closer baby is to the window, the more dramatic the shadow on the far side of their face. For softer results, move baby farther into the room. Experiment with distance until you achieve the shadow depth you prefer.
Back Lighting for Dreamy Effects
Back lighting positions the window behind or slightly behind your baby, with you shooting toward the light source. This creates a soft, ethereal glow around baby’s edges and can produce dreamy, high-key images with a light, airy feel. Back lighting works beautifully for silhouettes, detail shots of tiny features, and creating mood.
The challenge with back lighting is exposure. Your camera may underexpose baby’s face because it meters for the bright window. Use exposure compensation (add 1-2 stops) or meter for baby’s face specifically. Back lighting requires practice but creates some of the most artistic newborn images.
Front Lighting for Even Illumination
Front lighting places the window behind you, with light hitting baby directly from the front. This creates even illumination across baby’s face with minimal shadows. While front lighting is easy to work with, it can look flat compared to side lighting. Use front lighting when you want clean, bright images without dramatic shadows.
Be careful that your shadow does not fall across baby when using front lighting. Position yourself slightly to the side so your body does not block the window light.
Why You Must Avoid Up-Lighting
Up-lighting occurs when light comes from below your subject, creating unnatural shadows that look unflattering. This creates what photographers call “horror movie lighting” because it casts shadows upward in unnatural directions. Up-lighting happens when you position baby on the floor with bright light above, or when using bounce light incorrectly from below.
Always ensure your main light source comes from above or at baby’s level, never from below. If photographing from above with baby lying down, position yourself so window light comes from the side or above, not reflecting up from a bright surface below baby.
Diffusing Light with Sheer Curtains
Sheer white curtains act as a giant softbox, diffusing harsh window light into soft, even illumination. If your windows get direct sunlight, hang sheer curtains or drape a white sheet over the window. This simple trick transforms harsh light into beautiful, diffused light perfect for newborn skin tones.
Multiple layers of sheer fabric create even softer diffusion. You can purchase inexpensive sheer curtain panels at most home goods stores. White or off-white works best. Colored curtains can cast unwanted tints on baby’s skin.
Using Reflectors for Shadow Control
A reflector bounces light back into shadow areas, filling in dark spots without adding artificial light. You do not need expensive equipment; a piece of white foam board, a white pillowcase, or even a car sunshade works. Position the reflector opposite your window, angled to bounce light back toward baby’s shadowed side. This reduces contrast and creates more even illumination.
The closer the reflector is to baby, the more fill light it provides. Experiment with distance and angle until shadows look natural but not too dark. Silver reflectors add more light but can create cool tones. White reflectors provide softer, more neutral fill.
Creating Beautiful Catchlights
Catchlights are those appealing reflections of light in baby’s eyes that give them life and sparkle. To create catchlights, position baby so the window reflects in their eyes. With side lighting, you will see catchlights on the side of the eye closest to the window. With front lighting, catchlights appear more centered.
Large windows create larger, softer catchlights. Small windows or light sources create smaller, more defined catchlights. Both can look beautiful. What matters most is having some reflection in the eyes to prevent them from looking flat or lifeless.
Camera Settings and Equipment for Newborn Photography
Getting your camera settings right before you start saves time and frustration during your session. Newborns do not wait while you fiddle with menus. Here are the settings that consistently produce great results for newborn photography with natural light.
Aperture Settings for Newborns
Use a wide aperture between f/2.8 and f/4.0 for newborn photography. This creates a shallow depth of field, blurring the background while keeping baby’s face sharp. The blurred background, called bokeh, draws attention to your subject and hides cluttered backgrounds common in home settings.
If you are shooting with a kit lens that only opens to f/3.5 or f/5.6, that works too. Just position baby farther from the background to create more blur. Smartphone users can achieve similar results using portrait mode, which simulates shallow depth of field.
For detail shots of hands, feet, and features, you may want to stop down slightly to f/4.0 or f/5.6 to ensure more of the tiny details remain in focus. Extremely shallow depth of field can make it difficult to keep both a baby’s nose and ears sharp simultaneously.
Shutter Speed Recommendations
Keep your shutter speed at 1/200 second or faster to avoid camera shake and motion blur. Even when baby seems still, tiny movements during breathing can create blur at slower speeds. If your photos are coming out dark at 1/200, increase your ISO rather than slowing your shutter.
If you are using a longer focal length, like 85mm or 105mm, consider using an even faster shutter speed. A general rule is to use a shutter speed at least as fast as your focal length. For an 85mm lens, use 1/100 or faster, though 1/200 is still safer.
ISO Settings for Natural Light
Do not fear higher ISO settings. In natural light newborn photography, ISO 400 to 800 is often necessary and produces acceptable noise levels. Modern cameras handle high ISO well, and slight noise is preferable to motion blur from too slow a shutter speed. If your images are too dark, increase ISO before compromising on aperture or shutter speed.
Entry-level cameras may show more noise at ISO 800 than professional bodies. Test your camera at different ISO settings before your session to know your acceptable limits. ISO 1600 might be fine on some cameras while looking grainy on others.
White Balance for Accurate Skin Tones
Auto white balance often gets close, but for consistent, accurate skin tones, set a custom white balance or use the “shade” or “cloudy” preset when photographing near windows. These settings warm up the image slightly, which usually flatters newborn skin. If shooting RAW, you can adjust white balance in post-processing without quality loss.
Newborn skin often has red or yellow undertones that can be exaggerated by incorrect white balance. If baby looks too red, try a cooler white balance setting. If baby looks too pale or washed out, warm things up slightly.
Focus Techniques for Sharp Images
Use single-point autofocus and position your focus point on baby’s eye closest to the camera. Sharp eyes make or break a portrait. If baby’s eyes are closed in sleepy photos, focus on the bridge of the nose or the nearest eyelashes. For detail shots of hands and feet, switch to your camera’s closest focusing distance and use manual focus if autofocus struggles.
Continuous autofocus (AI Servo on Canon, AF-C on Nikon) can help if baby is wiggling. However, for stationary sleeping babies, single-shot autofocus (One Shot on Canon, AF-S on Nikon) usually provides more precise focus lock.
Shooting Mode Recommendations
Aperture priority mode (A or Av) works well for newborn photography because it lets you control depth of field while the camera adjusts shutter speed automatically. Set your aperture to f/2.8 or f/4.0 and let the camera handle the rest. Watch your shutter speed and increase ISO if it drops below 1/200.
Manual mode gives you complete control but requires more attention during the session. If you are comfortable with manual mode, it provides the most consistent results. Set your exposure once when you find your lighting position, then leave it alone unless light changes significantly.
Best Lenses for Newborn Photography
A 50mm f/1.8 prime lens offers excellent value and beautiful results for newborn photography. The 50mm focal length is versatile, and the wide aperture creates lovely background blur. A 35mm lens works well in smaller spaces where you cannot back up far enough. For detail shots, a macro lens or extension tubes let you get close while maintaining sharp focus.
If you only have a kit lens, it will still work well. Zoom to 50mm or 55mm and use the widest aperture available at that focal length. The most important factor is understanding light and composition, not having expensive equipment.
Basic Equipment Checklist
You can create beautiful newborn photos with minimal equipment. Here is what helps most:
– Camera (DSLR, mirrorless, or smartphone)
– 50mm lens or your sharpest lens
– Large white blanket or fuzzy texture for backdrop
– Boppy pillow or nursing pillow for positioning support
– White foam board or reflector for fill light
– Space heater to keep room warm
– White noise machine or app to soothe baby
– Clean swaddles and simple outfits
– Extra diapering supplies nearby
– Step stool for overhead shots
Basic Posing Safety for Newborn Photos
Simple poses often produce the most meaningful images. You do not need elaborate setups or complex poses to create beautiful newborn photos. Focus on poses that keep baby safe, comfortable, and naturally positioned. Here are the fundamental poses every parent can safely attempt.
Back Pose Basics
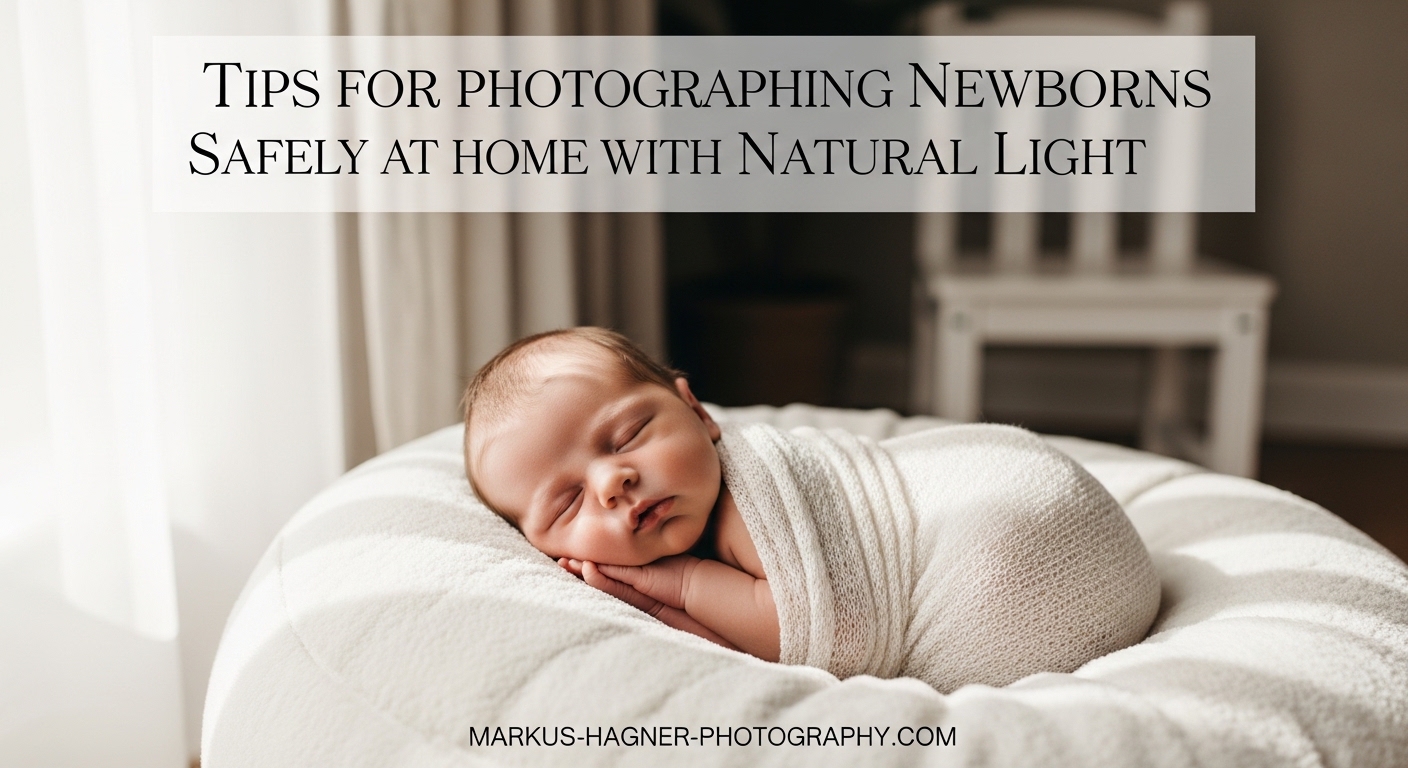
The back pose is the safest starting point for newborn photography. Lay baby on their back on a soft surface, head near the window with body angled away at 45 degrees. This pose shows baby’s face clearly and works for swaddled or unswaddled photos. Keep baby’s head turned slightly toward the light for nice facial illumination and catchlights in the eyes.
If baby’s arms flail, try tucking them across their chest or swaddling. A small rolled towel under the knees can help baby feel more secure and create a natural curve to the body.
Variations on the back pose include legs stretched out, knees bent, or froggy position with feet together and knees out. All are safe as long as baby remains comfortable and no pressure is placed on joints.
Side Pose Techniques
The side pose shows baby curled up in a fetal-like position, reminiscent of their time in the womb. Lay baby on their side, with head resting on a small cushion or rolled blanket. The back should curve naturally, with knees tucked toward chest. This pose requires support behind baby’s back to prevent rolling.
Always ensure baby’s face is visible and airway is clear. The chin should not press into the chest. Side poses work beautifully with swaddled babies and create intimate, peaceful images.
Use a nursing pillow or rolled blankets to create a supportive nest for side poses. Baby should feel securely positioned, not precariously balanced.
Tummy Pose with Support
Tummy poses require support and should only be attempted with a spotter. Position baby on their tummy with arms tucked under or to the side, head turned toward the light. Use a nursing pillow or bean bag under baby’s chest for support. This pose mimics the curled position babies find comforting.
Never attempt tummy poses without keeping hands on baby. Watch for signs of discomfort and reposition if baby’s face presses into the surface. The tummy pose is optional; skip it if you feel uncertain about safety.
Swaddling for Calm Photos
A well-swaddled baby is a calm, sleepy baby. Swaddling keeps baby’s arms contained, prevents startle reflexes from waking them, and creates clean, simple lines for photos. Use a stretchy, soft blanket and wrap firmly but not too tight. Baby should be able to breathe comfortably and move their hips slightly.
Practice swaddling before your session so you can do it quickly and confidently. There are many swaddling techniques; find one that works for you and creates the look you want.
Wrapped poses can be as simple or elaborate as you like. A basic swaddle with arms inside works beautifully. You can also wrap baby with arms out, or create layered looks with multiple wraps and textures.
Working with Baby’s Natural Positions
Some of the best newborn photos come from simply observing how baby naturally settles. If baby curls a certain way or seems comfortable in a particular position, work with that rather than forcing a pose. Lifestyle newborn photography captures baby as they naturally are, without elaborate posing, and these authentic images often become family favorites.
Watch for moments when baby stretches, yawns, or makes expressions. These candid moments often make the most memorable images. Keep your camera ready even when not actively posing.
Parent Hands and Family Connection Poses
Photos showing parent hands cradling baby are both beautiful and safe. Parents provide natural support while creating intimate, emotional images. Position baby in parent’s arms, focus on baby with parent’s face soft in the background, or capture close-ups of baby in parent’s hands.
These poses work well because baby feels secure and comfortable. The parent can adjust baby’s position as needed, and you get the added emotional connection of family presence in the image.
Composition and Angles for Better Photos
Composition transforms snapshots into portraits. A few simple compositional techniques elevate your newborn photos from casual to professional-looking. These principles work regardless of what camera you use.
Rule of Thirds for Newborn Photos
Imagine a tic-tac-toe grid over your image. Placing your subject at one of the intersection points, rather than dead center, creates more visually interesting images. For newborn photos, position baby’s face or eyes at an intersection point. This draws the viewer’s eye naturally and creates balance with negative space.
Most cameras and phones can display a grid overlay. Turn this feature on to help with composition until it becomes second nature.
Shooting from Above
The overhead angle is flattering for newborns and easy to execute safely. Stand on a step stool or chair (carefully) and shoot directly down at baby lying on a bed, blanket, or soft surface. This angle emphasizes baby’s small size and creates clean, simple compositions. Ensure your shadow does not fall across baby.
Overhead shots work beautifully for showing baby’s whole body, capturing the curl of their fingers, or documenting tiny features from a flattering perspective.
Eye-Level Perspectives
Get down to baby’s level for intimate, engaging photos. Lie on the floor beside baby or lower your camera to their eye level. This perspective creates connection and shows the world from baby’s point of view. Eye-level shots feel personal and engaging.
Eye-level shooting requires you to get uncomfortable. Lie on your stomach, crouch, or kneel. The resulting images are worth the effort.
Angles to Avoid
Never shoot up baby’s nose. This unflattering angle shows nostrils and creates awkward proportions. If shooting from above, do not go so high that baby’s forehead looks disproportionately large. Find angles that flatter baby’s features and create natural proportions.
Also avoid shooting directly into bright windows without adjusting exposure. The light will overwhelm your image and baby will appear as a silhouette. Either embrace the silhouette look intentionally or adjust your settings.
Background Considerations
De-clutter your background before shooting. Remove distracting items, busy patterns, or bright colors that draw attention away from baby. Simple, neutral backgrounds work best. A plain wall, soft blanket, or minimal nursery setting keeps focus on your subject.
Check the edges of your frame before pressing the shutter. Look for stray items, furniture corners, or anything that does not belong. A quick glance around the frame prevents disappointing discoveries later.
Using Negative Space
Negative space, the empty area around your subject, creates breathing room in your images. Do not fill every photo with baby filling the entire frame. Leave space for the eye to rest and the image to feel balanced. Negative space works particularly well with newborn photography, emphasizing how small and precious baby is.
Capturing Detail Shots
Detail shots capture the tiny features that change so quickly. Baby’s hands, feet, eyelashes, and lips will never be this small again. These intimate close-ups become treasured images and complement your wider portraits beautifully.
Tiny Hands and Feet
Photograph baby’s hands resting on a parent’s finger, feet curled together, or fingers wrapped around someone’s thumb. These shots work best with baby asleep so limbs stay still. Use macro mode or your closest focusing distance. Side lighting creates gentle shadows that show the dimension of tiny fingers and toes.
Include scale in your detail shots. A parent’s hand holding baby’s foot shows just how tiny those features are. These comparison images become powerful as baby grows.
Facial Features
Capture close-ups of eyelashes, lips, the curve of a cheek, or baby’s nose. These features are unique to your baby and change rapidly in the first weeks. Get close, focus carefully, and use soft light. A 50mm or macro lens works beautifully for these intimate portraits.
Baby eyelashes are particularly photogenic. Catch the light on them with side lighting for maximum impact. Lips, especially when slightly parted, create tender, emotional images.
Hair and Unique Features
Document baby’s hair swirls, the curve of their ears, birthmarks, or other unique features. These details tell the story of who your baby is. Some parents initially want to hide birthmarks or unusual features, but these become treasured documentation as baby grows.
Creating Variety in Detail Shots
Vary your angles and compositions for detail shots. Photograph baby’s whole hand, then zoom in on just the fingertips. Capture feet from above, then from the side. Include parent’s hands for scale and connection. These variations create a complete story of your baby’s first days.
Preparing Your Space for Newborn Photos
Preparation makes your session smoother and more successful. Taking time to set up your space before baby is ready means less stress and better photos. Here is how to prepare for a home newborn session.
De-Cluttering the Area
Remove everything from your shooting area that does not need to be in the photo. This includes laundry, diaper supplies, cords, and clutter on nearby surfaces. A clean, simple space makes better photos and lets you focus on baby rather than dodging distractions.
Check adjoining rooms visible in wide shots. An open closet door or messy hallway in the background can ruin an otherwise perfect image.
Temperature Control
Warm the room before you start. Turn up the heat, use a space heater, or close vents to other rooms to concentrate warmth where you are shooting. The room should feel slightly warm to you. Check baby’s temperature by feeling the back of their neck, not their hands or feet, which naturally run cooler.
Start warming the room at least 30 minutes before your session. It takes time to bring a room up to temperature, especially in winter.
White Noise for Sleep
White noise helps baby stay asleep during your session. Use a white noise machine, app on your phone, or run a fan. The constant sound mimics the womb environment and prevents sudden noises from startling baby awake.
Keep the white noise running throughout your session. Do not turn it off between shots. Consistency helps baby stay settled.
Simple Backdrop Options
You do not need expensive backdrops. A soft, neutral blanket draped over a bed or couch creates a clean background. Faux fur throws, knit blankets, and simple muslin wraps all work beautifully. Stick to neutral colors that complement baby’s skin tone rather than competing with it.
Avoid bright whites that can blow out in photos. Cream, light gray, and soft beige work better than stark white.
Timing Around Feeding
Plan your session for after a feeding when baby is naturally sleepy and content. A hungry baby will not settle, and a baby who just ate may need to be burped. Give yourself 15 to 30 minutes after feeding before you start shooting.
Have extra milk or formula ready in case baby gets hungry mid-session. Newborns are unpredictable, and a fed baby is a cooperative baby.
Smartphone Tips for Newborn Photography
Not everyone has a DSLR, and that is perfectly fine. Modern smartphones capture excellent newborn photos when used correctly. Here are techniques specifically for smartphone users.
Using Portrait Mode Effectively
Portrait mode on smartphones creates that professional-looking background blur automatically. Use it when photographing baby’s face or full-body shots. Tap on baby’s face to set focus and exposure, then take your shot. Portrait mode works best when baby is 2 to 8 feet from the camera with some distance between them and the background.
Portrait mode sometimes struggles with very small subjects or unusual lighting. If the effect looks artificial or uneven, try shooting in standard mode and adding blur during editing.
Finding Light with Your Phone
The same lighting principles apply to phones. Find a window with soft, indirect light. Position baby at 45 degrees from the window. Avoid overhead lights, which create harsh shadows and mixed color temperatures that phones struggle to balance.
Phone cameras have smaller sensors than DSLRs, making good light even more important. Get baby as close to your window as possible without entering harsh direct light.
Focus and Exposure Tricks
Tap and hold on your screen to lock focus and exposure on baby’s face. This prevents the camera from constantly adjusting as you move or as lighting changes. Slide your finger up or down on the screen to manually adjust brightness if the image looks too dark or bright.
Best Smartphone Settings
Turn off flash completely. Flash on phones is harsh and unflattering for newborns. Enable grid lines in your camera settings to help with composition and the rule of thirds. Shoot in the highest resolution available. If your phone has a “night mode” or low-light setting, experiment with it for indoor natural light situations.
Simple Editing Apps
Light editing can enhance your photos. Apps like Snapseed (free), VSCO, or Lightroom Mobile offer easy adjustments for exposure, warmth, and contrast. Keep edits subtle. Slightly warm the image, boost shadows if needed, and adjust exposure. Avoid heavy filters that obscure baby’s natural skin tones.
Common Mistakes to Avoid
Learning from common mistakes helps you avoid frustration. Here are the errors I see most often from parents attempting newborn photos at home.
Mixing Light Sources
Turn off all overhead lights and lamps when using window light. Mixed lighting creates color casts that are difficult to correct. Your camera cannot balance warm indoor lights and cool window light simultaneously, resulting in odd skin tones.
Shooting in Direct Sunlight
Direct sun creates harsh shadows and squinting babies. Always position baby in indirect light or diffuse direct sunlight with sheer curtains. Step back from the window into shadowed areas of the room if necessary.
Cluttered Backgrounds
Busy backgrounds distract from your subject. Take a moment to survey your frame before shooting. Remove anything that does not contribute to the image. Simple backgrounds keep focus on baby.
Forcing Poses
If baby is uncomfortable or fussy, stop. Never force a pose that upsets baby. The goal is capturing authentic, peaceful images. A crying baby photo has its place, but it should not be the result of forcing uncomfortable positions.
Skipping Safety Measures
Never prioritize a photo over safety. Always have a spotter, keep hands on baby, and avoid poses that require Photoshop to look safe. When in doubt, choose the simpler, safer option.
Shooting Only One Angle
Variety makes your photo collection richer. Shoot from above, from the side, from baby’s level. Capture wide shots and close-ups. Take horizontal and vertical images. This variety gives you more options and tells a more complete story.
Troubleshooting Common Challenges
Even with perfect preparation, challenges arise. Here is how to handle common problems during newborn photo sessions.
When Your Home Has Poor Natural Light
Not every home has ideal windows. If your home is dark, maximize what light you have. Position baby as close to your brightest window as possible. Use a reflector to bounce available light back onto baby. Consider shooting in black and white, which can look beautiful even with flat lighting.
Higher ISO settings become necessary in low light. Accept some noise in exchange for properly exposed images. Modern noise reduction software can clean up grainy photos surprisingly well.
Handling a Fussy Baby
If baby will not settle, take a break. Feed baby, check the diaper, and try again. Sometimes baby just needs to be held for a few minutes. Do not fight a fussy session; reschedule if needed. The photos will wait, and baby’s comfort matters most.
White noise, warmth, and swaddling help calm most babies. Movement also works. Rock baby gently while walking near your shooting area, then carefully transition to your posing spot.
Dealing with Baby Acne or Skin Issues
Newborn skin is unpredictable. Baby acne, dry patches, and blotchiness are normal and temporary. Soft, diffused light minimizes these issues. Slight overexposure can help skin look smoother. Most skin issues can be softened in post-processing.
Do not let temporary skin concerns prevent you from photographing your baby. These photos document this moment in time, imperfections and all.
Frequently Asked Questions
What is the best lighting for newborn photography?
The best lighting for newborn photography is soft, diffused natural light from a window. Position your baby at a 45 to 90 degree angle from the window for flattering side lighting. Use indirect light rather than direct sunlight, and consider sheer curtains to diffuse harsh light. Morning hours typically offer the softest, most consistent light for newborn sessions.
How do you take professional newborn pictures at home?
To take professional-looking newborn pictures at home, find a window with soft natural light, warm the room to 75-80 degrees Fahrenheit, and prepare a simple, clean backdrop. Time your session after a feeding when baby is sleepy. Use safe, simple poses, keep hands on baby at all times, and focus on capturing authentic moments. Good camera settings include aperture at f/2.8-4.0, shutter speed at 1/200 or faster, and ISO 400-800 as needed.
What time of day is best for newborn photos?
Morning hours between 9 AM and 11 AM typically provide the best light for newborn photos, offering soft indirect window light. However, the most important factor is timing your session when your baby is naturally sleepy, usually right after a feeding. Follow your baby’s schedule rather than forcing a specific time, as a content, sleepy baby makes for better photos.
How do you photograph a newborn without flash?
Photographing a newborn without flash requires positioning baby near a window with soft, indirect natural light. Turn off all overhead lights to avoid mixed color temperatures. Use a wider aperture (f/2.8-4.0) to let in more light, increase ISO to 400-800 if needed, and maintain a shutter speed of at least 1/200 to avoid blur. Move baby closer to the window if images are too dark.
What are the safety rules for newborn photography?
Essential newborn photography safety rules include: never leave baby unattended, keep hands on or near baby at all times during poses, maintain room temperature at 75-80 degrees Fahrenheit, ensure baby’s airway is always clear, avoid forcing uncomfortable poses, use a spotter for any posed shots, skip dangerous poses that require compositing, and stop immediately if baby shows any distress.
How do you pose a newborn for pictures?
Pose a newborn using simple, safe positions that work with their natural comfort. Start with a back pose with head near the window, try a side pose with baby curled naturally, or use a tummy pose with proper support. Swaddling helps keep baby calm and creates clean lines. Always support baby’s head and body, keep hands nearby, and never force poses that seem uncomfortable.
What camera settings are best for newborn photos?
The best camera settings for newborn photos with natural light are: aperture at f/2.8 to f/4.0 for shallow depth of field and background blur, shutter speed at 1/200 second or faster to prevent motion blur, ISO between 400-800 to maintain proper exposure, single-point autofocus on baby’s eye, and white balance set to shade or cloudy for warm skin tones. Shoot in RAW if possible for editing flexibility.
How do you prepare for a newborn photoshoot at home?
Prepare for a home newborn photoshoot by finding your best window with soft natural light, clearing clutter from the shooting area, warming the room to 75-80 degrees, preparing simple backdrops and swaddles, having white noise ready to soothe baby, gathering diaper supplies nearby, timing the session after a feeding when baby is sleepy, and charging your camera or phone beforehand.
Conclusion
Creating beautiful newborn photos at home with natural light is absolutely achievable with the right preparation and techniques. Remember that safety always comes first. Keep hands on baby, maintain a warm environment, use a spotter when needed, and never force uncomfortable poses. The best images come from patient, safe sessions where baby’s comfort is the priority.
Focus on finding soft, indirect window light and positioning baby at 45 to 90 degrees from your light source. Use camera settings that let in enough light without sacrificing sharpness: wide aperture, fast shutter speed, and moderate ISO. Simple poses, clean backgrounds, and attention to detail create professional-looking results without expensive equipment.
Most importantly, give yourself grace. Newborn photography takes practice, and every session teaches you something new. Your baby will never be this small again, so capture what you can, focus on authentic moments, and do not let perfectionism prevent you from documenting these precious early days. These tips for photographing newborns safely at home with natural light give you everything you need to start creating meaningful images your family will treasure for generations.
Start simple, prioritize safety, and enjoy the process. The photos you create today will become the treasured memories your family looks back on for years to come.