After editing hundreds of portraits over the years, I have found that two small adjustments make the biggest impact: whitening teeth and brightening eyes. These subtle enhancements draw viewers directly to the most expressive parts of any face without screaming “I edited this photo.” In this guide, I will walk you through exactly how to whiten teeth and brighten eyes in Lightroom using the masking tools, with specific slider values I use on client work.
Learning how to whiten teeth and brighten eyes in Lightroom portrait retouching transforms good photos into polished, professional images. The best part? Lightroom handles this non-destructively, meaning your original file stays intact while you experiment.
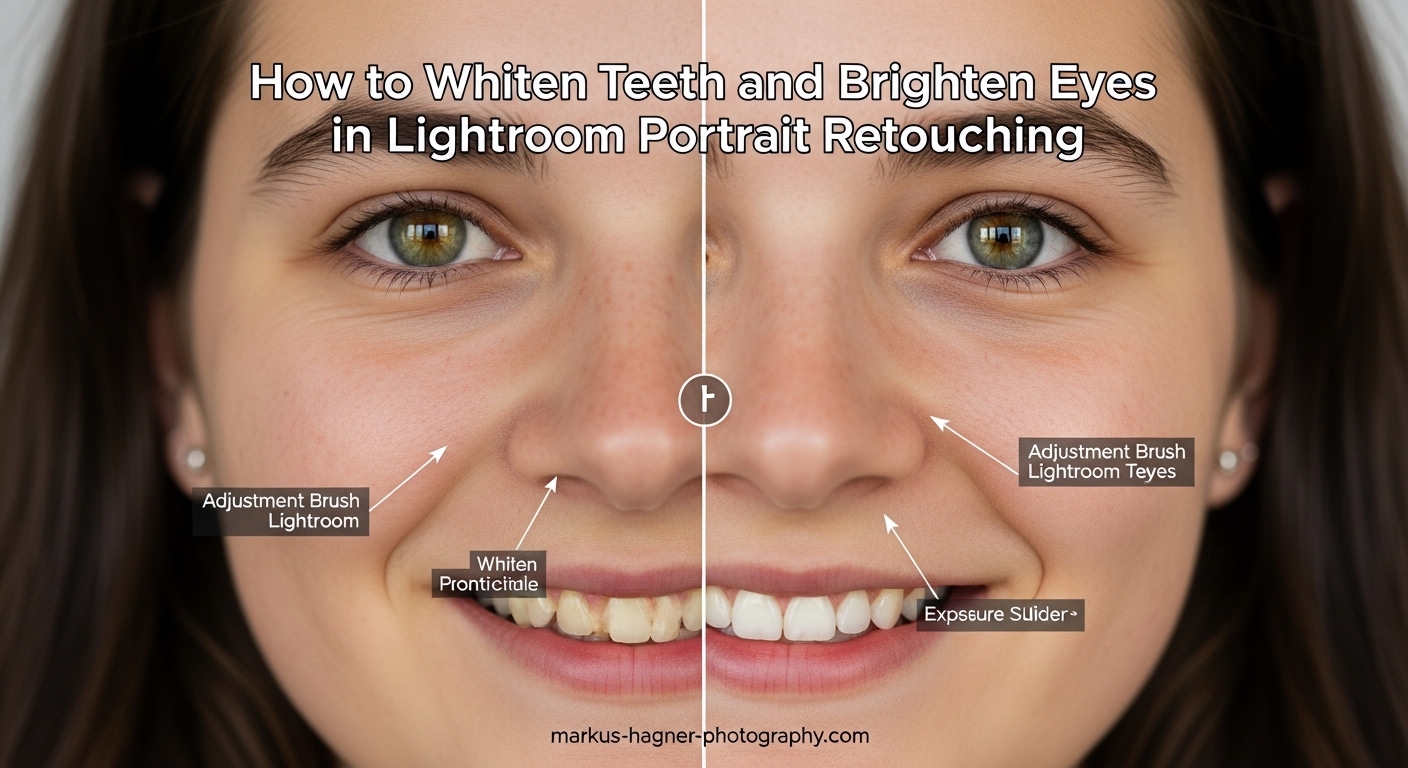
Understanding Lightroom’s Masking Tools for Portrait Retouching
The Masking panel in Lightroom is where all portrait retouching magic happens. Located on the right side of the Develop module, this tool gives you precise control over specific areas of your image without affecting the rest.
Lightroom’s AI-powered subject detection identifies facial features automatically. When you click the Masking icon and choose “Select People,” Lightroom analyzes your image and presents person mask options. These include Teeth, Eye Sclera (the whites of the eyes), Iris and Pupil, Facial Skin, and Hair. Each option creates a separate mask that you can adjust independently.
Both Lightroom Classic and Lightroom CC (the cloud version) include these masking features. Lightroom Mobile also offers the same person detection, though the interface looks slightly different on touch screens. The techniques I share work across all versions.
How to Whiten Teeth in Lightroom
Whitening teeth requires a careful balance. Push too hard and teeth look unnaturally white or even gray. Here is my step-by-step process that delivers natural results every time.
Step 1: Open the Masking Panel
Press Shift+M or click the Masking icon below the Histogram. This opens the masking tools where you will create your teeth adjustment.
Step 2: Select People and Choose Teeth
Click “Select People” in the masking panel. Lightroom’s AI will analyze your image and show thumbnails of detected faces. Click on the person you want to edit, then check the “Teeth” box from the available person mask options. A red overlay will show you exactly what Lightroom selected.
Step 3: Apply Whitening Adjustments
Now adjust these sliders for natural teeth whitening:
Saturation: Reduce by 10 to 20 points (not more, or teeth turn gray)
Temperature: Move slightly toward blue (negative values) by 3 to 8 points
Whites: Increase by 10 to 20 points
Exposure: Increase by 0.1 to 0.2 stops if teeth are dark
Step 4: Check Your Results
Press Y to toggle between before and after views. Zoom to 100% to check the edges of your mask. If the mask selected lips or gums, use the Subtract brush to clean up the selection.
Step 5: Fine-Tune with the Amount Slider
Lightroom remembers your last mask settings. Use the Amount slider at the top of the mask panel to control the overall intensity of your teeth whitening. I typically keep this between 70 and 90 percent for a natural look.
How to Brighten Eyes in Lightroom?
Brightening eyes in Lightroom involves two separate masks: one for the whites (sclera) and one for the iris. I treat them differently because each needs unique adjustments.
Brightening the Eye Whites (Sclera)
Step 1: Create a New Mask for Eye Sclera
Open the Masking panel and click “Select People.” Choose your subject and check “Eye Sclera” from the person mask options. Lightroom creates separate masks for each eye, which you can adjust together or individually.
Step 2: Apply Subtle Brightening
The eye whites need gentle treatment. Use these settings:
Exposure: Increase by 0.15 to 0.3 stops
Whites: Increase by 15 to 25 points
Saturation: Reduce by 5 to 15 points (removes redness)
Dehaze: Add 5 to 10 points for clarity
Scott Kelby warns against “alien eyes” in his tutorials, and I agree. The goal is to remove discoloration and add a subtle sparkle, not make eyes glow. If the whites look too bright at 100% zoom, dial back your adjustments.
Enhancing the Iris and Pupil
Step 1: Select Iris and Pupil
Create another mask using “Select People” and choose “Iris and Pupil.” This selects the colored part of the eye.
Step 2: Use Iris Enhance Preset or Manual Adjustments
Lightroom includes a built-in Iris Enhance preset in the Effects dropdown. This preset automatically adjusts exposure, clarity, saturation, and dehaze. It works well as a starting point, but I often reduce the Amount slider to 50-70% because adaptive presets tend to be too aggressive.
For manual control, try these settings:
Exposure: Increase by 0.2 to 0.4 stops
Clarity: Add 10 to 20 points
Texture: Add 5 to 15 points
Saturation: Increase by 10 to 20 points
Dehaze: Add 5 to 15 points
Step 3: Handle Dark Eyes Differently
For subjects with very dark brown or black eyes, I take a different approach. Instead of increasing exposure, I reduce the Blacks slider by 10-20 points and add texture. This brings out detail without creating an unnatural glow.
Recommended Slider Settings for Natural Results
After testing countless combinations on real client work, here are my go-to settings for natural portrait retouching in Lightroom.
For Teeth Whitening:
Saturation: -10 to -20
Temperature: -3 to -8
Whites: +10 to +20
Exposure: +0.1 to +0.2
For Eye Sclera:
Exposure: +0.15 to +0.3
Whites: +15 to +25
Saturation: -5 to -15
Dehaze: +5 to +10
For Iris Enhancement:
Exposure: +0.2 to +0.4
Clarity: +10 to +20
Texture: +5 to +15
Saturation: +10 to +20
The key is subtlety. Viewers should notice your subject looks great, not that you edited their face. Always check your work at 100% zoom and toggle the before/after view frequently.
Keyboard Shortcuts for Faster Portrait Editing
Speed matters when you are editing dozens of photos from a single session. These keyboard shortcuts have saved me hours of work.
Y – Toggle before/after view (essential for checking your work)
Shift+M – Open the Masking panel
O – Toggle mask overlay (shows the red overlay of your selection)
Backslash () – Quick before/after toggle without split view
Ctrl+Shift+C / Cmd+Shift+C – Copy develop settings
Ctrl+Shift+V / Cmd+Shift+V – Paste develop settings
I also recommend creating custom presets for your teeth and eye adjustments. Once you find settings that work, save them as a preset. This lets you apply consistent retouching across an entire photo session.
Common Mistakes to Avoid
Forum discussions on Reddit reveal the same mistakes repeatedly. Here is what to watch for.
Over-whitening teeth: Teeth should never be pure white. Natural teeth have a slight ivory tone. If you desaturate too much, teeth turn gray and look worse than before.
Creating alien eyes: Over-brightening the eye whites makes subjects look possessed. Keep sclera adjustments subtle and always check at 100% zoom.
Forgetting to reset mask settings: Lightroom remembers your last mask adjustments. If you whitened teeth on the previous photo, those settings carry over. Always check what adjustments are active before applying a new mask.
Ignoring the preset amount slider: Adaptive presets like Iris Enhance often apply too strongly by default. Use the Amount slider to dial back the intensity.
Not checking results at full zoom: Masking looks different at fit-to-screen vs 100% zoom. Always zoom in to check edges and intensity before moving on.
Tips for Batch Processing Multiple Portraits
When you have 50+ photos from a wedding or portrait session, efficiency becomes critical. Here is my batch processing workflow.
First, edit one photo completely with all teeth and eye adjustments. Then select all similar photos and click “Sync Settings” in the Library module. Check only the masks you want to copy. Lightroom will attempt to apply the same adjustments to each face.
Note that AI detection works independently on each image. If one photo has a subject smiling broadly and another has a neutral expression, the teeth mask may not appear on the second image. You will need to create a manual brush mask for those cases.
You can also create custom presets from your mask settings. After adjusting teeth on one photo, save those specific slider values as a preset. Apply this preset to new masks to maintain consistency across your session.
Troubleshooting When Masking Does Not Work
Sometimes AI masking fails to detect facial features. Here is what to do when that happens.
Teeth not detected: This happens most often when subjects are not smiling. Use the Brush tool instead. Create a new mask, select Brush, and manually paint over the teeth. Enable Auto Mask to help the brush stay within boundaries.
Eyes not detected properly: If the subject has glasses, shadows across their face, or is looking away, AI may struggle. Switch to the Brush or Linear Gradient tool to create a manual selection.
Mask overlay not showing: Press O to toggle the mask overlay. If it still does not appear, check that the mask is actually selected in the Masks panel. Sometimes I accidentally click away from the mask I intended to edit.
Adjustments affecting areas outside the mask: This usually means the AI selected too much. Use the Subtract brush to remove unwanted areas from your selection. Feathering also helps blend the edges naturally.
Frequently Asked Questions
Is there a teeth whitening tool in Lightroom?
Yes, Lightroom has built-in teeth whitening through the Masking panel. Click the Masking icon, select ‘Select People,’ and check the Teeth option. Lightroom’s AI automatically detects and masks the teeth, allowing you to apply targeted adjustments like reducing saturation and adjusting temperature to whiten teeth naturally.
How to whiten eyes in Lightroom?
To whiten eyes in Lightroom, open the Masking panel, click ‘Select People,’ and choose ‘Eye Sclera’ from the person mask options. Apply a Dodge preset or manually reduce saturation by 5-15 points and increase exposure by 0.15-0.3 stops. Keep adjustments subtle to avoid the alien eyes look.
How do I make teeth look natural when whitening in Lightroom?
For natural-looking teeth, avoid over-desaturating. Instead of removing all yellow, reduce saturation by only 10-20 points and slightly cool the temperature by 3-8 points. Then increase whites by 10-20 points. The goal is to remove color casts, not make teeth pure white.
Why do teeth turn gray when I whiten them in Lightroom?
Teeth turn gray when you desaturate too aggressively. Reducing saturation removes both yellow and the natural tooth color. Instead, try reducing saturation minimally (5-15 points) and use the Temperature slider to cool the teeth slightly, or increase Whites and Exposure for a brighter appearance.
Can I whiten teeth and brighten eyes in Lightroom Mobile?
Yes, Lightroom Mobile includes the same masking features as Lightroom Classic. Tap the Masking icon, select People, and choose the facial feature you want to adjust. The AI detection works similarly, though the interface is optimized for touch. Slider adjustments work the same way.
What is the Iris Enhance preset in Lightroom?
Iris Enhance is a built-in adaptive preset in Lightroom that automatically boosts exposure, clarity, and saturation on the iris (colored part of the eye). It draws attention to the eyes and makes them pop. Apply it through the Masking panel’s preset dropdown, then use the Amount slider to control intensity.
How do I fix AI masking when it doesn’t detect teeth?
If AI masking fails to detect teeth (common when subjects aren’t smiling broadly), use the Brush tool instead. Create a new mask, select Brush, and manually paint over the teeth area. Use Auto Mask to help stay within the teeth boundaries. Then apply the same whitening adjustments.
How do I avoid the ‘alien eyes’ look in Lightroom?
To avoid alien eyes, keep your eye white adjustments subtle. Increase exposure by only 0.15-0.3 stops and reduce saturation by just 5-15 points. Always check your work at 100% zoom. If the whites look too bright, dial back the adjustments.
What is the difference between Iris Enhance and Dodge in Lightroom?
Iris Enhance targets the colored part of the eye (iris) and boosts clarity and saturation. Dodge is a general brightening tool that works well on eye whites (sclera) to add subtle brightness without overexposing.
Can I batch whiten teeth in Lightroom?
Yes, you can batch process teeth whitening. Edit one photo completely, then select similar photos and use Sync Settings in the Library module. Check only the teeth mask to copy. Note that AI detection works independently on each image, so non-smiling subjects may need manual brushing.
Conclusion
Mastering how to whiten teeth and brighten eyes in Lightroom portrait retouching comes down to restraint and consistency. The masking tools give you incredible precision, but the real skill lies in knowing when to stop. I have found that reducing saturation slightly on teeth, adding subtle exposure to eye whites, and enhancing the iris with clarity and texture creates the most natural, professional results.
Remember to check your work at 100% zoom frequently. Toggle the before/after view with the Y key to ensure your adjustments enhance rather than distract. And when editing multiple photos from the same session, create presets to maintain consistency across all your images.
Practice these techniques on your own photos before applying them to client work. Once you develop an eye for natural-looking retouching, these adjustments will become second nature. The goal is always the same: help your subjects look their best while keeping the final image believable.