I’ve been shooting photography for over 15 years, and I can tell you that composition is what separates good photos from great ones. While most photographers start with the rule of thirds, there’s a more powerful compositional tool that the masters have used for centuries: the golden ratio. This mathematical principle appears throughout nature and has been used by artists from Leonardo da Vinci to Ansel Adams to create visually stunning works. When I first discovered how to apply the golden ratio in my photography, it completely transformed the way I see and compose images. In this comprehensive guide, I’ll share everything I’ve learned about using the golden ratio in photography composition, complete with expert tips, practical examples, and techniques you can start using today.
What is the Golden Ratio in Photography?
The golden ratio, also known as the divine proportion, golden mean, or phi (φ), is a mathematical ratio of approximately 1:1.618 that has been used in art and architecture for thousands of years. In photography, this ratio helps create compositions that feel naturally balanced and pleasing to the human eye.
I remember when I first encountered this concept in art history class, I thought it was just some abstract mathematical idea. But when I started seeing it everywhere in nature—from the spiral of a nautilus shell to the arrangement of leaves on a stem—I realized there was something special about this proportion. Our brains are literally wired to find this ratio beautiful, which makes it an incredibly powerful tool for photographers.
The golden ratio works because it creates a sense of harmony and balance that feels organic rather than forced. Unlike the rule of thirds, which divides your frame into equal parts, the golden ratio creates more dynamic and interesting compositions that guide the viewer’s eye through the image in a natural flow.
The Mathematics Behind the Magic
Now, don’t worry—I’m not going to bore you with complex equations (I was terrible at math in school, too!). But understanding the basic concept will help you apply it more effectively in your photography.
The golden ratio is derived from the Fibonacci sequence, a series of numbers where each number is the sum of the two preceding ones: 0, 1, 1, 2, 3, 5, 8, 13, 21, 34, and so on. When you divide any number in this sequence by the one before it, you get approximately 1.618. This ratio appears throughout nature in everything from flower petals to galaxy spirals.
In photography, we apply this ratio by dividing our frame according to these proportions. This creates several compositional tools we can use:
- The Golden Rectangle: A rectangle whose sides are in the golden ratio
- The Golden Spiral: A logarithmic spiral that grows outward by the golden ratio
- The Golden Grid: A grid that divides the frame according to golden ratio proportions
I discovered that understanding these mathematical foundations helped me “see” the golden ratio more easily when I’m out shooting. It’s like developing a new sense for composition.
Golden Ratio vs Rule of Thirds: Which is Better?
This is a question I get asked all the time in my photography workshops. The rule of thirds is probably the most well-known compositional guideline, dividing your frame into nine equal parts with two horizontal and two vertical lines. It’s simple, easy to remember, and most cameras even have a grid overlay for it.
But here’s the thing: the rule of thirds is actually a simplified version of the golden ratio. When I started experimenting with both techniques, I found that the golden ratio often creates more dynamic and engaging compositions. Here’s why:
The rule of thirds creates equal divisions, which can sometimes feel a bit static or mechanical. The golden ratio, on the other hand, creates unequal divisions that feel more natural and organic. This subtle difference can make your images feel more sophisticated and professionally composed.
I’m not saying you should abandon the rule of thirds entirely—it’s still a valuable tool, especially for beginners. But as you grow as a photographer, incorporating the golden ratio into your compositional toolkit can take your images to the next level.
In my experience, the golden ratio works particularly well for:
- Landscapes with natural curves and flows
- Portraits where you want to create more dynamic positioning
- Architectural photography with strong lines and shapes
- Street photography where you want to guide the viewer’s eye through the scene
Types of Golden Ratio Compositions
One of the things I love about the golden ratio is its versatility. There are several ways to apply it in your photography, each creating different effects. Let me walk you through the main types I use regularly.
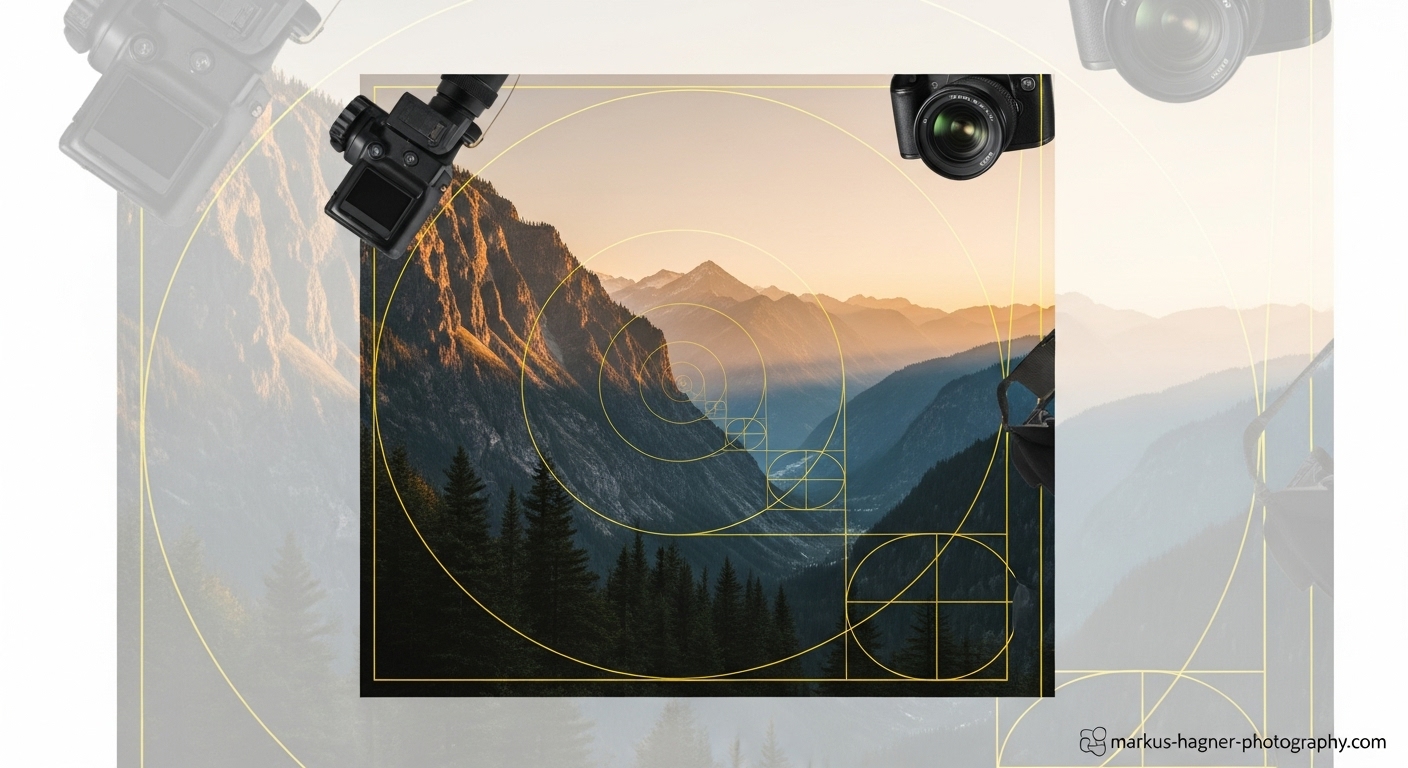
The Fibonacci Spiral
This is probably the most famous application of the golden ratio in photography. The Fibonacci spiral (or golden spiral) is created by drawing circular arcs connecting the opposite corners of squares in the Fibonacci tiling. The result is a beautiful, flowing spiral that appears throughout nature.
I use the Fibonacci spiral when I want to create a strong sense of movement or flow in my images. It’s perfect for leading the viewer’s eye from one part of the frame to another, creating a visual journey through the photograph.
For example, when I’m shooting landscapes, I might position a winding road or river to follow the curve of the spiral, with my main subject at the spiral’s focal point. This creates a natural path for the eye to follow, making the image more engaging and dynamic.
The Golden Grid
The golden grid is similar to the rule of thirds grid but with divisions based on the golden ratio rather than equal thirds. This creates a more complex grid with lines that aren’t evenly spaced, resulting in more interesting compositions.
I find the golden grid particularly useful for architectural photography and portraits. The unequal divisions help create more tension and interest in the composition. When I’m shooting portraits, I often place my subject’s eyes along one of the golden ratio lines rather than at a rule of thirds intersection. This subtle shift can make the portrait feel more sophisticated and professionally composed.
The Golden Triangle
The golden triangle is less commonly discussed but incredibly useful, especially for images with strong diagonal lines. It’s created by dividing your frame diagonally and then drawing lines from the corners to the diagonal according to the golden ratio.
I discovered the golden triangle when I was struggling with compositions that had strong diagonal elements, like mountain landscapes or architectural shots with dramatic angles. Using the golden triangle helped me create more balanced and harmonious compositions with these challenging elements.
How to Apply the Golden Ratio in Different Photography Genres
The beauty of the golden ratio is that it can be applied to virtually any type of photography. Let me share how I use it in different genres.
Landscape Photography
Landscape photography is where I first really fell in love with the golden ratio. Nature itself follows these proportions, so it’s natural that landscape compositions often benefit from applying them.
When I’m shooting landscapes, I look for natural elements that follow the golden spiral—rivers, coastlines, mountain ranges, or cloud formations. I position these elements to follow the curve of the spiral, with my main focal point at the spiral’s center.
For example, I once shot a sunrise over a winding river. I positioned the river to follow the golden spiral, with the sun rising at the spiral’s focal point. The result was an image that felt naturally balanced and guided the viewer’s eye through the scene in a satisfying way.
I also use the golden grid for horizon placement. Instead of placing the horizon at the 1/3 or 2/3 line (rule of thirds), I place it according to the golden ratio divisions. This creates a more dynamic and interesting composition, especially when there are dramatic clouds or foreground elements.
Portrait Photography
Portrait photography is another area where the golden ratio can make a huge difference. While many photographers default to centering their subjects or using the rule of thirds, I’ve found that golden ratio compositions often create more engaging and professional-looking portraits.
For individual portraits, I often use the golden spiral. I position my subject’s face along the curve of the spiral, with their eyes at the focal point. This creates a more dynamic composition than simply centering the subject or placing them at a rule of thirds intersection.
When shooting group portraits, I use the golden grid to position multiple subjects. The unequal divisions help create more interesting groupings and prevent the composition from feeling too static or formal.
I also pay attention to the golden ratio in facial features. Many naturally beautiful faces have features that approximate the golden ratio—eyes spaced according to the ratio, nose length to face width, and so on. While I don’t measure this precisely, being aware of these proportions helps me capture more flattering portraits.
Street Photography
Street photography is all about capturing decisive moments, and composition happens quickly. That’s why I’ve trained myself to see golden ratio opportunities instinctively.
When I’m shooting street photography, I look for scenes where elements naturally fall into golden ratio proportions. This might be a person walking along a path that curves like a golden spiral, or architectural elements that create golden ratio divisions.
I also use the golden ratio when cropping street photos in post-processing. Sometimes the perfect composition isn’t obvious when you’re shooting, but applying the golden ratio in cropping can transform an ordinary street shot into something extraordinary.
Architecture Photography
Architecture is full of lines, shapes, and proportions, making it perfect for golden ratio compositions. Many architects actually design buildings using the golden ratio, so recognizing these proportions can help you capture more compelling architectural images.
When I’m shooting architecture, I look for buildings or elements that incorporate golden ratio proportions. I then compose my shots to emphasize these proportions, using the golden grid or spiral to guide my composition.
I also use the golden triangle for architectural shots with strong diagonal lines. This helps create more dynamic and interesting compositions, especially with modern architecture that features dramatic angles.
Macro Photography
Macro photography is all about revealing the hidden beauty in small details, and the golden ratio appears frequently in nature at the macro level. From the spiral of a snail shell to the arrangement of seeds in a sunflower, these natural patterns are perfect for golden ratio compositions.
When I’m shooting macro, I look for these natural patterns and compose my shots to emphasize them. The golden spiral is particularly useful for macro compositions, as many natural objects at this scale follow spiral patterns.
Practical Tools and Techniques
Now that you understand the theory, let me share some practical tools and techniques I use to apply the golden ratio in my photography.
In-Camera Application
While most cameras don’t have a golden ratio overlay built-in (they typically offer rule of thirds grids), there are ways to approximate it while shooting:
- Visualize the Spiral: I’ve trained myself to visualize the golden spiral in my viewfinder. It takes practice, but now I can often “see” the spiral without any overlay.
- Use the Rule of Thirds as a Starting Point: Since the rule of thirds is a simplified version of the golden ratio, I often start with the rule of thirds grid and then adjust slightly to match golden ratio proportions.
- Focus on Natural Curves: I look for natural curves and flows in the scene that might follow a golden spiral, positioning my subject accordingly.
- Practice with Still Life: Before applying the golden ratio in fast-moving situations, I practiced with still life subjects where I could take my time to perfect the composition.
Post-Processing Techniques
Post-processing is where the golden ratio really shines for me. Most photo editing software offers tools to help you apply golden ratio compositions:
- Lightroom/Camera Raw: These programs have golden ratio overlays in the crop tool. Simply press ‘O’ to cycle through the different overlays until you find the golden ratio options.
- Photoshop: Photoshop’s crop tool also includes golden ratio overlays. You can also download custom golden ratio guides and actions.
- Cropping for Impact: I often re-crop images in post-processing to improve their composition using the golden ratio. This can transform an ordinary shot into something extraordinary.
- Multiple Variations: I sometimes create multiple cropped versions of the same image using different golden ratio compositions to see which works best.
Mobile Apps for Golden Ratio
If you’re shooting with your smartphone or want help visualizing the golden ratio, there are several apps that can help:
- Golden Ratio Camera: This app overlays golden ratio spirals and grids on your camera viewfinder, helping you compose shots in real-time.
- Phi Matrix: A powerful composition tool that offers various golden ratio overlays and guides.
- Photo Pills: While primarily a planning app for photographers, it includes golden ratio composition tools.
- Golden Ratio Calculator: Useful for understanding the mathematical relationships and applying them to your compositions.
Famous Photographers Who Mastered the Golden Ratio
Learning from the masters is one of the best ways to improve your photography, and many famous photographers have used the golden ratio to create their most iconic images.
Ansel Adams
Ansel Adams, the legendary landscape photographer, was a master of composition, and many of his most famous images exhibit golden ratio proportions. When I studied his work, I was amazed at how often his landscapes followed the golden spiral, with elements like rivers, mountain ranges, and cloud formations creating natural curves that guide the viewer’s eye through the image.
Adams didn’t just stumble upon these compositions—he was meticulous about his planning and often used view cameras that allowed him to precisely control the composition. His attention to golden ratio proportions is one reason his images feel so balanced and harmonious.
Henri Cartier-Bresson
Henri Cartier-Bresson, the father of modern photojournalism, was another master of the golden ratio. His concept of “the decisive moment” wasn’t just about timing—it was also about composition. Many of his most famous street photographs exhibit perfect golden ratio proportions.
What amazes me about Cartier-Bresson’s work is that he achieved these compositions spontaneously, in the split second of a decisive moment. He had such an intuitive understanding of composition that he could recognize and capture golden ratio proportions in fast-moving street scenes.
Annie Leibovitz
Annie Leibovitz, known for her iconic portrait photography, often uses golden ratio proportions in her group portraits. While many photographers struggle with group compositions, Leibovitz’s arrangements often follow golden ratio principles, creating balanced yet dynamic groupings.
I’ve studied her group portraits extensively, and I’m always impressed by how she positions multiple subjects according to golden ratio proportions. This is particularly evident in her work for Vanity Fair and Rolling Stone, where she often photographs large groups of people.
Steve McCurry
Steve McCurry, famous for his “Afghan Girl” portrait, is another photographer who frequently uses golden ratio compositions. His portraits often have the subject’s eyes positioned at golden ratio intersections, creating engaging and powerful images.
When I analyzed McCurry’s work, I found that many of his most compelling portraits use golden ratio proportions, even in seemingly simple compositions. This attention to compositional detail is one reason his portraits have such impact.
Common Mistakes to Avoid
As I’ve taught golden ratio techniques to other photographers, I’ve noticed some common mistakes that beginners often make. Let me share these so you can avoid them in your own work.
Forcing the Composition
One of the biggest mistakes I see is photographers trying to force the golden ratio into scenes where it doesn’t naturally fit. The golden ratio should enhance your composition, not constrain it. If the scene doesn’t naturally lend itself to golden ratio proportions, it’s better to use a different compositional approach.
I remember early in my photography journey, I would try to make every image fit the golden ratio, even when it didn’t make sense. The result was often awkward, forced compositions that felt unnatural. Now I’ve learned to recognize when the golden ratio will work and when it won’t.
Also Read: Sony A1 II Manual
Ignoring the Subject
Another common mistake is focusing so much on the golden ratio that you forget about the subject itself. The golden ratio is a tool, not the goal. Your subject should always be the primary focus, with the golden ratio serving to enhance its presentation.
I’ve seen photographers miss great shots because they were too busy trying to align everything with the golden ratio. Remember that sometimes capturing the moment is more important than perfect composition.
Using Only One Type of Golden Ratio
Many photographers learn about the Fibonacci spiral and then use it exclusively, ignoring other golden ratio compositions like the golden grid or golden triangle. Each type of golden ratio composition has its strengths and is suited to different situations.
I made this mistake early on, using only the Fibonacci spiral for everything. Once I started experimenting with the golden grid and golden triangle, I discovered new compositional possibilities that greatly expanded my creative options.
Neglecting Other Compositional Elements
The golden ratio is powerful, but it’s not the only compositional tool available. Leading lines, framing, balance, and other compositional elements are also important. The best images often combine multiple compositional techniques.
I’ve found that the golden ratio works best when combined with other compositional elements. For example, I might use the golden spiral for the overall composition while also using leading lines to guide the viewer’s eye to the main subject.
Advanced Golden Ratio Techniques
Once you’ve mastered the basics of golden ratio composition, you can start exploring more advanced techniques. These are some of the approaches I’ve developed over years of experimentation.
Multiple Golden Ratios
One advanced technique I use is incorporating multiple golden ratio elements within a single image. This might involve using both the golden spiral and the golden grid, or applying golden ratio proportions at different scales within the same composition.
For example, in a landscape image, I might use the golden spiral for the overall composition while also applying golden ratio proportions to smaller elements within the frame, like the arrangement of rocks or trees.
Golden Ratio in Color and Light
The golden ratio isn’t just about shapes and lines—it can also be applied to color and light. I often use golden ratio proportions when planning my color palettes or lighting setups.
For instance, I might divide my frame according to the golden ratio and use different color temperatures or lighting intensities in each section. This creates a more dynamic and interesting image that engages the viewer on multiple levels.
Combining Golden Ratio with Other Mathematical Concepts
The golden ratio is related to other mathematical concepts like the Fibonacci sequence and fractals. I sometimes combine these ideas in my compositions, creating images that have multiple layers of mathematical harmony.
This approach is particularly effective in nature photography, where these mathematical concepts often appear naturally. By recognizing and emphasizing these relationships, I can create images that feel deeply harmonious and balanced.
Golden Ratio in Post-Processing Workflow
I’ve integrated the golden ratio into my entire post-processing workflow, not just cropping. This includes using golden ratio proportions for adjustments to contrast, color balance, and even sharpening.
For example, I might apply different levels of sharpening to different areas of the image according to golden ratio proportions, or adjust color balance in golden ratio sections to create more dynamic images.
Real-World Examples and Case Studies
Let me walk you through some real-world examples of how I’ve applied the golden ratio in my photography, along with the thought process behind each image.
Case Study 1: Coastal Landscape
I was shooting a coastal landscape at sunrise, with a winding river leading to the ocean. The scene was beautiful, but my initial compositions felt static and uninteresting.
I noticed that the river formed a natural curve that resembled a golden spiral. I repositioned my camera to align this curve with the golden spiral, placing the rising sun at the spiral’s focal point. I also used the golden grid to position the horizon line.
The result was a much more dynamic composition that guided the viewer’s eye from the foreground river, through the middle ground, to the background ocean and sunrise. The image felt naturally balanced and engaging, with a clear visual path for the eye to follow.
Case Study 2: Street Portrait
I was shooting street portraits in a busy market when I noticed a vendor with an interesting face and expressive eyes. The background was cluttered, but I saw an opportunity to create a compelling portrait.
I positioned myself so that the vendor’s face aligned with the golden spiral, with his eyes at the focal point. I also used the golden grid to position elements in the background, creating a sense of depth and context without overwhelming the main subject.
The resulting portrait had a strong focal point (the vendor’s eyes) while still including enough environmental context to tell a story. The golden ratio composition helped balance the subject with the busy background, creating a harmonious and engaging image.
Case Study 3: Architectural Detail
I was photographing a modern building with dramatic angular lines. My initial shots felt unbalanced, with the strong diagonal lines creating tension without resolution.
I decided to try the golden triangle approach, aligning the building’s diagonal lines with the golden triangle divisions. This created a more balanced composition that still retained the dramatic impact of the architecture.
I also used the golden grid to position other elements in the frame, like windows and decorative details. The result was a sophisticated architectural image that felt both dynamic and harmonious.
Also Read: 12 Best Sony Wide Angle Lenses
Pro Tips from Professional Photographers
Over the years, I’ve had the privilege of learning from many professional photographers. Here are some of their best tips for using the golden ratio in photography:
“Practice Seeing the Ratio”
“The golden ratio isn’t just a tool for cropping—it’s a way of seeing. Spend time every day looking for golden ratio proportions in the world around you. Soon you’ll start seeing them everywhere, and your compositions will improve naturally.” – Sarah Chen, Landscape Photographer
“Don’t Be a Slave to the Grid”
“The golden ratio should serve your vision, not the other way around. If following the ratio strictly means missing the moment or compromising your artistic intent, it’s okay to break the rules. The best compositions often come from intuition, not rigid adherence to guidelines.” – Marcus Rodriguez, Street Photographer
“Combine with Other Techniques”
“The golden ratio is most powerful when combined with other compositional elements. Try using it with leading lines, framing, or color theory. The more tools you have in your compositional toolkit, the more creative and effective your images will be.” – Emily Watson, Portrait Photographer
“Study the Masters”
“Look at the work of photographers who consistently create strong compositions. Analyze how they use the golden ratio and other compositional techniques. You’ll learn more from studying great images than from reading a dozen books on composition.” – David Kim, Fine Art Photographer
“Experiment and Play”
“Don’t be afraid to experiment with different golden ratio compositions. Try the spiral, the grid, the triangle—see what works best for different subjects and situations. Photography is as much about play and experimentation as it is about rules and techniques.” – Lisa Thompson, Commercial Photographer
FAQ Section
What exactly is the golden ratio in photography?
The golden ratio is a mathematical proportion (approximately 1:1.618) that creates naturally balanced and pleasing compositions. In photography, it’s used to position elements within the frame in a way that feels harmonious and guides the viewer’s eye through the image.
How is the golden ratio different from the rule of thirds?
The rule of thirds divides your frame into nine equal parts, while the golden ratio creates unequal divisions based on the 1:1.618 proportion. The golden ratio often creates more dynamic and organic compositions compared to the more static feel of the rule of thirds.
Do I need special equipment to use the golden ratio?
No special equipment is needed. While some cameras have golden ratio overlays, you can also visualize it mentally or use post-processing software to apply it during editing. There are also mobile apps that can help you see and apply the golden ratio while shooting.
Can the golden ratio be used in all types of photography?
Yes, the golden ratio can be applied to virtually any type of photography, from landscapes and portraits to street photography and macro work. The key is recognizing when and how to apply it effectively for each genre.
How long does it take to master golden ratio composition?
Like any skill, mastering golden ratio composition takes time and practice. Most photographers start seeing improvements in their compositions within a few weeks of conscious practice, but true mastery can take months or even years of consistent application.
Are there situations where the golden ratio shouldn’t be used?
Yes, there are situations where other compositional approaches might be more effective. For example, when you want to create strong symmetry or when the subject doesn’t naturally lend itself to golden ratio proportions. The golden ratio is a tool, not a rule that must always be followed.
Can I use the golden ratio in post-processing if I didn’t apply it while shooting?
Absolutely! Many photographers, including myself, often apply the golden ratio during post-processing. Cropping is a powerful way to improve composition, and using the golden ratio as a guide can transform an ordinary image into something extraordinary.
How do I know if I’ve applied the golden ratio correctly?
If your composition feels balanced, harmonious, and naturally guides the viewer’s eye through the image, you’ve likely applied the golden ratio effectively. Trust your visual intuition—if it looks and feels right, it probably is.
Conclusion
Learning to use the golden ratio in photography composition has been one of the most transformative experiences in my photographic journey. What started as a mathematical curiosity has become an integral part of how I see and compose images.
The golden ratio isn’t just a technical tool—it’s a way of seeing the world that reveals the hidden harmonies and proportions that make certain images so compelling. By understanding and applying this principle, you can create photographs that feel naturally balanced, engaging, and professional.
Remember that mastering the golden ratio takes time and practice. Don’t be discouraged if your first attempts don’t yield perfect results. Keep practicing, keep experimenting, and most importantly, keep shooting. Over time, you’ll develop an intuitive sense for golden ratio compositions, and it will become second nature in your photography.
I encourage you to start applying these techniques in your own work. Try using the golden spiral for your next landscape, or the golden grid for a portrait. Experiment with different approaches and see what works best for your style and vision.
And don’t forget to bookmark this guide for future reference—I’ll be updating it regularly with new tips, examples, and techniques as I continue to explore the golden ratio in my own photography. Happy shooting!
Save this article for later! Photography techniques are constantly evolving, and I update this guide regularly with new insights and examples. Bookmark it now so you can stay up-to-date with the latest golden ratio photography techniques.