Every photographer has experienced the frustration of capturing what looked like a perfect shot, only to find curved lines where straight ones should be. Buildings that appear to lean backward, unwanted color fringing around edges, or dark corners in your images can all result from lens distortion. The good news? Adobe Lightroom has powerful built-in tools to fix these issues quickly. In this guide, I’ll walk you through exactly how to use lens corrections and transform tools in Lightroom to fix distortion and transform your photos from flawed to professional-looking.
Understanding Lens Distortion
Before diving into the corrections, it helps to understand what causes distortion in the first place. Different lens types produce different optical issues, and knowing what you’re dealing with makes fixing problems much easier.
Barrel Distortion
Barrel distortion makes straight lines bow outward like a barrel. This is most common with wide-angle lenses, especially at their widest focal lengths. If you photograph a brick wall with a wide-angle lens, the lines near the edges will curve outward instead of staying straight. This type of distortion is particularly noticeable in architectural and real estate photography.
Pincushion Distortion
Pincushion distortion is the opposite of barrel distortion. Straight lines curve inward toward the center of the image, creating a pinched look. This typically occurs with telephoto lenses at longer focal lengths. Portrait photographers using telephoto lenses may notice this effect, though it’s usually less obvious than barrel distortion.
Perspective Distortion and Converging Verticals
Perspective distortion happens when you tilt your camera up or down to capture a tall subject. Buildings appear to lean backward or forward, and parallel vertical lines converge toward each other. This is especially problematic for architectural and cityscape photographers who want their buildings to look straight and natural.
Chromatic Aberration
Chromatic aberration appears as colored fringes (usually purple or green) around high-contrast edges in your photo. This optical issue occurs when different wavelengths of light focus at different points. It’s most visible in backlit situations or when shooting with older or less expensive lenses.
Vignetting
Vignetting causes the corners and edges of your image to appear darker than the center. This happens when light doesn’t reach the edges of your sensor evenly, often with wide-angle lenses or when using certain filter combinations. While some photographers use vignetting creatively, unwanted vignetting can be easily corrected.
How to Use Lens Corrections and Transform Tools in Lightroom to Fix Distortion
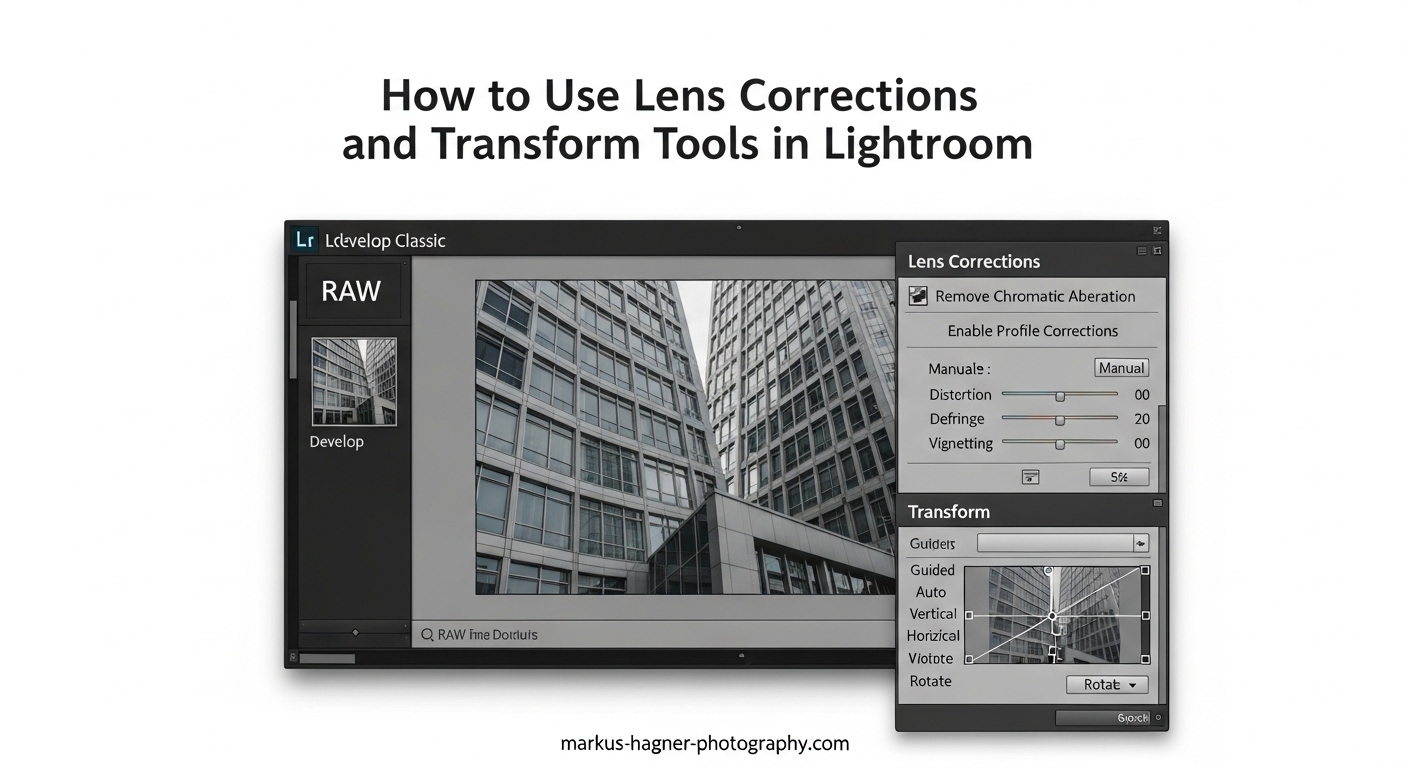
The Lens Corrections panel in Lightroom’s Develop module is your first stop for fixing optical distortion. This panel handles the physical characteristics of your lens, correcting issues built into the optics themselves.
Accessing the Lens Corrections Panel
Open your image in Lightroom and switch to the Develop module by pressing D on your keyboard or clicking “Develop” at the top right. In the right panel, scroll down until you find the Lens Corrections panel. If it’s collapsed, click the triangle to expand it. You’ll see two tabs: Basic and Profile, plus Manual and Color tabs for advanced adjustments.
Enable Profile Corrections (Automatic Method)
The fastest way to fix lens distortion is using Lightroom’s built-in lens profiles. Here’s how to do it:
Step 1: Click the Profile tab in the Lens Corrections panel.
Step 2: Check the box that says “Enable Profile Corrections.”
Step 3: Lightroom will automatically detect your camera and lens from the image metadata and apply the appropriate correction profile.
Step 4: If Lightroom doesn’t automatically select your lens, use the dropdown menus to manually choose your lens make and model.
This automatic method works remarkably well for most modern lenses from major manufacturers like Canon, Nikon, Sony, and Fujifilm. The correction is applied instantly, and you’ll see curved lines straighten and vignetting disappear.
Remove Chromatic Aberration
Right below the Enable Profile Corrections option, you’ll find the “Remove Chromatic Aberration” checkbox. Enable this to eliminate colored fringing around edges. For most images, this automatic removal works perfectly. If you still see color fringing after enabling it, switch to the Color tab and use the Defringe sliders for more targeted control.
Manual Correction Sliders
Sometimes the automatic profile doesn’t quite match your needs, or you’re working with a lens that doesn’t have a built-in profile. In these cases, switch to the Manual tab for hands-on control.
Distortion Slider: Drag left to correct barrel distortion (curved outward) or right to correct pincushion distortion (curved inward). Look for straight lines in your image and adjust until they appear truly straight.
Vignette Slider: Drag right to brighten the corners and edges, removing unwanted darkening. Drag left if you want to add a creative vignette.
Aspect Ratio: This slider adjusts the horizontal-to-vertical proportions of your image after distortion correction. Use it sparingly, as extreme adjustments can make subjects look unnatural.
Transform Panel and Upright Modes
While Lens Corrections fixes optical issues from the lens itself, the Transform panel handles perspective problems caused by camera angle. This is where you’ll fix those buildings that look like they’re falling backward.
Finding the Transform Panel
In the Develop module’s right panel, scroll down past Lens Corrections to find the Transform panel. Expand it by clicking the triangle if it’s collapsed. You’ll see five Upright mode buttons at the top, plus manual sliders below.
Understanding the Five Upright Modes
Lightroom offers five Upright modes, each designed for different correction scenarios:
Off: Disables all automatic Upright corrections. Use this when you want complete manual control or when the automatic modes produce unwanted results.
Auto: Applies a balanced correction to both horizontal and vertical perspective. This is the best starting point for most images and works well for general photography. Lightroom analyzes the image and makes its best guess at what needs correcting.
Level: Corrects only horizontal perspective, making horizontal lines straight without affecting vertical perspective. This is useful for landscape horizons or when you only need to level the image without changing vertical lines.
Vertical: Corrects only vertical perspective, making vertical lines straight. This is ideal for architectural photography where buildings should appear straight up and down. Photographers I’ve worked with prefer this mode for real estate and architectural work.
Full: Applies the strongest correction to both horizontal and vertical perspectives simultaneously. This can produce dramatic results but may crop significant portions of your image. Use with caution, as it can sometimes create unnatural-looking results.
Guided Upright Tool
For precise control over perspective correction, the Guided Upright tool lets you draw lines directly on your image to tell Lightroom exactly what should be straight. Here’s how to use it:
Step 1: Click the Guided Upright icon (the crossed lines) in the Transform panel, or press Shift+T.
Step 2: Draw a line along something that should be horizontal or vertical in your image. For buildings, trace along an edge or corner.
Step 3: Draw a second line perpendicular to the first (horizontal if you drew vertical first, or vice versa).
Step 4: Lightroom will apply the correction based on your guides. You can draw up to four lines for maximum precision.
Step 5: Press Enter or click the X to exit Guided mode.
This tool has a bit of a learning curve, but once mastered, it provides the most accurate perspective corrections for complex architectural shots.
Manual Transform Sliders
Below the Upright buttons, you’ll find manual sliders for fine-tuning your corrections:
Vertical: Adjusts the vertical perspective. Drag left or right to tilt the image forward or backward.
Horizontal: Adjusts the horizontal perspective. Drag to correct keystoning from side angles.
Rotate: Rotates the entire image. Use this for leveling horizons.
Aspect: Changes the aspect ratio of the corrected image. This can help recover stretched or compressed areas after perspective correction.
Scale: Zooms in or out on the image. Since perspective correction often crops your image, use Scale to adjust how much of the corrected area remains visible.
X Offset and Y Offset: These sliders reposition the image within the frame after correction.
Understanding Cropping Behavior
One common frustration I hear from photographers is that transform tools crop too much of their images. This happens because straightening tilted perspectives requires the corners of the image to extend beyond the original frame. Lightroom fills these areas with white or transparent space, then crops to remove them. The solution? Shoot wider than you think you need. Give yourself extra space around your subject so you have room to correct perspective without losing important elements.
Practical Step-by-Step Workflow
Here’s the workflow I use for correcting distortion in Lightroom, in the order that produces the best results:
Step 1: Enable Profile Corrections. Always start here. This fixes the optical characteristics of your lens and provides a clean baseline for further adjustments. Go to Lens Corrections > Profile and check “Enable Profile Corrections.”
Step 2: Remove Chromatic Aberration. Check the “Remove Chromatic Aberration” box in the Basic tab of Lens Corrections. This eliminates colored fringing before you make any other changes.
Step 3: Apply Upright Mode. Move to the Transform panel and try the Auto mode first. If it doesn’t give you what you need, try Vertical for architecture or Level for landscapes. For complex situations, use Guided Upright.
Step 4: Fine-Tune with Manual Sliders. If the automatic corrections aren’t quite right, use the manual sliders in both the Lens Corrections and Transform panels to dial in your adjustments.
Step 5: Adjust Crop. After all corrections, use the Crop tool to finalize your composition and remove any white edges created by the transformations.
Batch Processing Tips
For efficiency, you can apply lens corrections to multiple photos at once. Select all the images shot with the same lens, then enable profile corrections and any other settings you want to sync. Click the Sync button to apply those settings across all selected images. Many photographers create an import preset that automatically enables profile corrections and chromatic aberration removal on all incoming photos.
Tips and Common Mistakes to Avoid
After working with these tools extensively, here are the mistakes I see most often and how to avoid them:
Not Shooting Wide Enough: Transform corrections always crop your image. Frame your shots with 10-15% extra space around your subject to account for this cropping.
Over-Correcting Distortion: Sometimes a little barrel distortion adds character to an image. Don’t feel obligated to remove every trace of distortion if it serves your creative vision.
Using Full Upright Indiscriminately: The Full mode can produce strange results with complex scenes. Start with Auto or Vertical and only use Full when you understand its effects.
Ignoring Performance: If you’re working with a large catalog and notice Lightroom slowing down, consider applying lens corrections selectively rather than to every image by default.
When NOT to Use Lens Corrections: Some creative effects rely on distortion. Fisheye images, intentional perspective effects, and certain artistic styles may be ruined by automatic corrections. Also, if you’re matching images from different lenses where consistency matters more than technical perfection, sometimes skipping corrections produces better results.
Frequently Asked Questions
How do I fix lens distortion in Lightroom?
To fix lens distortion in Lightroom, open your image in the Develop module, navigate to the Lens Corrections panel, click the Profile tab, and check ‘Enable Profile Corrections.’ Lightroom will automatically detect your lens and apply the appropriate correction profile. For manual control, use the Distortion slider in the Manual tab.
Does Lightroom have distortion correction?
Yes, Lightroom has comprehensive distortion correction tools in the Develop module. The Lens Corrections panel handles optical distortion (barrel and pincushion), chromatic aberration, and vignetting. The Transform panel corrects perspective distortion using five Upright modes and manual sliders.
What does lens correction do in Lightroom?
Lens correction in Lightroom fixes optical imperfections caused by your lens design. It straightens curved lines (barrel and pincushion distortion), removes colored fringing (chromatic aberration), brightens dark corners (vignetting), and corrects perspective issues where buildings appear to lean. These corrections are based on built-in profiles for thousands of lens and camera combinations.
How to use the transform tool in Lightroom?
To use the Transform tool in Lightroom, go to the Develop module and find the Transform panel below Lens Corrections. Choose an Upright mode: Auto for balanced corrections, Level for horizontal lines only, Vertical for architecture, or Full for maximum correction. For precise control, click the Guided Upright icon and draw lines along edges that should be straight. Fine-tune results with the manual Vertical, Horizontal, and Rotate sliders.
Conclusion
Learning how to use lens corrections and transform tools in Lightroom to fix distortion will dramatically improve your architectural, landscape, and real estate photography. Start with Enable Profile Corrections for automatic fixes, then use the Transform panel’s Upright modes for perspective issues. Remember to shoot wider than needed to account for cropping, and don’t be afraid to use manual sliders for precise control. With practice, these corrections will become second nature in your editing workflow.