I’ve been using Photoshop for over a decade, and I can tell you that Content-Aware Fill is hands down one of the most powerful tools in my editing arsenal. When I first discovered this feature, it completely changed how I approach photo retouching. Gone were the days of spending hours with the clone stamp tool trying to perfectly remove distractions from my images.
In this comprehensive guide, I’m going to share everything I’ve learned about Content-Aware Fill in Photoshop. Whether you’re just starting out or looking to master advanced techniques, I’ll walk you through every aspect of this incredible tool. By the end of this article, you’ll be removing unwanted objects from your photos like a seasoned professional.
What is Content-Aware Fill?
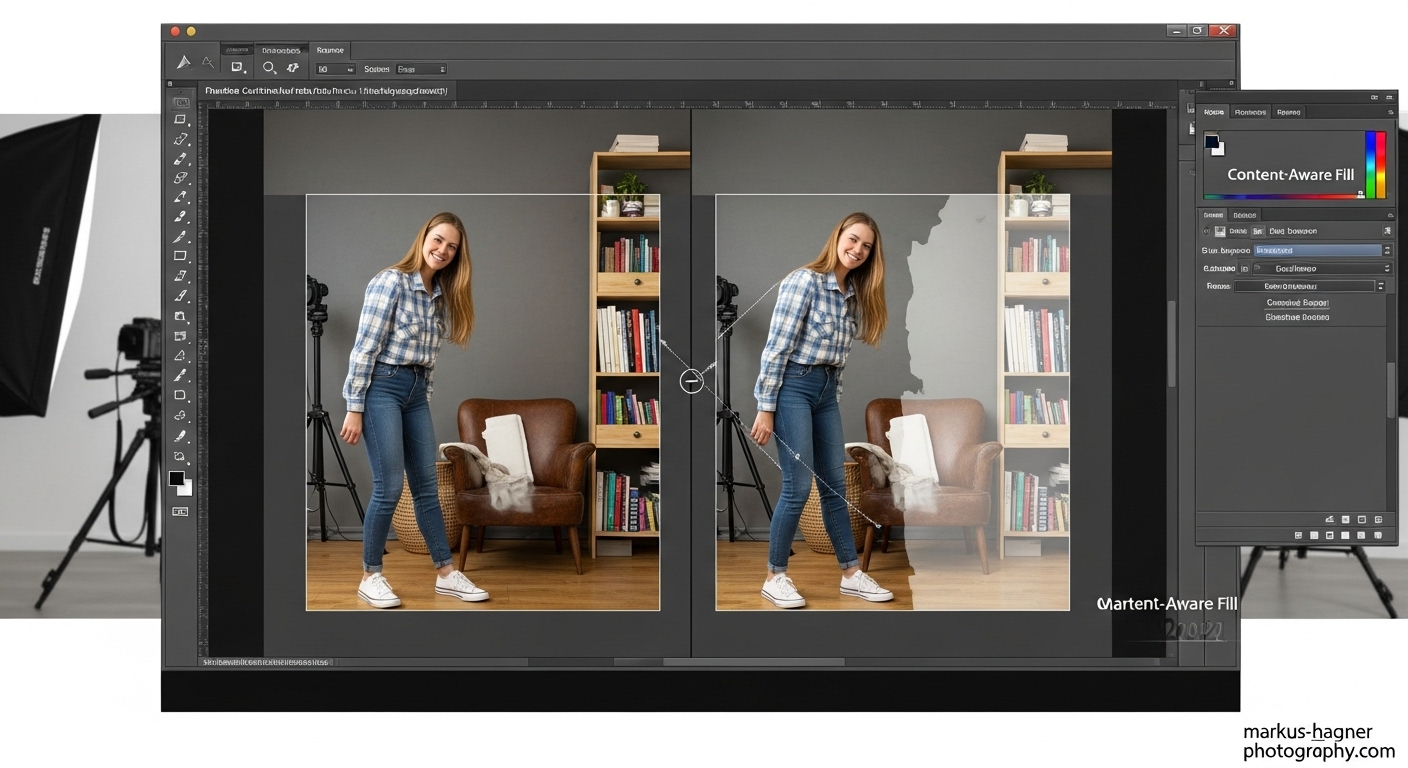
Content-Aware Fill is Photoshop’s intelligent technology that analyzes the surrounding pixels in your image and automatically fills selected areas with seamlessly blended content. When I first started using it, I was amazed at how it could magically remove objects while maintaining the natural look of the background.
The beauty of Content-Aware Fill lies in its ability to understand context. It doesn’t just copy and paste pixels from one area to another. Instead, it analyzes texture, color, lighting, and patterns to create a fill that looks completely natural. I’ve used it to remove everything from tourists in landscape shots to power lines in portrait photos, and the results are often indistinguishable from the original image.
Why Content-Aware Fill is a Game-Changer
Before Content-Aware Fill, removing unwanted objects from photos was a tedious process that required expert skills with the clone stamp and healing brush tools. I remember spending hours on single images, trying to match textures and lighting perfectly. Now, I can accomplish the same results in minutes.
Here’s why I believe Content-Aware Fill is essential for every photographer:
Time-Saving: What used to take hours now takes minutes. I can remove multiple distractions from an image in the time it used to take me to remove just one.
Professional Results: The intelligent algorithm ensures seamless blends that look natural, even to trained eyes.
Versatility: From small blemishes to large objects, Content-Aware Fill handles it all.
Non-Destructive: You can work on separate layers, preserving your original image.
User-Friendly: You don’t need to be a Photoshop expert to achieve professional results.
Understanding the Two Types of Content-Aware Fill
One thing I discovered early on is that Content-Aware Fill actually comes in two flavors: the simple method and the advanced workspace method. Each has its place in my editing workflow, and understanding when to use which is key to mastering this tool.
The Simple Method
The simple method is perfect for quick, straightforward removals. It’s my go-to when I need to remove small objects or when I’m working under tight deadlines. Here’s how I use it:
- Make a Selection: I use the Lasso tool or any selection tool to draw around the object I want to remove.
- Apply Content-Aware Fill: I simply press Shift+Delete (or Shift+Backspace on some keyboards) to bring up the Fill dialog box.
- Choose Content-Aware: From the dropdown menu, I select “Content-Aware” and click OK.
That’s it! Photoshop does the heavy lifting, and in most cases, the result is impressive right out of the box.
The Advanced Workspace Method
When I need more control or when dealing with complex removals, I turn to the advanced Content-Aware Fill workspace. This is where the real magic happens, and it’s what separates good retouchers from great ones.
The advanced workspace gives me precise control over:
- Sampling Area: I can choose exactly which parts of the image Photoshop uses to create the fill.
- Fill Settings: I can adjust how Photoshop blends the content.
- Output Options: I can choose to work on a new layer, preserving my original image.
Step-by-Step Guide: Using Content-Aware Fill (Simple Method)
Let me walk you through my exact process for using the simple Content-Aware Fill method. I’ve refined this approach over hundreds of editing sessions, and it consistently delivers excellent results.
Step 1: Prepare Your Image
Before I even think about removing objects, I make sure my image is properly prepared. Here’s my pre-editing checklist:
- Duplicate the Background Layer: I always work on a copy of my original image. This way, I can always go back if needed.
- Assess the Image: I take a good look at the image and identify all the objects I want to remove.
- Consider the Background: I pay attention to the complexity of the background around the objects. Simple backgrounds are easier to work with than complex ones.
Step 2: Make Your Selection
The quality of your selection directly impacts the quality of your final result. Here’s how I approach selections:
For Small Objects: I use the Lasso tool (L) and draw a loose selection around the object. I don’t worry about being too precise – Content-Aware Fill works better with a little breathing room.
For Larger Objects: I might use the Object Selection tool or the Quick Selection tool for more accuracy.
For Complex Shapes: I sometimes combine multiple selection tools to get the perfect selection.
Pro Tip: I always feather my selection slightly (Select > Modify > Feather) by 1-2 pixels. This helps create a smoother transition between the filled area and the surrounding pixels.
Step 3: Apply Content-Aware Fill
Once I’m happy with my selection, here’s exactly what I do:
- Press Shift+Delete (or Shift+Backspace) to open the Fill dialog box.
- Select “Content-Aware” from the Use dropdown menu.
- Click OK and let Photoshop work its magic.
Photoshop will analyze the surrounding pixels and fill the selected area. The process usually takes just a few seconds, depending on the size of the selection and the complexity of your image.
Step 4: Evaluate and Refine
After Content-Aware Fill does its job, I always zoom in to inspect the result. Here’s what I look for:
- Seamless Blending: Does the filled area blend naturally with the surroundings?
- Texture Matching: Are the textures consistent?
- Lighting Consistency: Does the lighting match the rest of the image?
If I spot any issues, I use the Spot Healing Brush tool (J) to touch up problem areas. Sometimes I need to apply Content-Aware Fill multiple times to get the perfect result.
Step-by-Step Guide: Using the Content-Aware Fill Workspace
When I need more control over the removal process, I turn to the Content-Aware Fill workspace. This is where I can really fine-tune the results and handle more complex removals.
Step 1: Access the Workspace
There are several ways to open the Content-Aware Fill workspace:
- Make a selection around the object you want to remove.
- Right-click and choose “Content-Aware Fill” from the context menu.
- Alternatively, go to Edit > Content-Aware Fill.
The workspace will open with your image and several panels for precise control.
Step 2: Understand the Workspace Interface
When I first opened the Content-Aware Fill workspace, I was a bit intimidated by all the options. But once I understood what each control does, it became my favorite tool for complex edits. Here’s what you’ll see:
Preview Panel: Shows a real-time preview of your fill as you adjust settings.
Sampling Area: This is the green overlay that shows which parts of the image Photoshop will use to create the fill. You can modify this area using the Lasso tool.
Tool Options Bar: Contains tools for modifying your selection and sampling area.
Content-Aware Fill Panel: This is where the magic happens. It contains all the settings for controlling how the fill is generated.
Step 3: Adjust the Sampling Area
The sampling area is crucial for getting good results. Here’s how I optimize it:
Auto Sampling: By default, Photoshop automatically selects the sampling area. For simple removals, this often works well.
Manual Adjustment: When I need more control, I use the Lasso tool to add or remove areas from the sampling. I look for areas with similar texture and lighting to the area I’m filling.
Sampling Area Options: In the Content-Aware Fill panel, I can choose between:
- Auto: Let Photoshop decide
- Custom: Manually define the sampling area
- All Layers: Sample from all visible layers
Step 4: Fine-Tune Fill Settings
The Content-Aware Fill panel offers several settings that I adjust based on the specific needs of my image:
Fill Settings:
- Color Adaptation: Controls how much the fill adapts to the surrounding colors
- Rotation Adaptation: Allows the fill to rotate to match the surrounding content
- Scale Adaptation: Enables scaling of the sampled content
- Mirror Adaptation: Creates a mirrored version of the sampled content
Output Settings:
- Output To: Choose between working on the current layer or creating a new layer
- Opacity: Control the transparency of the fill
Step 5: Preview and Apply
Before committing to the fill, I always use the preview feature to see how the result will look. Here’s my workflow:
- Check the Preview box in the Content-Aware Fill panel
- Zoom in on the area to inspect the details
- Make adjustments to the sampling area and settings as needed
- Click OK when satisfied with the result
Also Read: Canon 50Mm 1.2 Vs 1.4
Advanced Techniques for Professional Results
Over the years, I’ve developed several advanced techniques that take Content-Aware Fill to the next level. These are the methods I use when working on professional client work where perfection is non-negotiable.
Technique 1: Layer Masking for Ultimate Control
One of my favorite techniques is to apply Content-Aware Fill to a new layer and then use layer masking for precise control. Here’s how I do it:
- Create a New Layer: I duplicate my background layer to work non-destructively.
- Apply Content-Aware Fill: I use the workspace method and set the output to a new layer.
- Add a Layer Mask: I add a layer mask to the filled layer.
- Paint with Black: Using a soft brush, I paint with black on the mask to reveal areas where the fill isn’t perfect.
- Fine-Tune: I adjust brush opacity and flow for seamless blending.
This technique gives me pixel-level control over the final result.
Technique 2: Multiple Small Selections
For large or complex objects, I’ve found that making multiple small selections often works better than one large selection. Here’s my approach:
- Divide and Conquer: I break down the object into smaller, manageable sections.
- Work from Outside In: I start with the outer edges and work my way toward the center.
- Overlap Slightly: I make sure my selections overlap slightly to avoid seams.
- Evaluate Between Steps: I check the result after each removal before moving to the next section.
This method gives Photoshop better source material to work with and often results in more natural-looking fills.
Technique 3: Combining with Other Tools
Content-Aware Fill is powerful, but it’s not always perfect. I’ve learned that combining it with other Photoshop tools often yields the best results. Here are my go-to combinations:
Content-Aware Fill + Clone Stamp: I use Content-Aware Fill for the bulk of the removal, then fine-tune with the Clone Stamp tool for precise texture matching.
Content-Aware Fill + Healing Brush: For skin retouching, I use Content-Aware Fill to remove blemishes, then use the Healing Brush to blend the results seamlessly.
Content-Aware Fill + Patch Tool: When working with patterns or textures, I use the Patch tool to select source material, then Content-Aware Fill to blend it perfectly.
Technique 4: Working with Transparent Areas
When removing objects near the edge of an image or in areas with transparency, I use this specialized technique:
- Expand the Canvas: I temporarily expand the canvas to give Photoshop more source material.
- Apply Content-Aware Fill: I remove the object as usual.
- Crop Back: Once I’m happy with the result, I crop the image back to its original dimensions.
This prevents the edge artifacts that can occur when Content-Aware Fill doesn’t have enough surrounding pixels to work with.
Common Problems and How to Solve Them
Even with all these techniques, sometimes Content-Aware Fill doesn’t produce perfect results. Over the years, I’ve encountered nearly every problem imaginable and developed solutions for each one.
Problem 1: Visible Seams or Edges
Symptoms: You can clearly see where the filled area meets the surrounding pixels.
Solution: I’ve found that feathering the selection slightly before applying Content-Aware Fill helps tremendously. I also use the Spot Healing Brush afterward to blend any remaining edges.
Problem 2: Repeating Patterns
Symptoms: The filled area shows obvious repeating patterns or textures.
Solution: This happens when Photoshop samples from too small an area. I manually expand the sampling area to include more diverse source material. Sometimes I need to apply Content-Aware Fill multiple times with different sampling areas.
Problem 3: Color or Lighting Mismatch
Symptoms: The filled area doesn’t match the color or lighting of the surrounding area.
Solution: I adjust the Color Adaptation setting in the Content-Aware Fill panel. If that doesn’t work, I use adjustment layers like Curves or Color Balance to match the filled area to its surroundings.
Problem 4: Blurring or Softness
Symptoms: The filled area appears blurry or softer than the surrounding image.
Solution: This often happens when the sampling area isn’t sharp enough. I make sure to sample from sharp, in-focus areas. I also use the High Pass filter technique to add sharpness back to the filled area if needed.
Problem 5: Distorted Content
Symptoms: The filled area looks warped or distorted.
Solution: I check the Rotation and Scale Adaptation settings. Sometimes turning these off produces better results. I also make sure my selection isn’t too close to the object being removed.
Pro Tips for Flawless Results
After thousands of hours using Content-Aware Fill, I’ve accumulated a wealth of tips that help me achieve consistently excellent results. Here are my top pro tips:
Tip 1: Work at High Zoom Levels
I always work zoomed in to at least 100%, often more. This allows me to see exactly what I’m doing and catch small imperfections before they become big problems.
Tip 2: Use the Right Selection Tool
Different situations call for different selection tools:
- Lasso Tool: Great for irregular shapes
- Marquee Tool: Perfect for rectangular objects
- Object Selection Tool: Excellent for well-defined objects
- Quick Selection Tool: Good for complex shapes
Tip 3: Consider the Background Complexity
Simple backgrounds with consistent textures are easier to work with than complex backgrounds. When working with complex backgrounds, I take extra care with my sampling area selection.
Tip 4: Don’t Overdo It
Content-Aware Fill is powerful, but it’s not magic. I’ve learned to recognize when an object is too large or too complex for Content-Aware Fill to handle well. In these cases, I might use other methods or combine multiple techniques.
Tip 5: Save Incrementally
I save my work frequently, especially when working on complex edits. I also save multiple versions so I can go back if I don’t like the direction I’m heading.
Tip 6: Use Keyboard Shortcuts
Keyboard shortcuts speed up my workflow significantly:
- Shift+F5: Opens the Fill dialog box
- L: Lasso tool
- J: Spot Healing Brush
- Ctrl+Z: Undo
- Ctrl+Alt+Z: Step backward through history
Real-World Applications
Let me share some real-world scenarios where Content-Aware Fill has saved my shoots and delivered professional results.
Scenario 1: Landscape Photography
I was shooting a beautiful sunset at the beach when a group of tourists walked into my frame. Rather than waiting for them to leave (and missing the perfect light), I took the shot knowing I could remove them later.
My Process:
- Made individual selections around each person
- Used the Content-Aware Fill workspace with custom sampling areas
- Fine-tuned with the Spot Healing Brush
- Applied final color adjustments to ensure consistency
The result? A pristine beach sunset with no trace of the tourists.
Scenario 2: Portrait Photography
During a portrait session, my subject had a temporary blemish that would have taken hours of makeup to cover. Instead, I used Content-Aware Fill for a quick and natural fix.
My Process:
- Zoomed in to 200% for precision
- Made a small, precise selection around the blemish
- Applied Content-Aware Fill with minimal color adaptation
- Used the Healing Brush at 50% opacity for final blending
The blemish disappeared completely, and the skin texture remained natural.
Scenario 3: Product Photography
I was shooting product photos for a client when I noticed dust spots on the white background. Removing these manually would have taken forever, but Content-Aware Fill made it quick and easy.
My Process:
- Used the Marquee tool to select each dust spot
- Applied Content-Aware Fill with auto sampling
- Checked for consistency across all edits
- Exported the clean images to the client
The client was thrilled with the clean, professional-looking product shots.
Comparing Content-Aware Fill to Other Tools
Content-Aware Fill is powerful, but it’s not the only tool for removing objects in Photoshop. Let me compare it to other popular tools and explain when I use each one.
Content-Aware Fill vs. Clone Stamp Tool
Clone Stamp Tool: The Clone Stamp tool copies pixels from one area to another exactly as they are. It gives you complete control but requires more skill and time.
When I Use Clone Stamp:
- When I need precise control over texture matching
- When working with very specific patterns
- When Content-Aware Fill isn’t giving me the results I want
When I Use Content-Aware Fill:
- For quick removals
- When I want Photoshop to handle the blending automatically
- When working with complex textures
Content-Aware Fill vs. Healing Brush Tool
Healing Brush Tool: The Healing Brush tool samples pixels and automatically blends them with the surrounding area, similar to Content-Aware Fill but for brush strokes rather than selections.
When I Use Healing Brush:
- For small, detailed work
- When I need to paint rather than make selections
- For skin retouching and small blemish removal
When I Use Content-Aware Fill:
- For larger object removal
- When I need to remove entire objects
- When working with defined shapes
Content-Aware Fill vs. Patch Tool
Patch Tool: The Patch tool lets you select an area and then drag it to a source area for replacement. It’s great for when you want to choose exactly what replaces the selected area.
When I Use Patch Tool:
- When I want to manually select the source material
- When working with patterns or textures
- When I need more control than Content-Aware Fill provides
When I Use Content-Aware Fill:
- When I want Photoshop to automatically select the best source material
- For quick, automatic removals
- When working with complex backgrounds
Also Read: Nikon Vs Sony Mirrorless
Optimizing Your Workflow
To get the most out of Content-Aware Fill, I’ve developed an optimized workflow that maximizes efficiency and quality. Here’s my step-by-step process:
Step 1: Organize Your Layers
I always start with a well-organized layer structure:
- Background Layer: The original image (locked)
- Edit Layer: Where I do my Content-Aware Fill work
- Adjustment Layers: For final color and tone adjustments
Step 2: Assess the Image
Before I start removing objects, I take a moment to assess the image:
- Identify all objects to be removed
- Consider the complexity of the background
- Plan the order of removals (I usually work from largest to smallest)
Step 3: Make Initial Selections
I make my initial selections, keeping these principles in mind:
- Selections should be slightly larger than the object
- Include some surrounding context for better sampling
- Feather edges slightly for smoother blending
Step 4: Apply Content-Aware Fill
I apply Content-Aware Fill using either the simple or advanced method, depending on the complexity of the removal.
Step 5: Evaluate and Refine
I always evaluate the results and refine as needed:
- Zoom in to check for imperfections
- Use additional tools for fine-tuning
- Make adjustments to ensure consistency
Step 6: Final Adjustments
Once all objects are removed, I make final adjustments:
- Color correction to ensure consistency
- Sharpening if needed
- Final crop and export
Troubleshooting Guide
Even with all this knowledge, sometimes things don’t go as planned. Here’s my troubleshooting guide for common Content-Aware Fill issues:
Issue: Content-Aware Fill is Grayed Out
Possible Causes:
- Working on a locked background layer
- No active selection
- Working in a color mode that doesn’t support the feature
Solutions:
- Unlock the background layer by double-clicking it
- Make sure you have an active selection
- Check that you’re in RGB mode
Issue: Poor Results with Simple Backgrounds
Possible Causes:
- Selection is too tight around the object
- Not enough surrounding context for sampling
- Background is too uniform
Solutions:
- Make a larger selection that includes more context
- Use the advanced workspace to manually select sampling areas
- Consider adding some texture to the background first
Issue: Slow Performance
Possible Causes:
- Large image size
- Complex selections
- Limited computer resources
Solutions:
- Work on a smaller copy of the image for testing
- Simplify selections when possible
- Close other programs to free up resources
Issue: Inconsistent Results
Possible Causes:
- Varying lighting conditions in the image
- Different textures throughout the background
- Multiple objects with different characteristics
Solutions:
- Work on one object at a time
- Use different sampling areas for different objects
- Apply local adjustments to match lighting and color
FAQ: Content-Aware Fill in Photoshop
What’s the difference between Content-Aware Fill and Content-Aware Move?
Content-Aware Fill removes objects and fills the space with surrounding content, while Content-Aware Move moves selected objects to a new location and fills the original space. I use Content-Aware Fill for removals and Content-Aware Move when I want to reposition elements in my image.
Can Content-Aware Fill work on transparent backgrounds?
Yes, but it works best when there’s some surrounding content to sample from. For transparent areas, I sometimes temporarily add a solid color layer to give Photoshop something to work with, then remove it afterward.
Why does Content-Aware Fill sometimes create blurry results?
Blurry results usually occur when the sampling area isn’t sharp enough or when the selection is too large. I solve this by being more selective about my sampling area and breaking large removals into smaller, manageable sections.
How do I remove people from photos using Content-Aware Fill?
Removing people follows the same process as removing any object, but I pay extra attention to the sampling area since people often cover complex backgrounds. I use the advanced workspace and manually select the best sampling areas for natural results.
Can Content-Aware Fill remove text from images?
Yes, Content-Aware Fill can remove text, but the results depend on the background. Simple backgrounds work best, while complex backgrounds may require additional touch-up work with other tools.
What’s the best selection tool for Content-Aware Fill?
The best selection tool depends on the object you’re removing. I use the Lasso tool for irregular shapes, the Marquee tool for rectangular objects, and the Object Selection tool for well-defined objects.
How can I improve my Content-Aware Fill results?
Practice is key, but these tips help: make precise selections, choose appropriate sampling areas, work at high zoom levels, and don’t be afraid to combine Content-Aware Fill with other tools for the best results.
Does Content-Aware Fill work in all versions of Photoshop?
Content-Aware Fill was introduced in Photoshop CS5, but the advanced workspace feature was added in later versions. Make sure you’re using a recent version of Photoshop for access to all features.
Conclusion: Mastering Content-Aware Fill
Content-Aware Fill has revolutionized the way I approach photo editing. What used to be a time-consuming, skill-intensive process is now quick, efficient, and accessible to photographers of all skill levels.
Throughout this guide, I’ve shared everything I’ve learned about Content-Aware Fill – from the basics to advanced techniques, real-world applications, and troubleshooting tips. The key to mastering this tool is practice and experimentation. Don’t be afraid to try different approaches and combine Content-Aware Fill with other Photoshop tools.
Remember, the goal isn’t just to remove objects – it’s to do so in a way that looks completely natural and seamless. With the techniques I’ve shared in this guide, you’ll be well on your way to achieving professional-level results with Content-Aware Fill.
I encourage you to download some of your own images and start practicing. Try removing different types of objects, experiment with the advanced workspace, and develop your own workflow. Before you know it, you’ll be using Content-Aware Fill with confidence and precision.
Happy editing, and may your photos be distraction-free!