I have used fisheye lenses for over a decade, and I will be honest with you. When I first picked one up, my photos looked like they belonged in a funhouse mirror. Everything curved in weird places. Straight lines bent like noodles. People’s faces stretched into alien shapes near the edges of the frame.
But here is what changed everything for me. After years of experimentation, I discovered that a fisheye lens does not have to create that extreme distorted look. You can actually capture remarkably natural-looking images with one. The secret lies in understanding how to control the distortion through composition, camera positioning, and post-processing.
In this guide on how to use a fisheye lens creatively without extreme distortion, I will share every technique I have learned. We will cover the exact composition rules that minimize barrel distortion, the camera settings that help maintain natural perspective, and the post-processing methods that can completely transform your fisheye images. Whether you shoot landscapes, architecture, or astrophotography, you will walk away knowing how to make this lens work for you instead against you.
Understanding Fisheye Lens Basics
Before we dive into techniques, let me explain what makes a fisheye lens different from your standard wide-angle. This understanding is crucial for controlling distortion.
What Is a Fisheye Lens?
A fisheye lens is an ultra-wide-angle lens that captures a field of view between 100 and 180 degrees. Unlike rectilinear wide-angle lenses that attempt to keep straight lines straight, fisheye lenses use a special curvilinear projection. This mapping sacrifices straight lines at the edges in exchange for an extremely wide field of view.
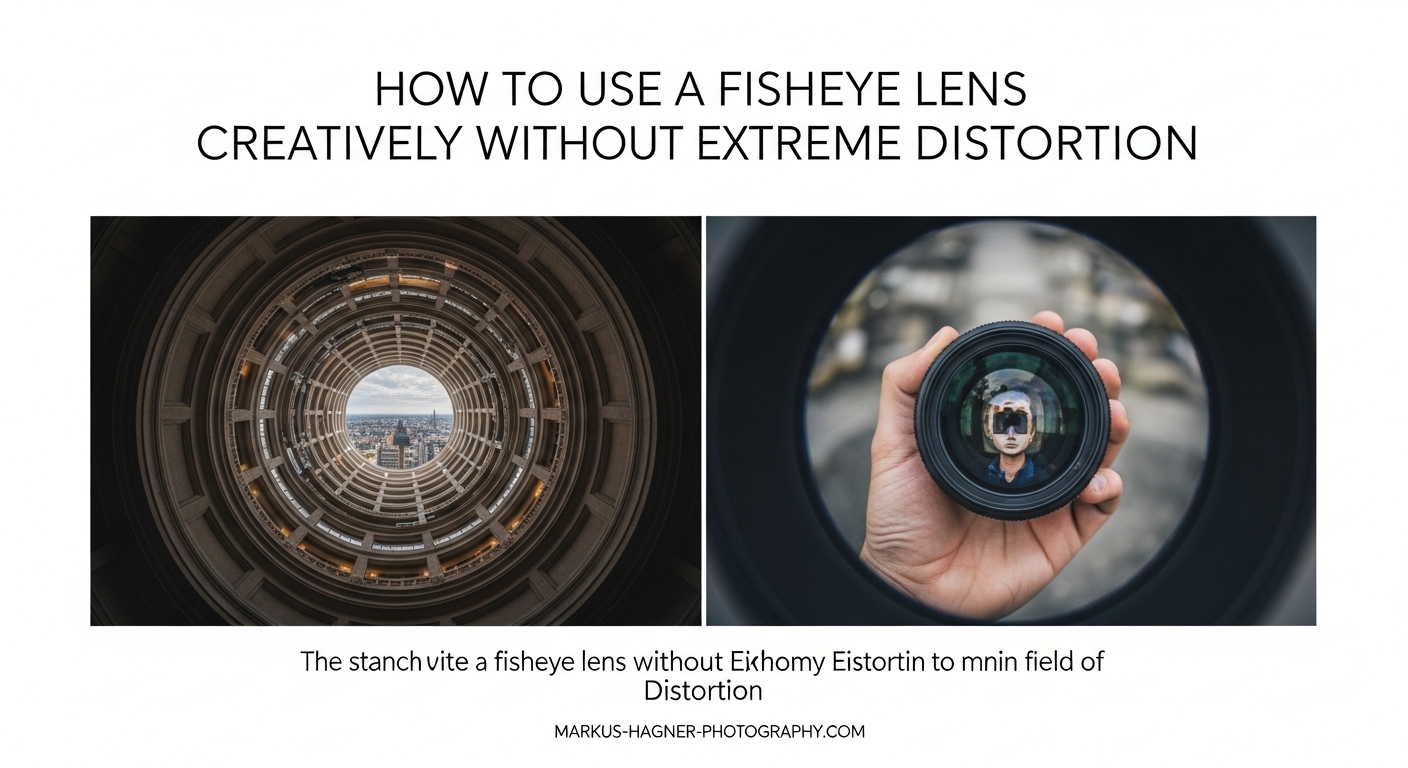
Most fisheye lenses fall into two categories. Circular fisheye lenses produce a complete circle image with black borders, capturing a full 180-degree hemisphere. Full-frame fisheye lenses fill the entire sensor but capture slightly less than 180 degrees. For most photography, full-frame fisheyes like the classic 8mm or 15mm focal lengths are more practical.
The characteristic barrel distortion happens because objects near the edges of the frame get stretched across a larger area. Think of it like projecting a globe onto a flat map. The further from the center, the more stretched things become.
How Fisheye Distortion Actually Works
Here is the key insight that changed my fisheye photography forever. Distortion is not uniform across the frame. The center of your image remains relatively distortion-free while the edges experience maximum curvature.
Objects placed dead center in your composition will appear almost normal. Move that same object to the edge of the frame, and suddenly it stretches dramatically. This is why horizon placement matters so much with fisheye lenses.
When your horizon sits in the middle of the frame, it passes through the least distorted zone. The curve appears minimal because the center maintains near-accurate perspective. But drop that horizon to the bottom third, and suddenly you see dramatic earth curvature that might not match reality.
The distance between your camera and subject also affects distortion intensity. Objects very close to the lens appear massively exaggerated. Distant subjects remain relatively normal. This is why fisheye lenses make foreground rocks look enormous while compressing distant mountains.
When Distortion Works Versus When to Avoid It
Not all distortion is bad. Sometimes that curved perspective adds drama and impact that you cannot achieve any other way. The key is knowing when to embrace it and when to minimize it.
Distortion works in your favor when shooting circular staircases, domed ceilings, spiral architecture, or any scene where curves already exist naturally. I have used fisheye distortion to enhance the sweeping curve of a spiral staircase, and the result looked more natural than a straight wide-angle shot.
Avoid distortion when photographing people near frame edges, architectural details that need to remain straight, product photography, or any situation where accurate representation matters. I learned this lesson photographing a wedding reception where the bride’s face stretched unflatteringly near the corner of my frame. Not my finest work.
Composition Techniques to Minimize Distortion
This section contains the most important information in this entire guide. Master these composition techniques, and you will capture natural-looking fisheye images straight out of camera.
The Horizon Placement Rule
If you remember only one thing from this article, make it this rule. Keep your horizon centered in the frame to minimize visible curvature.
When the horizon passes through the center of your fisheye frame, it travels through the zone of minimum distortion. The curve becomes barely noticeable in most situations. I have shot landscapes where viewers could not tell I used a fisheye until I pointed it out, simply by keeping the horizon centered.
This does not mean your compositions must be boring. You can still create dynamic images with centered horizons. Include strong foreground elements that draw the eye upward. Use leading lines that converge toward the center. Frame interesting sky elements above and ground details below.
When you must place the horizon off-center, understand that curvature will increase. A horizon at the bottom third of your frame will show dramatic earth curvature. Sometimes this effect is desirable for creative purposes. Other times it looks unnatural and distracting.
Camera Positioning and Distance
Your physical position relative to the scene dramatically impacts distortion levels. Here are the positioning principles I follow for distortion-free results.
First, get closer to your foreground subjects. Fisheye lenses exaggerate near-far relationships. Placing your camera close to interesting foreground elements creates that immersive feeling without making distant objects look warped. The foreground dominates the frame while the background remains relatively natural.
Second, keep your camera level. Tilting a fisheye lens up or down creates converging vertical lines that compound the barrel distortion. When shooting architecture, I use a bubble level on my hot shoe to ensure the camera stays perfectly perpendicular to the ground.
Third, consider your shooting height. Shooting from very low angles with a fisheye creates extreme perspective distortion. Higher angles tend to produce more natural results. For landscape work, I often shoot from chest height rather than ground level when I want to minimize the fisheye look.
Subject Placement Strategies
Where you place your main subject within the frame determines how distorted it appears. Use these strategies to keep your subjects looking natural.
The center frame sweet spot is your best friend. Anything placed dead center in a fisheye image experiences minimal distortion. For portraits with a fisheye, position your subject in the center third of the frame. Their face will look normal while the environment curves artistically around them.
Avoid placing people or recognizable objects near the edges. The extreme corners of a fisheye frame stretch subjects horizontally. A person standing at the far left or right edge will appear wider and distorted. I made this mistake early on photographing group shots, and the people on the ends looked like they were melting outward.
For landscape work, position your main subject whether that is a tree, rock formation, or building somewhere in the inner two-thirds of the frame. Let the edges contain less important elements that can handle more distortion.
The Center Frame Sweet Spot
Let me explain the center frame sweet spot in more detail because understanding this concept will transform your fisheye photography.
Imagine your frame divided into concentric circles radiating from the center point. The innermost circle, roughly the center third of your frame both horizontally and vertically, experiences almost zero barrel distortion. Objects in this zone appear nearly rectilinear.
As you move outward from this center zone, distortion increases gradually at first, then dramatically near the edges. The extreme corners experience maximum stretching. This is why fisheye lenses make square objects near the edges look like curved diamonds.
Practically speaking, compose your shots so important subjects fall within that center zone. For environmental portraits, place your subject centrally and let the surroundings curve around them naturally. For architecture, frame important building elements away from the extreme edges.
Step-by-Step Composition Checklist
Before every fisheye shot, I run through this mental checklist. Print this out and keep it in your camera bag.
Step 1: Check horizon placement. Is the horizon running through the center of my frame? If not, am I intentionally creating curved earth for creative effect?
Step 2: Verify camera level. Is my camera perpendicular to the ground? Am I tilting up or down unnecessarily?
Step 3: Position main subject. Is my primary subject in the center third of the frame? Have I avoided placing people or key elements near the edges?
Step 4: Check foreground distance. Am I close enough to foreground elements to create depth without making them look unnaturally large?
Step 5: Review edge content. What falls at the extreme edges and corners of my frame? Are there elements that will stretch unflatteringly?
Step 6: Consider shooting angle. Would a higher or lower angle produce more natural-looking results for this particular scene?
Creative Applications for Fisheye Lenses
Now that you understand distortion control, let me show you practical applications where fisheye lenses excel. These are not gimmicky uses. These are legitimate professional applications.
Fisheye Lens for Landscape Photography
Landscape photography is where fisheye lenses truly shine when used correctly. I have captured some of my favorite landscape images with an 8mm fisheye, and most viewers never realize what lens I used.
The key is shooting scenes where extreme width matters more than perfectly straight lines. Forest canopies, mountain ranges, and coastal scenes all work beautifully. The slight curvature often enhances the sense of immersion and grandeur.
For landscape work, I typically shoot with the horizon centered even if that means including more sky than a traditional composition would allow. The extra sky often adds drama, especially during golden hour or with interesting cloud formations.
Foreground elements become critical with fisheye landscapes. Get close to interesting rocks, flowers, or water features. The exaggerated near-far relationship draws viewers into the scene. Just keep those foreground elements away from the extreme corners where they might stretch unnaturally.
Interior and Architecture Photography
Interior photographers have used fisheye lenses for decades, often defishing the results in post-processing. The extreme field of view lets you capture entire rooms in a single shot, even in tight spaces.
For real estate and interior work, I shoot with the camera perfectly level and centered in the room. This minimizes converging verticals and keeps walls relatively straight near the center. Post-processing defishing handles any remaining curvature.
Ceiling photography is another architectural application where fisheye distortion works in your favor. Domed ceilings, cathedral interiors, and ornate rooflines photograph beautifully with fisheye lenses. The natural curves of these subjects complement the lens characteristics.
Be cautious with architectural details near frame edges. Crown molding, door frames, and window casings will curve near the corners. Either compose these elements centrally or plan to defish in post.
Astrophotography With Fisheye Lenses
Fisheye lenses are incredibly popular for astrophotography, and for good reason. That 180-degree field of view captures the entire Milky Way arc in a single frame. The Lonely Speck website popularized this technique, and it produces stunning results.
For Milky Way photography, shoot with the galactic core positioned through the center of your frame. The horizon will naturally curve, but this often enhances the sense of our planet floating in space. The curved earth beneath a sweeping Milky Way creates a powerful cosmic perspective.
Post-processing defishing works exceptionally well for astro shots. You can convert the curved horizon to straight while maintaining the dramatic sky coverage. I will cover the defishing process in detail later in this guide.
Fast apertures matter for astro work. Look for fisheye lenses with f/2.8 or wider maximum apertures. The Samyang 8mm f/2.8 and similar lenses are popular choices that balance wide aperture with reasonable prices.
Action Sports and Event Photography
Action sports photographers have long embraced fisheye lenses for their ability to capture both the athlete and the surrounding environment. Skateboarding, surfing, and snowboarding photography frequently use fisheye perspectives.
The technique involves getting extremely close to the action. A fisheye lets you photograph a skater passing inches from your lens while still showing the ramp, crowd, and venue behind them. This creates an immersive, in-the-action feeling that telephoto lenses cannot match.
For events like weddings and concerts, fisheye lenses capture the energy of crowded spaces. Dance floor shots at weddings benefit from fisheye perspective, showing the couple, guests, and venue atmosphere simultaneously. Concert photographers use fisheye to capture both the performer and the audience reaction.
The radial blur technique adds creative motion to action shots. Rotate the camera around its optical axis during a long exposure while shooting with fisheye. The center remains sharp while everything else spins dramatically. It takes practice, but the results are unique.
When to Embrace Distortion Intentionally
Sometimes distortion is exactly what your image needs. Here are situations where I intentionally push fisheye distortion to extremes.
Spiral staircases and curved architecture. When your subject already curves, fisheye distortion enhances rather than fights the natural lines. I have photographed spiral staircases where the fisheye made the curves appear even more dramatic and artistic.
Creative portraits. For editorial or artistic portrait work, extreme fisheye distortion creates surreal, eye-catching images. Position the face close to the lens for dramatic size exaggeration. Just make sure your subject understands the effect beforehand.
Abstract compositions. When photographing patterns, textures, or abstract subjects, distortion becomes a creative tool rather than a problem. Geometric patterns near frame edges transform into organic curves. Reflections in water or glass take on otherworldly shapes.
Underwater photography. Fisheye lenses are standard tools for underwater wide-angle work. The distortion often goes unnoticed underwater where reference points like horizons are absent or ambiguous. Reef scenes and wreck photography both benefit from extreme field of view.
Post-Processing Defishing Methods
Even with perfect composition, some images benefit from defishing in post-processing. Defishing converts the curved fisheye projection into a more rectilinear look. Here are the methods I use, from simplest to most advanced.
Adobe Lightroom Lens Corrections
Lightroom offers the easiest defishing method for most photographers. The built-in lens profiles handle much of the work automatically.
Step 1: Open your image in the Develop module and navigate to the Lens Corrections panel.
Step 2: Check the Enable Profile Corrections box. Lightroom will attempt to identify your lens automatically. If it does not find a match, manually select your lens from the dropdown menu.
Step 3: Adjust the Distortion slider. The default profile correction may overcorrect or undercorrect. Slide left to add more barrel distortion or right to remove more. Watch your horizon line while adjusting.
Step 4: Use the Transform panel for additional adjustments. The Vertical and Horizontal sliders can straighten any remaining perspective issues.
The limitation of Lightroom defishing is that it works best with lenses that have built-in profiles. Third-party fisheye lenses may not have profiles available. In those cases, manual distortion correction works but produces less precise results.
Adobe Camera Raw and Photoshop Methods
Photoshop offers more control over defishing, especially when Lightroom profiles are unavailable.
In Camera Raw, use the Manual tab under Lens Corrections. The Upright modes, particularly the Full setting, can automatically straighten horizons and verticals. For manual control, drag the Distortion slider to the right until the horizon appears straight.
For more precise control in Photoshop proper, use the Adaptive Wide Angle filter. Found under Filter > Adaptive Wide Angle, this tool lets you draw lines over areas that should be straight. Photoshop then warps the image to make those lines actually straight.
The Adaptive Wide Angle workflow: Open your image and launch the filter. Select the Constraint Tool from the toolbar. Draw lines along elements that should be straight, like horizons or building edges. Photoshop automatically warps the image to straighten these elements. Click OK to apply.
This method produces excellent results but requires some resolution loss through cropping. The warped image often needs edge cleanup where pixels have been pushed outside the original frame.
Fisheye-Hemi Plugin for Natural Results
Fisheye-Hemi is a specialized plugin that produces what I consider the most natural-looking defished results. Rather than forcing straight lines, it preserves the people and objects near frame edges while subtly correcting the overall projection.
The plugin works by applying a stereographic projection that maintains natural-looking subjects. Faces near the edges do not stretch horizontally like they do with standard rectilinear conversion. The result looks more like what your eye actually sees.
Fisheye-Hemi offers three modes. The first mode handles most situations with subtle correction. The second mode provides stronger correction for more distorted images. The third mode produces nearly rectilinear results with maximum cropping.
The main drawback is cost. Fisheye-Hemi is a paid plugin, and while not expensive, it represents an additional investment. However, if you frequently defish fisheye images, particularly for portrait or event work, the natural results justify the expense.
Free Alternative: Hugin Panorama Software
Hugin is a free, open-source panorama stitching program that also handles fisheye defishing. It offers powerful projection conversion tools at zero cost.
The Hugin defishing workflow: Open Hugin and load your fisheye image in the Assistant tab. Switch to the Stitcher tab. Under Projection, select Rectilinear from the dropdown. Adjust the field of view settings to crop the image appropriately. Generate the output.
Hugin gives you precise control over projection type, field of view, and cropping. You can even generate intermediate projections that fall somewhere between fisheye and rectilinear for unique creative looks.
The learning curve is steeper than Lightroom or Photoshop solutions. Hugin’s interface is functional but not intuitive. Expect to spend some time with tutorials before getting comfortable. Once learned, however, Hugin provides professional-quality defishing without software costs.
Troubleshooting Defishing Problems
Defishing does not always go smoothly. Here are common problems and their solutions.
Resolution loss occurs because defishing stretches edge pixels. Your final image will have lower resolution than the original, especially near the corners. Shoot at maximum resolution and expect to crop significantly. Some images may lose 20-30% of their original pixel dimensions.
Edge artifacts appear when pixels get pushed outside the frame during warping. You will see blank areas at the edges that need cropping or content-aware filling. Plan for this by shooting slightly wider than your intended final composition.
Overcorrection happens when defishing is applied too aggressively. The image develops a pinched appearance in the center. Back off the correction slightly for more natural results. Sometimes a partially defished image looks better than a fully corrected one.
People near edges look wrong after standard rectilinear defishing. They stretch horizontally and appear wider than reality. For images with people, consider using Fisheye-Hemi or accepting partial correction that keeps subjects natural even if some background curvature remains.
Common Mistakes to Avoid
After years of fisheye photography, I have made every mistake possible. Learn from my errors so you do not have to repeat them.
Mistake 1: Placing Subjects at Frame Edges
This is the most common fisheye mistake I see. Photographers compose normally, placing subjects using rule-of-thirds positioning. But with a fisheye, that position maximizes distortion.
Portrait subjects at frame edges stretch horizontally, making people look wider than reality. Architectural elements curve unflatteringly. The fix is simple. Move important subjects toward the center of the frame, even if that violates traditional composition rules.
Mistake 2: Tilting the Camera
Tilting a fisheye lens up or down compounds barrel distortion with converging verticals. Buildings lean dramatically. Horizons curve excessively. The combined effect often looks unnatural.
Keep your camera level when distortion control matters. Use a bubble level or your camera’s virtual horizon. If you need to include more sky or ground, recompose rather than tilt.
Mistake 3: Shooting from Too Low
Ground-level shooting with fisheye creates extreme perspective distortion. Foreground elements dominate excessively. The sense of scale becomes unrealistic.
While this works for creative effects, it produces unnatural results when you want subtle fisheye use. Raise your shooting height to chest level or higher for more natural perspectives.
Mistake 4: Ignoring Edge Content
The extreme corners of fisheye frames often contain distracting elements that become even more distracting when stretched. Tree branches, power lines, or people at the edges draw attention away from your subject.
Check all four corners before shooting. Either reframe to exclude problematic elements or accept that they will appear distorted. Sometimes a step left or right cleans up the edges significantly.
Mistake 5: Over-Defishing
Not every fisheye image needs defishing. Some photographs benefit from the curved perspective. Over-defishing creates flat, lifeless images that lose the immersive quality that makes fisheye special.
Ask yourself whether the distortion adds to or detracts from your image. If it enhances the scene, leave it. If it distracts, defish. Many of my favorite fisheye images retain subtle curvature because it enhances the composition.
How to Use a Fisheye Lens Creatively Without Extreme Distortion: Quick Reference
Let me summarize the key points for quick reference in the field.
For minimal distortion, center your horizon, keep the camera level, and place subjects in the center third of the frame. Get close to foreground elements while keeping them away from extreme corners. Shoot from chest height or higher rather than ground level.
For post-processing, start with Lightroom lens profiles. Move to Photoshop’s Adaptive Wide Angle for more control. Consider Fisheye-Hemi for natural-looking subjects. Use Hugin for free, powerful defishing when budget matters.
Embrace distortion when photographing already-curved subjects like spiral staircases, domes, and circular architecture. Avoid distortion when photographing people near edges, architectural details requiring accuracy, or any scene where natural representation matters most.
The fisheye lens is not a gimmick. It is a powerful creative tool when you understand how to control its signature characteristic. With these techniques, you can capture images that range from subtly wide to dramatically curved, all while maintaining control over the final result.
FAQ
How to remove fisheye distortion?
You can remove fisheye distortion using lens correction tools in Adobe Lightroom or Camera Raw by enabling profile corrections. For more control, use Photoshop’s Adaptive Wide Angle filter to draw lines over elements that should be straight. Specialized plugins like Fisheye-Hemi produce natural results, while the free Hugin software offers powerful defishing without cost.
How to avoid lens distortion when shooting with a fisheye?
To avoid distortion in-camera, center your horizon in the frame, keep your camera level without tilting, and position important subjects in the center third of the frame. Shoot from chest height rather than ground level, and keep foreground elements away from extreme corners where stretching is most dramatic.
Can you un-distort a fisheye image?
Yes, you can un-distort fisheye images through a process called defishing. Software like Adobe Lightroom, Photoshop, Fisheye-Hemi, and Hugin can convert the curved fisheye projection into a more rectilinear look. The process typically involves some resolution loss and cropping at the edges.
What is a fisheye lens used for?
Fisheye lenses are used for landscape photography capturing wide vistas, astrophotography showing the entire Milky Way arc, interior and real estate photography in tight spaces, action sports getting close to athletes while showing context, and creative photography where curved perspectives enhance the artistic vision.
When should I use a fisheye lens?
Use a fisheye lens when you need extreme field of view up to 180 degrees, when photographing already-curved subjects like domes and spirals, for immersive action sports shots, when shooting in confined interior spaces, or when you want to create dramatic creative effects with intentional distortion.
Final Thoughts on Fisheye Photography
The fisheye lens taught me an important lesson about photography gear. No tool is inherently gimmicky or professional. What matters is understanding your equipment deeply enough to control its characteristics.
When I stopped fighting fisheye distortion and started working with it, my images improved dramatically. I learned when to minimize curvature through composition and when to embrace it for creative effect. I discovered that defishing in post-processing could rescue shots that seemed too distorted, while also recognizing when natural curves enhanced the final image.
The techniques in this guide represent years of trial and error. The horizon placement rule alone would have saved me dozens of failed landscape shots. The composition checklist prevents mistakes before I press the shutter. The defishing methods give me options when in-camera techniques are not enough.
Mastering how to use a fisheye lens creatively without extreme distortion opens creative possibilities that no other lens provides. That 180-degree field of view captures scenes no other optic can see. The immersive perspective draws viewers into your images. And when you control the distortion, the results look professional rather than novelty.
Grab your fisheye lens and start practicing these techniques. Check your horizon placement. Watch your subject positioning. Experiment with defishing in post. Before long, you will capture images that showcase the creative power of fisheye photography while maintaining the natural look your subjects deserve.