Creating stunning multi-row panoramas in Photoshop opens up incredible possibilities for ultra-high-resolution photography. I’ve spent years perfecting this technique, capturing gigapixel landscapes and architectural detail that single frames simply cannot achieve. The process combines careful field technique with Photoshop’s powerful Photomerge feature, followed by precise perspective correction to eliminate those frustrating warped edges and converging verticals that plague many stitched images.
In this guide, I’ll walk you through my complete workflow for how to stitch a multi-row panorama in Photoshop and correct perspective errors that commonly occur. Whether you’re shooting vast landscapes, intricate architecture, or interior spaces, these techniques will help you create seamless, distortion-free panoramas that maintain perfect perspective from edge to edge.
What Is a Multi-Row Panorama?
A multi-row panorama is created by stitching together a grid of overlapping photos rather than a single horizontal row. Instead of just panning left to right, you capture multiple rows that move both horizontally and vertically, creating a much larger field of view with dramatically higher resolution. This technique is essential for gigapixel photography and allows you to maintain natural-looking proportions without the extreme distortion of ultra-wide lenses.
Multi-row panoramas offer two major advantages over single-row stitches. First, you achieve standard aspect ratios with incredible detail—perfect for large format printing. Second, you can capture both wide expanses and significant height, which is crucial for towering architecture or tall mountain scenes. I regularly create panoramas exceeding 200 megapixels using this technique, revealing detail that’s impossible to capture in a single frame.
Essential Equipment for Multi-Row Panoramas
You don’t need specialized gear to get started with multi-row panoramas, but having the right equipment makes a significant difference in your success rate. Here’s what I recommend based on years of field experience:
Sturdy Tripod (Essential) – A solid tripod is non-negotiable for multi-row work. Any movement between frames creates alignment nightmares. I use a carbon fiber tripod rated for at least twice my camera’s weight. Cheap, wobbly tripods will frustrate you with failed stitches.
L-Bracket (Highly Recommended) – An L-bracket lets you switch between horizontal and vertical orientation while keeping the camera’s optical center directly over the tripod head. This is crucial for maintaining consistent alignment between rows. Without one, you’ll struggle with parallax errors as the camera shifts position when you rotate it.
Panorama Head (Optional but Helpful) – Dedicated panorama heads like the Nodal Ninja or Manfrotto panoramic heads help eliminate parallax error by rotating the camera around its nodal point. These are especially valuable for scenes with close foreground elements. However, I’ve successfully created countless multi-row panoramas without one by using careful technique.
Understanding Parallax Error – This is the most common cause of stitching failures. Parallax occurs when your camera rotates from a point other than its optical center, causing foreground and background elements to shift relative to each other between frames. The solution? Rotate around your lens’s nodal point, or simply keep distant subjects and avoid prominent foreground objects near the frame edges.
Camera Settings for Successful Stitching
Consistent camera settings across all frames are absolutely critical for successful panorama stitching. Here’s the setup I use for every multi-row panorama:
Manual Mode – Never use auto exposure. Your camera will meter each frame differently, creating obvious brightness seams that are nearly impossible to fix. Set your exposure based on the brightest part of your scene, typically the sky. This may mean some shadow areas are dark, but that’s easier to recover than blown highlights.
Manual Focus – Autofocus can shift slightly between frames, creating focus mismatches that confuse Photoshop’s alignment algorithms. Focus manually once, then switch to manual mode and leave it alone. I typically focus about one-third into the scene for maximum depth of field.
Fixed White Balance – Auto white balance will vary between frames, creating color shifts across your panorama. Choose a consistent preset (daylight, cloudy, etc.) or set a custom white balance. I typically shoot in RAW and apply a consistent white balance during post-processing, but the key is consistency across all frames.
Aperture Selection – I usually shoot between f/8 and f/11 for sharpness throughout the frame. Stopping down further (f/16 or smaller) can introduce diffraction softness that defeats the purpose of high-resolution stitching. If you need more depth of field, focus stack instead of stopping down excessively.
Multi-Row Panorama Shooting Technique
The secret to successful multi-row panoramas is systematic shooting with consistent overlap. I use a specific workflow that ensures Photoshop has enough information to align everything perfectly:
Start at the Top Left – Begin your grid at the top-left corner of your scene. This creates a logical order that makes file management easier. I always shoot left to right, top to bottom, like reading a book.
Overlap Generously – Aim for 30-40% overlap between adjacent frames. More overlap gives Photoshop more data to work with for alignment and blending. I’ve found that 30% is the minimum for reliable stitching, while 40% provides a safety margin for challenging scenes with minimal detail.
Shoot Row by Row – Complete each horizontal row before moving to the next. If you’re shooting three rows, capture all images in the top row left-to-right, then move down and repeat for the middle row, then the bottom row. This systematic approach prevents confusion and ensures complete coverage.
Maintain Level – Use your camera’s electronic level or a hot-shoe bubble level to keep each row perfectly horizontal. Tilted rows create nightmare scenarios during stitching. Most modern cameras have built-in virtual horizons—use them religiously.
Allow Extra Edge Space – Stitching software always crops edges. Shoot wider than your intended composition to allow for this inevitable crop. I typically add an extra frame on each side of my grid just for this purpose. It’s frustrating to carefully compose a perfect multi-row pano, only to have the edges cropped off during stitching.
Work Quickly – If lighting conditions are changing rapidly (sunrise, sunset, moving clouds), work as fast as possible to maintain consistent exposure across all frames. I can typically shoot a 3×5 grid (15 frames) in under two minutes with practice.
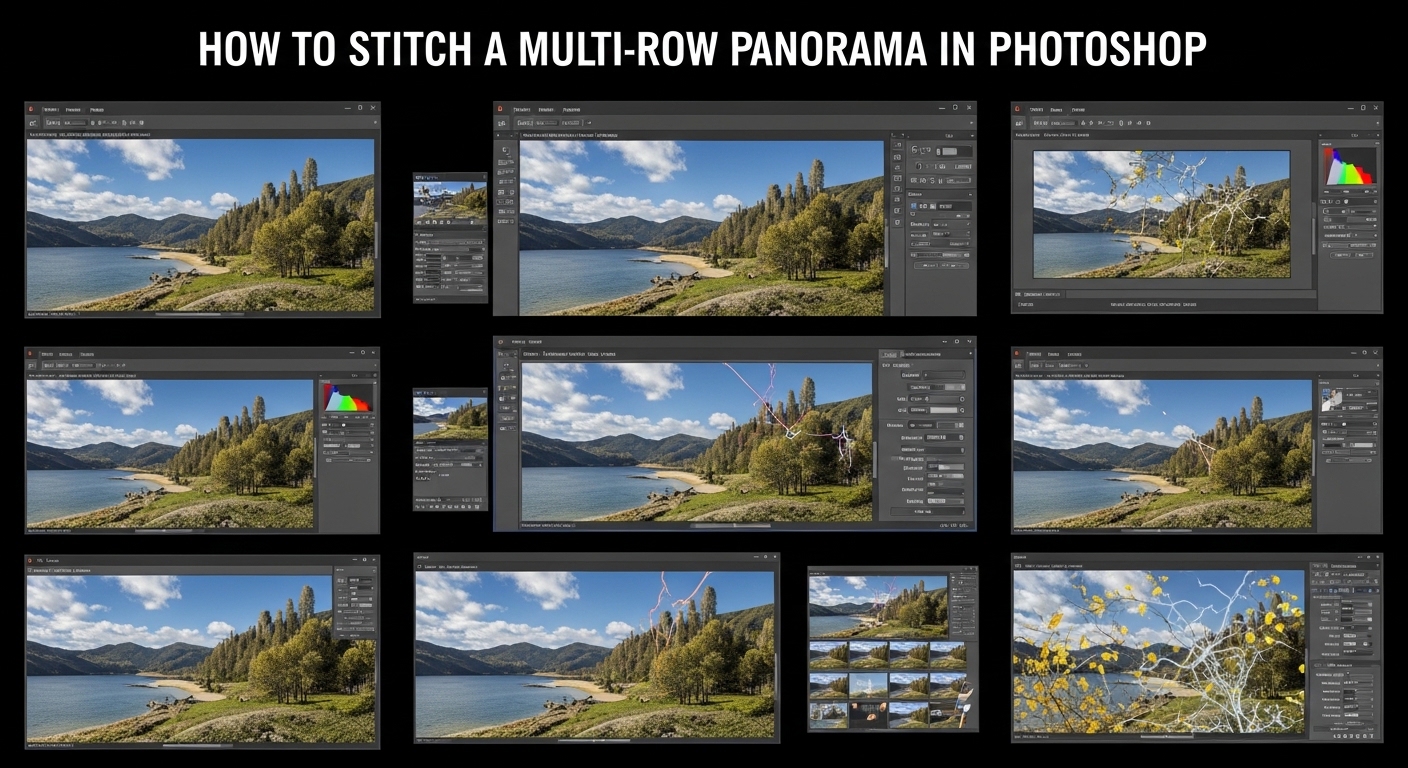
How to Stitch a Multi-Row Panorama in Photoshop
Photoshop’s Photomerge feature has improved significantly over the years and now handles multi-row panoramas quite well. Here’s my complete workflow for getting perfect results every time:
Step 1: Prepare Your Images – Select all your panorama frames in Adobe Bridge or Lightroom. Before opening in Photoshop, apply any lens correction profiles but avoid heavy editing that might affect alignment. Slight exposure adjustments are okay, but save major edits for after stitching.
Step 2: Open Photomerge – In Photoshop, go to File > Automate > Photomerge. This opens the Photomerge dialog box where you’ll control the entire stitching process.
Step 3: Load Your Images – Click “Browse” and select all frames from your multi-row panorama. You can also drag and drop images directly from Bridge or Lightroom into the Photomerge window.
Step 4: Choose Your Layout Mode – For multi-row panoramas, I typically start with “Auto” layout, which lets Photoshop analyze the images and choose the best projection method. However, don’t be afraid to experiment with “Cylindrical” or “Spherical” if Auto produces weird results. Each projection handles different scene types differently.
Step 5: Enable Key Options – Check these three critical boxes:
– Blend Images Together – Essential for seamless results
– Vignette Removal – Helps eliminate edge darkening
– Geometric Distortion Correction – Can fix minor lens issues
Step 6: Stitch and Wait – Click OK and let Photoshop work. For large multi-row panoramas, this can take several minutes. Don’t interrupt the process—Photoshop is aligning, matching, and blending potentially dozens of images simultaneously.
Step 7: Evaluate the Result – Once complete, examine your panorama at 100% zoom. Check for misalignments, ghosting, or weird artifacts. If you see problems, try stitching again with different layout options. Sometimes “Reposition” works better than “Auto” for certain scenes.
Step 8: Crop and Clean – Your stitched panorama will have irregular edges from the stitching process. Use the Crop Tool (C) to create clean edges. I recommend the Content-Aware Crop option if you have Photoshop CC, which can intelligently fill in missing edge areas.
Understanding Projection Types – The projection method dramatically affects how your panorama looks. Spherical projection works best for very wide multi-row panoramas but can distort vertical elements near edges. Cylindrical is great for standard landscapes and maintains better straight lines. Perspective projection keeps everything rectilinear but creates extreme distortion at wider angles. I typically start with Auto and adjust if needed.
Boundary Warp vs. Content-Aware Fill – After stitching, you’ll often see empty wedges at the edges from the image rotation. Photoshop CC offers two solutions: Boundary Warp warps the image to fill the frame (preserves all content but may introduce slight distortion), while Content-Aware Fill generates new pixels to fill gaps (can look artificial in detailed areas). I usually prefer Boundary Warp for natural scenes and Content-Aware Fill for sky or simple textures.
How to Correct Perspective Errors in Panoramas
Even perfectly stitched multi-row panoramas often suffer from perspective distortion. Buildings lean, horizons curve, and vertical lines converge. Here are the techniques I use to correct these issues:
The Perspective Warp Tool – This is Photoshop’s most powerful tool for fixing perspective issues in panoramas. Here’s how I use it:
Step 1: Duplicate your panorama layer (Ctrl/Cmd+J) to preserve the original.
Step 2: Go to Edit > Perspective Warp. Your image will display a grid overlay.
Step 3: Draw two layout grids covering your image—click and drag to create each grid. Position them so they cover the areas you want to straighten.
Step 4: Switch to “Warp” mode in the top options bar.
Step 5: Click and drag the grid lines to straighten converging verticals or curved horizons. For architectural shots, align vertical grid lines with building edges. For landscapes, align horizontal grids with the horizon.
Step 6: Click the “X” to accept the changes when satisfied. The Perspective Warp tool maintains image quality better than most other distortion corrections because it warps the actual pixels rather than stretching them.
The Transform Tool Method – For simpler perspective fixes, the Free Transform tool works well:
Step 1: Press Ctrl/Cmd+T to enter Free Transform mode.
Step 2: Hold Ctrl/Cmd while dragging corner handles to adjust perspective individually. This corrects keystoning where buildings appear to lean backward or forward.
Step 3: Use the Warp option (right-click > Warp) for curved horizons. Drag the grid to gently curve the horizon line back to level.
Step 4: Press Enter to apply. Note that heavy transformation can degrade image quality, so work non-destructively on duplicate layers.
Correcting Curved Horizons – Multi-row panoramas often exhibit horizon bowing, especially with wide-angle lenses. The fix depends on the curve type:
For upward bowing (horizon curves up at edges): Use the Warp tool (Edit > Transform > Warp) and gently pull the center grid points down while raising the edge points. For downward bowing (horizon curves down at edges): Pull the center grid points up while lowering the edge points. Work subtly—small adjustments are usually sufficient.
Fixing Converging Verticals – Architectural panoramas frequently suffer from converging verticals where buildings appear to lean inward. The Perspective Warp tool is ideal for this correction:
Draw a layout grid covering each building facade. In Warp mode, drag the vertical grid lines to match the building edges perfectly. You can pull the top outward to make buildings stand straight or push the top inward to exaggerate the perspective for dramatic effect. I typically aim for perfectly vertical lines on all structural elements—edges of buildings, window frames, and doorways should be parallel to the image edges.
When to Accept Some Distortion – Not all perspective distortion should be eliminated. Some distortion is inherent to wide-angle views and correcting it excessively can make images look unnatural. I ask myself: Would this look correct to a viewer standing at this location? If yes, the distortion is acceptable. The goal is natural-looking perspective, not mathematical perfection.
Common Multi-Row Panorama Problems and Solutions
Even with careful technique, multi-row panoramas sometimes present challenges. Here are solutions to the most common issues I encounter:
Stitching Failures – If Photoshop fails to stitch your images, try these fixes: Ensure you have at least 30% overlap between frames. Check that exposure settings are consistent across all frames. Verify that you’re shooting in RAW format for maximum alignment data. Try different Photomerge layout modes (Auto, Cylindrical, Spherical). Remove any frames that are significantly out of alignment and stitch manually or exclude problematic areas.
Misalignment in Textureless Areas – Large expanses of sky, water, or blank walls can confuse Photoshop’s alignment algorithms. Solution: Include identifiable features in every frame when possible. Shoot during times when clouds provide texture in the sky. Add minimal foreground elements to give the software alignment points. Consider manual alignment in Photoshop using the Auto-Align Layers feature.
Inconsistent Exposure Between Rows – If you notice banding or brightness differences between rows, it’s usually from exposure variation during shooting. Prevention: Use manual exposure mode and set exposure based on the brightest part of your scene. Work quickly when light is changing rapidly. Consider using a neutral density filter to balance bright sky with darker foreground. Correction: Use the Gradient Map adjustment layer to smooth exposure transitions between rows.
Ghosting from Moving Elements – Trees blowing in wind, moving water, or people walking through frames create ghosting artifacts during blending. Prevention: Use faster shutter speeds to freeze motion. Wait for calm conditions when photographing foliage. Remove moving elements from individual frames using Content-Aware Fill before stitching. Correction: Use layer masks to manually paint in the cleanest version of problematic areas from different source frames.
Heavy Vignetting After Stitching – Multiple stacked images can create pronounced vignetting at frame edges. Prevention: Enable “Vignette Removal” in Photomerge. Shoot with lens corrections applied to minimize native vignetting. Correction: Use the Lens Correction filter in Photoshop with custom vignette removal. Apply radial gradients to brighten corners selectively.
Parallax Error in Foreground – When close foreground elements appear misaligned between frames, you’re experiencing parallax. Prevention: Rotate around your lens’s nodal point using a panorama head. Avoid including close foreground elements in your composition. Increase distance between camera and foreground subjects. Correction: This is difficult to fix perfectly in post. Use Content-Aware Fill to clone and blend the worst areas, or crop out problematic sections.
I’ve found that most panorama problems stem from shooting technique rather than software limitations. Taking extra care in the field—consistent overlap, level camera, manual settings—saves hours of frustration during post-processing. The time invested in getting it right in camera always pays off with cleaner stitches and less correction work later.
Frequently Asked Questions
How to correct perspective distortion in Photoshop?
How to stitch together a Panorama in Photoshop?
What is the image stitching algorithm for Panorama?
How to fix skew in Photoshop?
How to edit panorama in Photoshop?
How to automatically straighten perspective in Photoshop?
Conclusion
Learning how to stitch a multi-row panorama in Photoshop and correct perspective errors opens up incredible creative possibilities for your photography. The combination of ultra-high resolution and precise perspective control allows you to capture scenes that would otherwise be impossible with a single frame. Whether you’re creating massive gigapixel landscapes or perfectly corrected architectural shots, these techniques give you professional-quality results that stand out in today’s competitive photography landscape.
The key is patience and practice. Your first multi-row panoramas may not be perfect, but with each shoot you’ll develop a better sense of overlap, camera movement, and the specific challenges of different scenes. Start simple with two-row panoramas of straightforward subjects, then gradually increase complexity as you become more comfortable with the workflow. The most important lesson I’ve learned after hundreds of multi-row panoramas is that time invested in proper shooting technique pays dividends in easier post-processing and superior final results.
Remember that Photoshop’s Photomerge and perspective correction tools are powerful, but they’re not magic. They work best when given solid source material to work with. Consistent camera settings, adequate overlap, level framing, and careful attention to parallax issues will make the difference between a frustrating failed stitch and a stunning gigapixel masterpiece that prints beautifully at massive sizes.