I remember the first time I tried shooting a macro image of a tiny flower. I stopped down to f/22, expecting everything to be sharp from front to back. Instead, I got diffraction-softened details and still had areas out of focus. That frustration led me to discover focus bracketing, a technique that has completely transformed my photography.
Learning how to set up focus bracketing on your mirrorless camera opens up possibilities that simply are not achievable with a single frame. Whether you are capturing the intricate details of an insect, photographing products for e-commerce, or shooting landscapes where you want foreground and background equally sharp, focus bracketing is the solution.
In this guide, I will walk you through exactly how to set up focus bracketing on the major mirrorless camera brands, share the settings that actually work in real-world shooting, and troubleshoot the common problems that trip up most photographers. By the end, you will have everything you need to start creating images with stunning depth of field.
What Is Focus Bracketing (And How It Differs From Focus Stacking)
Focus bracketing is a shooting technique where your camera automatically captures a series of images at different focus distances. The camera shifts the focus point slightly between each shot, moving from the nearest point of your subject through to the farthest. You then combine these images using focus stacking software to create a single photograph with far more depth of field than possible in one exposure.
Here is where people get confused: focus bracketing and focus stacking are not the same thing. Focus bracketing is the capture process, taking multiple shots at different focus distances. Focus stacking is the post-processing technique where you blend those images together. Some cameras now offer in-camera focus stacking, which combines both steps, but most require you to handle the blending in software afterward.
The main benefit is achieving sharp focus throughout your entire subject. In macro photography, even f/22 might only give you a few millimeters of depth of field at 1:1 magnification. With focus bracketing, you can have everything from the closest antenna to the farthest wing tip tack sharp, while still shooting at an optimal aperture like f/8 or f/11 for maximum lens quality.
This technique is essential for macro photographers, product photographers who need every detail sharp, and landscape photographers working with foreground elements close to the lens. I have used it for everything from jewelry photography to close-up nature shots, and the results consistently beat what I could achieve in a single frame.
Which Mirrorless Cameras Support Focus Bracketing
Most modern mirrorless cameras now include some form of focus bracketing, but the implementation varies significantly between brands. Sony added focus bracketing via firmware updates to cameras like the A1, A7S III, A7 IV, A7R V, and FX3. Canon offers focus bracketing on the R5, R6, R7, R10, and most recent R-series bodies, with some models also featuring in-camera stacking. Nikon calls it Focus Shift Shooting and includes it on the Z6 II, Z7 II, Z8, Z9, and Zf.
Fujifilm has focus bracketing on most X-series cameras including the X-T5, X-T4, X-H2, and X-S20, plus the GFX medium format bodies. Olympus and OM System have arguably the most robust implementation, with both focus bracketing (capture only) and focus stacking (in-camera blending) available on OM-D cameras and the OM-1. Panasonic offers focus bracketing on the S5 II, S1R, and G9 II.
Before getting started, check if your camera needs a firmware update. Sony cameras in particular require the latest firmware to unlock focus bracketing. I learned this the hard way when my A7 IV would not show the option until I updated to firmware version 2.0.
Essential Settings for Focus Bracketing
Before diving into brand-specific menus, you need to understand the universal settings that affect your results. These principles apply regardless of which camera you use.
Aperture choice matters more than you might think. While you might assume stopping down to f/22 is ideal, diffraction actually softens your images at such small apertures. I typically shoot focus brackets at f/8 to f/11, which gives me the sweet spot for lens sharpness while still capturing enough depth per frame to keep my shot count manageable. For extreme macro at 2x magnification or higher, I might go to f/5.6.
You absolutely need a tripod for serious focus bracketing work. The camera must stay perfectly still while capturing anywhere from 10 to 100+ frames. Any movement between shots will cause alignment problems during stacking. If you must shoot handheld, use the fastest shutter speed possible and brace yourself against something solid. Some photographers successfully do handheld focus bracketing with high shutter speeds and image stabilization, but your success rate will be lower.
Set your camera to manual exposure mode or aperture priority with exposure smoothing enabled. This ensures consistent brightness across all frames, which makes blending smoother. If your camera has exposure smoothing during bracketing, turn it on. This automatically adjusts exposure as focus shifts, which helps when shooting reflective subjects.
Use manual focus or single-point autofocus to set your starting focus point. Most cameras begin the bracketing sequence from wherever you have focused, then shift progressively toward the far focus distance. For macro work, I typically focus on the closest part of my subject, then let the camera rack focus toward the back.
How to Set Up Focus Bracketing on Sony Cameras
Sony added focus bracketing relatively recently, so you will need current firmware on most bodies. The feature is available on the A1, A7S III, A7 IV (firmware 2.0+), A7R V, A7CR, A7C II, FX3, and FX30.
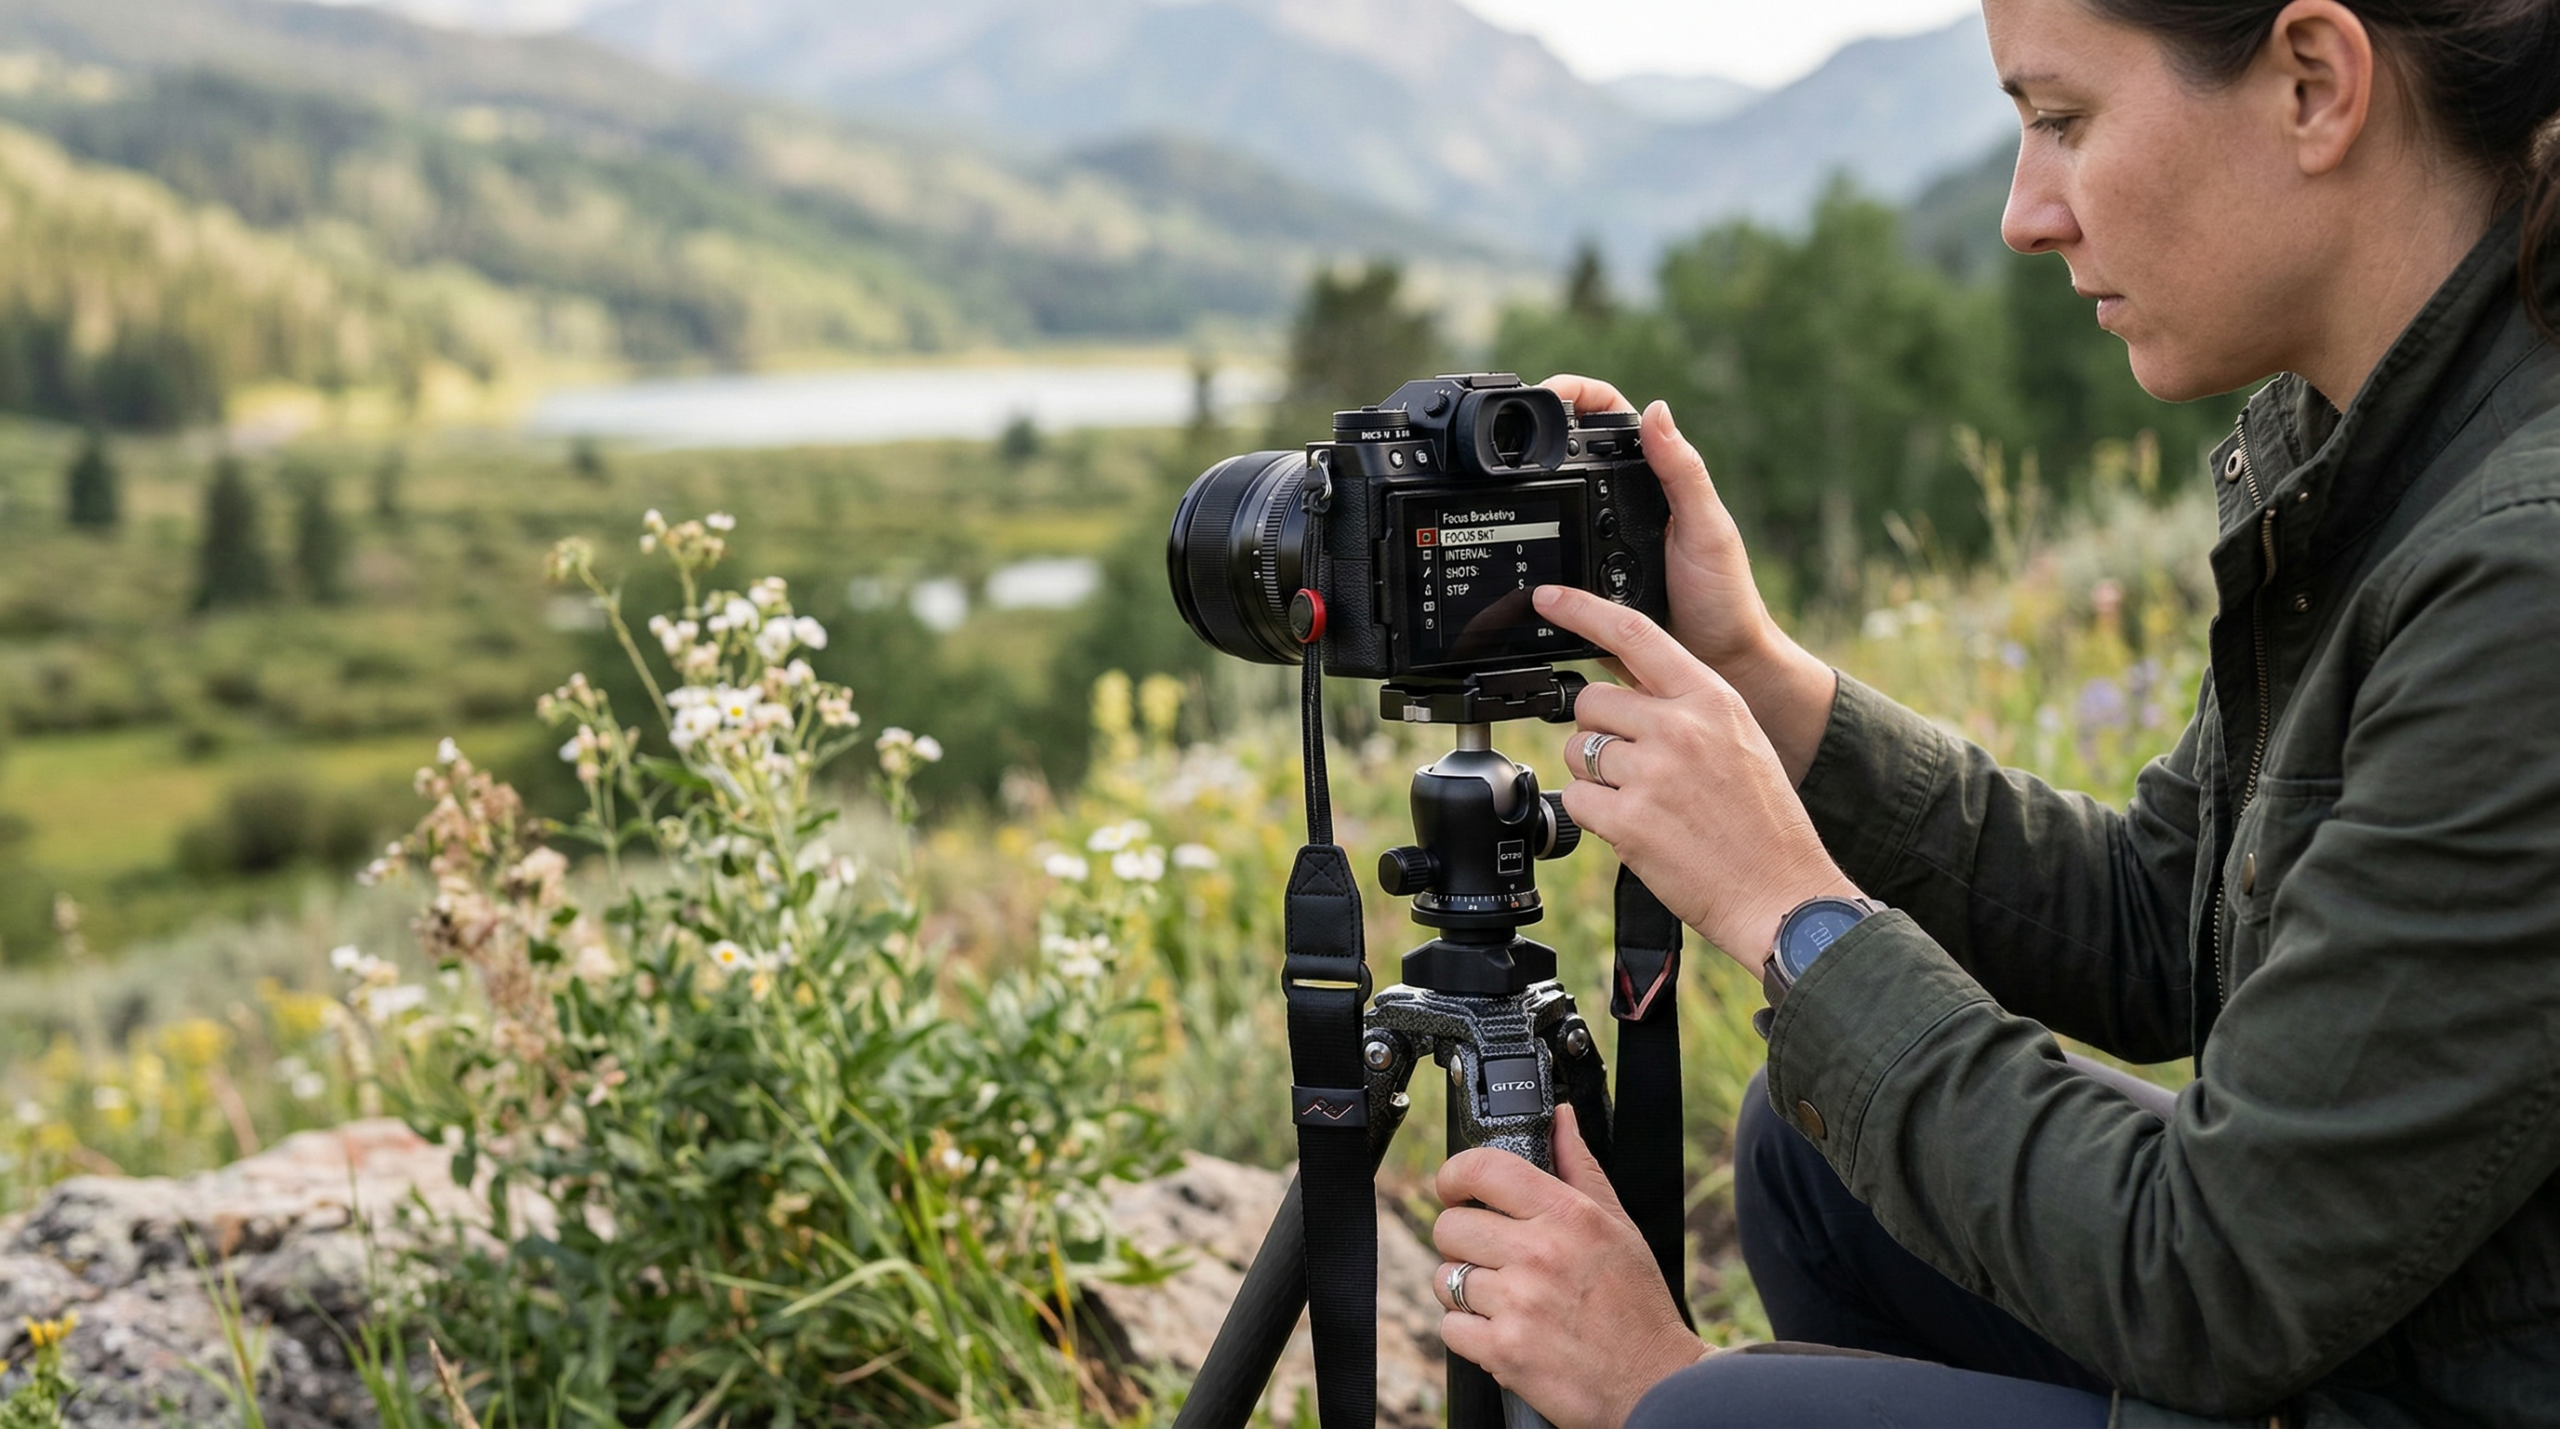
Navigate to the Shooting menu (camera icon), then look for Focus Bracketing under the focus settings. If you cannot find it, check your firmware version first. Once enabled, you will see several options. Focus Bracket enables or disables the feature. Shooting Interval controls the time between shots, with shorter intervals being better for moving subjects but requiring faster shutter speeds. Focus Bracket Order determines whether focus shifts from near to far or far to near.
Step Width is the critical setting. This controls how far the focus shifts between each frame. Sony uses values from 1 to 10, with higher numbers meaning larger focus steps. For macro photography at high magnification, I use values between 1 and 3. For landscape work where subjects are farther away, values of 5 to 8 work well. Too small a step means more frames and larger files. Too large a step risks gaps in your final stack.
Number of Shots determines how many frames the camera captures. For close-up work, I typically use 30 to 50 shots. For true macro at 1:1 or higher, you might need 50 to 150 frames. Landscape photographers can often get away with 5 to 15 shots.
Enable Exposure Smoothing if you want the camera to adjust exposure as focus shifts. This helps with reflective subjects or scenes where focus moves from shadow to highlight areas. The Focus Bracket Saving Destination option lets you choose where files are stored, which is useful if you shoot to both cards.
One Sony quirk: some Godox flashes have compatibility issues with focus bracketing mode. If your flash will not fire during bracketing, try switching to a different flash or using continuous lighting instead.
How to Set Up Focus Bracketing on Canon Cameras
Canon’s focus bracketing implementation is found on the R5, R6, R6 II, R7, R10, R50, R8, and R5 C. Some of these cameras also offer in-camera focus stacking, which blends the images for you.
Find Focus Bracketing in the red Shooting menu, typically under Shoot 5 or Shoot 6 depending on your camera. The menu path is Menu, then the red camera icon, then scroll to Focus Bracketing. Press Set to open the options.
Focus Bracketing has a simple on/off toggle. Once enabled, you will see Focus Increment, which controls how far focus shifts between frames. Canon uses a scale from 1 to 10. For macro photography, I recommend starting with values of 2 to 4. For product photography and moderate close-ups, 4 to 6 works well. Landscape work can use higher values.
Number of Shots works the same as on other systems. Canon cameras can capture up to several hundred frames in a sequence, though I rarely need more than 100 for most subjects. The camera shows an estimate of how long the sequence will take, which helps you plan for subject movement.
If your Canon camera supports in-camera Depth Compositing (focus stacking), you will see an option for that as well. This blends the images in-camera and outputs a single JPEG or RAW+JPEG. The R7 and R10 both offer this feature. In-camera stacking saves significant post-processing time but gives you less control over the final result.
For post-processing, Canon includes focus stacking in their Digital Photo Professional (DPP) software. This free tool handles Canon RAW files well and can process focus bracket sequences automatically. I use it for quick projects, though I prefer Helicon Focus or Photoshop for critical work.
How to Set Up Focus Bracketing on Nikon Cameras
Nikon calls their implementation Focus Shift Shooting, available on the Z6 II, Z7 II, Z8, Z9, Zf, and Zfc. The feature works similarly to other brands but uses Nikon-specific terminology.
Access Focus Shift Shooting through the Photo Shooting Menu. Scroll down until you find Focus Shift Shooting and press right to enter the submenu. You will see several options to configure before starting your sequence.
Focus Shift Shooting Start triggers the capture sequence once everything is configured. Before starting, set your Number of Shots, which can range from a handful to several hundred. The Z8 and Z9 allow particularly long sequences for demanding macro work.
Focus Step Width controls the distance the focus moves between frames. Nikon uses a scale where smaller numbers mean smaller steps. For macro photography, I use values of 1 to 3. For general close-up work, 3 to 5 is appropriate. Landscape photographers shooting distant subjects can use 5 to 10.
Time Between Shots lets you control the interval, which is useful if you need time for flash recycling or want to minimize camera shake from the shutter mechanism. Set this to 0 for the fastest sequence, or increase it when using slower flash units.
Nikon includes a First-frame Focus Lock option that locks focus on the starting point before beginning the sequence. Enable this for macro work to ensure consistency. The Silent Photography option turns off the mechanical shutter, which reduces vibration but may affect flash compatibility.
The Z8 and Z9 have particularly refined focus shift capabilities thanks to their fast electronic shutters and powerful processors. These cameras can capture sequences very quickly, which helps with moving subjects like insects swaying in the breeze.
How to Set Up Focus Bracketing on Fujifilm Cameras
Fujifilm includes focus bracketing on most X-series cameras including the X-T5, X-T4, X-T3, X-H2, X-H2S, X-S20, and X-S10. The GFX 100S, GFX 100 II, and GFX 50S II also support the feature for medium format work.
Find Focus Bracketing in the Shooting Menu under the Focus Setting or AF/MF Setting section depending on your camera model. Fujifilm keeps the interface simple with a few key options.
Focus Bracketing turns the feature on or off. When enabled, you can set the Number of Frames, which ranges up to 999 on some cameras. For most macro work, 30 to 100 frames is sufficient. The Interval setting controls time between shots, useful for flash recycling or minimizing vibration.
Step controls the focus increment between frames. Fujifilm uses values typically from 1 to 10, with smaller values for macro and larger values for distant subjects. I start with Step 2 or 3 for macro work and adjust based on results. If I see gaps in my final stacked image, I reduce the step value and shoot again with more frames.
Fujifilm cameras capture RAW files to a single folder during bracketing, making it easy to import the entire sequence into your stacking software. The camera also creates a separate folder for each bracketing sequence, which helps with organization when you are shooting multiple subjects.
One advantage of Fujifilm is the excellent manual focus clutch on many XF lenses. This makes setting your starting focus point precise and tactile. However, make sure the clutch is in the AF position, as some lenses will not bracket with the clutch set to manual focus mode.
How to Set Up Focus Bracketing on Olympus and OM System Cameras
Olympus and OM System offer two distinct features: Focus Bracketing, which captures a sequence for post-processing, and Focus Stacking, which blends images in-camera. Both are available on the OM-D E-M1 Mark III, OM-D E-M1X, OM System OM-1, OM-1 Mark II, and several PEN cameras. The OM-5 also supports focus bracketing.
Find these features in the Shooting Menu 2 under Focus Bracketing or Focus Stacking. The two modes work differently, so choose based on your needs. Focus Bracketing captures up to 999 frames that you process later. Focus Stacking captures a sequence and blends it in-camera, outputting a single RAW+JPEG or just JPEG.
For Focus Bracketing, set the Number of Shots first. Olympus allows up to 999 frames, which is more than most macro photographers ever need. I typically use 30 to 100 frames for close-up work. The Focus Differential setting controls step size, with values from 1 to 10. Smaller values give you more overlap between frames.
Focus Stacking works similarly but adds in-camera blending. Set your number of shots (typically 3 to 15 for in-camera stacking), choose your focus differential, and the camera handles the rest. The blending algorithm works well for moderate depth of field extensions but may struggle with extreme macro work.
OM System cameras are favorites among macro photographers because of their excellent image stabilization, which makes handheld focus bracketing more feasible than on other systems. The focus stacking mode is genuinely useful for field work when you cannot carry a tripod or need to work quickly.
One note on flash compatibility: some Olympus users report issues with third-party flashes during focus bracketing. If your flash behaves unexpectedly, try using Olympus’s own flash units or switching to continuous LED lighting.
Best Practices for Sharp Focus Bracketing Results
Getting the camera set up is only half the battle. These practical tips will help you consistently produce sharp, stackable images.
Choosing the right number of shots depends entirely on your subject and magnification. For landscape photography where you are shooting at f/11 and your closest subject is several feet away, 5 to 15 frames is usually plenty. For moderate close-ups at 0.5x magnification, 20 to 40 frames works well. True macro at 1:1 and higher magnifications often requires 50 to 150 frames. I have shot over 200 frames for extreme close-ups of insect eyes at 3x magnification.
Step width selection is more art than science, but here is my approach. Start with smaller step values than you think you need. It is better to have more overlap between frames than gaps in your final stack. For macro work at 1:1, I use the smallest or second-smallest step value my camera offers. I only increase step width when shooting more distant subjects.
Stability is critical for success. Beyond using a sturdy tripod, I recommend a remote shutter release or the self-timer to eliminate camera shake from pressing the shutter button. If your camera has an electronic shutter option, use it to eliminate mechanical shutter vibration. Some photographers even use mirror lock-up on DSLRs for the same reason.
Wind and subject movement are your enemies in focus bracketing. Even slight movement between frames causes problems during stacking. I use a fast shutter speed (1/250 or faster) to freeze any subject movement. For outdoor macro work, I often wait for lulls in the wind or use a diffuser to block air currents. Some photographers build small windbreaks around their subjects.
Handheld focus bracketing is possible but challenging. If you must shoot handheld, use the fastest shutter speed possible, enable image stabilization, and brace your elbows against your body. Some cameras with excellent IBIS, like OM System bodies, make this more feasible. Expect a lower success rate and plan to shoot multiple sequences.
Lighting consistency matters more than you might think. If you are using natural light, be aware that clouds passing during your sequence can cause exposure changes between frames. If using flash, make sure your flash can recycle fast enough to keep up with your shooting interval. Continuous LED lighting is often the most consistent option for focus bracketing.
Troubleshooting Common Focus Bracketing Problems
Even with everything set up correctly, things can go wrong. Here are the most common problems I encounter and how to fix them.
If focus bracketing is greyed out or not available in your menu, check your shooting mode first. Many cameras disable bracketing features in fully automatic modes. Switch to aperture priority, shutter priority, or manual mode. Also verify that your lens supports focus bracketing. Some older lenses or manual focus lenses will not work with this feature.
Firmware updates are often the culprit when focus bracketing is missing. Sony cameras in particular require recent firmware to enable this feature. Check your camera manufacturer’s website for the latest firmware version and update instructions. I have seen photographers spend hours troubleshooting when a simple firmware update would have solved everything.
Flash not firing during bracketing is a widespread complaint, especially with third-party flash units. Sony and Olympus users report this frequently with Godox flashes. Try enabling silent shooting or electronic shutter mode, as some cameras disable flash when the mechanical shutter is active. If problems persist, you may need to use continuous lighting or switch to a first-party flash unit.
If your camera is not completing the full sequence, check your memory card speed. Slow cards can cause the buffer to fill, interrupting the sequence. Use a fast UHS-II SD card or CFexpress card for best results. Also check that you have not set a limit on continuous shooting in your camera’s settings.
Images not aligning properly during stacking usually indicates camera movement between frames. Review your sequence and look for frames that seem shifted compared to others. A sturdy tripod, remote release, and electronic shutter all help minimize this. Some stacking software has alignment correction, but it works best with minimal movement to correct.
The manual focus clutch on some lenses can interfere with focus bracketing. Fujifilm XF lenses and some Panasonic lenses have a clutch that switches between AF and MF modes. Make sure this is set to the AF position before starting your sequence. The camera cannot automatically shift focus if the clutch is in manual mode.
Silent shooting mode is sometimes required for focus bracketing to work correctly. If your camera has both mechanical and electronic shutter options, try switching to electronic shutter. This also eliminates vibration from the shutter mechanism, which can improve your stack alignment.
Gaps in your final stacked image mean your step width was too large or you did not capture enough frames. Reduce your step value and increase your shot count, then reshoot. It is frustrating to discover this after processing, so I recommend checking a few sequences on your computer before committing to a full shoot.
How to use focus bracketing?
Set your camera to aperture priority or manual mode, mount it on a tripod, and focus on the nearest point of your subject. Enable focus bracketing in your camera menu, set your step width (start with small values like 2-3 for macro), choose your number of shots (30-50 for close-ups), and press the shutter. The camera will automatically capture multiple frames at different focus distances that you later blend in stacking software.
What camera settings are best for bracketing?
Use aperture priority or manual mode at f/8 to f/11 for optimal lens sharpness. Set a fast shutter speed (1/250 or faster) to freeze any subject movement. Enable exposure smoothing if available. Use a sturdy tripod and remote release. Set your step width to small values (1-3) for macro work, and capture 30-100 shots depending on your subject depth and magnification.
Which mirrorless cameras have focus stacking?
Cameras with in-camera focus stacking include the Canon R7, R10, and some R5/R6 models via firmware; Olympus OM-D E-M1 Mark III, E-M1X, and OM System OM-1/OM-1 II; and various Panasonic bodies. Most other mirrorless cameras offer focus bracketing (capture only) that requires post-processing stacking in software like Helicon Focus or Photoshop.
How to do focus bracketing?
Enable focus bracketing in your camera menu, set your starting focus point on the nearest part of your subject, configure your step width and number of shots, then press the shutter. The camera captures a sequence of images at progressively farther focus distances. Import the sequence into focus stacking software like Helicon Focus, Zerene Stacker, or Photoshop to blend them into a single image with extended depth of field.
What aperture for focus stacking?
Shoot at f/8 to f/11 for most focus stacking work. This provides the best balance between depth per frame and lens sharpness while avoiding diffraction that occurs at smaller apertures like f/22. For extreme macro at 2x magnification or higher, you may use f/5.6 to f/8. The goal is to capture enough depth per frame to keep your shot count reasonable while maintaining optical quality.
Getting Started With Focus Bracketing
Focus bracketing transforms what is possible in a single photograph. With the techniques in this guide, you can capture images with depth of field that simply cannot be achieved any other way. Start with a simple subject on a tripod, work through your camera’s menu settings, and process your first stack. The results will speak for themselves.
The key is practice. Your first few attempts might have alignment issues or gaps in the stack. That is normal. Adjust your step width, increase your shot count, and try again. Once you understand how your camera behaves at different magnifications and subject distances, focus bracketing becomes second nature.
Whether you shoot macro, products, or landscapes, mastering focus bracketing opens creative possibilities that will elevate your photography. Grab your camera, find a subject, and start experimenting. The sharp, detailed images waiting at the end are worth every bit of effort.