Creating a drone hyperlapse is one of the most cinematic techniques you can add to your aerial photography toolkit. I have spent years perfecting this craft, and the results never fail to impress. A well-executed hyperlapse shows the world in motion from perspectives that simply are not possible any other way.
In this guide, I will walk you through exactly how to do a drone hyperlapse step by step. We will cover everything from planning your shoot to capturing the footage and editing the final result. Whether you are shooting clouds rolling over a city skyline or documenting a construction project over months, this tutorial has you covered.
By the end, you will understand the essential camera settings, which DJI hyperlapse mode to choose for each situation, and how to polish your footage into a professional-looking video.
What Is a Drone Hyperlapse?
A drone hyperlapse combines two powerful techniques: timelapse photography and camera movement. Unlike a traditional timelapse where the camera stays in one spot, a hyperlapse captures photos at set intervals while the drone moves through the air. The result is accelerated footage that shows both time passing and the camera traveling through space.
Think of it this way: a timelapse compresses time, while a hyperlapse compresses both time and distance. This combination creates dynamic, flowing footage that draws viewers into the scene.
Hyperlapse vs Timelapse: The Key Difference
The main difference comes down to camera movement. A standard drone timelapse keeps the drone hovering in one position while capturing images at intervals. A drone hyperlapse actively moves the drone along a path during capture. This movement can be a simple straight line, a circle around a subject, or a complex multi-point journey.
DJI drones make this process easier with built-in intelligent flight modes designed specifically for hyperlapse capture. These modes handle the movement and photo timing automatically, letting you focus on composition and settings.
How DJI Hyperlapse Works
DJI hyperlapse works by capturing a series of still photos at defined intervals (typically 2-10 seconds) while the drone follows a programmed flight path. The drone then combines these images into a video file, or you can work with the raw photos yourself for more control in post-production.
The magic happens in the interval between shots. During each gap, the drone moves to its next position. When played back at normal video speed (usually 24-30 frames per second), hours of real-time movement compress into seconds of footage.
Planning and Preparation
Successful hyperlapse shots rarely happen by accident. I always spend time planning before I even take off. This preparation makes the difference between a mediocre result and a stunning one.
Location Scouting
Start by identifying subjects with visible movement. Clouds moving across the sky, traffic flowing through city streets, waves crashing on a shoreline, or the sun setting over a landscape all make excellent hyperlapse subjects. Static scenes will not benefit from the timelapse element.
Scout your location in person if possible. Look for interesting foreground elements that will create depth as the drone moves past them. A flat scene with no foreground interest often looks flat in the final video, even with camera movement.
Weather and Lighting Considerations
Wind is your enemy for smooth hyperlapses. Strong winds cause micro-vibrations that translate into jittery footage. I prefer to shoot on days with winds under 10 mph for the smoothest results. Check weather apps before heading out.
Lighting changes dramatically during long captures. A 30-minute hyperlapse shot at sunset will shift from bright to dark. This can create beautiful results, but it also presents exposure challenges we will address in the settings section.
Battery Life Planning
Here is a practical reality: battery life limits your hyperlapse length. Most consumer drones fly for 25-40 minutes on a single charge. Factor in takeoff, positioning, and landing, and you might have 20-30 minutes of actual capture time.
Plan your shot duration accordingly. A 5-second interval with a 30-minute flight gives you roughly 360 photos, which translates to about 12-15 seconds of final video at 24fps. Always bring extra batteries for longer projects.
Choosing the Right Subject
The best hyperlapse subjects have three qualities: visual movement, interesting geometry, and a clear focal point. Urban cityscapes work beautifully because buildings create strong lines and traffic adds motion. Natural scenes with moving clouds or water also excel.
Avoid subjects without clear movement. A static forest on a calm day will not showcase what makes hyperlapse special. Similarly, scenes that are too busy can become chaotic when sped up.
Essential Camera Settings for Drone Hyperlapse
Getting your camera settings right is crucial for professional-looking hyperlapses. I will share the exact settings I use, but remember that these are starting points. Adjust based on your specific conditions.
Manual Exposure Is Non-Negotiable
This is the most important setting tip I can give you: always use manual exposure. Auto exposure will shift brightness between frames as lighting conditions change, creating an unpleasant flickering effect in your final video.
Lock in your aperture, shutter speed, and ISO before you start capturing. If you need to adjust exposure during a long shoot (like a day-to-night transition), you will need to use specialized techniques like the Holy Grail method, which I will touch on later.
Shutter Speed and the 180-Degree Rule
For natural-looking motion blur, follow the 180-degree shutter rule. This means your shutter speed should be roughly twice your frame rate. Since most hyperlapses output at 24 or 30fps, aim for a shutter speed around 1/50 to 1/60 second.
Slower shutter speeds create more motion blur, which smooths out the individual frames. Faster shutter speeds freeze motion, which can make your video look choppy. I rarely go faster than 1/100 second for hyperlapse work.
ND Filters for Proper Motion Blur
Here is the challenge: achieving a 1/60 second shutter speed in bright daylight requires reducing the light entering your lens. This is where ND (neutral density) filters become essential.
I carry ND16, ND32, and ND64 filters for my drone. On bright sunny days, an ND32 or ND64 lets me maintain that 1/60 shutter speed without overexposing. Think of ND filters as sunglasses for your camera. They are not optional for serious hyperlapse work.
White Balance and ISO Settings
Just like exposure, lock your white balance before shooting. Auto white balance will shift color temperature between frames, creating inconsistent colors in your final video. I typically set white balance to 5500K for daylight or adjust based on conditions.
Keep ISO as low as possible to minimize noise. ISO 100-400 is ideal. Higher ISO settings introduce grain that becomes very visible when viewed as video. Only increase ISO when shooting in low light conditions.
Interval Settings for Different Subjects
The interval between photos determines how much time passes in each frame. Choose your interval based on how fast your subject moves:
2-3 seconds: Fast-moving subjects like traffic, people, or clouds on a windy day.
4-5 seconds: General purpose. This is my default setting for most scenes.
7-10 seconds: Slow-moving subjects like gentle cloud movement or very long captures.
Shorter intervals capture more photos, giving you longer final videos. Longer intervals compress time more aggressively but give you fewer frames to work with.
RAW vs JPEG
Always shoot in RAW format if your drone supports it. RAW files contain significantly more information than JPEGs, giving you flexibility to adjust exposure, white balance, and color in post-production without degrading quality.
The trade-off is file size and processing time. RAW files take longer to transfer and edit, but the quality advantage is substantial. For professional work, RAW is the only choice.
DJI Hyperlapse Modes Explained
DJI drones offer several hyperlapse modes, each designed for different types of shots. Understanding when to use each mode helps you plan more effective hyperlapses.
Free Mode
Free mode gives you complete manual control over the drone during hyperlapse capture. The drone takes photos at your set interval while you fly manually using the controller. This mode offers maximum creative freedom but requires steady hands and practice.
Use Free mode when you want organic, unpredictable movement or when the other modes do not fit your creative vision. It works well for following moving subjects or creating abstract, flowing camera movements.
The downside is inconsistency. Recreating the exact same movement later is nearly impossible, which matters if you want to shoot the same scene over multiple sessions.
Circle Mode
Circle mode orbits the drone around a selected point of interest while capturing photos. You set the center point, radius, and arc length, and the drone handles the rest. This creates a classic spinning perspective that reveals the subject from all angles.
Circle mode excels for showcasing buildings, monuments, or any subject that looks interesting from multiple angles. The continuous orbit creates a hypnotic, spinning effect that draws focus to the center subject.
I use Circle mode frequently for architectural shots and landscape features. It is one of the easiest modes to set up and consistently produces satisfying results.
Course Lock Mode
Course Lock locks the drone’s flight direction while allowing you to adjust its position. Think of it as flying along an invisible rail. The drone maintains a straight path regardless of which way the camera points.
This mode works beautifully for linear hyperlapses: traveling down a coastline, across a bridge, or through a canyon. The consistent movement direction creates a clean, purposeful feel.
Course Lock also lets you yaw (rotate) the camera while moving forward, adding an extra dimension of motion to your shot. This creates dynamic reveals as the camera pans while traveling.
Waypoint Mode: The Most Powerful Option
Waypoint mode is the most versatile and powerful hyperlapse option available. You program a series of points in 3D space, and the drone flies between them while capturing photos. The drone interpolates its position smoothly between each waypoint.
This mode shines for complex shots that require precise positioning. You can create paths that curve around obstacles, change altitude, and approach subjects from specific angles. Waypoint mode also lets you recreate the exact same flight path on different days, which is essential for long-term projects like construction documentation.
The setup takes longer than other modes, but the creative possibilities are virtually unlimited. I recommend mastering the simpler modes before diving into Waypoint mode.
Hyperlapse Mode Comparison
Free Mode: Best for creative freedom and following subjects. Requires piloting skill.
Circle Mode: Best for orbiting around a single point of interest. Easy to set up.
Course Lock Mode: Best for straight-line paths with optional camera rotation. Good for linear subjects.
Waypoint Mode: Best for complex paths and repeatable flights. Most versatile but requires more setup time.
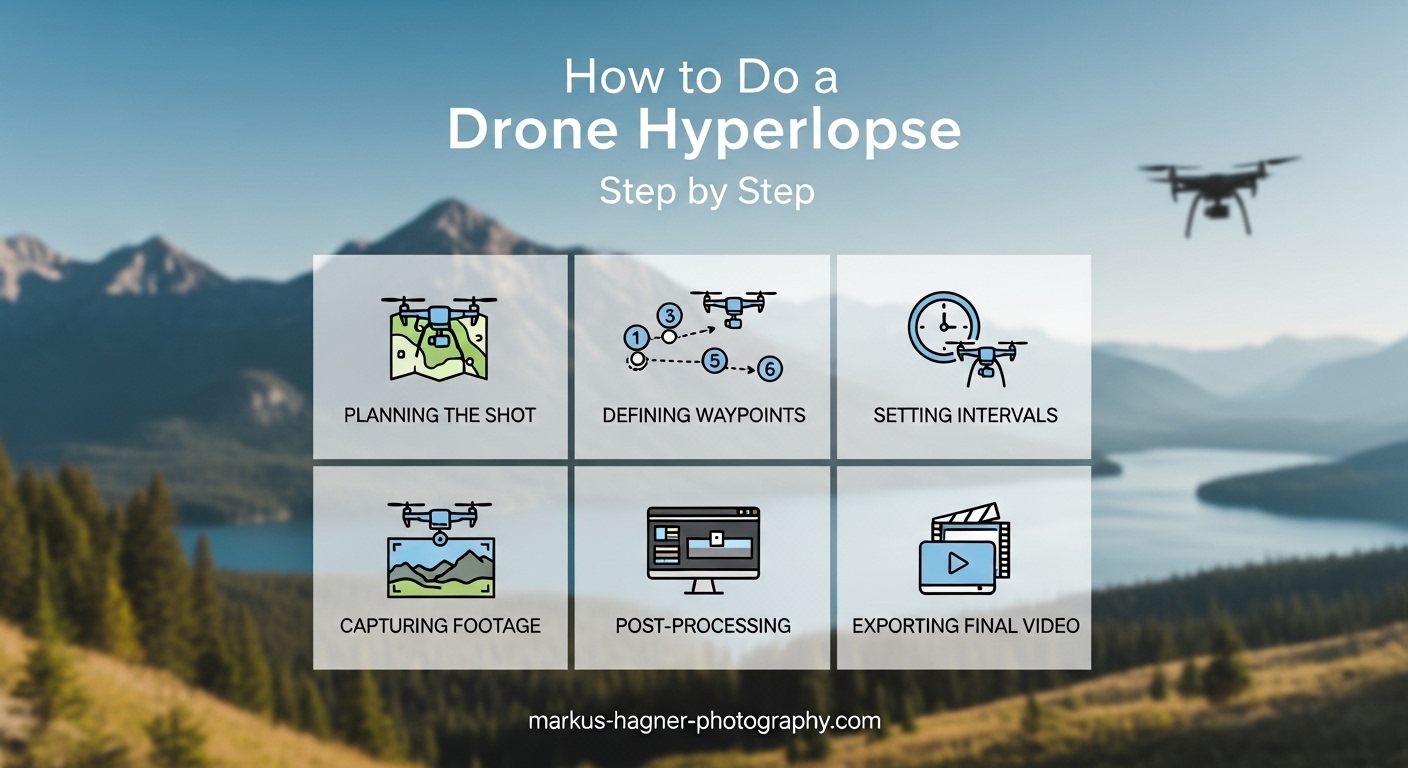
How to Shoot a Drone Hyperlapse Step by Step
Now let me walk you through my complete workflow for capturing a drone hyperlapse from start to finish.
Step 1: Pre-Flight Preparation
Before leaving home, charge all your batteries and format your memory cards. Check the weather forecast for wind speed and visibility. Pack your ND filters. I also recommend having a clear idea of what you want to shoot before you arrive at your location.
Step 2: Scout and Plan Your Shot
Once on location, take a few minutes to observe the scene. Identify your subject, the movement direction, and any obstacles. Visualize the final video. This mental preview helps you choose the right hyperlapse mode and settings.
Step 3: Configure Camera Settings
Take off and hover at a safe altitude. Set your camera to manual mode. Adjust aperture, shutter speed (aim for 1/50-1/60), ISO (keep it low), and white balance. Attach your ND filter if needed to achieve proper exposure. Switch to RAW format.
Step 4: Select Your Hyperlapse Mode
In the DJI Fly app, navigate to the hyperlapse menu and choose your mode. Set your interval (I typically start with 4-5 seconds). Configure the specific parameters for your chosen mode, such as circle radius or waypoints.
Step 5: Start the Capture
Position your drone at the starting point and begin the hyperlapse. Resist the urge to constantly check the screen. Let the drone do its work. Monitor for any safety issues, but trust the automated flight path.
Step 6: Monitor Battery and Conditions
Keep an eye on your battery level. Return to home with at least 20% battery remaining. Watch for changing weather conditions or unexpected obstacles. Safety always comes first.
Step 7: Land and Backup
After the capture completes, land safely and immediately back up your photos. Do not wait until you get home. Memory card failures happen, and losing hours of capture is heartbreaking.
Editing Your Drone Hyperlapse
Capturing the photos is only half the work. Post-processing transforms raw images into a polished video. Here is my editing workflow.
Import and Organize
Transfer your photos to your computer and organize them in a dedicated folder. If you shot multiple takes, label them clearly. I use the format “YYYY-MM-DD_Location_Take01” to keep everything organized.
Stabilization Techniques
Even with perfect flying, some micro-movement is inevitable. Stabilization in post-production smooths out these imperfections. Most editing software includes stabilization tools.
In Adobe Premiere Pro, the Warp Stabilizer effect works well for hyperlapses. Apply it to your image sequence and let it analyze the footage. Be careful with high stabilization settings, which can introduce warping in foreground elements.
After Effects offers even more control with the 3D Camera Tracker for complex shots. DaVinci Resolve includes powerful stabilization in its free version.
Color Correction and Grading
Working with RAW files gives you tremendous latitude for color work. Start with basic corrections: exposure, contrast, white balance, and highlight/shadow recovery. Apply these adjustments consistently across all frames.
Most editing software lets you apply adjustments to the entire sequence at once using synchronization features. Develop your look on a representative frame, then sync those settings across all images.
For more advanced work, LRTimelapse integrates with Lightroom to handle complex tasks like deflickering and Holy Grail transitions (smooth day-to-night changes).
Creating the Video Sequence
Import your processed images as an image sequence. Set the frame rate to 24fps or 30fps depending on your target output. The software will play back each photo as a single frame, creating your timelapse video.
Review the footage for any remaining jitter or jumps. Minor issues can often be fixed with additional stabilization passes or by removing problematic frames.
Export Settings for Best Quality
For maximum quality, export at your source resolution in a high-bitrate codec. I recommend:
Resolution: Match your drone’s native resolution (4K for most modern drones)
Codec: H.265 (HEVC) for efficient compression or ProRes/DNxHR for maximum quality
Bitrate: 50-100 Mbps for H.265, higher for intermediate codecs
Frame Rate: 24fps for cinematic feel, 30fps for smoother motion
Auto-Generated vs Manual Editing
DJI drones can generate hyperlapse videos automatically in-camera. This is convenient for quick social media posts, but manual editing gives you far more control. The auto-generated videos apply generic processing and cannot match the quality of a carefully edited sequence.
I always work with the raw photos. The extra effort is worth it for professional results.
Tips and Troubleshooting
Even experienced pilots encounter issues. Here are solutions to common problems.
Common Mistakes to Avoid
Using auto exposure: This causes flickering. Always shoot manual.
Skipping ND filters: Without motion blur, your video looks choppy.
Too short intervals: Very short intervals leave no time for drone movement between frames.
Ignoring foreground elements: Foreground adds depth and makes movement more dramatic.
Not monitoring battery: Running out of power mid-capture ruins shots.
Fixing Shaky Footage
If your hyperlapse still looks shaky after applying stabilization, try these fixes. First, increase your stabilization effect’s smoothness setting gradually. Second, use multiple stabilization passes with different settings. Third, consider cropping in slightly to remove edge distortion from stabilization.
Extreme shakiness usually indicates too much wind or aggressive drone movement. Sometimes the best fix is reshooting in calmer conditions.
Warping and Distortion Issues
Warping occurs when stabilization software incorrectly interprets movement. You will see foreground objects bending unnaturally. Reduce stabilization strength or try a different algorithm. Rolling shutter correction can also help with drones that have significant rolling shutter.
Day-to-Night Transitions
The Holy Grail method creates smooth transitions from day to night. This advanced technique requires gradually adjusting exposure during capture, then smoothing the transitions in software like LRTimelapse. It takes practice but produces stunning results for sunset and sunrise hyperlapses.
For beginners, I recommend shooting shorter clips during golden hour rather than attempting full day-to-night transitions until you have mastered the basics.
Frequently Asked Questions
What are the three settings for a hyperlapse on a DJI drone?
The three main settings you need to configure for DJI hyperlapse are: interval between shots (typically 2-10 seconds), total duration or number of shots, and the flight mode (Free, Circle, Course Lock, or Waypoint). Additionally, lock your camera settings to manual exposure, set your shutter speed around 1/50-1/60 second for proper motion blur, and attach an ND filter if shooting in bright conditions.
What settings should I use for hyperlapse?
Use manual exposure mode with shutter speed at 1/50-1/60 second (following the 180-degree rule), ISO at 100-400 to minimize noise, locked white balance (around 5500K for daylight), and an interval of 4-5 seconds as a starting point. Always shoot in RAW format for maximum post-processing flexibility. Attach ND filters to achieve proper shutter speed in bright conditions.
How does DJI hyperlapse work?
DJI hyperlapse works by automatically capturing photos at set intervals while the drone moves along a programmed path using intelligent flight modes. The drone takes a photo, moves to its next position, waits for the interval duration, then takes another photo. These individual photos are combined into a video sequence, compressing hours of real-time movement into seconds of accelerated footage.
How to put together a DJI hyperlapse?
Import your photos as an image sequence into video editing software like Premiere Pro, DaVinci Resolve, or After Effects. Apply color correction and grading consistently across all frames. Use stabilization tools like Warp Stabilizer to smooth out any camera movement. Export at your drone’s native resolution using H.265 or ProRes codec at 24-30fps for best quality.
Conclusion
Creating a drone hyperlapse combines technical skill with artistic vision. Now you understand how to do a drone hyperlapse from initial planning through final export. The key elements are proper camera settings (manual exposure, correct shutter speed, ND filters), choosing the right flight mode for your subject, and careful post-processing with stabilization.
Start simple with Circle mode on an interesting subject. Master the fundamentals before attempting complex Waypoint shots. Each hyperlapse you create teaches you something new about timing, composition, and movement.
The best way to improve is practice. Get out there, experiment with different modes and settings, and develop your own style. The more you shoot, the better your results will become.