Have you ever looked at your landscape photos and felt something was missing? The scene looked amazing in person, but your image feels flat and two-dimensional. I struggled with this for years until I discovered the power of foreground interest.
Foreground interest is one of the most effective ways to transform flat photos into immersive, three-dimensional images. When you include a compelling element close to your camera, you create visual layers that guide the viewer’s eye through the scene and establish a real sense of depth.
In this guide, I’ll show you exactly how to create depth in a flat photo using foreground interest. You’ll learn seven proven techniques, the camera settings that make them work, and the common mistakes that keep photos looking flat.
What is Foreground Interest?
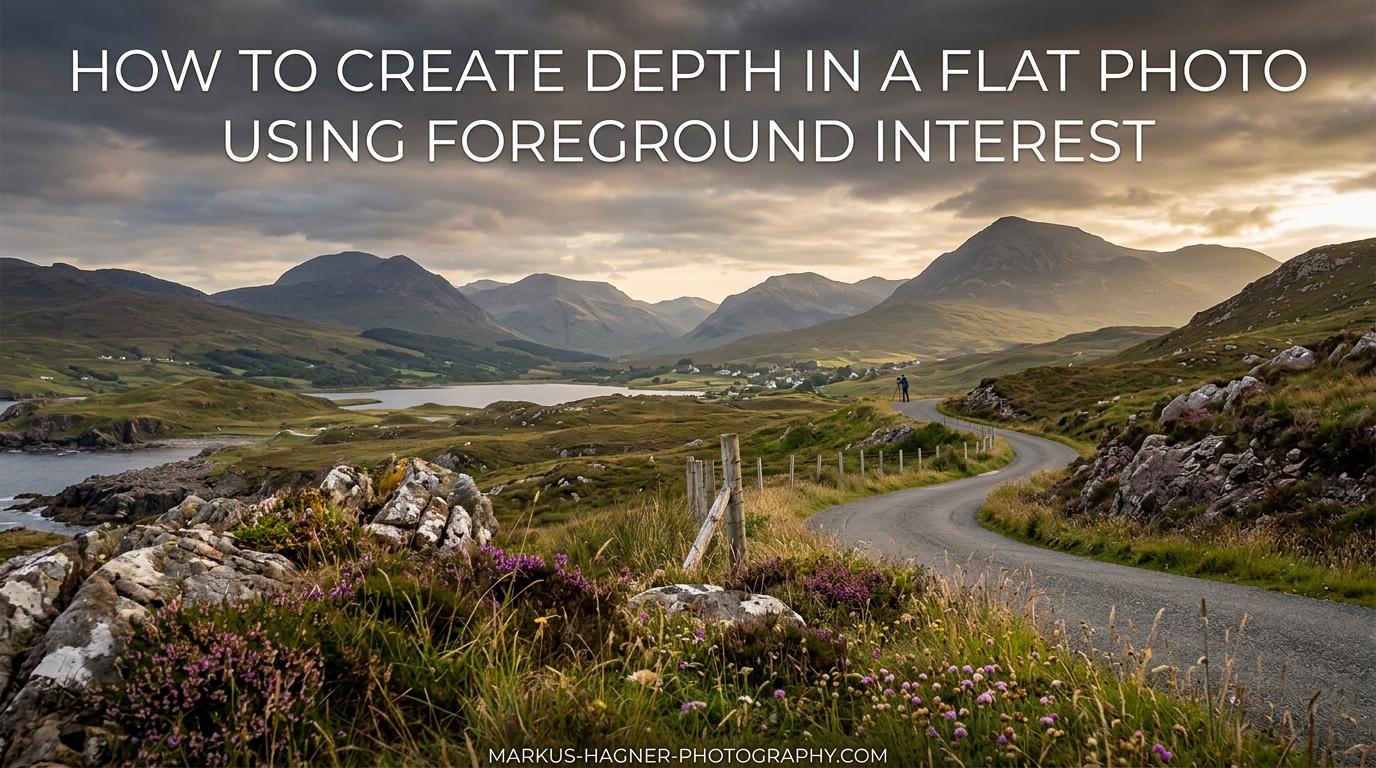
Foreground interest refers to any visually appealing element positioned in the front portion of your photograph, close to the camera. This could be rocks, flowers, fences, puddles, or any object that adds visual weight to the immediate foreground of your composition.
Think of your photograph as having three distinct zones. The foreground sits closest to the camera, the middle ground occupies the center space, and the background contains the distant elements like mountains, buildings, or the sky. When all three layers work together, your photo gains dimensional depth.
A good foreground element does more than fill empty space. It establishes scale, creates visual entry points, and provides context for the rest of the scene. The foreground becomes the anchor that makes viewers feel like they could step right into the photograph.
Common foreground elements in landscape photography include textured rocks, wildflowers, flowing water, fallen leaves, driftwood, and architectural details. In street photography, foreground interest might come from street furniture, shadows, or people positioned near the camera.
Why Foreground Interest Creates Depth in Photography
Photography inherently flattens three-dimensional scenes into two dimensions. Our brains rely on visual cues to perceive depth, and foreground interest provides those cues through size contrast and perspective.
When an object sits close to your camera, it appears large in the frame. Elements further away appear smaller. This size difference creates a natural sense of depth because our brains interpret size variation as distance variation. The stronger this contrast, the more pronounced the depth effect becomes.
Perspective also plays a crucial role. Wide-angle lenses exaggerate the size difference between near and far objects, making foreground elements appear dramatically larger than background elements. This exaggerated perspective intensifies the three-dimensional feeling.
Visual layering adds another dimension to depth perception. When viewers can clearly distinguish between foreground, middle ground, and background, the image feels more immersive. Each layer creates a visual stepping stone that pulls the eye deeper into the scene.
7 Proven Techniques for Using Foreground Interest
After years of experimenting with foreground elements, I’ve identified seven techniques that consistently create depth in photos. Each approach works across different genres, from landscapes to street photography.
Technique 1: Get Low and Close
The single most effective way to maximize foreground impact is to lower your camera position and move closer to your foreground element. This exaggerates the size contrast between near and far objects.
When I photograph flowers or rocks, I often position my camera just inches away. This makes small foreground elements appear prominent while still capturing the distant landscape. The dramatic size difference creates instant depth.
Try crouching, kneeling, or even lying on the ground. The lower you go, the more dominant your foreground becomes. Just remember to keep your foreground element sharp by using appropriate aperture settings.
Technique 2: Use Wide-Angle Lenses
Wide-angle lenses between 16mm and 24mm excel at foreground interest photography. Their expanded field of view captures both nearby elements and distant scenery while naturally exaggerating perspective.
The wider your lens, the more dramatic the near-far effect becomes. A 16mm lens will make foreground elements appear much larger relative to the background compared to a 35mm lens from the same position.
I recommend starting with a 24mm focal length if you’re new to this technique. It provides noticeable perspective exaggeration without the extreme distortion of ultra-wide lenses. As you gain confidence, experiment with wider focal lengths for more dramatic results.
Technique 3: Find Leading Lines
Leading lines guide the viewer’s eye from the foreground into the deeper parts of your image. When these lines start in the foreground and extend toward the background, they create a powerful sense of depth.
Natural leading lines include shorelines, paths, fences, rivers, and tree lines. Man-made options range from roads and bridges to boardwalks and walls. The key is finding lines that begin near your camera position and extend into the distance.
Position yourself so the leading line enters from a bottom corner of your frame. This creates a natural visual flow that pulls viewers from the foreground through the middle ground and into the background.
Technique 4: Shoot Through Objects
Shooting through foreground objects creates natural framing and adds depth through partial obstruction. This technique works beautifully with foliage, fences, archways, and any semi-transparent elements.
When I photograph through leaves or branches, I position them slightly out of focus in the foreground. This creates a soft frame around my main subject while adding layers to the composition. The blurred foreground suggests depth without competing for attention.
Try shooting through windows, doorways, or gaps in vegetation. The frame-within-a-frame effect instantly adds dimensionality while focusing attention on your main subject.
Technique 5: Change Your Viewpoint
Sometimes the perfect foreground element exists right where you’re standing, but you won’t see it from eye level. Changing your viewpoint reveals foreground opportunities that disappear from standard shooting positions.
Walk around your scene and look down. Interesting textures, patterns, or objects might be at your feet. Then experiment with different heights and angles. What looks unremarkable from standing height might become compelling when you crouch or lie down.
I often spend the first few minutes at any location simply exploring different viewpoints. This exploration frequently reveals foreground elements I would have missed from my initial position.
Technique 6: Layer Your Composition
Effective depth comes from distinct visual layers. Instead of just foreground and background, look for opportunities to include middle ground elements that create additional depth stepping stones.
In a beach scene, your foreground might be textured sand, the middle ground could be rolling waves, and the background shows distant cliffs. Each layer adds depth and visual interest.
The transitions between layers matter too. Smooth transitions create gentle depth, while abrupt changes between layers generate more dramatic three-dimensional effects.
Technique 7: Use Natural Frames
Natural frames combine foreground interest with compositional structure. Overhanging branches, rock formations, and architectural elements can frame your subject while adding foreground depth.
The frame doesn’t need to surround your entire image. Partial frames along the top or sides create depth while keeping the composition open and inviting. The key is balancing the frame’s visual weight with your main subject.
Look for frames that relate to your subject thematically. A cave entrance framing a coastal scene or tree branches framing a forest path creates visual cohesion while establishing depth.
Camera Settings for Maximum Depth
Technical settings play a crucial role in foreground interest photography. The wrong aperture or focus point can leave your foreground soft or your background blurred.
Aperture for Foreground-to-Background Sharpness
For maximum depth of field, use apertures between f/11 and f/16. These smaller apertures keep both foreground and background reasonably sharp. I typically shoot landscapes at f/11 as my starting point.
Avoid apertures smaller than f/16 on most lenses. Diffraction begins to soften your entire image, counteracting the depth of field benefits. The sweet spot for most lenses falls between f/8 and f/11.
If you’re using a smartphone, most models handle depth of field automatically. Tap on your foreground element to set focus, and the camera will optimize settings for you.
Focus Techniques
Where you focus significantly impacts depth. Focus too close and your background blurs. Focus too far and your foreground loses sharpness.
The hyperfocal distance technique maximizes depth of field. Focus approximately one-third into your scene from your foreground element. This keeps both foreground and background acceptably sharp.
For critical sharpness throughout, consider focus stacking. Take multiple shots at different focus points and blend them in post-processing. This technique works especially well for close foreground elements with distant backgrounds.
Smartphone Photography Tips
Smartphone cameras can create depth using foreground interest too. The key is getting close to your foreground element and using portrait mode or the native camera’s depth features.
Tap and hold on your foreground to lock focus and exposure. Then compose your shot with the foreground prominent in the frame. Most modern phones handle the rest automatically.
Common Mistakes to Avoid
Even with the right techniques, several pitfalls can undermine your foreground interest efforts.
Distracting foregrounds: Not every foreground element enhances your composition. If the foreground competes with your main subject for attention, it becomes a distraction rather than an asset. Choose elements that complement rather than dominate.
Getting too close: While proximity exaggerates depth, getting too close can create focus problems. If your minimum focus distance isn’t close enough, your foreground will be soft. Know your lens’s capabilities.
Ignoring the middle ground: Foreground and background alone create depth, but adding middle ground elements amplifies the effect. Don’t let your composition skip the middle layer.
Forcing the technique: Not every scene needs foreground interest. Sometimes the composition works better without it. If you can’t find an element that genuinely enhances the image, don’t force one into the frame.
Troubleshooting: When Your Photos Still Look Flat
Even after applying these techniques, some photos still lack depth. Here’s how to diagnose and fix the problem.
Check your distance: Are you close enough to your foreground? The depth effect strengthens as you move nearer. Try getting closer than feels comfortable.
Evaluate element relevance: Does your foreground relate to the scene? Random objects in the foreground create confusion rather than depth. Look for elements that connect visually to the rest of the image.
Consider post-processing: Subtle adjustments to contrast and clarity can enhance depth in post-processing. Slightly darkening the foreground while brightening the middle ground creates visual separation.
Practice deliberately: Set aside time to practice foreground interest techniques without pressure to create portfolio-worthy images. The more you experiment, the better you’ll recognize opportunities in the field.
Frequently Asked Questions
How to make a flat image have depth?
To make a flat image have depth, include foreground interest close to your camera. This creates size contrast between near and far elements, establishing visual layers that simulate three-dimensional space. Use a wide-angle lens, get low and close to foreground elements, and compose with distinct foreground, middle ground, and background layers.
How to create depth in pictures?
Create depth in pictures by using foreground elements, leading lines, layering, and perspective. Get close to interesting foreground objects, shoot with wide-angle lenses to exaggerate perspective, find lines that guide the eye from front to back, and compose with multiple distinct layers. Camera settings like f/11 to f/16 help keep everything sharp from foreground to background.
What aperture should I use for foreground depth?
Use apertures between f/11 and f/16 for maximum foreground-to-background sharpness. These settings provide enough depth of field to keep both near foreground elements and distant backgrounds acceptably sharp. Avoid apertures smaller than f/16 to prevent diffraction softening your image.
How to get both foreground and background sharp?
To get both foreground and background sharp, use a small aperture (f/11 to f/16), focus approximately one-third into the scene from your foreground element, or use hyperfocal distance focusing. For critical sharpness, try focus stacking by taking multiple shots at different focus distances and blending them in post-processing.
Conclusion
Creating depth in a flat photo using foreground interest transforms ordinary images into immersive visual experiences. By getting low and close, using wide-angle lenses, finding leading lines, and layering your composition, you can add three-dimensional impact to any photograph.
Remember that foreground interest works best when it enhances rather than distracts. Choose elements that complement your scene, use appropriate camera settings for sharpness, and don’t force the technique when it doesn’t serve the composition.
The key is practice. Start looking for foreground opportunities everywhere you shoot, and experiment with different approaches. With time, incorporating foreground interest will become second nature, and your photos will gain the depth they deserve.