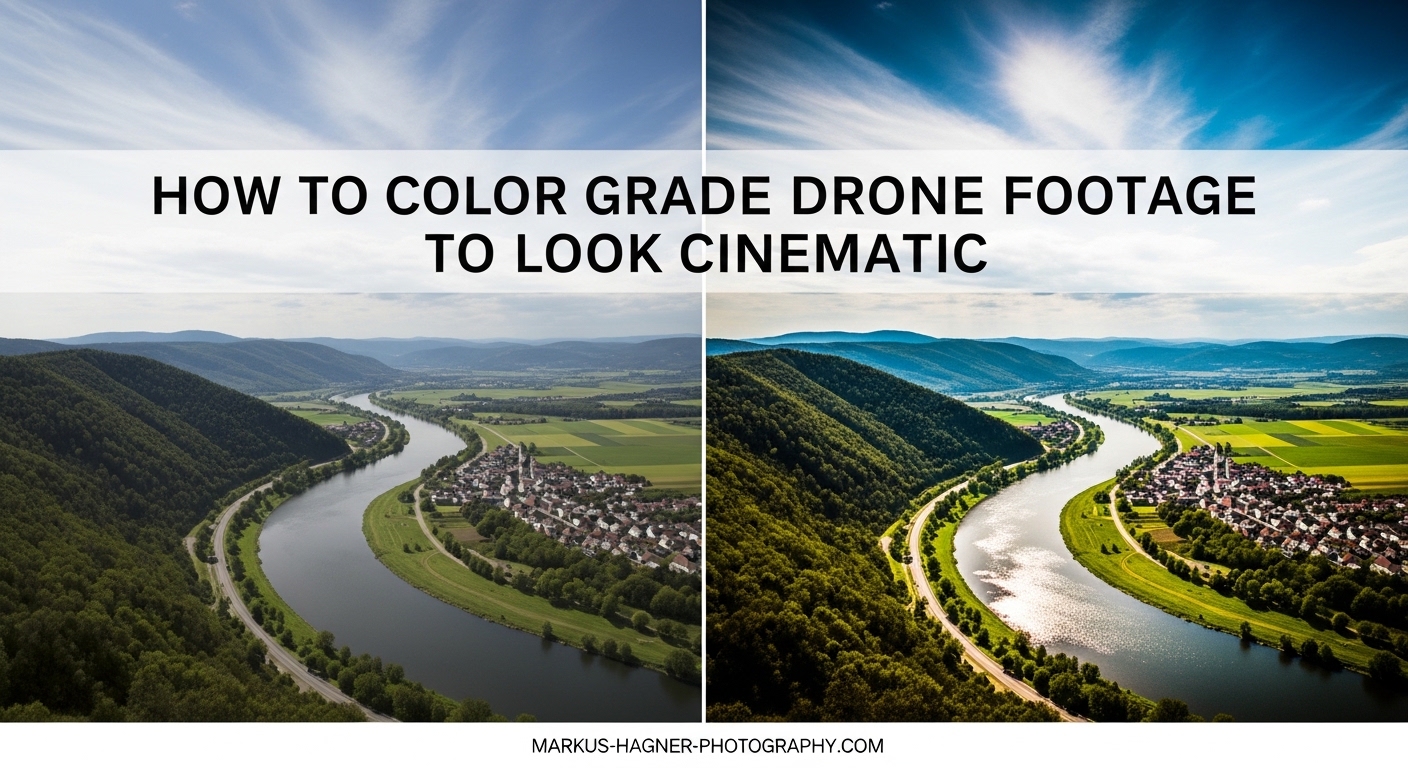
Transforming raw drone footage into cinematic video requires more than just flying skills. The real magic happens in post-production, where color grading turns flat, washed-out aerial shots into stunning visuals that captivate viewers. When I first started editing drone footage, my videos looked amateurish despite hours of careful flying. The missing piece was understanding how to color grade drone footage properly.
Cinematic drone footage has a distinct look that sets it apart from casual smartphone videos. Colors appear richer, contrast feels more intentional, and the overall mood draws viewers into the scene. This transformation comes from two essential processes: color correction, which fixes technical issues, and color grading, which adds creative style. Both work together to create that professional film appearance.
In this guide, I will walk you through the complete workflow to color grade drone footage for a cinematic look. You will learn camera settings that make grading easier, software options from free to professional, step-by-step correction techniques, and creative grading styles that give your footage that Hollywood feel. Whether you shoot with a DJI Mavic, Mini, Air series, or FPV drone, these techniques apply to all platforms.
Preparation: Camera Settings for Better Color Grading
The foundation of great color grading starts before you even open your editing software. Shooting with the right camera settings gives you maximum flexibility in post-production. Without proper preparation, even the best grading techniques cannot salvage poorly captured footage.
Why Flat Color Profiles Matter
Most consumer drones ship with vivid color profiles that look good straight from the camera. However, these baked-in looks limit your grading options later. Shooting in a flat or log profile preserves more dynamic range and color information, giving you a better starting point for grading.
DJI drones offer D-Log and D-Log M profiles, while GoPro cameras use ProTune with flat color settings. These profiles appear washed out and desaturated when you first view them. Do not worry, this is intentional. That flat look contains more shadow and highlight detail that you can recover and enhance during grading.
The trade-off is that flat profiles require more post-processing work. You cannot skip the grading step when shooting log. Think of it like shooting RAW photos versus JPEG. RAW files look flat initially but offer far more editing potential.
Essential Camera Settings for Drone Footage
Beyond color profile, several other settings affect your grading results. ND filters rank among the most important accessories for cinematic drone video. These neutral density filters act like sunglasses for your camera, allowing you to maintain a 180-degree shutter angle even in bright conditions. This creates natural motion blur that looks more filmic.
Set your white balance manually rather than using auto. Auto white balance can shift during a flight, making shot matching difficult later. Choose a consistent temperature, typically between 5600K for daylight and 3200K for golden hour shots. Lock this setting before takeoff.
Keep ISO as low as possible, ideally at the base ISO for your drone model. Higher ISO settings introduce noise that becomes more visible after grading. For most DJI drones, this means ISO 100-400 for the cleanest footage. If you need more light, use ND filters to control exposure rather than increasing ISO.
Record in the highest bitrate your drone supports. Higher bitrates preserve more detail and handle grading better without breaking apart. If your drone offers 10-bit recording, use it. The extra color depth makes a significant difference when pushing colors in post.
Choosing Your Color Grading Software
Your choice of editing software shapes your entire workflow. Each program offers different strengths, from free professional tools to subscription-based industry standards. The best choice depends on your budget, computer platform, and specific needs.
DaVinci Resolve: The Professional Free Option
DaVinci Resolve stands out as the most powerful free option available. Originally built for Hollywood color grading, it offers professional-level tools without cost. The free version includes almost every feature most drone videographers need, including advanced color wheels, curves, qualifiers, and power windows.
The learning curve is steeper than consumer software, but the results justify the effort. Resolve organizes work into tabs for media, editing, color, effects, and delivery. The dedicated Color tab provides node-based grading that offers incredible precision and flexibility.
For drone footage specifically, Resolve handles D-Log and other flat profiles excellently. The software includes built-in color space transforms and supports LUTs natively. Many professional colorists use Resolve exclusively, making skills transferable to higher-end work.
Adobe Premiere Pro: Industry Standard Integration
Premiere Pro integrates seamlessly with other Adobe products like After Effects and Photoshop. If you already subscribe to Adobe Creative Cloud, the Lumetri Color panel provides capable grading tools within a familiar interface.
Lumetri offers color wheels, curves, and HSL secondary corrections. While not as deep as Resolve, it handles most grading tasks well. The advantage comes from dynamic linking with After Effects for advanced compositing and effects work.
Premiere excels at workflow efficiency. You can edit and grade in the same timeline without switching applications. For content creators producing regular videos, this speed advantage matters.
Final Cut Pro: Mac-Optimized Performance
Final Cut Pro offers exceptional performance on Mac computers, taking full advantage of Apple Silicon optimization. The magnetic timeline and color board interface appeal to editors who prefer visual workflows over technical controls.
The Color Board in Final Cut provides simple lift, gamma, and gain adjustments along with saturation and exposure controls. For more advanced work, third-party plugins extend its capabilities. Final Cut also handles ProRes footage natively, which many professional workflows prefer.
Software Comparison Summary
Choose DaVinci Resolve if you want professional color tools at no cost and are willing to learn a more complex interface. Select Premiere Pro if you value Adobe ecosystem integration and all-in-one editing efficiency. Pick Final Cut Pro if you work on Mac and prioritize speed and performance over deep color controls.
Color Correction vs Color Grading: Understanding the Difference
Many beginners use these terms interchangeably, but they describe distinct processes. Understanding the difference helps you approach your workflow systematically.
What Is Color Correction?
Color correction refers to technical adjustments that fix problems in your footage. This includes correcting exposure errors, fixing white balance, recovering shadow and highlight detail, and ensuring consistent appearance across different shots. Think of correction as making your footage look natural and accurate.
For drone footage, correction often involves recovering detail from skies that are too bright or shadows that are too dark. You use tools like waveform monitors and vectorscopes to make objective decisions about exposure and color accuracy. Correction comes first in your workflow.
What Is Color Grading?
Color grading is the creative process of stylizing your footage to achieve a specific look or mood. This is where you make artistic choices about color temperature, contrast curves, and color relationships. Grading gives your video its visual identity.
Popular grading styles include the teal and orange look common in action films, warm vintage tones for nostalgic content, and cool blue tones for moody atmospheric shots. Grading happens after correction, building on your technically accurate base.
Why Both Matter for Drone Footage
Drone footage presents unique challenges that require both correction and grading. Aerial shots often contain bright skies and dark landscapes in the same frame, demanding careful exposure correction. Different lighting conditions throughout a shoot require shot matching to maintain consistency.
Once corrected, grading transforms that balanced footage into something cinematic. Without proper correction, grading exaggerates problems. Without grading, corrected footage looks accurate but lacks emotional impact. Mastering both processes elevates your drone videos significantly.
How to Color Grade Drone Footage: Step-by-Step Workflow
This section provides a complete workflow you can follow with any footage. I will focus on DaVinci Resolve terminology, but the concepts apply across software platforms.
Step 1: Stabilize Your Footage First
Before any color work, stabilize shaky footage. Color grading amplifies shake and wobble, making them more visible. Tools like Gyroflow for FPV footage or Reelsteady for GoPro provide excellent stabilization. DaVinci Resolve includes built-in stabilization in the Edit tab.
Stabilization algorithms analyze frames and may introduce slight color shifts or artifacts. By stabilizing first, you ensure these issues do not compound during grading. Export stabilized footage as new files before importing into your color grading timeline.
Step 2: Set Up Your Workspace
Enable scopes in your software to make objective decisions. The waveform monitor shows exposure levels from black to white. The vectorscope displays color saturation and hue. The RGB parade helps identify color casts in shadows, midtones, and highlights.
These scopes matter because your eyes can deceive you. What looks correct on one monitor may appear wrong elsewhere. Scopes provide consistent reference points that translate across different displays.
Step 3: Apply Color Space Transform
If you shot in D-Log or another log profile, apply the appropriate color space transform first. This converts your flat footage to standard Rec709 viewing space. Most software includes built-in transforms for common log formats.
In DaVinci Resolve, find this in the Color tab under Color Space Transform. Select your input color space, such as DJI D-Log, and output to Rec709. This gives you a proper starting point for further adjustments.
Step 4: Adjust White Balance
Even with manual white balance set in-camera, you may need fine adjustments. Use the temperature slider to warm or cool your image. Adjust tint to correct green or magenta casts. The goal is neutral whites without color contamination.
Some editors use the white balance eyedropper tool on a neutral gray or white area in the frame. This provides a quick starting point. Fine-tune manually based on the creative direction you want.
Step 5: Set Exposure and Contrast
Use the waveform monitor to set proper black and white levels. Your darkest shadows should sit just above 0 on the waveform, while brightest highlights should approach but not exceed 100. This maximizes dynamic range without clipping.
Adjust contrast to taste after setting exposure. Higher contrast creates more dramatic images but reduces shadow and highlight detail. Lower contrast appears flatter but preserves more information. Find the balance that serves your content.
Step 6: Match Shots for Consistency
When your video contains multiple clips from different times or locations, matching shots becomes essential. Viewers notice when cuts jump between warm and cool tones or bright and dark exposures.
Use your scopes to match exposure levels between shots. Compare waveforms side by side and adjust until they align. For color, reference skin tones or other consistent elements across clips. Shot matching takes practice but dramatically improves production value.
Step 7: Apply Your Creative Grade
With correction complete, begin creative grading. This is where you develop your visual style. The next section covers specific techniques for achieving cinematic looks.
Color Grading Techniques for Cinematic Drone Footage
Now we move into the creative side of color grading. These techniques transform technically correct footage into visually compelling video.
Mastering the Color Wheels
Color wheels provide intuitive control over your image. The three wheels correspond to shadows (lift), midtones (gamma), and highlights (gain). Moving the center puck adjusts brightness while pushing toward edges adds color.
For cinematic drone footage, subtle adjustments work best. Pushing shadows toward cool blues and highlights toward warm oranges creates depth without appearing artificial. This separation between tonal ranges gives footage dimensionality.
Avoid extreme saturation in the wheels. Heavy color shifts look unnatural quickly. Instead, make small adjustments and build them across multiple nodes or layers for smoother results.
Working with Curves
Curves offer precise tonal control beyond what wheels provide. The master curve affects overall brightness. Individual RGB curves adjust color channels independently. Parametric curves let you target specific tonal ranges.
A common technique involves adding a slight S-curve to increase contrast in midtones while preserving shadow and highlight detail. Pull the shadows down slightly and raise highlights slightly, creating a gentle S shape in the curve line.
RGB curves enable color separation between tones. Raising the red curve in highlights while lowering it in shadows creates warm highlights and cool shadows. This technique underlies many cinematic color grades.
The Teal and Orange Look
Teal and orange dominates Hollywood color grading because these complementary colors create visual tension and separation. Skin tones fall in the orange range, while shadows shifted toward teal provide contrast.
To achieve this look, push shadows toward cyan or teal using the lift wheel or curves. Keep midtones relatively neutral. Warm highlights slightly toward orange without making everything look jaundiced.
The key is subtlety. Heavy teal and orange grades appear obviously manipulated. Professional colorists use this technique so gently that viewers notice the mood without identifying the color manipulation.
Creating Mood with Color Temperature
Color temperature fundamentally affects how viewers perceive your footage. Warm grades evoke comfort, nostalgia, or golden hour beauty. Cool grades suggest professionalism, technology, or melancholy.
Match your grade to your content purpose. Real estate drone videos benefit from warm, inviting grades. Tech or corporate content often uses cooler, cleaner looks. Travel videos might shift between warm and cool to match time of day.
Primary vs Secondary Color Corrections
Primary corrections affect the entire image globally. Secondary corrections target specific colors or areas. Both play important roles in cinematic grading.
Use secondary corrections to enhance specific elements. Boost green in vegetation without affecting other colors. Darken blue skies while leaving everything else untouched. Draw attention to subjects by slightly desaturating backgrounds.
Tools for secondary work include HSL qualifiers that select colors by hue, saturation, and luminance. Power windows or masks define geographic regions. Combining these tools enables precise adjustments impossible with primary controls alone.
Using LUTs Effectively
Look-Up Tables, or LUTs, provide quick starting points for color grading. Understanding their proper use prevents common mistakes that undermine footage quality.
What Are LUTs?
LUTs are mathematical formulas that remap color values in your footage. A LUT takes an input color and outputs a different color based on its instructions. Think of them as presets or filters that transform your image instantly.
Technical LUTs convert between color spaces, such as transforming D-Log footage to Rec709. Creative LUTs apply stylistic looks designed to mimic film stocks or achieve specific aesthetics.
DJI Built-In LUTs
DJI provides free LUTs for their log profiles. The DJI D-Log to Rec709 LUT correctly transforms flat footage for standard viewing. These LUTs serve as excellent starting points because they are designed specifically for DJI color science.
Apply the appropriate DJI LUT before creative grading. This ensures your footage starts from a technically correct baseline. Building your grade on top of a proper transform produces better results than trying to grade raw log footage.
When to Use LUTs vs Manual Grading
LUTs excel as starting points, not finishing points. Apply a LUT to see what direction a grade might take your footage. Then adjust intensity, modify colors, and customize to your specific shots.
Manual grading gives you complete control and typically produces better results. However, it requires more time and skill. For quick projects or learning purposes, LUTs provide valuable shortcuts.
The best approach combines both. Start with a technical LUT to normalize your footage. Apply a creative LUT at reduced intensity for inspiration. Then manually adjust to perfect the look for your specific content.
Adjusting LUTs for Your Footage
No LUT works perfectly on every shot. Lighting conditions, camera settings, and subject matter all affect how a LUT appears. Always adjust after applying.
Common adjustments include reducing LUT intensity to 70-80% rather than full strength. Correct exposure and white balance before applying creative LUTs. Use nodes or layers to stack corrections before and after LUTs for maximum flexibility.
Advanced Techniques: AI Tools and Emerging Workflows
Technology continues evolving how we approach color grading. AI-powered tools and HDR workflows represent the cutting edge of post-production.
AI-Powered Color Grading Tools
Artificial intelligence now assists with color grading tasks. Some tools analyze your footage and suggest grades based on reference images or learned aesthetics. Others automate tedious tasks like shot matching.
DaVinci Resolve includes neural engine features that can track faces, refine edges, and assist with matching. Third-party AI tools generate custom LUTs based on still images you provide. These tools accelerate workflows but still benefit from human oversight.
ChatGPT and AI for LUT Generation
Recent developments enable AI language models to generate LUTs. You can describe a desired look to ChatGPT and receive a downloadable .cube file for use in editing software. This technology democratizes custom look creation.
These AI-generated LUTs work best as starting points. Describe your vision with specific terms like warm golden hour with lifted blacks and slightly desaturated greens. The more detailed your description, the better the result.
Remember that AI cannot view your actual footage. It generates generic looks based on your description. Always adjust AI-generated LUTs to match your specific shooting conditions and creative goals.
HDR Grading Considerations
High Dynamic Range grading represents the next frontier for drone footage. HDR displays show more brightness range and color volume than standard displays. Grading for HDR requires different approaches.
HDR demands more careful exposure management because viewers can see more shadow and highlight detail simultaneously. Grades that work in SDR may appear flat or harsh in HDR. Special HDR-capable monitors help, though they remain expensive.
Most drone content currently delivers in SDR for broad compatibility. Consider HDR for projects targeting premium platforms or clients specifically requesting it. The extra effort and equipment cost may not justify itself for standard social media content.
Mobile Color Grading Apps
Mobile apps now handle basic to intermediate grading tasks. LumaFusion on iPad provides a capable editing environment. Adobe Premiere Rush syncs with desktop Premiere projects. These tools enable field grading when you need quick turnaround.
Mobile workflows suit social media content where speed matters more than perfection. For client work or portfolio pieces, desktop software still provides superior control and quality.
Troubleshooting Common Color Grading Issues
Even experienced editors encounter problems. This section addresses the most common issues drone videographers face during grading.
Footage Looks Washed Out After Grading
Washed-out results usually indicate insufficient contrast or improper color space handling. First, verify you applied the correct log-to-Rec709 transform. Without this conversion, log footage appears permanently flat.
Add contrast using curves or contrast controls. Lift blacks slightly and ensure highlights approach their maximum. A gentle S-curve often fixes washed-out appearance while maintaining detail.
Over-Grading Destroys Quality
Pushing adjustments too far introduces banding, posterization, and noise. 8-bit footage suffers more visibly than 10-bit. When you see quality degradation, reduce adjustment intensity.
Build grades in layers rather than making extreme single adjustments. Multiple subtle changes produce smoother results than one heavy manipulation. If noise appears after grading, apply noise reduction as a final step.
Matching Shots from Different Times
Shots captured at different times of day or in varying weather conditions challenge consistency. Use scopes rather than your eyes to match exposure. Compare histogram shapes and waveform patterns.
For color matching, identify neutral reference points across clips. Gray pavement, white buildings, or consistent objects provide targets. Adjust temperature and tint to align these references, then fine-tune creative elements.
Colors Look Different on Other Screens
This common problem stems from uncalibrated monitors. Your editing display may show colors inaccurately. Professional colorists use calibrated monitors that meet specific standards.
Consumer solutions include monitor calibration devices like the SpyderX. At minimum, grade on the best display available to you. Check your final video on multiple devices including phones, tablets, and televisions to ensure acceptable results across platforms.
Grain and Noise After Grading
Color grading amplifies noise already present in footage. Underexposed shots and high ISO settings create more noise that becomes visible after contrast adjustments.
Prevention means shooting with proper exposure and low ISO. In post, apply noise reduction after grading. Most editing software includes noise reduction filters. Use them sparingly to avoid softening detail while reducing visible grain.
Export and Render Settings for Graded Footage
Your export settings determine how much quality survives delivery. Choose settings that preserve your grading work while meeting platform requirements.
Codec Recommendations
For YouTube and most online platforms, H.264 or H.265 provide the best balance of quality and file size. H.264 offers maximum compatibility. H.265 (HEVC) provides better compression efficiency but may not play on older devices.
For archival or further editing, export in ProRes or DNxHR. These intermediate codecs preserve quality at the cost of larger file sizes. Use them when handing off to other editors or archiving master files.
Bitrate Guidelines
Higher bitrates preserve more detail but create larger files. For 4K drone footage targeting YouTube, aim for 45-60 Mbps for H.264. For H.265, 35-50 Mbps provides equivalent quality.
Match bitrate to content complexity. Footage with lots of motion and detail requires higher bitrates. Simpler shots with less movement can use lower bitrates without visible quality loss.
Platform-Specific Considerations
YouTube re-encodes all uploaded video, so export at high quality to give their encoder the best source. Use standard frame rates like 24, 30, or 60 fps for best results. Non-standard rates may cause playback issues.
Instagram and TikTok compress heavily and crop to various aspect ratios. Export with these limitations in mind. Consider separate exports optimized for each platform rather than one file for all destinations.
Frequently Asked Questions
How to make drone footage cinematic?
To make drone footage cinematic, combine proper shooting techniques with thoughtful color grading. Shoot in flat profiles like D-Log for maximum dynamic range, use ND filters for natural motion blur, and frame shots with foreground elements and varying heights. In post, color correct for consistent exposure and white balance, then grade creatively using techniques like teal and orange color separation, subtle contrast increases, and mood-appropriate color temperature.
What is the best color grade for cinematic look?
The teal and orange color grade remains the most popular cinematic look because complementary colors create visual separation and depth. This technique pushes shadows toward cool teal or cyan tones while warming highlights toward orange. The key is subtlety. Professional colorists apply this so gently that viewers feel the mood without noticing the color manipulation. Other cinematic options include warm vintage looks for nostalgia and cool blue grades for moody atmosphere.
Can ChatGPT color grade my video?
ChatGPT cannot directly edit video files, but it can generate custom LUTs for color grading. You describe your desired look using specific terms like warm golden hour with lifted blacks, and ChatGPT creates a downloadable .cube file compatible with DaVinci Resolve, Premiere Pro, and other editing software. These AI-generated LUTs work best as starting points that you then adjust for your specific footage and shooting conditions.
Should I use LUTs for drone footage?
Use LUTs as starting points rather than finishing points for drone footage. Technical LUTs like DJI’s D-Log to Rec709 conversion provide essential color space transformation. Creative LUTs offer quick style inspiration but require adjustment for your specific shots. Apply LUTs at 70-80% intensity, correct exposure and white balance first, and always customize the result manually. This approach combines the speed of LUTs with the control of manual grading.
What software is best for color grading drone footage?
DaVinci Resolve offers the best value as a free professional-grade tool with dedicated color grading features including color wheels, curves, qualifiers, and node-based workflows. Adobe Premiere Pro suits editors who need integration with other Adobe products and prefer all-in-one editing. Final Cut Pro excels on Mac with optimized performance and intuitive interface. For most drone videographers, DaVinci Resolve provides the most powerful tools at no cost, though it requires more learning investment.
Conclusion
Learning how to color grade drone footage transforms your aerial videos from casual captures into professional cinematic content. The process starts with proper preparation, shooting in flat profiles like D-Log with ND filters and manual settings. Color correction comes next, fixing exposure, white balance, and consistency issues. Finally, creative color grading adds the style and mood that defines your visual voice.
Remember that great color grading takes practice. Start with the fundamentals covered in this guide and experiment with different techniques. Watch how professional films use color to create mood, then try recreating those looks in your own footage. The skills you develop will distinguish your drone videos from the countless others flooding social platforms.
Your workflow matters as much as your creative choices. Develop a consistent process from import through export. Use scopes to make objective decisions. Build grades in layers for smoother results. And always check your work on multiple displays before final delivery. These habits, combined with the techniques in this guide, will elevate your drone footage to truly cinematic levels.