Nothing ruins a photography trip faster than losing your images. I learned this the hard way on a two-week trip to Iceland when a single corrupted SD card erased three days of northern lights shots. Since then, I have developed a bulletproof system to backup photos in the field using dual card slots and portable SSDs. This guide shows you exactly how to protect your images while shooting on location, whether you are photographing weddings, wildlife, or once-in-a-lifetime travel destinations.
You will learn how to configure your camera’s dual card slots for instant redundancy, which portable SSD solutions work best for different shooting scenarios, and a complete step-by-step workflow you can implement on your next trip. No more hoping your memory cards make it home safely.
Why Field Backup Matters for Photographers
Memory cards fail more often than most photographers realize. According to data recovery specialists, approximately 1 in 100 memory cards will experience some form of data corruption or failure during its lifespan. For professional photographers shooting thousands of images per event, those odds catch up with you eventually.
The risks multiply when you are traveling. Cards get lost, stolen, or damaged by extreme temperatures, humidity, or physical impact. Hotel safes do not protect against data corruption. Carrying your cards in a pocket exposes them to static electricity and bending. Even high-quality cards from reputable brands can fail without warning.
Wedding photographers face the highest stakes. You cannot reshoot a first kiss or a father-daughter dance. Wildlife photographers spend days or weeks waiting for the perfect shot. Travel photographers capture moments that will never happen again. For all these scenarios, losing images is simply not an option.
The 3-2-1 Backup Strategy Adapted for Field Work
The 3-2-1 backup strategy is the industry standard for data protection: keep three copies of your data, on two different types of media, with one copy stored offsite. Adapting this for field photography requires some creative thinking since you likely will not have access to your usual studio setup.
Here is how I implement 3-2-1 in the field. Copy one lives on your primary memory card in the camera. Copy two gets created simultaneously on your secondary card slot when shooting in backup mode. Copy three goes to a portable SSD at the end of each shooting day. This gives you three copies on two different media types (memory cards and SSD) before you even return home.
For extended trips, I add a fourth layer by syncing selected images to cloud storage when WiFi is available. This creates the offsite component of the strategy. Even slow hotel WiFi can handle a few dozen edited shots overnight, giving you cloud protection for your best work.
Understanding Dual Card Slot Modes
Dual card slots have become standard on professional and enthusiast cameras from Canon, Nikon, Sony, Fujifilm, and others. But many photographers never configure them properly, missing out on powerful protection features. Understanding the four main modes helps you choose the right setup for each shooting situation.
Backup Mode (Redundant Recording)
Backup mode writes every image to both cards simultaneously. This is the most protective configuration and my default choice for any paid work or important personal projects. If one card fails, you have an identical copy on the other.
The tradeoff is slightly reduced buffer depth. Your camera must write data to two cards instead of one, which can slow down burst shooting slightly. Modern cameras with fast cards handle this well, but sports photographers shooting extended bursts might notice the difference. For most situations, the safety benefit far outweighs this minor performance impact.
When using backup mode, I recommend using identical cards with matching speed ratings. Mismatched cards force the camera to write at the slower card’s speed. Two 128GB V90 SD cards perform better together than a fast CFexpress card paired with a budget SD card.
Overflow Mode (Extended Storage)
Overflow mode fills the first card completely before switching to the second. This doubles your shooting capacity but provides no redundancy. I only use overflow mode when shooting non-critical subjects where I prioritize storage space over safety.
Overflow works well for casual travel photography, test shots, or situations where you are shooting massive amounts of content and have time to backup cards frequently throughout the day. It is not appropriate for weddings, paid assignments, or once-in-a-lifetime opportunities.
RAW+JPEG Separation
This mode writes RAW files to one card and JPEGs to the other. Some photographers use this for workflow convenience, keeping RAW files for editing and JPEGs for quick sharing. While this creates two copies of each image, they are not identical files, so it is not true backup protection.
I find RAW+JPEG separation useful for event photography where clients want preview images quickly. The JPEGs go to the SD card for easy transfer to my phone, while RAW files stay on the faster CFexpress card. But I still backup both cards to a portable SSD each night.
Video+Stills Mode
Hybrid shooters can dedicate one card slot to video and the other to stills. This keeps file types organized and prevents a single card from filling up mid-shoot. Like RAW+JPEG separation, this prioritizes organization over redundancy.
For hybrid wedding shoots, I might record video to the CFexpress card (which handles high bitrates better) and stills to the SD card. But I am careful to backup both cards at every break in the action.
How to Configure Dual Card Slots
Every camera manufacturer handles card slot configuration differently. On Canon EOS R series cameras, look for “Card/Beep” or “Record func+card/folder sel” in the yellow setup menu. Nikon Z cameras use the “Role played by card in Slot 2” option. Sony Alpha cameras have a “Recording Media” setting in the setup menu.
Take five minutes before your next shoot to verify your configuration. Many cameras default to overflow mode out of the box, providing no backup protection. Switch to backup mode for important work, and verify both cards are recording by taking a test shot and checking playback.
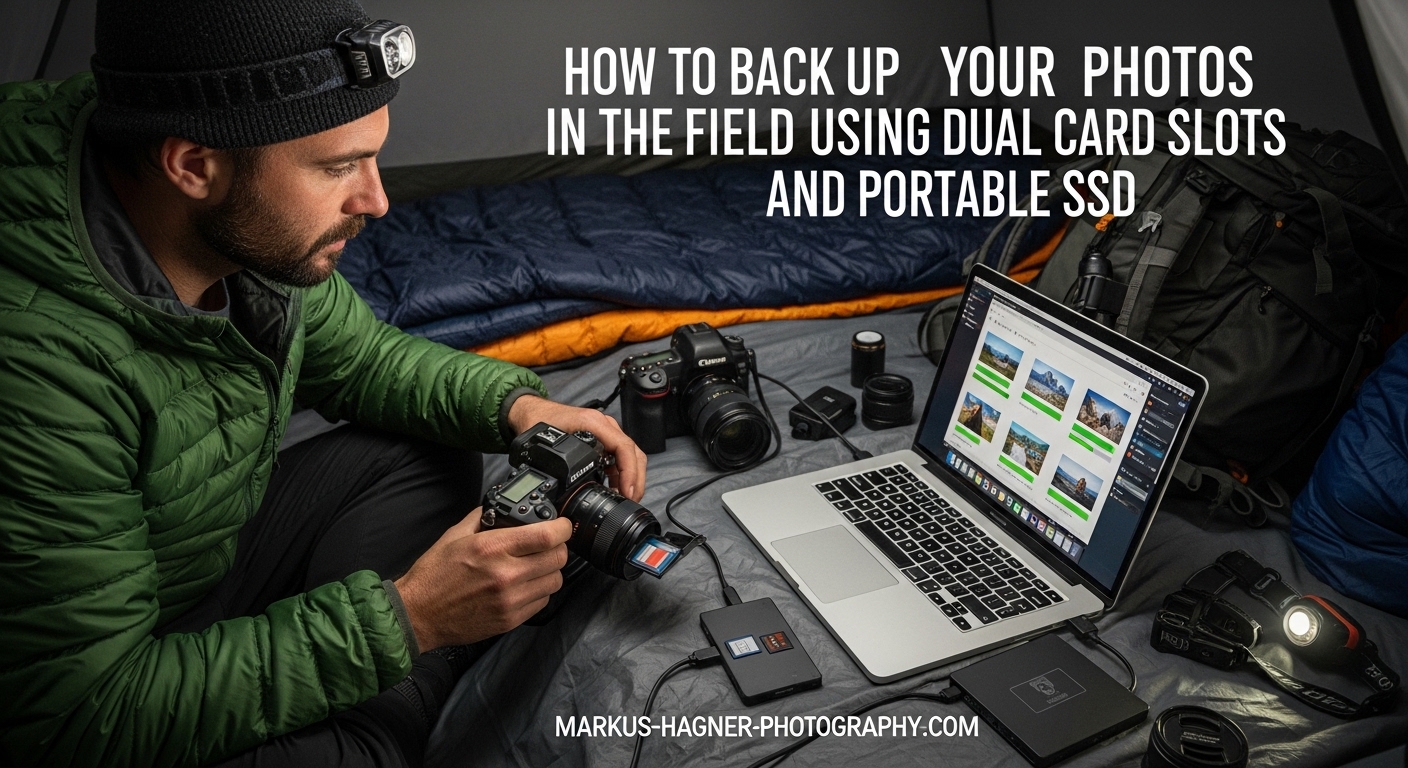
Portable SSD Backup Solutions
Dual card slots provide in-camera redundancy, but you still need to offload images during extended trips. Portable SSDs offer the best combination of speed, reliability, and portability for field backup. Several approaches work depending on your budget and preferences.
Wireless SSDs with Built-in SD Card Slots
Wireless SSDs like the WD My Passport Wireless Pro and SanDisk Extreme PRO Portable SSD include SD card readers and battery power. You simply insert your memory card, press a button, and the device copies your files automatically. No laptop, phone, or cables required.
The convenience is hard to overstate. After a long day of shooting, you can backup your cards while eating dinner or relaxing at your hotel. The backup happens in the background without requiring your attention. Most wireless SSDs also include WiFi, allowing you to preview images on your phone or tablet.
The downsides are cost and speed. Wireless SSDs cost significantly more than standard portable drives. Transfer speeds are slower than direct connections, often taking 30-60 minutes for a full 128GB card. Battery life limits how many cards you can backup on a single charge.
Direct Connection SSDs
Standard portable SSDs like the Samsung T7 or SanDisk Extreme require a connection to a laptop, tablet, or phone. They are faster and cheaper than wireless options but need another device to function.
For photographers who travel with a laptop, this is often the best choice. A USB 3.2 Gen 2 SSD can transfer a 128GB card in under 10 minutes. The drives are tiny, rugged, and affordable enough to carry multiple for redundancy.
The laptop-free approach uses a USB-C hub with your smartphone. Connect a card reader and SSD to your iPhone or Android device, then use the Files app to copy from card to drive. This works surprisingly well and eliminates laptop weight from your kit.
Smartphone-Based Backup Workflow
Modern smartphones have become powerful enough to serve as the hub for field backup. An iPhone 15 Pro or recent iPad Pro with a USB-C hub can read SD cards and write to external SSDs at impressive speeds.
My smartphone workflow uses three pieces of gear: a powered USB-C hub, an SD card reader, and a portable SSD. The hub connects to my iPhone, providing ports for both the card reader and SSD. The Files app handles the transfer. A 128GB card copies in about 15 minutes.
The advantage is carrying one less device. Your phone is already in your bag, and the total weight of hub, reader, and SSD is less than a wireless backup drive. The disadvantage is needing to manage the process manually rather than pressing a button and walking away.
Backup Methods Comparison
Each backup method has distinct advantages. Here is how they compare for field photography:
Dual Card Slots (Backup Mode) provides instant redundancy with zero extra gear. It works automatically while you shoot and adds no weight to your kit. The limitation is that both copies stay in your camera bag together.
Wireless SSD offers the most convenience with automatic, unattended backup. It works without any other device but costs more and transfers slower than other options. Best for photographers who value simplicity over speed.
Direct Connection SSD delivers the fastest transfer speeds at the lowest cost. It requires a laptop or smartphone but gives you the most control over the backup process. Best for photographers who already carry a computer.
Smartphone Hub Setup splits the difference between wireless and laptop solutions. It is lighter than a laptop, faster than wireless, and costs less than dedicated wireless drives. The tradeoff is manual operation and more cables to manage.
Complete Field Backup Workflow: Step by Step
A systematic workflow ensures you never skip critical backup steps. Here is the exact process I follow on every trip, refined over years of professional travel photography.
Step 1: Camera Setup Before Shooting
Start each trip with freshly formatted cards and verified camera settings. Format both cards in-camera rather than on your computer. This ensures the file system matches your camera’s expectations and reduces the risk of corruption.
Verify your dual card slot configuration. For important work, confirm you are shooting in backup mode. Check that both cards are actually recording by taking a test shot and viewing it on the LCD. Navigate to the playback menu and confirm you can switch between card slots.
Label your cards with a numbering system. I use Card 1A and Card 1B for the first pair, Card 2A and Card 2B for the second pair, and so on. The A cards stay in the camera. The B cards get swapped out and backed up. This system prevents confusion about which cards have been backed up.
Step 2: During Shoot Best Practices
While shooting, avoid removing cards unless necessary. Each time you open the card door, you introduce dust and risk damaging the contacts. Let backup mode do its job and focus on making images.
If you must swap cards during a shoot, have a system for tracking which cards have been backed up. I keep fresh cards in my right pocket and exposed cards in my left pocket. Never mix them. Some photographers use card wallets with labeled slots.
Monitor your card capacity and swap before cards are completely full. Shooting until the last frame increases the risk of file fragmentation and makes recovery harder if something goes wrong. I swap when cards reach about 80% capacity.
Step 3: End of Day Backup Routine
At the end of each shooting day, before you do anything else, backup your cards. This is non-negotiable. Dinner can wait. Social media can wait. Your images need protection first.
If using a wireless SSD, insert each card and start the backup. The device will create a folder with the date and copy all files. While it works, you can organize your gear, charge batteries, or review your shots on camera.
With a laptop or smartphone setup, create a dated folder on your SSD and copy the entire contents of each card. Keep the folder structure simple: Year-Month-Day (like 2026-03-13). Do not rename files or reorganize folders until you are home with a proper backup system.
Step 4: File Verification
Never assume a backup completed successfully. Verify your files before formatting cards. This takes an extra minute but prevents catastrophic data loss.
Check the file count on your SSD against the file count on your memory card. They should match exactly. Open a few random images to confirm they are not corrupted. Look for files that will not open or display artifacts.
Some photographers use checksum verification software to mathematically confirm file integrity. This is overkill for most situations but worth considering for critical paid work. At minimum, visually spot-check your backups before formatting cards.
Step 5: Power Management
Field backup requires power, and running out of battery mid-backup can corrupt files. Plan your power needs before the trip.
Wireless SSDs have internal batteries that need charging. A fully charged WD My Passport Wireless Pro can backup about four 128GB cards. Carry a power bank if you will backup more than that between charging opportunities.
Laptop and smartphone setups draw power from the host device. A USB-C hub with pass-through charging lets you power your phone while backing up. For extended trips without reliable electricity, a large power bank becomes essential equipment.
Real-World Scenario Examples
Different photography situations require adapted workflows. Here is how I adjust my backup strategy for common scenarios.
Wedding Photography: I shoot dual cards in backup mode all day. During the reception dinner break, I swap both cards and store the originals in my car. The backup cards continue shooting. That night at the hotel, I copy both sets of cards to a portable SSD. I never format cards until images are delivered to the client.
Wildlife Photography: I use backup mode but swap cards more frequently due to high burst shooting. A wireless SSD in my vehicle handles backup between location moves. For multi-day remote trips, I carry enough cards to avoid formatting any until I return home.
Travel Photography: For shorter trips, I often rely solely on dual card backup mode without portable SSD backup. The cards stay with me in a secure pocket or hotel safe. For trips longer than a week, I add nightly SSD backup to handle the volume of images.
Best Practices and Common Mistakes to Avoid
Even experienced photographers make backup mistakes. Learning from others’ errors saves you from learning the hard way.
Best Practices Checklist
Always format cards in-camera, never on your computer. The camera’s formatting routine optimizes the file system for its specific needs.
Use quality cards from reputable brands. Cheap cards fail more often and recover less successfully. Stick with SanDisk, Lexar, ProGrade, or similar established brands.
Replace cards periodically. Memory cards have limited write cycles. I replace mine every two to three years of heavy use, even if they have not shown problems.
Keep cards in protective cases when not in the camera. Static electricity, dust, and physical damage cause preventable failures.
Backup before editing. Never start culling or editing until you have at least two copies of every image. You might accidentally delete something important.
Test your backup system before important shoots. Practice the workflow at home so it becomes automatic when you are tired after a long day of shooting.
Common Mistakes to Avoid
The biggest mistake is trusting a single copy of your images. Memory cards are reliable but not infallible. Always maintain at least two copies of important work.
Never format cards immediately after backup. Wait until you need the card space. Keeping files on cards provides an additional backup layer for minimal effort.
Avoid using cards larger than you can afford to lose. A single 1TB card holding an entire wedding is terrifying. I prefer multiple 128GB or 256GB cards so a failure costs fewer images.
Do not ignore warning signs. If a card acts slow, shows errors, or feels warm during use, retire it immediately. Cards often give subtle warnings before complete failure.
Never remove cards while the camera is writing. The access light exists for a reason. Wait for it to stop blinking before opening the card door.
Troubleshooting Common Issues
If a card shows errors in-camera, stop using it immediately. Do not try to reformat it. Put it aside for professional data recovery if the images matter.
When a backup fails mid-transfer, do not panic. Check your connections and available storage space. Try a different cable or port. If files already transferred, verify them before trying again.
For corrupted files, stop writing to the card immediately. Recovery software like PhotoRec or Disk Drill can often rescue images from damaged cards. The key is preventing further writes that might overwrite the data.
Budget vs Premium Considerations
You do not need the most expensive gear to backup photos effectively. Budget options work well if you understand their limitations.
Budget memory cards (V30 speed) work fine for most still photography. Fast V90 or CFexpress cards matter most for high-resolution video and extended burst shooting. If you do not need that speed, save money on cards and invest in more of them.
Basic portable SSDs handle photo backup adequately. Premium drives with faster speeds benefit video editors more than photographers. A Samsung T7 at half the price of a SanDisk Extreme PRO works perfectly for still images.
Wireless backup drives are the one area where spending more helps. Cheaper wireless drives often have unreliable WiFi, slow transfer speeds, and poor battery life. If you go wireless, choose a reputable brand with good reviews.
Frequently Asked Questions
Can I back up all my photos to an external hard drive?
Yes, external hard drives work well for photo backup. Portable SSDs are ideal for field use because they are fast, compact, and have no moving parts to damage. Connect via USB-C or USB 3.0 for best transfer speeds. A 1TB SSD holds roughly 25,000-50,000 RAW files depending on your camera resolution.
Is it better to back up photos to cloud or hard drive?
Both have advantages. Hard drives offer faster access, no monthly fees, and work anywhere. Cloud storage provides offsite protection and access from multiple devices. The best approach uses both: local drives for quick access and cloud for disaster recovery. For field work, backup to a portable SSD first, then sync to cloud when WiFi is available.
What is the best way to backup my photos?
The 3-2-1 strategy works best: keep three copies of your photos on two different media types with one copy offsite. For photographers, this means using dual card slots in backup mode for instant redundancy, copying to a portable SSD daily, and syncing to cloud storage when possible. Never rely on a single copy of important images.
How to back up photos from SD card?
To backup photos from an SD card, insert the card into a card reader connected to your computer or smartphone. Create a dated folder on your backup drive and copy the entire DCIM folder from the card. Verify the file count matches before formatting the card. Wireless SSDs can backup cards automatically without a computer by inserting the card directly into the drive’s built-in slot.
Conclusion
Learning how to backup photos in the field transforms your photography from hoping nothing goes wrong to knowing your images are protected. Dual card slots give you instant redundancy while shooting. Portable SSDs provide secondary storage that travels with you. Together, they create a robust system that handles everything from weekend trips to multi-week expeditions.
Start simple if this feels overwhelming. Configure your camera’s dual card slots for backup mode today. Add a portable SSD to your kit before your next important shoot. Build the habit of nightly backup. Your future self will thank you when the inevitable card failure happens and your images are still safe.