Have you ever taken a photo that looked perfect on your camera screen, only to find the final image had blown-out highlights or muddy shadows? I have. That frustration led me to study one of photography’s most powerful exposure techniques. The Zone System, developed by Ansel Adams and Fred Archer in the late 1930s, solves this problem by giving you complete control over how every tone in your scene will appear in the final image.
This method divides the world into 11 distinct tonal zones, from pure black to pure white. Understanding how the Zone System works transforms you from someone who hopes the camera gets it right into a photographer who knows exactly how each image will turn out before pressing the shutter.
In this guide, I will explain the Zone System in plain terms, show you exactly how Ansel Adams applied it to create his legendary black-and-white landscapes, and demonstrate how you can use these same principles with your modern digital camera.
What Is the Zone System?
The Zone System is a photographic technique for determining optimal film exposure and development by mapping the tonal values of a scene to a scale of 11 zones. Ansel Adams and his colleague Fred Archer at the California School of Fine Arts developed this system around 1939-1940 to solve a fundamental problem: how to consistently translate the wide range of brightness found in nature into the limited tonal range of photographic prints.
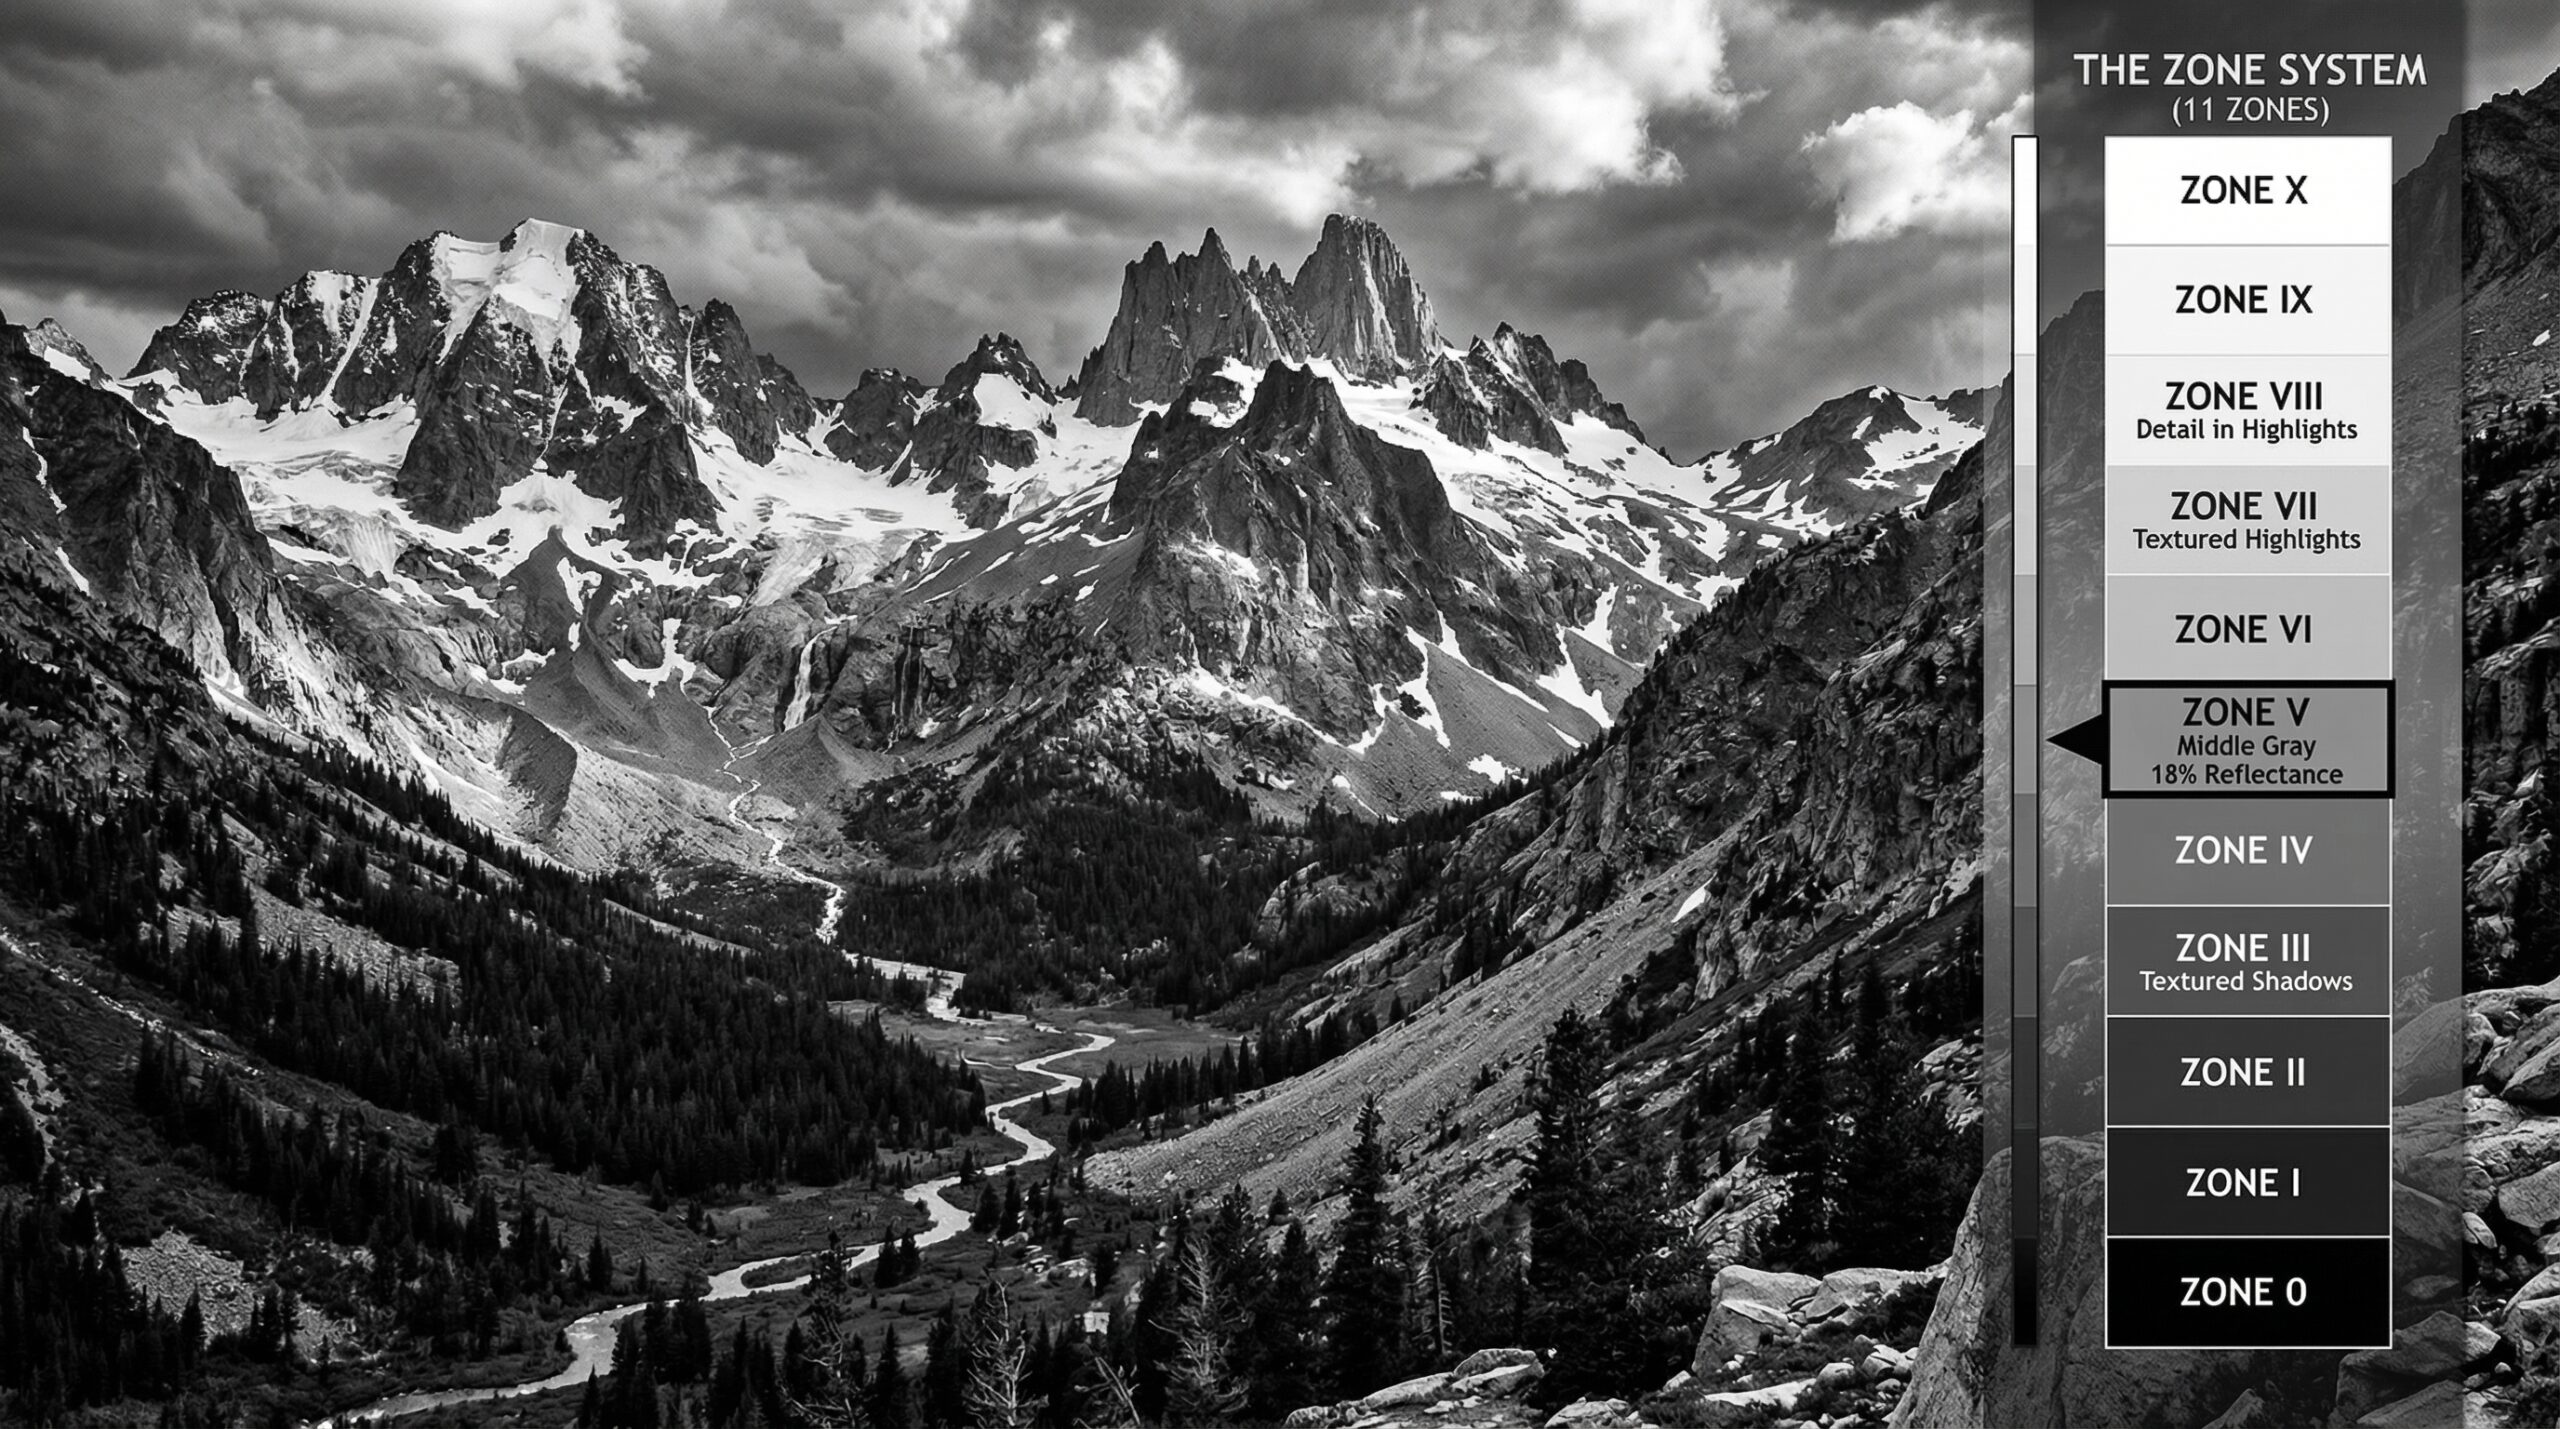
At its core, the Zone System gives photographers a language for describing tones. Instead of vague terms like “light” or “dark,” you can specify exactly which zone a subject should occupy. Zone 0 represents pure black with no detail, while Zone X represents pure white with no detail. The middle of the scale, Zone V, corresponds to middle gray or 18% reflectance.
The brilliance of this system lies in its combination of science and art. Adams, a classically trained pianist, understood that photography needed a structured approach to exposure similar to musical notation. Just as a composer writes specific notes for musicians to play, the Zone System lets photographers pre-visualize and specify exactly where tones should fall.
The 11 Zones Explained
Understanding each zone is essential before attempting to use the system in practice. Here is the complete breakdown of all 11 zones and what they represent in real-world scenes:
Zone 0: Pure black. This represents the maximum black your printing paper can produce. There is no visible detail or texture. Think of the inside of a closed camera lens cap.
Zone I: Near black with slight tonality but no texture. This is the darkest tone where you can begin to perceive some lightness, though barely. Deep shadows in a cave might fall here.
Zone II: Dark tone with visible texture. This is the darkest area where detail becomes clearly visible. Dark foliage in shadow, black fabric with texture, or the dark side of a building often occupy this zone.
Zone III: Dark tone with distinct detail. This zone shows fully textured dark areas. Dark skin tones in shadow, dark blue jeans, or deep forest shadows typically fall here.
Zone IV: Dark middle gray. This represents slightly darker than middle gray. Dark skin in direct light, dark foliage in sunlight, or dark stone buildings often occupy Zone IV.
Zone V: Middle gray (18% reflectance). This is the standard that all light meters are calibrated to. Gray card readings, average Caucasian skin in shadow, and typical concrete in overcast light fall here.
Zone VI: Light middle gray. Average Caucasian skin in open shade, light concrete, or sunlit foliage typically occupies this zone.
Zone VII: Light gray with distinct texture. This zone captures pale skin tones, light-colored clothing, or light gray walls with full detail.
Zone VIII: Very light gray with visible texture. This is the lightest tone where texture is clearly preserved. White clothing with texture, light sand, or snow in shadow often falls here.
Zone IX: Very light tone with slight texture. This approaches pure white but retains minimal detail. Snow in direct sunlight or white paper in bright light might occupy this zone.
Zone X: Pure white with no detail. This represents paper white in a print. Specular highlights like the sun reflecting off water or bright light sources fall here.
Each zone represents one f-stop of exposure difference from the next. Moving from Zone V to Zone VI requires twice as much light, while moving from Zone V to Zone IV requires half as much light.
How the Zone System Works in Practice
The practical application of the Zone System follows a logical sequence that becomes second nature with practice. Here is exactly how to use it when photographing.
Step 1: Pre-visualization. Before taking the photo, look at your scene and decide which tones are most important. Ask yourself where you want specific elements to fall on the zone scale. Do you want those white clouds to show texture at Zone VIII, or should they be brilliant white at Zone IX? Do you want shadow detail in that dark tree at Zone III, or should it merge into black at Zone I?
Step 2: Meter the key tone. Use a spot meter to measure the area you have chosen as your key tone. Most photographers place important shadow detail at Zone III or important highlight detail at Zone VIII. Your camera’s spot meter assumes everything is middle gray (Zone V), so you need to compensate based on where you actually want that tone to fall.
Step 3: Calculate exposure. If your spot meter reads f/8 at 1/125 second for a shadow area you want at Zone III, you need to reduce exposure by two stops. That shadow is currently metering as Zone V (middle gray), but you want it at Zone III (dark with detail). You would adjust your exposure to f/16 at 1/125 second or f/8 at 1/500 second.
Step 4: Check the range. After setting exposure for your key tone, meter the brightest and darkest areas to ensure they fall within the film or sensor’s dynamic range. Modern cameras can typically handle 7-9 zones, while the human eye can see 11+ zones simultaneously.
Understanding Middle Gray
The concept of middle gray sits at the heart of the Zone System. All light meters are designed to produce a reading that results in a middle gray tone, regardless of what you meter. This works well for average scenes but fails spectacularly for extreme subjects.
Photograph a white wall, and your camera will make it gray. Photograph a black wall, and your camera will also make it gray. The Zone System prevents this by teaching you to compensate based on what you are actually photographing.
Middle gray corresponds to 18% reflectance, meaning it reflects 18% of the light that hits it. This value was chosen because it represents the average reflectance of typical outdoor scenes. A standard gray card is manufactured to this exact specification and serves as a reliable reference.
Incident vs Reflected Metering
The Zone System traditionally uses reflected light metering, where you measure the light bouncing off your subject. However, incident metering offers a valuable alternative. With incident metering, you measure the light falling on your subject rather than the light reflected from it.
Incident meters ignore subject reflectance and give readings that place subjects according to their actual brightness. A white subject exposed by incident light will render white, while a black subject will render black. This simplifies exposure but removes the precise tonal placement control that defines the Zone System.
Many photographers use both approaches, using reflected spot metering for critical zone placement and incident metering for quick, reliable exposures.
Why Ansel Adams Used the Zone System
Ansel Adams did not create the Zone System on a whim. He developed it out of necessity while working with large-format black-and-white film in the 1930s. Understanding his motivations helps explain why the system remains relevant today.
Film limitations demanded precision. Unlike digital cameras with their forgiving RAW files, film required accurate exposure at the moment of capture. Slide film had particularly narrow latitude, often less than 5 stops between completely black and completely white. Even black-and-white negative film, which Adams preferred for its flexibility, worked best when exposed correctly.
Large format consequences. Adams primarily worked with 8×10 and 4×5 view cameras. Each sheet of film was expensive and time-consuming to expose and develop. You could not simply shoot ten frames and pick the best one. Each exposure needed to be right the first time.
Pre-visualization philosophy. Adams believed photography was about conveying emotion and vision, not simply recording what existed. He wanted to darken skies to make them more dramatic, lighten foregrounds to add depth, and control every tone to match his artistic intent. The Zone System gave him the technical control to realize his pre-visualized images.
The collaboration with Fred Archer. While Adams popularized the Zone System, it emerged from his collaboration with Fred Archer at the California School of Fine Arts. Archer brought technical expertise about sensitometry, the science of measuring film’s response to light. Together, they created a system that bridged artistic vision and technical precision.
Adams famously described this process as “visualization” – the conscious image of the final print seen in the mind’s eye before releasing the shutter. The Zone System made visualization practical by providing a framework for predicting and controlling results.
Using the Zone System in Digital Photography
Digital cameras work differently than film, but the Zone System adapts beautifully to modern equipment. The fundamental principles remain unchanged, though some techniques have evolved.
The histogram connection. Your camera’s histogram essentially displays zone information digitally. The left edge represents Zone 0, the right edge represents Zone X, and the middle represents Zone V. Learning to read histograms through the lens of zone thinking makes exposure more intuitive.
RAW file flexibility. Modern RAW files contain incredible latitude, often 11-14 stops of dynamic range. This means you have more room for error than Adams did with film. However, proper zone placement still matters because pushing files too far introduces noise in shadows and loses detail in highlights.
Exposure compensation. When using evaluative or matrix metering, your camera tries to average the scene to middle gray. Apply exposure compensation based on zone thinking. Photographing snow? Add +2 stops because your camera will try to make it gray. Photographing a dark subject? Subtract exposure to prevent it from becoming muddy gray.
Color photography adaptation. The Zone System was designed for black-and-white, but it works for color too. In color photography, you must consider both tone and color saturation. Overexposing color film or digital sensors can wash out colors even if tones look correct. The solution is to place important colors in zones that preserve their saturation while maintaining tonal relationships.
Many digital photographers use “expose to the right” (ETTR) technique, which aligns with Zone System thinking. By exposing so the histogram shifts toward the right without clipping highlights, you maximize signal-to-noise ratio in digital files.
Practical Zone System Examples
Let me walk you through some common scenarios where the Zone System solves exposure problems.
Photographing Snow
Snow is notoriously tricky because cameras want to make it gray. Snow in direct sunlight should typically fall at Zone VIII or IX. If you meter the snow directly, your camera will place it at Zone V. You need to add 3-4 stops of exposure to render it properly white. Alternatively, meter off something middle gray in the same light, then increase exposure by two stops to place the snow at Zone VII, letting the brightest areas fall at Zone VIII.
Portrait Photography
For Caucasian skin tones, place them at Zone VI for normal rendering. Darker skin tones typically look best at Zone V or IV. The key is deciding how you want the skin to appear. For high-key fashion photography, you might place skin at Zone VII. For dramatic low-key portraits, Zone V might work better.
Always meter off the cheek or forehead, avoiding specular highlights on oily skin which would be Zone X. After metering, adjust exposure to place the skin in your chosen zone.
High Contrast Scenes
When the scene contains more dynamic range than your camera can handle, you must choose what to sacrifice. Sunset photography exemplifies this challenge. The sky might span Zones II through X while foreground sits in Zone I shadows.
Your options include exposing for the sky and letting foreground go black, exposing for foreground and blowing out the sky, using graduated neutral density filters to balance the range, or bracketing for HDR processing later. The Zone System helps you make these decisions consciously rather than hoping the camera guesses correctly.
Black and White Film Development
Adams extended the Zone System beyond exposure into development. By adjusting development time, you could compress or expand the tonal range. A normal (N) development preserved the scene’s contrast. N+1 development increased contrast by pushing highlights higher while holding shadows. N-1 development decreased contrast by controlling highlights while bringing up shadows.
This control allowed photographers to adapt the film’s response to match the scene’s contrast. High-contrast scenes received reduced development (N-1 or N-2), while flat scenes received increased development (N+1 or N+2).
Frequently Asked Questions
How did Ansel Adams use the Zone System?
Ansel Adams used the Zone System to pre-visualize his final prints before taking the photograph. He would spot meter key areas of the scene, decide which zones they should occupy in the final image, and adjust exposure accordingly. Adams primarily used the system with large-format black-and-white film, allowing him to control both exposure and development to achieve his artistic vision. He taught this method extensively through his books including The Negative, The Print, and The Camera.
What is the zone method used for?
The zone method is used for controlling exposure to achieve precise tonal placement in photographs. It allows photographers to decide exactly how bright or dark each element in their image should appear, rather than accepting whatever the camera’s automatic metering provides. The method is particularly valuable for high-contrast scenes, black-and-white photography, and any situation where creative control over tones matters.
How many steps of gray did Ansel Adams use in his Zone System?
Ansel Adams used 11 zones in his Zone System, numbered 0 through X (Roman numeral for 10). Zone 0 represents pure black with no detail, Zone V represents middle gray (18% reflectance), and Zone X represents pure white with no detail. Each zone represents one f-stop of exposure difference from adjacent zones, covering the full tonal range from maximum black to maximum white.
What is the Zone System in color photography?
The Zone System works in color photography by applying the same tonal principles while considering color saturation. In digital color photography, you use the histogram and exposure compensation to place tones in desired zones, but must also monitor color channels to prevent clipping. RAW files provide flexibility similar to black-and-white negative film. The key difference is that overexposure in color photography can wash out saturation even when tones look acceptable, so you typically expose more conservatively than with black-and-white.
Is the Zone System still relevant today?
Yes, the Zone System remains highly relevant for digital photographers. While modern cameras have automatic metering and histogram displays, understanding zones helps you interpret what your camera is doing and take control of exposure. The system is especially valuable for landscape photographers, film photographers, and anyone shooting high-contrast scenes. Digital cameras with their histograms essentially display zone information graphically, making the concepts easier to apply than ever.
Conclusion
The Zone System, developed by Ansel Adams and Fred Archer over 80 years ago, remains one of photography’s most powerful tools for controlling exposure. By understanding how the Zone System works and why Ansel Adams used it, you gain the ability to pre-visualize your final images and make conscious decisions about tonal placement.
The 11 zones provide a language for discussing tones precisely, moving beyond vague descriptions into specific, actionable measurements. Whether you shoot film or digital, black-and-white or color, the principles remain the same: decide where you want tones to fall, meter accordingly, and adjust exposure to achieve your vision.
Start practicing with simple scenes. Identify Zone V tones and use them as your reference point. Then experiment with placing shadows at Zone III or highlights at Zone VIII. With time, zone thinking becomes automatic, and you will find yourself consistently creating images that match your pre-visualization. That is the power Adams unlocked, and it remains available to every photographer willing to learn it.