Getting sharp focus on your subject’s eyes can make or break a portrait. I learned this the hard way during my first paid engagement shoot, where half my images looked sharp on the camera LCD but showed soft eyes when viewed on a larger screen. That experience sent me down a rabbit hole of understanding autofocus technology, specifically the difference between Eye Detection AF vs Face Detection AF for portraits.
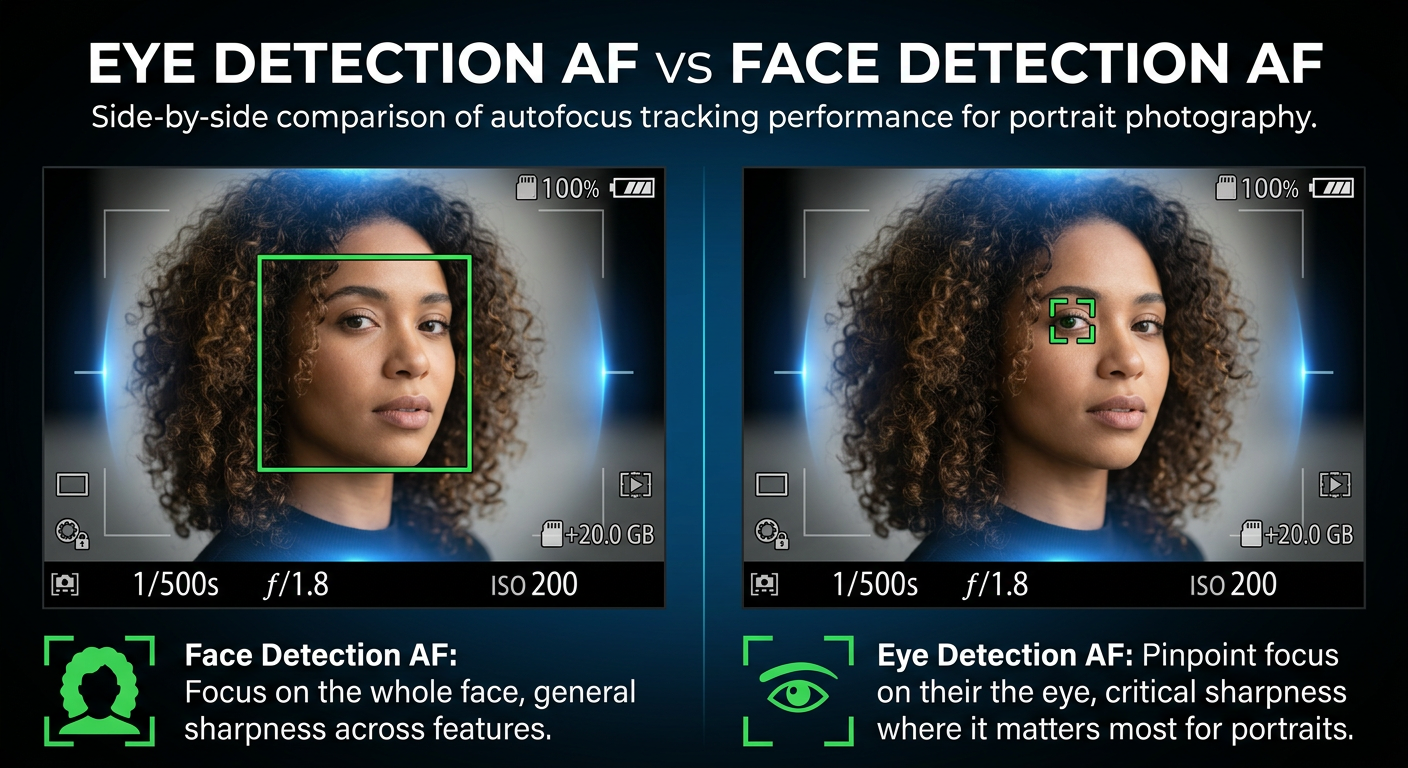
Modern cameras offer both Face Detection AF and Eye Detection AF, but they serve different purposes and excel in different situations. Face Detection AF identifies facial features and optimizes both focus and exposure for the entire face, while Eye Detection AF uses AI-powered recognition to lock specifically onto the eyes for maximum sharpness.
After testing both modes extensively across hundreds of portrait sessions with Canon, Sony, and Fujifilm cameras, I can tell you that neither mode is universally better. The right choice depends on your aperture, subject count, and shooting style. In this guide, I’ll break down exactly when to use each mode for portrait photography.
Eye Detection AF vs Face Detection AF: Quick Comparison
Here’s a side-by-side breakdown of how these two autofocus technologies differ:
| Feature | Face Detection AF | Eye Detection AF |
|---|---|---|
| Focus Target | Entire face region | Specifically the eyes |
| Exposure Optimization | Yes, adjusts for skin tones | No, focus only |
| White Balance | Yes, optimized for faces | No adjustment |
| Best Aperture Range | f/2.8 and narrower | f/1.2 to f/2.8 |
| Group Portraits | Better for multiple faces | Can favor one subject |
| Individual Portraits | Good | Excellent |
| Tracking Moving Subjects | Excellent whole face tracking | Excellent eye tracking |
| Low Light Performance | Good | Better (eyes are high contrast) |
Face Detection AF gives you a broader, more forgiving focus area plus automatic exposure and white balance adjustments. Eye Detection AF delivers pinpoint accuracy on the most critical part of any portrait: the eyes. But that precision comes with tradeoffs, especially when shooting groups or at narrower apertures.
What is Face Detection AF
Face Detection AF identifies human faces within your frame using pattern recognition algorithms. When enabled, your camera scans the scene for facial shapes and features, then automatically locks focus on detected faces. The system continuously tracks these faces even as your subject moves.
What sets Face Detection AF apart from other focusing modes is its ability to do more than just focus. When your camera detects a face, it also adjusts exposure settings to properly expose skin tones and tweaks white balance to render natural-looking skin colors. This dual optimization makes Face Detection particularly useful for event photography where lighting conditions change constantly.
I rely on Face Detection AF during wedding receptions and family gatherings because it handles mixed lighting well. The exposure optimization means I spend less time adjusting settings between shots, and the broader focus area gives me more leeway when photographing groups.
How Face Detection AF Works
Face Detection AF uses machine learning algorithms trained on millions of facial images. Your camera’s processor analyzes the scene looking for patterns that match facial structures: the relationship between eyes, nose, and mouth, the oval shape of a head, and skin tone variations.
When the camera identifies a face, it draws a box around it in your viewfinder or LCD. Most modern cameras can detect multiple faces simultaneously and let you select which face to prioritize. The AF system then tracks that face using your camera’s phase detection or contrast detection autofocus points.
When Face Detection AF Excels
Face Detection AF shines in several portrait scenarios. Group portraits benefit from the broader focus area, as the camera can track multiple faces without the precision requirements of eye-level focus. At narrower apertures like f/4 or f/5.6, depth of field is generous enough that face-level focus still renders eyes sharp.
Environmental portraits where you want to include context around your subject also work well with Face Detection. The exposure optimization helps balance your subject against the background, and you don’t need the extreme precision of eye-level focus when shooting at narrower apertures.
Video work during events benefits from Face Detection’s smoother tracking and exposure adjustments. The transitions feel more natural than the sometimes-jumpy behavior of Eye Detection when it switches between eyes or loses track momentarily.
What is Eye Detection AF
Eye Detection AF takes facial recognition a step further by specifically targeting and locking onto your subject’s eyes. This technology uses advanced AI and deep learning to identify eyes within detected faces, then maintains precise focus on them even as your subject moves, turns their head, or changes expression.
The critical difference is precision. While Face Detection focuses on the general face area, Eye Detection places its focus point directly on the iris or eyelid. At wide apertures where depth of field might be just a few centimeters, this precision becomes essential for capturing tack-sharp portraits.
Most cameras offer three Eye Detection options: Auto (camera chooses which eye to track), Left Eye Priority, and Right Eye Priority. I typically shoot with Auto mode for candid portraits but switch to specific eye priority when I know my subject will be positioned at a particular angle.
How Eye Detection AF Works
Eye Detection AF builds on Face Detection technology. Your camera first identifies faces in the frame, then zooms in on each face to locate the eyes. The system uses pattern recognition to identify the characteristic shape of eyes: the curve of eyelids, the circular iris, and the contrast between pupil and iris.
Modern cameras from Canon, Sony, and others use Deep Learning AI trained on thousands of eye images to improve detection accuracy. These systems can now detect eyes even when partially obscured by hair, glasses, or when subjects are looking slightly away from the camera.
The AF system continuously adjusts focus as your subject moves closer or farther away, and it can switch between eyes if your subject turns their head. Some cameras even allow you to register specific people so the camera prioritizes their face and eyes in crowded scenes.
When Eye Detection AF Excels
Eye Detection AF becomes invaluable when shooting at wide apertures. At f/1.2 or f/1.4, your depth of field might be only 2-3 centimeters. Focus on the tip of the nose instead of the eyes, and your portrait will look soft where it matters most. Eye Detection eliminates this problem by always placing the focal plane exactly where viewers look first.
Individual portraits and headshots benefit enormously from Eye Detection. The precision ensures your subject’s eyes are always the sharpest part of the image, creating that professional look where the subject appears to pop off the background.
Low light portraits also work better with Eye Detection. Eyes provide high-contrast targets that autofocus systems can lock onto more reliably than general facial features. I’ve found Eye Detection consistently outperforms Face Detection in dim reception halls and outdoor evening sessions.
Head-to-Head Comparison: Eye Detection AF vs Face Detection AF
Let me break down how these two modes compare across the factors that matter most for portrait photography.
Focus Accuracy
Eye Detection AF wins for accuracy, hands down. When your aperture is wide open, only Eye Detection guarantees sharp eyes. I’ve run tests shooting the same subject at f/1.4 with both modes, and Face Detection routinely placed focus on the bridge of the nose or even the ears, while Eye Detection nailed the eyes every time.
However, at narrower apertures like f/4 or f/5.6, the accuracy difference becomes negligible. The increased depth of field means face-level focus still renders eyes acceptably sharp. For most group portraits and environmental shots, Face Detection’s accuracy is plenty.
Exposure and White Balance Handling
Face Detection AF wins this category. The automatic exposure and white balance optimization for skin tones saves time in post-processing and helps you get consistent results straight out of camera. This matters especially for event photographers shooting hundreds of images in varying light.
Eye Detection AF doesn’t adjust exposure or white balance at all. You’ll need to handle these settings manually or rely on your camera’s standard metering. For controlled studio work, this isn’t an issue, but for run-and-gun portrait sessions, it’s one more thing to monitor.
Tracking Performance
Both modes track moving subjects well, but they behave differently. Face Detection maintains smooth, consistent tracking of the face as a whole. Eye Detection can be more erratic, especially when the camera switches between left and right eyes or loses eye contact momentarily.
For subjects moving toward or away from you, both systems perform similarly. But for subjects turning their heads or moving erratically, Face Detection tends to be more stable. I prefer Face Detection for active children and pets, while Eye Detection works better for posed portraits with cooperative subjects.
Low Light Performance
Eye Detection AF performs better in low light. The high contrast of eyes against the surrounding face gives autofocus systems a stronger target to lock onto. Face Detection can struggle when lighting is flat or when faces are partially shadowed.
In my experience shooting evening engagement sessions and dimly lit wedding venues, Eye Detection consistently acquires focus faster and holds it more reliably than Face Detection. The difference is most noticeable when shooting at ISO 3200 and above.
Group Portrait Handling
Face Detection AF is the clear winner for groups. The broader focus area works well when you need multiple faces in focus, and the camera can track several faces simultaneously without the precision issues that plague Eye Detection in group settings.
Eye Detection AF tends to favor one subject in groups, usually whoever is closest to the camera or has the most prominent face. This creates uneven sharpness across your group. For couples portraits, you can sometimes work around this, but for larger groups, Face Detection is more reliable.
Portrait Scenarios: Which Mode to Use
Let me walk through specific portrait situations and recommend which AF mode works best for each.
Individual Portraits
Use Eye Detection AF for individual portraits. The precision ensures tack-sharp eyes, which is what viewers notice first in any single-subject portrait. This applies whether you’re shooting professional headshots, senior portraits, or casual individual shots during a family session.
I keep Eye Detection engaged for all my individual portrait work. Even at narrower apertures, the extra precision doesn’t hurt, and it ensures consistency when I switch between wide and mid-range apertures throughout a shoot.
Couple Portraits
This is where things get interesting. For couples, I generally start with Eye Detection AF, but I’m more careful about my aperture choice. At f/2.8 or wider, depth of field might not cover both subjects’ eyes if they’re at slightly different distances from the camera.
For couples, I recommend Eye Detection AF at f/2.8 or narrower, or Face Detection AF if you’re shooting wider and want both faces equally sharp. Position your couple so their faces are on the same focal plane, and Eye Detection will handle the rest.
Group Portraits
Switch to Face Detection AF for groups of three or more. The broader focus area gives you better odds of getting everyone reasonably sharp, especially when people are standing at slightly different distances. At f/5.6 or f/8, depth of field is generous enough that face-level focus renders all eyes acceptably sharp.
Face Detection also handles the exposure and white balance for groups better, ensuring consistent skin tones across multiple subjects. This saves significant editing time when you’re delivering dozens of group shots from a wedding or corporate event.
Environmental Portraits
For environmental portraits where you want to show your subject in context, Face Detection AF often works better. You’re typically shooting at narrower apertures (f/4 to f/8) to keep both subject and background recognizable, so the extreme precision of Eye Detection isn’t necessary.
The exposure optimization from Face Detection also helps balance your subject against the environment. I find this especially useful for outdoor portraits where dappled light or backlit situations create exposure challenges.
Studio Portraits
Eye Detection AF is my default for studio work. In a controlled environment with consistent lighting, the exposure and white balance benefits of Face Detection don’t matter. What matters is absolute sharpness on the eyes, and Eye Detection delivers that consistently.
The only exception is when I’m shooting groups in studio. Then I switch to Face Detection for the same reasons mentioned above: better handling of multiple subjects and more even focus distribution.
Aperture Considerations for Each Mode
Your aperture choice significantly impacts which AF mode will serve you best. Here’s what I’ve learned from testing both modes across different aperture ranges.
Wide Aperture (f/1.2 to f/1.8)
At these apertures, Eye Detection AF is practically mandatory. Your depth of field is so shallow that focus on the nose or ears will leave the eyes soft. I’ve seen portraits shot at f/1.2 with Face Detection where the tip of the nose is razor sharp but the eyes are noticeably soft.
Eye Detection ensures the focal plane lands exactly where it needs to. Even with Eye Detection, you’ll need to pay attention to your subject’s position and maintain consistent distance for critical sharpness at these apertures.
Mid-Range Aperture (f/2.0 to f/4)
This is the transition zone where both modes can work, but your choice should depend on subject count and shooting style. For individual portraits, Eye Detection still provides better results. For couples and small groups, Face Detection becomes viable.
At f/2.8, I use Eye Detection for individuals and Face Detection for couples. At f/4, either mode works well for individuals, and Face Detection is my preference for any multi-subject shot.
Narrower Aperture (f/5.6 and above)
At f/5.6 and narrower, depth of field is generous enough that Face Detection AF delivers sharp eyes in most situations. The precision advantage of Eye Detection becomes less relevant, while the exposure and white balance benefits of Face Detection become more valuable.
For group portraits, environmental portraits, and any situation where you need more depth of field, Face Detection AF is the better choice. You get consistent skin tone exposure plus focus that’s plenty sharp for the eyes.
Brand-Specific Implementations
Different camera manufacturers implement Face and Eye Detection AF slightly differently. Here’s what to expect from each major brand.
Canon Eye Detection AF
Canon calls their system Eye Detection AF, and it’s available on EOS R series mirrorless cameras and recent DSLRs. Canon’s implementation includes “AF on Detected Subject” mode, which prioritizes eyes when visible but falls back to face, head, or body tracking when eyes aren’t detectable.
Canon also offers “Register People Priority,” which lets you register specific faces so the camera prioritizes them in group situations. This is useful for wedding photographers who want to prioritize the couple in crowded reception shots.
Sony Eye AF
Sony pioneered Eye AF technology and their implementation is widely considered the benchmark. Sony’s Real-time Eye AF works with both humans and animals, tracking eyes continuously in real-time as subjects move. The system is particularly effective in low light and with moving subjects.
Sony cameras differentiate between Eye AF (focus only) and Face Detection (focus plus exposure/white balance). You can enable both simultaneously, with Eye AF handling focus priority while Face Detection manages exposure.
Fujifilm Face and Eye Detection
Fujifilm offers four modes: Face Detection OFF, Face Detection ON, Eye Detection AUTO, and Eye Detection with Left/Right priority. The system is straightforward and works well for portraits, though some photographers find it slightly less responsive than Sony’s implementation.
Fujifilm’s Q Menu provides quick access to Face/Eye Detection settings, making it easy to switch between modes during a shoot. The system integrates well with Fujifilm’s Film Simulations for consistent portrait rendering.
Nikon AF Implementation
Nikon’s Face and Eye Detection AF is available on Z series mirrorless cameras. The system offers similar functionality to Canon and Sony, with the ability to detect and track eyes in real-time. Nikon’s implementation works well for portraits and includes animal detection for pet photographers.
Nikon’s system lets you choose between Face/Eye Detection and subject tracking modes, giving you flexibility to match your shooting style. The interface for switching between detected faces is intuitive and works well for group portraits.
Troubleshooting Common Issues
Even the best AF systems have quirks. Here are solutions to the most common problems photographers encounter with Face and Eye Detection AF.
Camera Detecting Faces That Aren’t There
Your camera might identify faces in patterns, textures, or objects that resemble facial features. I’ve seen cameras detect faces in rock formations, tree bark, and even cloud patterns. This causes focus to lock onto the wrong area.
The solution is to temporarily disable Face/Eye Detection when shooting scenes without people, or use your camera’s subject detection area restriction to limit where the system looks for faces. Some cameras also let you adjust detection sensitivity.
AF Favoring One Subject in Groups
Eye Detection AF tends to lock onto the closest or most prominent face in group shots. This leaves other group members slightly soft. The fix is to switch to Face Detection AF for groups, use a narrower aperture for more depth of field, or manually select which face to track if your camera allows it.
For critical group shots, I sometimes disable Face/Eye Detection entirely and use single-point AF positioned on the middle row of faces. This gives me consistent, predictable results.
Erratic AF Box Behavior
When Eye Detection can’t decide between left and right eyes, or when it loses and reacquires eye contact, the AF box can jump around erratically. This is disconcerting in the viewfinder and can cause missed shots.
Try switching to a specific eye priority (left or right) instead of Auto mode. This gives the camera a clear target and reduces the hunting behavior. Also ensure your subject’s eyes are clearly visible and not obscured by hair or glasses.
Low Light AF Struggles
Both Face and Eye Detection can struggle in very dim conditions. Eye Detection typically performs better because eyes provide higher contrast targets. If your camera is hunting, try switching to Eye Detection, using your AF assist beam if available, or positioning subjects where more light falls on their faces.
For extremely low light, I sometimes switch to manual focus with focus peaking. Modern mirrorless cameras make manual focus surprisingly viable even for portrait work.
Verdict: Which Should You Use
After hundreds of portrait sessions using both modes, here’s my final take on Eye Detection AF vs Face Detection AF for portraits.
Use Eye Detection AF When:
Choose Eye Detection AF for individual portraits, headshots, and any situation where you’re shooting at wide apertures (f/1.2 to f/2.8). The precision ensures tack-sharp eyes, which is the single most important technical quality in a portrait. Eye Detection also performs better in low light situations.
Professional portrait photographers, engagement photographers, and anyone focused on creating impactful individual portraits should make Eye Detection their default mode.
Use Face Detection AF When:
Choose Face Detection AF for group portraits, environmental portraits, and situations where you’re shooting at narrower apertures (f/4 and above). The exposure and white balance optimization saves editing time, and the broader focus area handles multiple subjects better.
Event photographers, wedding photographers shooting reception groups, and family portrait specialists will benefit from Face Detection’s versatility and skin tone optimization.
Frequently Asked Questions
What AF mode should I use for portraits?
Use Eye Detection AF for individual portraits at any aperture, especially when shooting wide open (f/1.2-f/2.8). Switch to Face Detection AF for group portraits or when shooting at narrower apertures (f/4+) where you want exposure and white balance optimization in addition to focus.
What is the difference between eye AF and face AF?
Eye AF specifically targets and locks focus on your subject’s eyes for maximum sharpness, but doesn’t adjust exposure or white balance. Face AF focuses on the broader face area and automatically optimizes exposure and white balance for skin tones. Eye AF is more precise; Face AF offers more comprehensive image optimization.
Should I use Face or Eye Detection for group portraits?
Use Face Detection AF for group portraits of three or more people. Eye Detection tends to favor one subject, creating uneven sharpness across the group. Face Detection handles multiple faces better and the exposure optimization ensures consistent skin tones across all subjects.
Does Eye Detection AF affect exposure?
No, Eye Detection AF only controls focus placement on the eyes. It does not adjust exposure or white balance. Face Detection AF, in contrast, optimizes both focus and exposure/white balance for detected faces. If you use Eye Detection, you’ll need to manage exposure settings manually.
My Final Recommendation
For most portrait photographers, Eye Detection AF should be your default mode. Sharp eyes are non-negotiable in portraiture, and Eye Detection delivers that consistency. Switch to Face Detection when shooting groups or when you need the exposure/white balance optimization.
The beauty of modern cameras is how quickly you can switch between modes. I keep both assigned to custom buttons on my camera, allowing me to adapt to each situation without digging through menus. Master when to use each mode, and you’ll see a noticeable improvement in your portrait photography.