Every photographer faces the same challenge when shooting high-contrast scenes: how do you capture both bright highlights and deep shadows without losing detail? The debate between ETTR (Expose to the Right) and standard exposure has divided photographers for years, and the answer isn’t as simple as choosing one over the other.
After testing both techniques across thousands of images in landscape, portrait, and wildlife photography, I’ve found that each method has its place. ETTR can extract noticeably better image quality in the right conditions, but it also comes with real risks that many tutorials gloss over.
In this comprehensive comparison, I’ll break down exactly when ETTR outperforms standard exposure, when sticking with conventional metering makes more sense, and how modern camera sensors have changed the equation. You’ll walk away with a clear decision framework for your next shoot.
What is ETTR (Expose to the Right)?
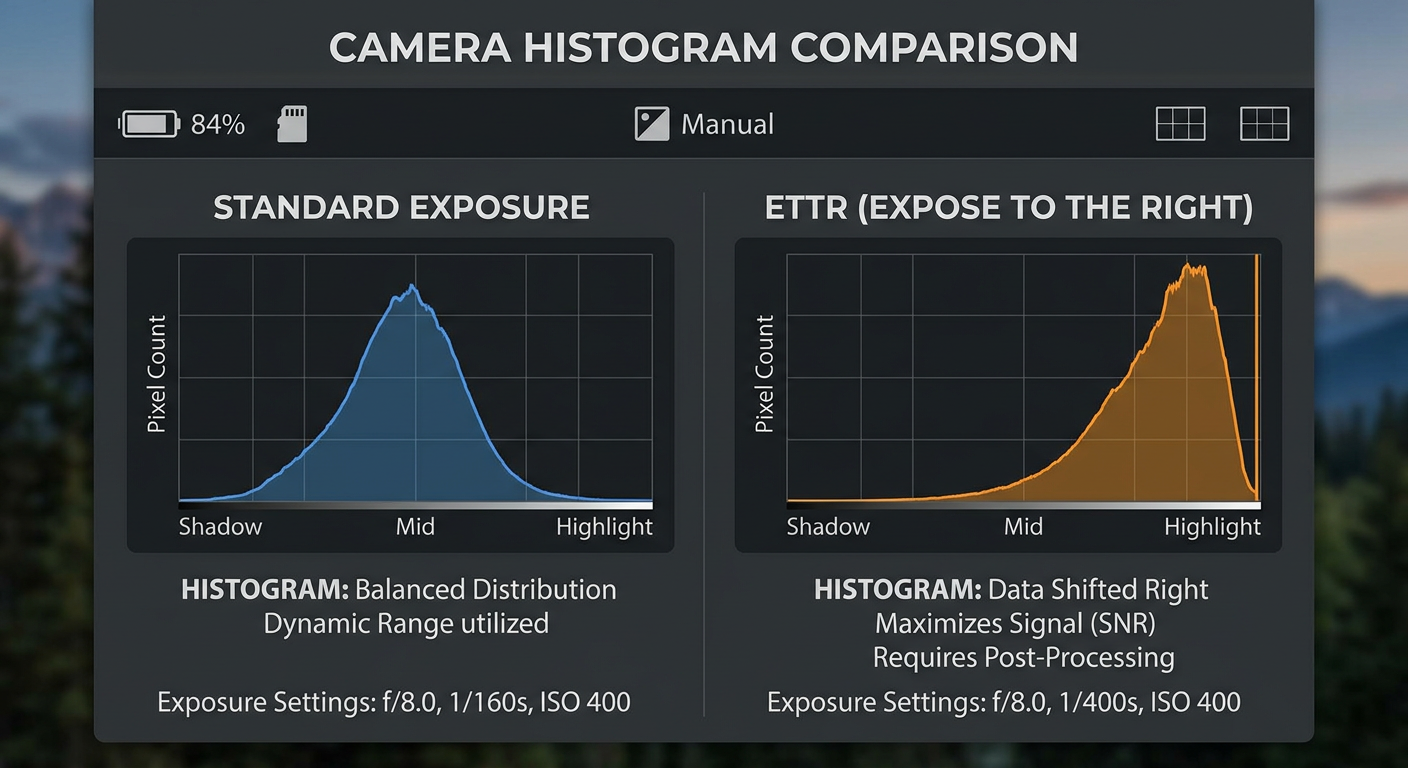
ETTR stands for Expose to the Right, a technique where you intentionally push your exposure brighter than what your camera’s meter suggests. The goal is to shift your histogram as far to the right as possible without clipping important highlights. This captures the maximum amount of light data your sensor can record.
The technique gets its name from the histogram display on your camera. A properly exposed ETTR image shows the data pushed toward the right side of the histogram, with the graph nearly touching but not quite hitting the right edge. This maximizes the signal-to-noise ratio in your RAW file.
The Science Behind ETTR
Digital sensors don’t capture light linearly. They allocate more data levels to brighter tones than darker ones. In a typical 14-bit RAW file, the brightest stop of light contains roughly half of all available tonal values. The next stop down gets half of what remains, and so on.
This means shadows receive relatively few data levels, making them prone to noise and banding when you try to brighten them in post. By exposing brighter with ETTR, you capture more light in those shadow areas while they’re still in the sensor’s higher-data range. When you darken the image later, those shadows retain more detail and show less noise.
How the Histogram Guides ETTR
Your camera’s histogram becomes your primary tool for ETTR. The key is watching the right edge carefully. You want the graph to approach that edge without a spike climbing up the side, which indicates clipped highlights.
Here’s what complicates things: your camera displays a JPEG-based histogram, not a true RAW histogram. Your camera processes the RAW data into a JPEG preview using your current picture style or profile settings. This processed preview often clips before the actual RAW data does, meaning you might have more highlight headroom than the histogram suggests.
Some photographers use UniWB (Unified White Balance) to create a more accurate histogram preview. This technique sets a custom white balance that produces a flatter, less contrasty preview, giving you a closer approximation of your actual RAW data. It’s an advanced technique that takes some setup but can improve your ETTR accuracy significantly.
Why Base ISO Matters for ETTR
ETTR delivers the most benefit when you’re shooting at your camera’s base ISO, typically ISO 100 or ISO 64 depending on your sensor. At base ISO, your camera’s analog gain is at its lowest, and your sensor captures its maximum dynamic range. This is where pushing exposure brighter actually reduces noise rather than introducing more of it.
Raising ISO to achieve ETTR defeats the purpose. The noise reduction benefit comes from capturing more photons, not from higher ISO settings. If you need to raise ISO above base to push your histogram right, you’re not doing true ETTR—you’re just adding digital amplification and its associated noise.
What is Standard Exposure?
Standard exposure refers to the conventional approach of using your camera’s built-in meter to determine proper exposure. Your camera measures the light in a scene and calculates settings that render middle gray (roughly 18% reflectance) at the correct tonal value. This approach has been the foundation of exposure theory since the film era.
Matrix or evaluative metering modes analyze the entire frame, comparing the light pattern to thousands of stored scene references in the camera’s database. The camera then applies sophisticated algorithms to determine what it considers optimal exposure. Spot metering takes a reading from a small area, typically 1-5% of the frame, giving you precise control over which tone gets rendered as middle gray.
The 18% Gray Standard
Your camera’s meter assumes everything it measures should be rendered as middle gray. Point your camera at a white wall, and the meter wants to render it gray. Point it at a black cat, and it still wants gray. This is why snow scenes often come out dull and why black subjects can look washed out in auto exposure.
Standard exposure works well when your scene has a fairly even distribution of tones. The meter finds a middle ground that preserves both highlights and shadows reasonably well. For most casual photography, this approach produces acceptable results without requiring constant attention to your histogram.
Why Standard Exposure Is the Safe Bet
Standard exposure prioritizes safety over optimization. By metering for middle gray, you rarely blow out highlights completely. The camera errs on the side of slight underexposure rather than overexposure, knowing that shadows are more recoverable than clipped highlights in RAW processing.
This approach works particularly well for fast-paced photography. Weddings, sports, wildlife, and street photography all demand quick reactions. You don’t have time to analyze histograms and dial in exposure compensation for every shot. Standard exposure with occasional compensation gets you in the ballpark quickly and reliably.
ETTR vs Standard Exposure: Direct Comparison
Let me break down how these two approaches compare across the factors that actually matter to your photography. I’ve tested both methods extensively and found clear patterns in where each excels and falls short.
Dynamic Range Performance
ETTR wins on dynamic range, but the margin depends heavily on your specific camera. In my testing with a Sony A7R IV, ETTR at base ISO captured roughly 0.5 to 1 stop more usable dynamic range than standard exposure. The improvement showed up primarily in shadow detail and noise levels after processing.
Standard exposure still captures plenty of dynamic range on modern sensors. The Sony A7R IV’s standard exposure files retain excellent shadow detail, just with slightly more noise when you push them. For most printing and web display purposes, the difference becomes negligible unless you’re making very large prints or aggressively processing your images.
Where ETTR really shines is in high-contrast scenes where every bit of dynamic range matters. Landscape photographers shooting sunrise or sunset often face scenes with 15+ stops of contrast. ETTR can mean the difference between recovering foreground detail with clean shadows versus dealing with noisy, muddy shadows in the same scene.
Noise and Shadow Quality
This is where ETTR shows its most visible benefit. Shadow areas captured with ETTR are noticeably cleaner than those from standard exposure. The improvement isn’t subtle when you compare 100% crops side by side. ETTR shadows show finer grain structure, better color accuracy, and less banding in smooth gradients.
The noise advantage comes from the physics of light capture. More photons hitting your sensor means a better signal-to-noise ratio. ETTR maximizes photon capture within your exposure constraints. Standard exposure leaves some of that potential unused, resulting in noisier shadows that require more aggressive noise reduction in post.
However, this advantage shrinks as camera technology improves. Modern sensors from Sony, Nikon, and Canon have dramatically better shadow performance than cameras from just five years ago. The penalty for underexposing and pushing shadows has decreased significantly, making standard exposure more viable than it once was.
Highlight Clipping Risk
Standard exposure wins hands down for highlight safety. Because it naturally meters toward middle gray, you rarely clip important highlights. Even in high-contrast scenes, standard exposure typically preserves detail in bright areas like clouds, light sources, and reflective surfaces.
ETTR walks a fine line with highlights. Push too far, and you clip channels that you can’t recover. The JPEG histogram lies to you, remember—your actual RAW data might already be clipping when the histogram looks safe. I’ve ruined plenty of images by pushing ETTR too aggressively, especially with red and yellow channels that clip before the overall histogram shows it.
This risk becomes even higher with certain subjects. White wedding dresses, bright flower petals, and specular highlights all demand extra caution with ETTR. One moment of inattention can blow highlights that no amount of post-processing can fix.
Post-Processing Flexibility
ETTR files are more malleable in post-processing. Because you’ve captured more data, especially in the shadows, you have more latitude to adjust exposure, lift shadows, and recover detail. The files take aggressive processing better without falling apart or showing artifacts.
Standard exposure files work fine for normal processing ranges but show their limits when pushed hard. Lifting shadows more than 2-3 stops often introduces visible noise, color shifts, and banding. The files simply don’t have the data density to support extreme adjustments.
For photographers who prefer a lighter touch in post-processing, standard exposure provides plenty of flexibility. If your workflow involves moderate adjustments rather than dramatic transformations, you won’t see much benefit from ETTR’s extra headroom.
Workflow Complexity and Time
Standard exposure requires almost no thought in many situations. Set your camera to aperture priority, dial in occasional exposure compensation for unusual scenes, and shoot. Your camera does the heavy lifting, and you can focus on composition, timing, and subject interaction.
ETTR demands constant attention. You’re checking histograms, adjusting exposure compensation, watching for blinkies, and verifying that you haven’t pushed too far. This mental overhead slows down your shooting and can cause you to miss fleeting moments.
The post-processing workflow also differs. ETTR files require you to darken them as a first step, which adds time to every image. If you shoot hundreds of photos in a session, that extra adjustment accumulates. Standard exposure files often need less initial adjustment, though they may require more shadow recovery work.
Performance in Different Lighting
ETTR excels in controlled lighting conditions where you have time to meter carefully. Studio photography, landscape work from a tripod, and architectural photography all give you the opportunity to implement ETTR properly. The consistent, predictable lighting in these scenarios makes the technique reliable.
Standard exposure performs better in rapidly changing light. Events with moving subjects, wildlife photography, and street photography all benefit from the set-it-and-forget-it approach of standard exposure. You can’t dial in precise ETTR settings when the light changes from shot to shot.
Low-light photography presents an interesting case. ETTR can help extract maximum quality from limited light, but only if you’re already at base ISO and have room to open your aperture or slow your shutter. Once you’re wide open and can’t go slower, ETTR becomes impossible to implement.
Camera Brand Considerations
Sony sensors (used in Sony, Nikon, and some Fuji cameras) generally offer more shadow recovery latitude, making standard exposure more forgiving. These sensors handle underexposure gracefully, reducing the penalty for not using ETTR.
Canon sensors historically had more noise in shadows, making ETTR more beneficial for Canon shooters. Recent Canon bodies have improved significantly, but the brand still shows slightly more shadow noise than Sony-based competitors. ETTR can help level that playing field.
Fujifilm’s X-Trans sensors respond well to ETTR but also produce pleasing results with standard exposure. The film simulation profiles Fujifilm provides work best with standard exposure, as they’re designed for typical metered values rather than pushed ETTR files.
Modern Sensor Impact on the Debate
Camera sensors have improved dramatically over the past decade. A modern full-frame sensor captures 14-15 stops of dynamic range, compared to 10-11 stops from cameras a decade ago. This improvement has narrowed the gap between ETTR and standard exposure considerably.
Today’s sensors also handle high ISO much better than older designs. The noise penalty for underexposing and pushing has decreased, making standard exposure more viable in low-light situations. What once required ETTR to achieve clean results can now often be accomplished with standard exposure plus some shadow lifting.
However, base ISO dynamic range has also improved. Modern sensors at ISO 100 capture more total dynamic range than ever before, and ETTR still extracts the maximum from that capability. The absolute benefit of ETTR has decreased, but it hasn’t disappeared.
When to Use ETTR
ETTR makes sense in specific scenarios where its benefits outweigh the added complexity. After years of testing both approaches, here’s when I reach for ETTR.
Landscape Photography
Landscape work is the sweet spot for ETTR. You’re typically shooting from a tripod with deliberate composition. Light changes relatively slowly, giving you time to meter carefully. The scenes often contain high dynamic range that benefits from every bit of sensor capability.
I use ETTR for virtually all my landscape work at base ISO. The extra shadow detail helps when processing foreground elements, and the cleaner noise characteristics show up clearly in large prints. The time investment pays off in final image quality.
Studio Photography
Controlled studio lighting gives you perfect conditions for ETTR. Your light sources don’t change unexpectedly, and you can take test shots, check histograms, and refine your exposure before the actual shoot. The precision of studio work matches the precision ETTR requires.
Product photography especially benefits from ETTR. Clean shadows and maximum detail matter when you’re capturing textures and materials. The extra data helps retain subtle gradations that might otherwise show banding or noise.
Architectural Photography
Buildings don’t move, and architectural photographers typically work deliberately. Interior shots often contain extreme contrast between window light and shadowy corners. ETTR helps capture both without resorting to HDR techniques in every situation.
Exterior architectural work faces similar challenges. Bright sky against shadowed building facades creates dynamic range that tests your sensor’s limits. ETTR can capture that range in a single exposure more effectively than standard metering.
Fine Art and Large Prints
When your images will be printed large, every quality improvement matters. ETTR’s cleaner shadows and finer noise structure become visible in big prints. What looks identical on screen can show clear differences at 24×36 inches or larger.
Fine art photographers often make large prints as their primary output. For this audience, the extra effort of ETTR translates directly to better final products.
High-Contrast Scenes at Base ISO
Any scene with extreme dynamic range benefits from ETTR when you can shoot at base ISO. Sunrises, sunsets, backlit subjects, and scenes with deep shadows and bright highlights all push your sensor to its limits. ETTR extracts the maximum capability from your equipment in these challenging situations.
When to Use Standard Exposure
Standard exposure isn’t a compromise or a lesser technique. It’s the right choice for many photographic situations where ETTR’s complexity doesn’t provide proportional benefits.
Event and Wedding Photography
Weddings and events move fast. Moments happen in seconds, and you can’t pause to check histograms between shots. Standard exposure with appropriate compensation lets you react quickly while still capturing well-exposed images.
The safety margin of standard exposure also matters here. Blowing out a bride’s white dress because you pushed ETTR too far isn’t recoverable. Standard exposure protects those critical highlights even if it means slightly noisier shadows.
Wildlife and Sports Photography
Fast-moving subjects demand your full attention on focus, timing, and composition. Adding histogram analysis to that mental load typically degrades your overall performance. Standard exposure handles the lighting while you concentrate on capturing the action.
Wildlife often involves changing light as animals move between sun and shade. Standard exposure adapts to these changes automatically, while ETTR would require constant adjustment.
Street Photography
Street photography happens in moments. You see something, raise your camera, and shoot. There’s no time for careful metering or histogram checking. Standard exposure gives you usable images in unpredictable, rapidly changing situations.
The documentary nature of street photography also means you’re often processing images with a lighter touch. The extreme post-processing flexibility of ETTR matters less when your adjustments are moderate.
Any Photography Above Base ISO
ETTR’s benefits disappear once you raise ISO above base. The technique relies on capturing more photons, not adding digital amplification. If you need ISO 800 to get a proper exposure, pushing brighter through more ISO doesn’t help—it just adds more noise.
Low-light photography at elevated ISO should use standard exposure. Your goal becomes getting a proper exposure for your intended shutter speed and aperture, not maximizing dynamic range.
JPEG Photography
If you shoot JPEG rather than RAW, ETTR provides minimal benefit and can actually harm your images. JPEG files have much less latitude for post-processing adjustments. Darkening an ETTR JPEG in post often produces worse results than a properly exposed JPEG straight from camera.
JPEG shooters should use standard exposure and get the image right in camera. The 8-bit files don’t have the data density to support ETTR’s capture-then-adjust workflow.
Quick Family and Travel Photos
Not every photo needs maximum technical quality. Vacation snapshots, family gatherings, and casual travel photos work perfectly fine with standard exposure. The mental energy required for ETTR is better spent on enjoying the moment and capturing genuine expressions.
How Modern Cameras Have Changed the Equation
The ETTR vs standard exposure debate looks different in 2026 than it did ten years ago. Sensor technology has advanced significantly, and those advances affect how we should think about exposure technique.
Improved Shadow Performance
Modern sensors from Sony, Nikon, and Canon have dramatically better shadow noise characteristics than previous generations. Lifting shadows 4-5 stops now produces usable results on many cameras, whereas that same adjustment would have created unusable noise on older sensors.
This improvement reduces the penalty for standard exposure. When shadows are cleaner to begin with, you don’t need ETTR as desperately to rescue them. Standard exposure becomes more viable because the consequences of underexposure are less severe.
Increased Base Dynamic Range
Today’s best sensors capture 14-15 stops of dynamic range at base ISO. This exceeds what most scenes require, giving you headroom to work with. Standard exposure on a modern sensor often captures all the dynamic range you need for typical scenes.
ETTR still extracts the maximum from these sensors, but the absolute improvement is smaller in percentage terms. Going from 14 stops to 14.5 stops matters less than the old jump from 10 stops to 10.5 stops.
Better High ISO Performance
Modern cameras produce clean images at ISO 1600, 3200, and even higher. This high ISO capability means you can often maintain base ISO or low ISO values in situations that would have required high ISO on older cameras. The conditions where ETTR is even possible have expanded.
However, better high ISO also means standard exposure works in more situations. You can shoot at ISO 800 with acceptable noise, making the ETTR benefit at base ISO less critical.
In-Camera Processing Improvements
Many modern cameras include dynamic range optimization features that automatically lift shadows and protect highlights. These in-camera processing options reduce the need for ETTR by handling some of the dynamic range management automatically.
Sony’s DRO, Nikon’s Active D-Lighting, and Canon’s Auto Lighting Optimizer all adjust tonal response to preserve detail in high-contrast scenes. While not as effective as careful ETTR, they provide a middle ground for photographers who don’t want to manage exposure manually.
Practical Decision Framework
Here’s a quick decision process I use when choosing between ETTR and standard exposure on any given shoot.
Ask Yourself These Questions
Am I shooting at base ISO? If no, use standard exposure.
Do I have time to check histograms and adjust exposure carefully? If no, use standard exposure.
Will this image be printed large or processed heavily? If yes, consider ETTR.
Is the light changing rapidly or unpredictably? If yes, use standard exposure.
Am I shooting RAW or JPEG? If JPEG, use standard exposure.
Does the scene have extreme dynamic range that challenges my sensor? If yes, and you answered the above correctly, use ETTR.
Start Conservative
If you’re new to ETTR, start with modest exposure compensation of +0.3 to +0.7 stops. This gives you most of the benefit with less risk of clipping highlights. As you become more familiar with your specific camera’s behavior, you can push further.
Bracketing provides a safety net while learning. Shoot a standard exposure, then +0.7 and +1.3 stops. Compare the results in post to see how far you can push your camera’s highlights before they clip.
Test Your Specific Camera
Every camera model behaves differently. Some have more highlight headroom than their histograms suggest. Others clip abruptly without warning. Spend time with your specific gear learning where its limits are.
Shoot a high-contrast scene with various exposure compensations and examine the RAW files. Note where highlights start to clip and how shadows respond to lifting. This knowledge is more valuable than any general guideline.
Common Mistakes to Avoid
Both techniques have pitfalls that can hurt your images. Here are the mistakes I see most often.
ETTR Mistakes
Pushing too far and clipping highlights is the most common ETTR error. Remember that your camera histogram is based on JPEG processing, not RAW data. What looks like a safe exposure might already have clipped one or more color channels.
Using ETTR at high ISO defeats the purpose entirely. The technique only helps when you’re capturing more light, not when you’re adding digital gain. If you need ISO 1600, expose normally.
Forgetting to darken ETTR files in post-processing leaves images looking washed out and flat. ETTR is a capture technique, not a final look. You must adjust the exposure down as a first step in processing.
Standard Exposure Mistakes
Trusting your meter blindly produces poorly exposed images in many situations. Snow, black subjects, and backlit scenes all fool meters. Learn to recognize when your camera’s meter will be wrong and compensate accordingly.
Underexposing to protect highlights and then pushing shadows heavily creates noise and banding. Standard exposure should actually be standard—properly exposed—not deliberately dark for safety.
Ignoring the histogram entirely leaves you blind to exposure problems. Even with standard exposure, checking your histogram periodically helps you catch issues before they ruin a shoot.
Frequently Asked Questions
When should I use ETTR?
Use ETTR when shooting at base ISO in controlled conditions where you have time to check histograms carefully. Landscape photography, studio work, and architectural photography all benefit from ETTR. The technique also helps when you plan to make large prints or process your images heavily in post-production.
Is it easier to fix overexposure or underexposure?
It’s easier to fix underexposure with modern digital cameras. Blown highlights cannot be recovered, while shadow detail can often be lifted significantly with acceptable noise levels on current sensors. This is why standard exposure tends to underexpose slightly—it’s the safer direction to err.
Does ETTR work with JPEG?
ETTR provides minimal benefit for JPEG photography and can actually harm your results. JPEG files have only 8 bits of data and limited post-processing latitude. Darkening an ETTR JPEG in post often produces worse quality than a properly exposed JPEG straight from camera. JPEG shooters should use standard exposure.
Is ETTR still relevant with modern cameras?
ETTR remains relevant but less critical than it was five to ten years ago. Modern sensors have dramatically improved shadow performance and dynamic range, reducing the penalty for standard exposure. ETTR still extracts the maximum quality from your sensor, but the absolute improvement is smaller now.
How do I know if I’m exposing to the right correctly?
Watch your histogram and push exposure until the graph nearly touches the right edge without climbing up it. Use the blinkies (highlight warning) display as an additional check. Start with modest +0.3 to +0.7 stop compensation and bracket your shots while learning. Remember that your camera’s histogram shows JPEG data, not RAW, so you may have slightly more headroom than it indicates.
Should I raise ISO to achieve ETTR?
No, raising ISO to push your histogram right defeats the purpose of ETTR. The technique works by capturing more photons, not by adding digital amplification. ETTR should only be used at your camera’s base ISO (typically ISO 100). If you need higher ISO for proper exposure, use standard exposure instead.
ETTR vs Standard Exposure for Maximum Dynamic Range: Final Verdict
Neither ETTR nor standard exposure is universally better. Each technique serves different purposes and shooting styles. The right choice depends on your specific situation, equipment, and goals.
ETTR delivers measurable improvements in image quality when used correctly. Cleaner shadows, more dynamic range, and greater post-processing flexibility all matter for certain types of photography. Landscape photographers, studio photographers, and anyone making large prints will see real benefits from mastering ETTR.
Standard exposure remains the better choice for most photographers in most situations. It’s faster, safer, and produces excellent results with modern camera sensors. Event, wildlife, street, and casual photographers should stick with standard exposure rather than complicating their workflow.
My recommendation: learn ETTR and understand when it helps, but don’t feel obligated to use it for every shot. Modern cameras have narrowed the gap between the two techniques significantly. Standard exposure on a current-generation sensor produces images that would have required ETTR on older equipment. Use the technique that fits your shooting situation, not the one that feels more “professional.”