If you have spent any time in wildlife photography circles, you have likely heard the debate: back button focus vs shutter button focus. After shooting wildlife for over a decade, I can tell you this is not just technical nitpicking. The way you trigger autofocus fundamentally changes how you photograph moving animals.
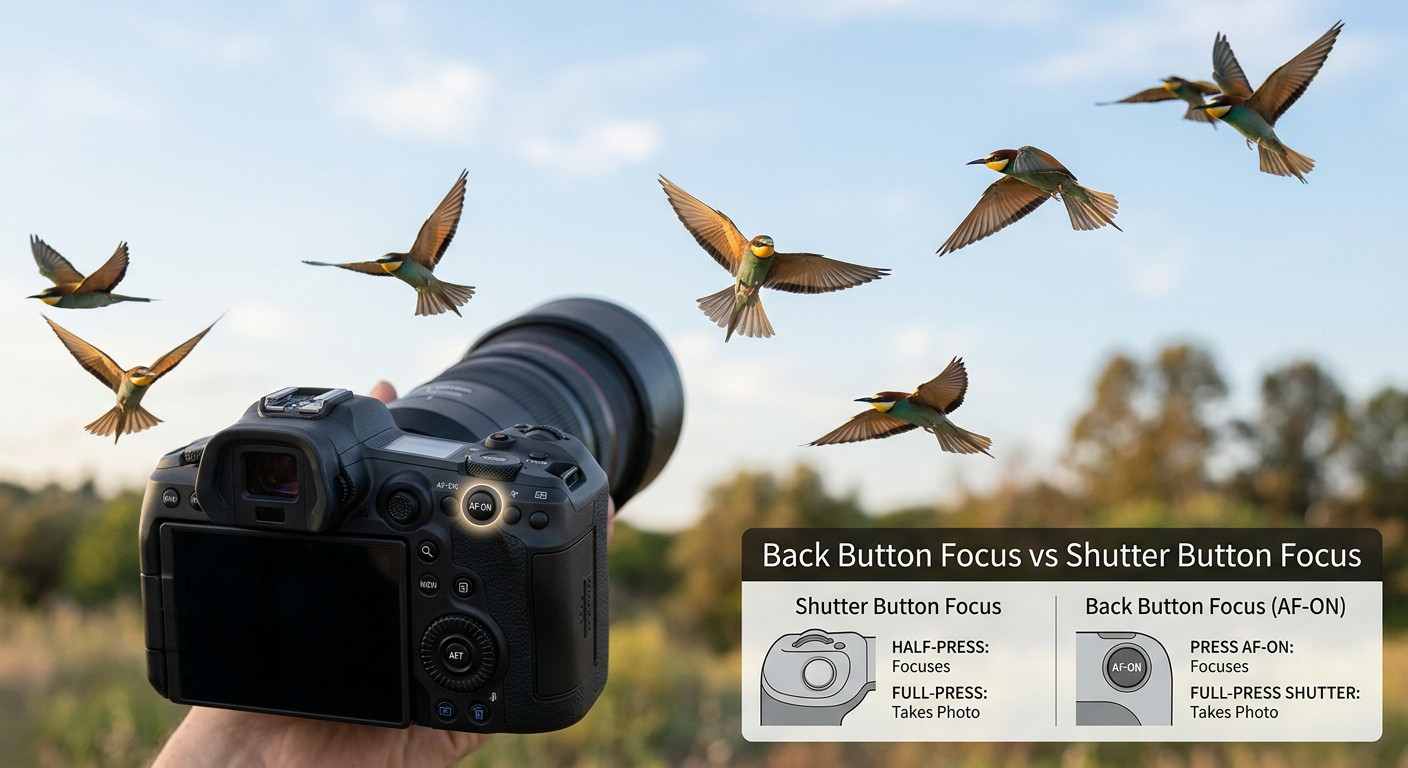
Shutter button focus is the default method most cameras use out of the box. You half-press the shutter to focus, then press fully to take the photo. Back button focus separates these actions entirely. You use a button on the back of your camera (usually labeled AF-ON) to focus, and the shutter button only releases the shutter.
Here is my quick verdict after thousands of wildlife shots: back button focus wins for most wildlife situations. But that does not mean it is perfect for everyone or every scenario. Let me break down exactly when each method shines and help you decide which approach fits your wildlife photography style.
What Is Back Button Focus?
Back button focus is a camera technique that separates the autofocus function from the shutter release button. Instead of half-pressing the shutter to focus, you press a dedicated button on the back of your camera with your thumb. The AF-ON button is the most common assignment, though some photographers use the AE-L/AF-L button on older bodies.
When you enable back button focus, your shutter button becomes a simple shutter release. It no longer triggers autofocus at all. This separation gives you complete control over when your camera focuses and when it stops focusing.
I remember when I first tried back button focus about eight years ago. It felt awkward for about two weeks. My thumb kept searching for the right button, and I missed shots while adjusting. But once the muscle memory developed, I wondered how I ever photographed wildlife without it.
The Key Principle: Separation of Control
The core idea behind back button focus is simple. Focus and shutter are two different actions, so they should have two different buttons. When you want to track a bird flying across the sky, you hold the AF-ON button continuously. When you want to lock focus on a perched owl and wait for it to take off, you press once and release.
This separation eliminates the constant focus hunting that happens when you use continuous autofocus with shutter button focus. Every time you lift your finger slightly off the shutter, the camera might refocus on something else entirely.
What Is Shutter Button Focus?
Shutter button focus is the default autofocus activation method on virtually every camera. When you press the shutter button halfway down, the camera engages autofocus and metering. Press fully, and the shutter fires.
This method works by design for most general photography situations. It is intuitive because pressing the shutter feels like the natural way to tell the camera “get ready to take a photo.” The half-press, full-press motion becomes second nature quickly.
For portrait sessions, landscape work, or casual family photos, shutter button focus is perfectly adequate. You focus on your subject, maybe recompose slightly, and take the shot. The process is straightforward and requires no custom settings.
Why It Is the Default
Camera manufacturers default to shutter button focus for good reason. It is simple to understand and works well for stationary subjects. Most casual photographers never need anything more sophisticated.
The problem arises when you point your camera at a deer walking through tall grass, a hawk circling overhead, or a bear fishing in a river. In these situations, the default behavior becomes a liability rather than a convenience.
Back Button Focus vs Shutter Button Focus: Head-to-Head Comparison
Let me break down how these two methods compare across the factors that matter most for wildlife photography. I have tested both extensively in the field, and the differences become obvious when you know what to look for.
| Feature | Back Button Focus | Shutter Button Focus |
|---|---|---|
| Focus Control | Complete control – focus only when you press AF-ON | Focus engages every time you half-press shutter |
| Continuous Tracking | Hold AF-ON to track, release to lock focus | Must keep shutter half-pressed constantly |
| Reaction Time | Instant – shutter fires immediately when pressed | Slight delay while camera confirms focus |
| Obstruction Handling | Excellent – release AF-ON when branches interfere | Poor – camera refocuses on foreground objects |
| Manual Override | Easy – just grab focus ring anytime | Requires switching to manual focus mode |
| Learning Curve | Steep – 1-2 weeks to develop muscle memory | None – works out of the box |
| Cold Weather Use | Challenging – requires thumb dexterity | Easier – single finger operation |
| Handoff to Others | Confusing – camera behaves unexpectedly | Intuitive – standard operation |
Focus Control: Who Has the Power?
Back button focus puts you in complete control of when focus engages. Want to pre-focus on a branch where a kingfisher might land? Press AF-ON once, then release. Your focus stays locked at that distance until you tell it otherwise.
With shutter button focus, every time your finger touches that button, the camera tries to focus. If you accidentally lift your finger slightly and press again, the camera hunts. This constant engagement becomes frustrating when photographing wildlife that moves in and out of obstructions.
Reaction Time: The Decisive Moment
Here is a scenario I encounter constantly. A bald eagle is perched on a snag, preening. I have my camera ready, focus locked on the bird. Suddenly it spreads its wings to take off. I have maybe one second to capture that launch.
With back button focus, I simply press the shutter. No focus confirmation delay, no hunting, just instant shutter release. With shutter button focus, the camera often insists on confirming focus before firing, costing precious milliseconds.
Those milliseconds matter. I have captured perfect takeoff shots with back button focus that would have been missed with the default method.
Handling Obstructions: Branches, Grass, and Reeds
Wildlife rarely presents itself against clean backgrounds. Birds hide in bushes, mammals walk through tall grass, and shorebirds forage among reeds. These foreground obstructions are the enemy of autofocus systems.
With back button focus, I can track a subject through intermittent obstructions. When a branch passes between me and the bird, I release the AF-ON button momentarily. The focus stays where it was. When the branch clears, I press AF-ON again to continue tracking.
Shutter button focus users have no such luxury. Every time that branch crosses the frame, the camera tries to refocus on it. You end up with dozens of photos focused on foreground grass instead of the fox walking behind it.
One wildlife photographer I spoke with put it perfectly: “If I had been using shutter button autofocus, about 50 percent of my images would have been focused on foreground reeds, not the bird.”
Continuous Focus Tracking
For birds in flight and running mammals, you need continuous autofocus (AI Servo on Canon, AF-C on Nikon and Sony). The camera constantly adjusts focus as your subject moves closer or farther away.
Back button focus excels here. You hold the AF-ON button down, and the camera tracks your subject continuously. Release the button, and focus locks at the current distance. This on-demand tracking gives you the benefits of both continuous and single-shot autofocus without changing modes.
With shutter button focus, you must keep the shutter half-pressed to maintain tracking. This becomes uncomfortable during extended tracking sessions, and any accidental release causes the camera to stop tracking or refocus on something else.
Manual Focus Override
Sometimes autofocus gets confused. Low light, low contrast subjects, or repetitive patterns can fool even the best AF systems. In these moments, manual focus override saves the shot.
Back button focus makes manual override seamless. Your thumb is not on the AF-ON button, so the camera is not trying to autofocus. Simply grab the focus ring and adjust. When you want autofocus again, press AF-ON.
With shutter button focus, manual override typically requires switching to manual focus mode or holding the shutter in a specific position. It is less intuitive and slower in the field.
Wildlife Photography Scenarios: Which Method Wins?
Let me walk you through specific wildlife situations I encounter regularly and explain which focusing method works best for each.
Birds in Flight
Winner: Back Button Focus
Flying birds are the ultimate test of autofocus tracking. They change direction, speed, and distance constantly. You need continuous focus that you can control precisely.
I photograph a lot of raptors in flight. When a red-tailed hawk circles overhead, I hold the AF-ON button continuously while tracking with my lens. If another bird momentarily enters the frame, I release AF-ON to prevent focus jumping, then continue tracking my original subject.
Back button focus also lets me switch between tracking and lock-and-wait strategies instantly. If I see a bird approaching from a distance, I can track it with AF-ON held. When it gets to the perfect position, I release AF-ON and fire multiple frames with focus locked.
Wildlife with Obstructions
Winner: Back Button Focus
Photographing wildlife through grass, branches, or reeds is incredibly challenging. The autofocus system wants to lock onto the nearest object, which is rarely your subject.
Last spring, I spent a week photographing owls hunting in tall grass. The owls would hover, then dive. With back button focus, I could track the owl in the air, then release the button as it dove into the grass. Focus stayed on the owl, not the grass blades rushing past.
Shutter button focus would have been a disaster in this situation. Every grass blade passing through the frame would trigger refocusing.
Stationary Wildlife Waiting for Action
Winner: Back Button Focus
Sometimes the best wildlife shots happen when you wait. A heron stands motionless at the edge of a pond. A cheetah watches the horizon. You know action might come, but you do not know when.
Back button focus is perfect for this scenario. Focus once on your stationary subject, then release the AF-ON button. Your focus is now locked. When the action finally happens, you fire immediately without any focus delay.
I photographed a great blue heron for 45 minutes as it stood perfectly still. Focus locked, waiting. When it finally struck at a fish, I captured the entire sequence with perfect focus because the camera was not wasting time trying to refocus.
Fast Action Sequences
Winner: Back Button Focus
When animals run, fight, or chase, things happen fast. You need maximum responsiveness from your camera.
I photographed two foxes playing in snow last winter. They tumbled, chased, and wrestled in unpredictable patterns. Back button focus let me track continuously through the chaos. When they momentarily paused, I released AF-ON to lock focus and fired a burst.
The ability to instantly switch between tracking and locked focus without changing camera modes is invaluable for fast action.
Low Light Wildlife
Winner: Back Button Focus (usually)
Low light challenges autofocus systems. The camera hunts more, takes longer to lock, and sometimes fails entirely.
Back button focus helps here because you can manually override focus when AF struggles. Focus approximately with AF-ON, then fine-tune manually. When your subject moves, press AF-ON again.
However, there is one exception. In very cold low-light conditions, your thumb may become numb. Operating a small button on the back of the camera becomes difficult. In these extreme conditions, shutter button focus might actually be easier.
When Shutter Button Focus Makes Sense
Despite my strong preference for back button focus, I want to be honest about when the default method works better.
Cold weather: When your fingers are numb and your thumb does not want to find a specific button, shutter button focus is easier. One finger does all the work.
Handing your camera to others: If someone else picks up your camera with back button focus enabled, they will be confused. Nothing happens when they press the shutter because the camera is not focusing.
Quick snapshots: If you are just grabbing a quick photo and do not need precision, the default method is simpler.
Physical limitations: Some photographers have thumb issues or find back button operation uncomfortable. Shutter button focus is a valid choice if physical comfort is a concern.
How to Set Up Back Button Focus
Ready to try back button focus? Here are setup instructions for the major camera brands. The exact menu names vary slightly between models, but the general process is similar.
Canon Setup
For Canon DSLRs and mirrorless cameras:
- Press the Menu button and navigate to Custom Functions (or Custom Functions Menu on older bodies)
- Look for Custom Controls or Custom Buttons
- Find the Shutter Button option and set it to Metering Start only (remove AF from shutter)
- Find AF-ON button and ensure it is set to Metering and AF Start
- Exit the menu and test – shutter should now fire without focusing
On newer Canon mirrorless bodies like the R5 or R6, you can also assign back button focus to the AF-ON button through the custom buttons menu in the main settings.
Nikon Setup
For Nikon DSLRs and Z-series mirrorless:
- Press Menu and go to Custom Setting Menu (pencil icon)
- Navigate to Autofocus settings
- Find AF Activation and set to AF-ON Only
- This removes AF from the shutter button
- Ensure AF-ON button is assigned to autofocus
On some Nikon bodies, you may need to assign AF-ON to the AE-L/AF-L button if a dedicated AF-ON button is not present.
Sony Setup
For Sony Alpha mirrorless cameras:
- Press Menu and go to Setup (toolbox icon)
- Find Operation Customize or Custom Key Settings
- Set AF On to your preferred back button (AF-ON or center button)
- Set Shutter AF to Off to remove AF from shutter button
- Test to confirm shutter fires without focusing
Sony offers extensive customization, so you can assign back button focus to several different buttons depending on your preference.
Fujifilm Setup
For Fujifilm X and GFX cameras:
- Press Menu and navigate to User Setting
- Find Button/Dial Setting
- Look for AF Mode Setting or Focus Ring Setting
- Assign AF-ON to your preferred back button
- Set shutter button to release only (no AF)
Fujifilm menus vary significantly between models, so consult your manual for exact locations.
Tips for the Transition Period
Switching to back button focus takes adjustment. Here is what to expect and how to make the transition smoother.
Give it two weeks: Your muscle memory needs time to develop. Do not give up after a few frustrating sessions. Commit to using back button focus exclusively for at least two weeks.
Practice on non-critical subjects: Before your next wildlife trip, practice back button focus on pets, birds in your backyard, or even moving cars. Build the muscle memory in low-stakes situations.
Expect to miss some shots: During the learning period, you will miss shots while your thumb searches for the right button. This is normal and temporary.
Use the AF-ON button, not AE-L: If your camera has a dedicated AF-ON button, use it. The AE-L/AF-L button works but is less ergonomically positioned for back button focus.
Pros and Cons: The Complete Picture
Back Button Focus Pros
- Complete control over when focus engages
- No focus hunting when shooting through obstructions
- Instant shutter response without focus confirmation delay
- Seamless switching between continuous and locked focus
- Easy manual focus override without mode changes
- Better for focus-and-recompose techniques with moving subjects
- Reduces missed shots in dynamic wildlife situations
Back Button Focus Cons
- Steep learning curve – takes 1-2 weeks to feel natural
- Confusing for others who borrow your camera
- Challenging in cold weather with numb fingers
- Can cause thumb fatigue during long sessions
- Requires menu diving to set up initially
- Not ideal for all photography genres
Shutter Button Focus Pros
- Works out of the box with no setup required
- Intuitive for beginners and casual photographers
- Single-finger operation is comfortable in any weather
- Camera behaves as others expect when shared
- No muscle memory retraining needed
Shutter Button Focus Cons
- Camera refocuses every time you touch the shutter
- Focus jumps to obstructions in the frame
- Slight delay while camera confirms focus before firing
- Must switch modes to use continuous focus effectively
- Manual focus override requires mode changes
- More missed shots in dynamic wildlife situations
Frequently Asked Questions
What is the best focus mode for wildlife photography?
For most wildlife photography, back button focus combined with continuous autofocus (AI Servo on Canon, AF-C on Nikon/Sony) is the best approach. This combination lets you track moving subjects while maintaining control over when focus engages. Use back button focus to lock focus on stationary wildlife waiting for action, or hold the button to track birds in flight and running mammals.
What are the disadvantages of back button focus?
The main disadvantages of back button focus include a steep learning curve of 1-2 weeks to develop muscle memory, difficulty using it in cold weather when fingers are numb, thumb fatigue during long shooting sessions, and confusion when handing your camera to others. It also requires initial setup in your camera menus, which can be intimidating for beginners.
Why is back button focus better?
Back button focus is better because it gives you complete control over when autofocus engages. You can lock focus on a subject and wait for action without the camera refocusing, track moving subjects without keeping the shutter half-pressed, handle obstructions by releasing focus temporarily, and override focus manually without switching modes. This control translates to fewer missed shots in dynamic wildlife situations.
How long does it take to learn back button focus?
Most photographers need 1-2 weeks of consistent practice to feel comfortable with back button focus. During this transition period, you will likely miss some shots while your thumb searches for the right button. Commit to using it exclusively for at least two weeks before deciding if it works for you. Practice on non-critical subjects like backyard birds or pets during the learning period.
The Verdict: Which Should You Use?
After weighing all the factors, my recommendation for wildlife photographers is clear: learn and use back button focus. The control it provides over your autofocus system translates directly to more keepers and fewer missed opportunities.
Back button focus vs shutter button focus is not really a fair fight when it comes to wildlife photography. The separation of focus and shutter gives you precision that the default method simply cannot match. Tracking birds through branches, waiting for action with focus locked, and switching between tracking strategies on the fly are all dramatically easier with back button focus.
You should use back button focus if:
- You photograph birds, mammals, or other moving wildlife regularly
- You shoot through grass, branches, or other obstructions
- You want maximum control over when focus engages
- You are willing to invest 1-2 weeks in building new muscle memory
Shutter button focus may be better if:
- You photograph mostly stationary subjects
- You frequently shoot in very cold conditions
- You have physical limitations that make thumb operation difficult
- You regularly hand your camera to other people
The back button focus vs shutter button focus debate has raged for years, but for wildlife photographers serious about their craft, the answer is increasingly clear. Make the switch, push through the learning curve, and watch your keeper rate climb.