You have probably seen those oversaturated, halo-ridden landscape photos that scream “HDR” from a mile away. I know I have created my fair share of them back when HDR tone mapping was the hot new technique. But here is the truth most photographers eventually discover: the best high dynamic range images are the ones where you cannot tell any special technique was used at all.
That is where exposure blending comes in. This manual approach to combining multiple exposures gives you complete control over your final image while maintaining a natural, realistic appearance. Unlike automated HDR software that applies tone mapping algorithms to your entire photo, exposure blending lets you selectively choose which parts of each exposure to reveal.
In this guide, I will walk you through everything you need to know about using exposure blending as a natural alternative to HDR tone mapping. You will learn why many photographers have moved away from automated HDR, how to shoot for exposure blending, five different blending methods ranging from beginner to advanced, and when to use each technique based on your photography genre.
What Is HDR Tone Mapping?
HDR stands for High Dynamic Range. The technique was developed to address a fundamental limitation of cameras: they cannot capture the full range of light that our eyes can see in a single exposure. When you photograph a sunset landscape, for example, your camera typically has to choose between properly exposing the bright sky or the dark foreground, but it cannot do both simultaneously.
HDR tone mapping solves this by merging multiple bracketed exposures (usually 3 to 7 shots at different brightness levels) into a single 32-bit image that contains all the tonal information. The problem is that this merged image cannot be displayed on standard monitors or printed, so HDR software uses tone mapping algorithms to compress that massive dynamic range back into something viewable.
Here is where things often go wrong. Tone mapping algorithms apply adjustments globally across your image, boosting shadows, compressing highlights, and increasing local contrast. When pushed too far, which is incredibly easy to do, the result is that unmistakable “HDR look” with glowing halos around high-contrast edges, radioactive colors, and an almost three-dimensional but completely unnatural appearance.
The technique exploded in popularity around 2008-2010 when software like Photomatix made it accessible to everyone. For a while, heavily processed HDR images were everywhere, from photography forums to real estate listings. But as photographers matured and tastes evolved, many began seeking a more subtle approach that did not scream “processed” to viewers.
Why Photographers Are Moving Away from HDR Tone Mapping
The backlash against HDR tone mapping is not just about following trends. There are legitimate technical and aesthetic reasons why many photographers now avoid automated HDR software or use it with extreme restraint.
The most obvious issue is the overprocessed appearance. When tone mapping algorithms aggressively boost local contrast, images develop an artificial, almost illustrative quality. Shadows become unnaturally bright, highlights lose their brilliance, and the overall tonal relationship that our eyes expect to see gets completely disrupted.
Halos are another telltale sign of heavy HDR processing. These glowing edges appear where dark areas meet light areas, such as around tree branches against a bright sky or building silhouettes at sunset. They occur because the tone mapping algorithm is applying different adjustments to adjacent areas, creating an artificial boundary that simply does not exist in natural scenes.
Color problems are equally common. HDR software often oversaturates colors in its quest to extract maximum detail and contrast. Blues become electric, greens turn radioactive, and skin tones take on an unnatural orange or magenta cast. Even when you try to dial back the settings, the color shifts can be difficult to fully correct.
There is also a practical consideration that many HDR tutorials overlook: modern camera sensors have dramatically improved. Cameras from Sony, Nikon, and Canon now routinely offer 13 to 15 stops of dynamic range. Many scenes that once required bracketing can now be captured in a single well-exposed RAW file with careful shadow and highlight recovery in post-processing.
I have found myself reaching for bracketed exposures far less often with my current camera than I did five years ago. The combination of better sensors and improved RAW processing means that for many situations, you may not need HDR techniques at all. When you do need extended dynamic range, exposure blending offers more control with more natural results.
What Is Exposure Blending?
Exposure blending is a manual post-processing technique where you combine multiple photographs of the same scene taken at different exposures, using masks to selectively reveal the best parts of each shot. Think of it as hand-picking which exposure works best for each area of your image rather than letting software make those decisions for you.
The fundamental difference between exposure blending and HDR tone mapping comes down to control and philosophy. HDR software applies tone mapping algorithms globally, making decisions about how to compress dynamic range based on mathematical formulas. Exposure blending puts you in the driver’s seat, allowing you to decide exactly where and how much of each exposure to use.
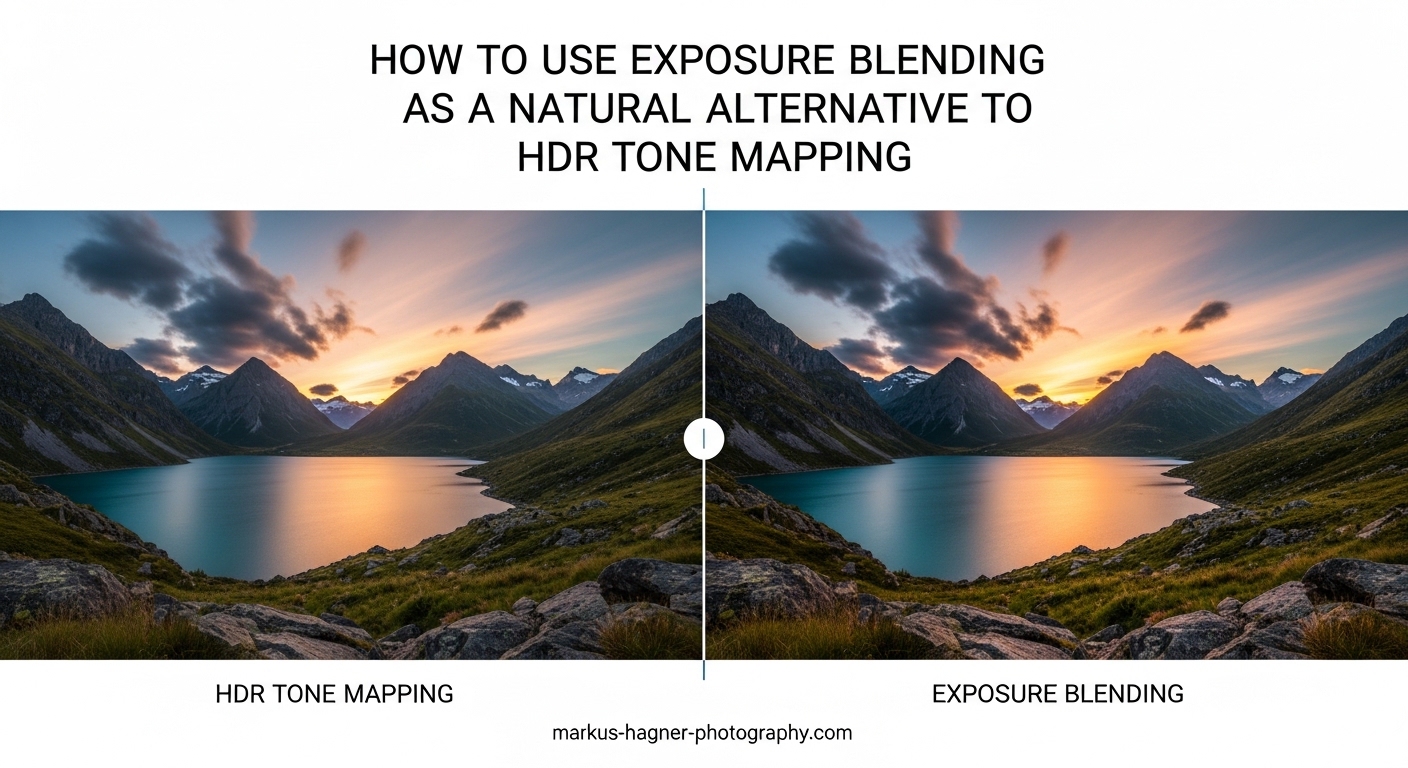
Here is a practical example. Imagine you photographed a sunset over a mountain lake with three bracketed exposures: one dark exposure capturing the brilliant sky, one medium exposure, and one bright exposure capturing foreground details in the shadows. With exposure blending, you might use the sky from your dark exposure, the middle tones from your medium exposure, and the shadow details from your bright exposure, seamlessly blending them together.
The result maintains the natural tonal relationships that our eyes expect to see. The sky remains bright because it should be bright. The shadows stay dark because that is how they appear in nature. You are not forcing everything into a compressed tonal range but rather selecting the best capture for each area.
This approach aligns with a broader philosophy in photography that values subtlety over spectacle. The goal is not to create an image that impresses viewers with its technical prowess, but rather one that communicates the beauty and mood of the scene as you experienced it. Many photographers find this approach more satisfying both creatively and technically.
How to Shoot for Exposure Blending
Before you can blend exposures, you need to capture them properly in the field. The shooting phase is just as important as the post-processing, and a few key techniques will set you up for success.
Exposure Bracketing Setup
Most modern cameras have a built-in bracketing feature that automatically captures multiple exposures with one shutter press. Set your camera to aperture priority mode (A or Av) so your aperture stays constant across all exposures. Consistent depth of field is essential for clean blending.
For most landscape and architectural scenes, three exposures work well: one at the metered exposure, one 2 stops darker, and one 2 stops brighter. Some photographers prefer 5 or even 7 exposures for extremely high-contrast situations, but I have found that 3 well-spaced exposures handle the vast majority of scenes.
Set your camera to continuous shooting mode so all bracketed shots fire in quick succession. This minimizes the chance of anything moving between exposures and makes alignment easier in post-processing.
Tripod Use and Stability
A tripod is highly recommended for exposure blending because it keeps your framing identical across all shots. Even small shifts between exposures can cause alignment problems and blurry edges where the blends occur.
If you must shoot hand-held, use a fast shutter speed (at least 1/250 second for normal focal lengths) and brace yourself against something stable. Photoshop’s auto-align layers feature can help correct minor misalignment, but it is not a substitute for proper technique in the field.
Scene Considerations
Not every scene requires exposure blending. Before setting up for brackets, evaluate whether your camera can capture the dynamic range in a single exposure. Check your histogram: if both highlights and shadows have detail without clipping, you may not need multiple exposures at all.
The best candidates for exposure blending are scenes with extreme contrast: interiors with bright windows visible, landscapes with dramatic sunrises or sunsets, backlit architectural subjects, and any situation where the dynamic range exceeds what your sensor can capture in one shot.
Exposure Blending Methods Compared
There are several ways to blend exposures in Photoshop, each with different levels of complexity and control. I recommend starting with simpler methods and working your way up as you gain confidence.
Method 1: Simple Layer Masks (Beginner)
This is the most straightforward approach and an excellent starting point for photographers new to exposure blending. Load your two exposures as layers in Photoshop with the darker exposure on top. Add a black layer mask to completely hide the top layer, then use a white brush to paint back the darker exposure only where you need it, typically the bright sky or highlights.
The advantage of this method is its simplicity. You can see exactly what you are doing and make adjustments in real-time. The disadvantage is that painting with a soft brush can create imprecise transitions, especially along complex edges like tree branches or architectural details.
Best for: Simple scenes with a clear horizon line or straightforward separation between bright and dark areas.
Method 2: Gradient Masks (Beginner)
When your scene has a relatively flat horizon, gradient masks offer a clean and efficient blending solution. Load your exposures as layers, add a mask to the top layer, and apply a black-to-white gradient across the mask. The gradient creates a smooth transition between exposures.
This technique works beautifully for many landscape photographs where the sky needs one exposure and the foreground needs another. The transition is seamless and natural-looking when applied correctly.
The limitation becomes apparent with uneven horizons. Mountains, buildings, or trees that break the horizon line will show obvious banding where the gradient cuts through them. In those cases, you will need to refine the mask manually or use a different technique.
Best for: Landscapes with flat or nearly flat horizons, seascapes, and any scene where the bright and dark areas are clearly separated horizontally.
Method 3: Luminosity Masks (Intermediate)
Luminosity masks are selections based on the brightness values in your image. They allow you to target specific tonal ranges (highlights, midtones, or shadows) with remarkable precision. This technique has become the gold standard for natural-looking exposure blending.
The basic concept is straightforward: create a luminosity mask that selects the bright areas of your image, then use that mask to blend in your darker exposure only where those highlights exist. Because the mask is based on actual pixel brightness, it naturally follows the contours of your scene without the harsh edges that hand-painted masks can create.
Creating luminosity masks manually involves using the Channels panel to load brightness selections, then refining them through successive selections. Several free Photoshop actions and panels (like the TK Actions panel) can generate these masks automatically, significantly speeding up your workflow.
The learning curve is steeper than simple layer masks, but the results are worth it. Luminosity masks produce transitions so smooth that they are virtually invisible, even at high magnification.
Best for: Complex scenes with irregular boundaries, any situation requiring precise tonal targeting, professional work where quality is paramount.
Method 4: Blend If Sliders (Intermediate)
The Blend If sliders in Photoshop’s Layer Style dialog offer a powerful automated blending option. These sliders control which pixels from the current layer and underlying layers are visible based on their brightness values.
To use Blend If for exposure blending, place your darker exposure on top of your lighter one. Open the Layer Style dialog and adjust the “Underlying Layer” sliders so that bright pixels from the bottom layer show through while dark pixels remain hidden. Hold Alt (Option on Mac) while dragging the sliders to split them, creating smooth transitions.
This method is fast and produces excellent results for many scenes. It is particularly effective when your exposures differ mainly in brightness without significant color shifts. The main limitation is that Blend If affects the entire layer uniformly, so you cannot target specific areas independently.
Best for: Quick blending when speed matters, images where the exposure differences are primarily tonal rather than color-based.
Method 5: Apply Image Technique (Advanced)
The Apply Image command allows you to use one image as a source for creating masks on another. This advanced technique offers tremendous control for creating custom luminosity masks tailored to your specific image.
The workflow involves using Apply Image to blend a grayscale version of one exposure into the mask of another. By adjusting blending modes and opacity during this process, you can create masks that precisely target the tonal ranges you want to affect.
This method requires a solid understanding of how Photoshop channels and blending modes interact. It is not for beginners, but for photographers who master it, Apply Image provides nearly unlimited creative control over the blending process.
Best for: Complex professional work, photographers who want maximum control, situations where other methods produce less-than-perfect results.
When to Use Exposure Blending by Photography Genre
Different photography genres present different challenges and opportunities for exposure blending. Here is how the technique applies across common specialties.
Landscape Photography
Sunrise and sunset landscapes are perhaps the most common application for exposure blending. The extreme contrast between a brilliant sky and shadowed foreground often exceeds what any camera can capture in a single exposure. Exposure blending lets you preserve the drama of colorful skies while maintaining detail in foreground elements.
For landscapes, I typically start with gradient masks for simple horizons and move to luminosity masks when mountains, trees, or other elements break the skyline. The natural appearance of exposure blending is particularly valuable here because landscape viewers generally expect realistic representations of natural scenes.
Architectural Photography
Architectural photographers almost universally prefer exposure blending over HDR tone mapping. The clean lines and precise details of architecture show every artifact, making the natural results of blending essential for professional work.
Common challenges include interior shots with bright windows visible, exterior shots in mixed lighting, and details in shadowed areas that need to be visible without looking artificially brightened. Luminosity masks are particularly valuable here for their precision along building edges.
Real Estate and Interior Photography
Real estate photography demands a balance between speed and quality. While some photographers use HDR for its speed advantage, exposure blending produces noticeably better results that can help properties stand out in competitive markets.
The primary challenge in real estate is balancing interior lighting with views through windows. Exposure blending handles this beautifully, allowing you to show both the room details and the view outside without the telltale signs of HDR processing.
Cityscapes and Night Photography
Urban scenes at twilight present extreme contrast between artificial lights and shadowed buildings. Exposure blending excels here because it allows you to capture the full brightness range of streetlights, building lights, and neon signs without the halos and artifacts that HDR tone mapping often produces around light sources.
Troubleshooting Common Exposure Blending Problems
Even with careful technique, exposure blending can present challenges. Here are solutions to the most common issues you will encounter.
Alignment Issues
If your blended image shows ghosting or blurry edges, your exposures were not perfectly aligned. In Photoshop, select all your layers and use Edit > Auto-Align Layers before beginning your blend. This feature can correct minor misalignment from hand-held shooting or even slight tripod movement.
Ghosting with Moving Subjects
Moving subjects like clouds, water, people, or vehicles create a fundamental challenge for exposure blending because they appear in different positions across your bracketed shots. The best solution is to mask these areas from a single exposure rather than trying to blend them.
For water and clouds, I often use the medium exposure for these elements and only blend the static parts of the scene. Some photographers use a hybrid approach, doing an initial HDR merge for areas with movement and then manually blending that result with other exposures for static areas.
Harsh Transitions
If your blended image shows visible lines where one exposure meets another, your masks need refinement. Feathering your selections, using softer brushes, or switching to luminosity masks will typically resolve this issue. Remember that the goal is invisible transitions.
Color Consistency
Different exposures may have slightly different color casts due to changing light during the bracket sequence or sensor response variations. Before blending, use Camera RAW or Lightroom to match the white balance and color profile across all exposures. Consistency at this stage prevents color banding in your final blend.
Frequently Asked Questions
What is exposure blending?
Exposure blending is a manual post-processing technique where multiple photographs of the same scene taken at different exposures are layered and selectively combined using masks to create a final image with extended dynamic range while maintaining a completely natural appearance.
Is exposure blending better than HDR?
Exposure blending produces more natural, realistic results than automated HDR tone mapping because it gives you complete control over which parts of each exposure to use. However, it requires more time and skill than automated HDR software. For professional work where natural appearance matters, exposure blending is generally preferred.
Is exposure bracketing the same as HDR?
No, exposure bracketing is the capture technique where you take multiple shots at different exposures. HDR tone mapping and exposure blending are both methods for processing those bracketed exposures. Bracketing is the input; HDR and blending are different approaches to using that input.
Why do photographers turn off HDR?
Photographers turn off or avoid HDR because automated tone mapping often produces unnatural results including oversaturated colors, halos around high-contrast edges, loss of local contrast, and an overall artificial appearance. Many prefer the control and natural results of exposure blending or single-exposure techniques.
How many exposures do I need for blending?
For most scenes, three exposures work well: one at the metered exposure, one 2 stops darker, and one 2 stops brighter. Extremely high-contrast scenes may benefit from 5 exposures, but modern cameras with 13+ stops of dynamic range often need fewer exposures than older equipment required.
Getting Started with Exposure Blending
If you are ready to move beyond HDR tone mapping and try exposure blending for yourself, start simple. Grab a tripod and head out to photograph a scene with a clear horizon, like a seascape or flat landscape at sunset. Shoot three bracketed exposures and practice blending them using gradient masks first, then progress to simple layer masks.
Photoshop is the most common tool for exposure blending, but alternatives exist. Luminar Neo offers HDR merge with manual refinement options. ON1 Photo RAW includes blending capabilities. Lightroom’s HDR merge can create a base that you then refine with local adjustments. For full control, though, Photoshop with its layer and masking capabilities remains the professional standard.
As you gain confidence, explore luminosity masks and Blend If sliders for more complex scenes. Free resources like the TK Actions panel can generate luminosity masks automatically, dramatically reducing the learning curve. Many photographers find that after a few successful blends, the technique becomes intuitive and even enjoyable.
The key insight I want you to take away is that exposure blending is not about showing off technical skill. It is about creating images that faithfully represent the scenes you photograph. The best exposure blending is invisible: viewers should see a compelling photograph, not evidence of post-processing technique.
Exposure blending gives you the dynamic range you need without the artificiality you do not want. Whether you are photographing dramatic landscapes, architectural subjects, or real estate interiors, this technique will help you create images that look natural while capturing the full beauty of high-contrast scenes. The learning investment pays dividends in the quality and professionalism of your final results.