Shooting at high ISO is often unavoidable. Concert venues, indoor events, night skies, and wildlife at dawn all demand you push your camera’s sensitivity to its limits. The trade-off has always been noise. Those gritty, speckled artifacts that ruin detail and make your photos look grainy have been the bane of low-light photography since the dawn of digital.
Lightroom AI Denoise changes the equation completely.
Introduced in 2026, this machine learning-powered feature can rescue high ISO images that would have been considered unusable just a few years ago. I’ve tested it on everything from ISO 6400 concert shots to ISO 25600 astrophotography, and the results consistently impress. The best part? It’s built right into Lightroom Classic and Lightroom, so you don’t need to buy expensive third-party software or upgrade your camera body.
In this guide, I’ll show you exactly how to use Lightroom AI Denoise to reduce noise in your high ISO photos while preserving the detail, texture, and color that traditional noise reduction would destroy.
Understanding Noise and Why High ISO Creates It
Noise is the digital equivalent of film grain. It appears as random variations in brightness and color that become more visible as you increase ISO. The reason comes down to how camera sensors capture light.
When you double your ISO setting, you’re essentially telling your camera to amplify the signal from the sensor. This amplification makes the sensor more sensitive to light, which is exactly what you need in dark environments. But amplification is a double-edged sword. Along with the image signal, it also amplifies electrical noise inherent in the sensor and its circuitry.
Think of it like turning up the volume on a quiet audio recording. You hear the music more clearly, but you also hear the background hiss and static that were always there but barely noticeable at lower volumes. Higher ISO works the same way. The more you amplify the signal, the more visible the electrical noise becomes.
There are two main types of noise you’ll encounter. Luminance noise appears as grainy variations in brightness, like sandpaper texture across your image. Color noise shows up as those ugly red, blue, and green speckles, especially in shadow areas. Modern cameras handle color noise well through in-camera processing, but luminance noise remains the primary challenge at high ISO settings.
The ISO threshold where noise becomes problematic depends entirely on your camera. A modern full-frame mirrorless might produce clean files at ISO 6400, while an older APS-C camera could show noticeable noise at ISO 1600. This is where AI Denoise becomes a game-changer, especially if you’re shooting with older gear that can’t keep up with the high-ISO performance of newer bodies.
What Is Lightroom AI Denoise and How Does It Work?
Lightroom AI Denoise is a machine learning feature that automatically reduces noise while preserving detail. Unlike traditional noise reduction, which simply blurs noise pixels, AI Denoise uses a deep convolutional neural network trained on millions of image pairs to understand the difference between noise and detail.
Adobe trained the AI on countless pairs of images. Each pair consisted of the same photo captured at low ISO (clean) and high ISO (noisy). By analyzing millions of these pairs, the neural network learned to recognize what noise looks like at different ISO levels and, more importantly, what lies beneath that noise. It can distinguish between random noise artifacts and genuine image detail like texture, edges, and fine patterns.
The technical magic happens during demosaicing. When you shoot RAW, your camera records single color values per pixel in a Bayer pattern. Demosaicing is the process of interpolating the missing color values to create a full RGB image. AI Denoise combines denoising and demosaicing into a single step, allowing the AI to work with the raw sensor data before artifacts from traditional demosaicing are baked in.
This approach is fundamentally different from the manual noise reduction sliders in Lightroom’s Detail panel. Those tools work by selectively blurring areas where they detect noise, which inevitably blurs detail along with it. The AI approach recognizes patterns and reconstructs what the image should look like without noise, preserving edges and texture that traditional methods would destroy.
AI Denoise is available in Lightroom Classic version 7.0 and later, Lightroom (the cloud-based version) 6.0 and later, and Adobe Camera Raw 15.0 and later. It works with RAW files from most modern cameras, including both Bayer sensors and Fujifilm X-Trans sensors, though there are some limitations I’ll cover later.
How to Reduce Noise in High ISO Photos Using Lightroom AI Denoise Feature
Using AI Denoise is straightforward once you know where to find it. Here’s the complete step-by-step process I use on my high ISO images.
Step 1: Open Your RAW File in Lightroom
AI Denoise only works with RAW files. If you’re working with JPEGs or TIFFs, you’ll need to use the manual noise reduction sliders in the Detail panel instead. Import your RAW file into Lightroom and switch to the Develop module (Lightroom Classic) or Edit view (Lightroom).
Step 2: Navigate to the Detail Panel
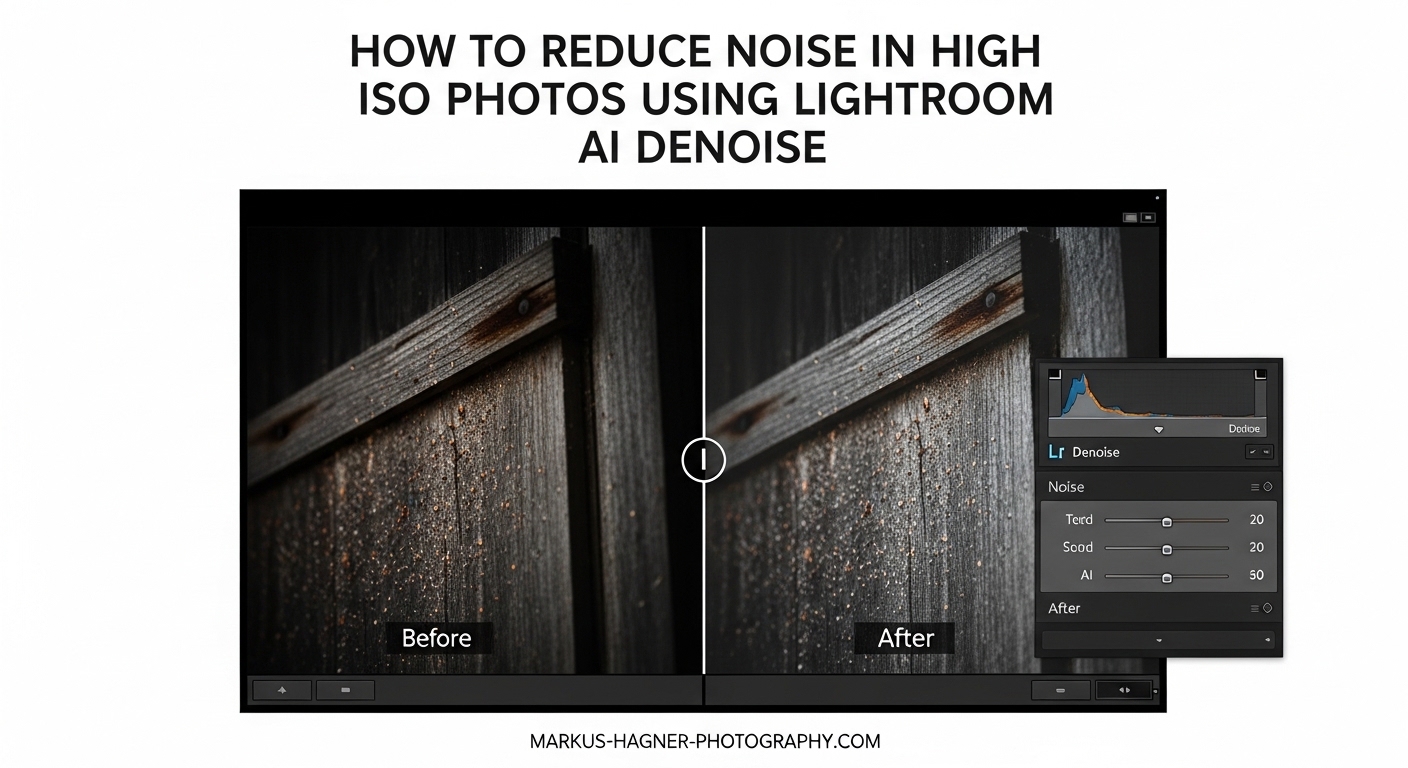
On the right side of the Develop module, scroll down to the Detail panel. This is where you’ll find the traditional Sharpening and Noise Reduction controls. Look for the new Denoise section at the top of the panel, which should show a button labeled “Denoise.”
Step 3: Click the Denoise Button
Click the Denoise button to open the Enhance dialog. This dialog contains a single slider labeled Amount that ranges from 0 to 100. You’ll also see a preview window showing a 100% crop of your image, which is crucial for evaluating the effect.
Step 4: Adjust the Amount Slider
The Amount slider controls how aggressively the AI reduces noise. The default setting varies based on your image, but it typically lands somewhere between 40 and 60. I recommend starting with the default and then adjusting while watching the preview carefully.
Lower values (under 30) provide subtle noise reduction that preserves maximum detail but may leave noticeable grain in extremely noisy images. Higher values (above 70) remove more noise but can start to affect fine detail and texture, potentially creating an overly smooth appearance.
For most high ISO images, I find the sweet spot between 40 and 50 works best. This provides significant noise reduction while maintaining natural texture. However, the optimal amount depends heavily on your ISO level and subject matter.
Step 5: Evaluate the Preview at 100%
Before applying the effect, zoom your preview to 100% and pan around different areas of the image. Pay special attention to important detail areas like faces, textures, and fine patterns. The preview in the Enhance dialog is small, so checking the actual image at full resolution helps ensure you’re happy with the results.
Look for two things: noise reduction in smooth areas like skies and out-of-focus backgrounds, and detail preservation in textured areas like fabric, hair, and foliage. If you see unwanted smoothing or loss of important detail, lower the Amount value.
Step 6: Click Enhance to Create a New DNG
When you’re satisfied with the Amount setting, click the Enhance button. Lightroom will process your image and create a new DNG file alongside your original RAW. This new file contains the denoised version of your photo, and it will appear in your filmstrip with “_Enhanced” appended to the filename.
The processing time varies significantly depending on your image resolution, ISO level, and computer hardware. On a modern machine with a dedicated GPU, a 24-megapixel file might take 30-60 seconds. Older hardware or integrated graphics could take several minutes per image.
Step 7: Continue Your Edit
Once the new DNG is created, it becomes your working file. You can apply any additional edits you would normally make, including exposure adjustments, color grading, and sharpening. The denoised file behaves exactly like any other RAW file in Lightroom, giving you full editing flexibility.
Real Results: Before and After Examples at Different ISO Levels
The effectiveness of AI Denoise varies depending on your ISO level and how much you’ve had to push the image in post. Here’s what I’ve found from real-world testing across different shooting scenarios.
At ISO 3200, AI Denoise produces remarkably clean results. Noise is significantly reduced in shadow areas and smooth surfaces, while fine detail remains intact. The difference is especially noticeable in portraits, where skin texture stays natural-looking instead of becoming plasticky. If you shoot a modern full-frame camera at ISO 3200, you might find the results subtle—but for APS-C and older sensors, the improvement can be dramatic.
ISO 6400 is where AI Denoise really starts to shine. This is the threshold where many cameras begin to struggle, and noise becomes obvious even at normal viewing sizes. With AI Denoise applied at moderate settings (around 45-50), ISO 6400 images can look cleaner than ISO 3200 images without denoising. I’ve shot entire concerts at ISO 6400 and delivered client images that needed minimal additional processing.
At ISO 12800, we’re in territory that was essentially unusable for most photographers just a few years ago. AI Denoise can rescue these images, but the results depend heavily on your subject matter. Images with fine texture and detail, like landscapes or fabrics, denoise remarkably well. Areas of relatively uniform tonality, like skies or skin tones, may show some minor artifacts if you push the Amount slider too high.
ISO 25600 and above is extreme territory. Even with AI Denoise, you’ll see some remaining noise and potential artifacts. However, the feature can still make these images usable for web display and small prints. The key is managing expectations—at these extreme ISO levels, you’re working with limited signal to begin with, and even AI can’t create detail that was never captured.
One important insight from my testing: AI Denoise works better with noisier files. I’ve found that ISO 6400 images often denoise more completely than ISO 1600 images from the same camera. The AI seems to have an easier time identifying and removing noise patterns when they’re more pronounced. This means you might not always need Denoise for moderate ISO settings, and the results can actually be less impressive than on higher ISO files.
Best Practices for Using AI Denoise Effectively
After processing thousands of images with AI Denoise, I’ve developed a workflow that maximizes quality while minimizing processing time. Here’s what works best.
Apply Denoise early in your editing workflow, before making major adjustments to exposure, contrast, or color. Since Denoise creates a new DNG file, any edits you’ve already made will be copied to the enhanced version. However, I’ve found that starting with a clean baseline yields the most consistent results. Make basic exposure corrections if needed, but save heavy editing for after denoising.
Be selective about which images you process. Denoise takes time, and not every image needs it. I typically apply Denoise only to images shot at ISO 3200 and above, or lower ISO images that I’ve had to significantly brighten in post. If you’re batch processing a large photo shoot, this selective approach saves hours of processing time.
Match your Amount setting to your ISO level. For ISO 3200-6400, I usually stick around 40-50. For ISO 12800 and above, I might push to 60-70. For very high ISO images where some noise is acceptable, lower values around 30-40 can preserve more texture while still providing meaningful improvement.
Pay attention to subject matter when choosing your Amount setting. Portraits require more caution—too much Denoise can create unnatural skin textures. Landscapes and architectural photos can often handle more aggressive settings since fine detail patterns are usually less critical. Wildlife and sports shots fall somewhere in between, where you want to preserve feather or fur texture but still reduce distracting noise.
Consider your output when deciding whether to use Denoise. For web display and social media, moderate ISO images might not need denoising at all once resized. For large prints, especially of important images, Denoise can make a significant difference even at moderate ISO levels. Match your effort to your end use.
Skip Denoise for images that don’t need it. If you shot at ISO 800-1600 on a modern camera, you probably won’t see meaningful benefits from AI Denoise. Using it unnecessarily just wastes time and creates larger files. The feature is designed for problematic high ISO images, not as a default for every photo.
Limitations and Important Considerations
AI Denoise is powerful, but it’s not magic. Understanding its limitations helps you use it more effectively and avoid frustration.
Processing time is the biggest practical limitation. Denoise is computationally intensive, especially compared to normal Lightroom operations. On a modest computer, expect to wait 1-3 minutes per image. This adds up quickly when processing hundreds of photos from a shoot. There’s currently no batch Denoise function with an “apply to all” option—each image requires individual processing, though you can queue multiple images.
File size increases significantly. The enhanced DNG files are roughly 2-4 times larger than your original RAW files. This makes sense when you consider what’s happening: Lightroom is essentially embedding the denoised data alongside the original RAW data. If you’re tight on storage space, you’ll want to delete original files after confirming the enhanced versions are satisfactory, or archive originals to external storage.
RAW files are mandatory. AI Denoise doesn’t work with JPEGs, TIFFs, or already-edited DNG files. The AI needs access to the raw sensor data to perform its magic. If you only have JPEGs from a high ISO shoot, you’re limited to the traditional noise reduction sliders in the Detail panel.
Not all cameras are supported. While most modern cameras work with AI Denoise, very old models or some obscure formats may not be compatible. Adobe has been steadily adding support for additional cameras, so if your camera isn’t supported now, it might be in a future update. Check Adobe’s official documentation for the current camera compatibility list.
GPU acceleration makes a huge difference. While AI Denoise will run on any computer that meets Lightroom’s minimum requirements, having a dedicated graphics card dramatically speeds up processing. The feature uses GPU acceleration through Tensor cores on NVIDIA cards or the Neural Engine on Apple Silicon Macs. If you find Denoise painfully slow, upgrading your GPU (if you’re on a desktop) might be a worthwhile investment.
Troubleshooting: When AI Denoise Doesn’t Work
Sometimes things don’t go smoothly. Here are the most common issues photographers encounter and how to resolve them.
If the Denoise button is grayed out, you’re probably not working with a compatible RAW file. Make sure you’re editing the original RAW file, not a virtual copy or a DNG that was previously enhanced. Some camera formats, particularly older models or some medium-format backs, may not be supported yet. Check that your Lightroom is updated to the latest version, as Adobe adds camera support regularly.
Processing stops at 45-50% with no error message. This is a common issue reported in forums and usually indicates insufficient GPU memory. Try reducing the resolution of your preview cache in Lightroom preferences, close other applications that might be using GPU resources, or temporarily switch to the integrated GPU if you have a laptop with switchable graphics. Updating your graphics drivers can also help.
The enhanced DNG doesn’t appear in Lightroom. Sometimes the file is created but doesn’t show up in your filmstrip or grid view. Try collapsing and expanding your filmstrip, switching to a different view and back, or using the synchronize folder function. Check your actual folder in Finder or Explorer—the file is usually there even if Lightroom isn’t displaying it immediately.
Results look worse than the original. This usually means the Amount setting is too high for your image. Lower the value and try again. Remember that AI Denoise isn’t always the right tool—some images, particularly those shot at moderate ISO on modern cameras, may look better without any denoising at all.
Lightroom crashes during processing. This is often a memory issue. Make sure your computer meets the recommended requirements for AI Denoise, close other applications to free up RAM, and try processing smaller batches of images rather than queuing dozens at once.
Frequently Asked Questions
How to remove high ISO noise in Lightroom?
The most effective method is using Lightroom’s AI Denoise feature in the Detail panel. Click the Denoise button, adjust the Amount slider (40-50 is typically ideal), and click Enhance to create a new DNG file with reduced noise while preserving detail.
Does Lightroom have AI noise reduction?
Yes, Lightroom Classic (version 7.0+), Lightroom (version 6.0+), and Adobe Camera Raw (version 15.0+) all include AI-powered Denoise. This machine learning feature was introduced by Adobe in 2023 and works directly on RAW files.
Why does higher ISO create more noise?
Higher ISO amplifies the sensor signal to capture more light in dark conditions. This amplification increases both the image signal and electrical noise inherent in the sensor. Less light requires more amplification, which makes noise more visible in the final image.
How do you fix grainy photos with AI?
Open your RAW file in Lightroom, navigate to the Detail panel, click the Denoise button, and adjust the Amount slider. The AI analyzes your image to distinguish noise from detail, reducing grain while preserving texture and edges that traditional noise reduction would blur.
Is Lightroom AI Denoise better than Topaz?
Many photographers find Lightroom AI Denoise produces more natural color accuracy compared to DXO PureRAW. Topaz DeNoise AI is sometimes more powerful but can over-smooth images. Lightroom’s built-in convenience and lack of additional cost make it the preferred choice for most users.
Does Lightroom Denoise work on JPEGs?
No, AI Denoise only works with RAW files. The machine learning model needs access to raw sensor data to function properly. For JPEG images, use the manual Noise Reduction sliders in Lightroom’s Detail panel instead.
Conclusion
Lightroom AI Denoise represents a significant leap forward in noise reduction technology. By leveraging machine learning, it achieves results that were simply impossible with traditional tools. The ability to rescue high ISO images that would have been rejected just a few years ago opens up new creative possibilities for low-light photography.
Whether you’re shooting concerts, weddings, night skies, or indoor events, AI Denoise gives you more flexibility to push your ISO without fear of unusable results. You no longer need to choose between missing the shot and getting a noisy image. With AI Denoise in your toolkit, you can capture moments in challenging light and still deliver clean, professional-looking files.
The key is using the feature wisely. Apply it selectively to images that genuinely need it, match your Amount settings to your ISO level and subject matter, and integrate it into a workflow that maximizes quality while managing processing time and storage. Remember that not every image needs denoising, and sometimes the best choice is to skip it entirely.
Experiment with AI Denoise on your own high ISO images. Test different Amount settings, compare results at various ISO levels, and see how it performs with your specific camera and subjects. Like any tool, it takes some practice to understand exactly when and how to use it for optimal results.