Creating stunning glamour and beauty portraits starts with mastering the right lighting techniques. If you have ever admired those perfectly sculpted cheekbones and flawless skin in magazine covers, chances are you were looking at butterfly lighting in action. This classic lighting pattern has been the secret weapon of Hollywood portrait photographers since the golden age of cinema, and it remains just as powerful for modern beauty photography in 2026.
Butterfly lighting glamour beauty photography is a technique I have used extensively in my own portrait work, and I can tell you from experience that it transforms ordinary shots into something extraordinary. The dramatic shadow under the nose, the sculpted cheekbones, and the overall glamorous feel make this pattern indispensable for anyone serious about beauty portraiture.
In this comprehensive guide, I will walk you through everything you need to know about creating butterfly lighting. We will cover exactly what it is, why it works so well for glamour shots, the step-by-step setup process, essential gear recommendations, common mistakes to avoid, and advanced techniques that will take your portraits to the next level.
What is Butterfly Lighting?
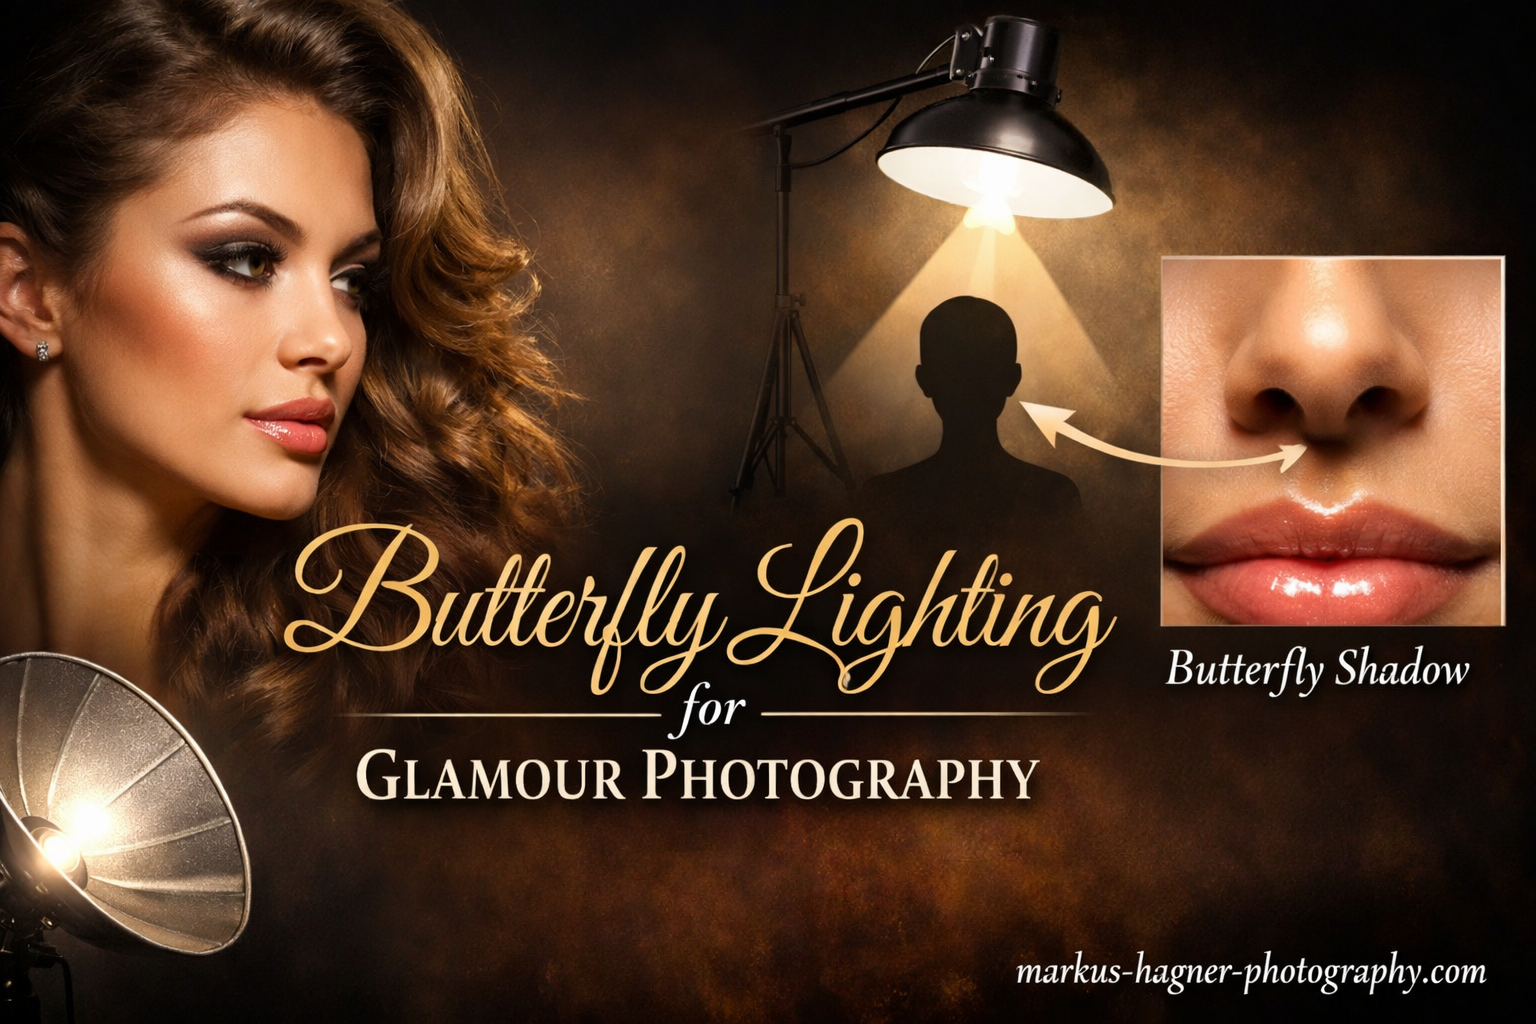
Butterfly lighting is a classic portrait photography lighting pattern where the main light source is positioned high and directly in front of the subject, creating a small, distinctive butterfly-shaped shadow directly beneath the nose. This symmetrical lighting setup places the light on the same axis as the camera lens, which is why photographers also call it paramount lighting.
The name comes from that telltale shadow under the nose. When positioned correctly, the shadow resembles a butterfly with its wings spread. This single characteristic is what defines the pattern and tells you whether your setup is correct. If you see that butterfly shadow, you know you have achieved the look.
The Hollywood Origins of Paramount Lighting
Before digital cameras and modern strobes, Hollywood portrait photographers needed a lighting setup that made every star look glamorous. Enter paramount lighting, named after Paramount Pictures where this technique became the studio standard during the 1930s and 1940s. Photographers like George Hurrell used this pattern to create iconic portraits of stars such as Marlene Dietrich, Greta Garbo, and Gloria Swanson.
The technique was designed to flatter. By placing light high and centered, photographers could sculpt cheekbones, narrow the face, and hide minor imperfections. The result was a look that screamed glamour and sophistication. Today, the same principles apply whether you are shooting with a high-end strobe or an affordable LED panel.
How Butterfly Lighting Actually Works
The physics behind butterfly lighting is straightforward but important to understand. When you position your key light approximately 45 degrees above your subject and centered on their face, the light travels downward at an angle that creates specific shadows. The nose blocks some of that light, creating the butterfly shadow beneath it. The cheekbones catch the light from above, creating highlights that define and sculpt the face.
Because the light comes from directly in front of the subject, both sides of the face receive equal illumination. This creates a symmetrical look that photographers find universally flattering. The shadows fall naturally downward, hiding areas we typically want to minimize while emphasizing bone structure.
What makes this pattern so effective for glamour and beauty work is how it handles skin texture. The downward angle of light minimizes the appearance of pores and minor blemishes. Unlike side lighting that can emphasize texture, butterfly lighting tends to smooth everything out while still providing enough shadow definition to keep faces from looking flat.
Why Use Butterfly Lighting for Glamour and Beauty Photography?
Not every lighting pattern works for every situation. Butterfly lighting has earned its place as a go-to technique for glamour and beauty photography for very specific reasons. Understanding these will help you decide when this pattern is the right choice for your shots.
Cheekbone Accentuation
Of all the benefits butterfly lighting offers, the way it sculpts cheekbones might be the most valuable for beauty work. The high, frontal light source naturally creates highlights on the tops of the cheekbones while allowing shadows to form beneath them. This contrast between highlight and shadow is what creates that chiseled, defined look we associate with high-fashion photography.
I have photographed subjects with subtle bone structure who were amazed at how dramatic their cheekbones looked under butterfly lighting. The pattern simply excels at bringing out this facial feature. If your client wants that editorial, high-fashion look, this is your starting point.
Face-Slimming Effect
The shadows created by butterfly lighting fall on the sides of the face and under the jawline. This naturally narrows the appearance of the face, creating a more oval shape that is traditionally considered flattering in portrait photography. For subjects concerned about a round or wide face shape, butterfly lighting provides an immediate slimming effect.
The key is that the shadows are soft and gradual rather than harsh and obvious. This creates a natural-looking slimming effect rather than an obviously manipulated appearance. Your subjects will simply look their best without being able to pinpoint exactly why.
Symmetrical, Balanced Illumination
Because the light source sits centered on the subject’s face, both sides receive equal treatment. This symmetry creates a balanced, harmonious look that feels right to viewers. Unlike split lighting or even Rembrandt lighting, which intentionally create asymmetry for drama, butterfly lighting aims for perfection and balance.
This symmetry is part of why butterfly lighting works so well for beauty photography. Makeup artists and retouchers love it because both sides of the face have similar tonal values. This makes post-processing more consistent and predictable.
Industry Standard for Beauty Work
Walk into any professional beauty photography studio and you will find photographers using butterfly lighting or one of its variations. It has remained the industry standard for decades because it simply delivers consistent, flattering results. Magazine covers, cosmetic advertisements, and celebrity portraits routinely employ this technique.
Learning butterfly lighting connects you to this professional tradition. Once you master it, you will have a technique that works across countless beauty and glamour applications. It is a foundational skill that opens doors to more advanced lighting setups.
How to Set Up Butterfly Lighting: Step-by-Step Guide
Now that you understand what butterfly lighting is and why it works, let me walk you through the exact setup process. I will break this down into clear steps so you can follow along whether you are working in a professional studio or a makeshift home setup.
Step 1: Position Your Key Light
Start by positioning your main light source, also called the key light, directly in front of your subject. The light needs to be centered on their face, which means it should align with the bridge of their nose. If you imagine a line running from your camera lens through your subject’s face, the light should sit on that same axis.
The height of your light is crucial. You want it positioned approximately 45 degrees above your subject’s eye level. In practical terms, this usually means the light is about 1 to 2 feet above their head, depending on your working distance. The exact height will vary based on your subject’s face shape and the look you want to achieve.
Step 2: Adjust Height for the Butterfly Shadow
With your light positioned roughly where you want it, take a test shot and examine the shadow under your subject’s nose. This is where the magic happens, and precision matters. The shadow should be small and sit directly beneath the nose, not extending to either side and certainly not reaching the upper lip.
If the shadow is too long and touching the lip, your light is too high. Lower it gradually until the shadow shortens. If the shadow is barely visible or non-existent, raise your light higher. The perfect butterfly shadow is small, symmetrical, and sits comfortably between the nose and upper lip without touching either.
Step 3: Position Your Subject Facing the Camera
Butterfly lighting works best when your subject faces directly toward the camera. Any head rotation will disrupt the symmetrical shadow pattern and reduce the effectiveness of the technique. Instruct your subject to keep their chin level and their face pointed straight at the lens.
This limitation is important to understand. While butterfly lighting looks stunning from the front, it does not handle profile shots or dramatic head turns well. If your shoot requires varied poses, plan to switch lighting setups or accept that the butterfly effect will be lost when the subject turns their head.
Step 4: Add a Reflector Below (Optional Clamshell)
For a more refined look, add a reflector below your subject’s chin. This creates what photographers call a clamshell setup, which fills in shadows under the chin and eyes while maintaining the butterfly pattern. The reflector bounces some of the key light back up into the face, reducing contrast and creating a softer overall appearance.
Position the reflector just below the frame, angled upward toward your subject’s face. A white or silver reflector works well here. White gives a softer fill, while silver provides more punch. Experiment with both to see which works better for your particular setup and subject.
Step 5: Fine-Tune the Lighting Ratio
If you are using additional lights or reflectors, pay attention to your lighting ratio. The lighting ratio describes the difference in brightness between the highlighted and shadowed areas of the face. For beauty and glamour photography, a ratio between 2:1 and 3:1 typically works well. This provides enough shadow to create dimension without becoming too dramatic.
Without a fill light or reflector, your ratio will be higher, creating more contrast. This can work beautifully for certain looks, especially if you are going for a more dramatic, editorial feel. For softer beauty shots, add fill to reduce that ratio and create a more even illumination.
Step 6: Test and Adjust
Take several test shots and review them carefully on your camera’s LCD or a tethered monitor. Look specifically at the butterfly shadow, the catchlights in your subject’s eyes, and the overall balance of light across the face. Small adjustments to light position can make significant differences in the final result.
Check that your subject’s eyes have catchlights, which are reflections of the light source. Without catchlights, eyes can look dark and lifeless, sometimes called the raccoon effect. If eyes appear too dark, you may need to lower your light slightly or add fill from below.
Essential Gear for Butterfly Lighting
You do not need expensive equipment to create beautiful butterfly lighting, but having the right tools makes the process easier and more consistent. Here is what I recommend based on years of shooting with this technique.
Key Light Options
Your key light is the heart of the setup. You have several options depending on your budget and shooting style. Studio strobes offer the most power and fastest recycle times, making them ideal for professional work. Speedlights work well for smaller setups and location shooting. Continuous LED panels let you see the lighting effect in real-time, which can be helpful when learning.
For beginners, I recommend starting with a single strobe or speedlight. You can always expand your kit later. The important thing is having a light source you can position overhead and control precisely.
Light Modifiers: Beauty Dish, Softbox, or Umbrella?
The modifier you choose dramatically affects the quality of light. Beauty dishes are the classic choice for butterfly lighting and for good reason. They produce a light that is soft yet punchy, with excellent contrast and skin rendering. The light from a beauty dish sculpts faces beautifully while maintaining smooth skin tones.
Softboxes provide softer, more diffused light. If you want a gentler version of butterfly lighting, a softbox is an excellent choice. They come in various sizes, with larger softboxes producing softer light. Umbrellas offer the most affordable option and spread light widely, though with less control than other modifiers.
For glamour and beauty work, I prefer beauty dishes in the 22 to 24 inch range. This size provides the right balance of softness and definition for most face sizes. Add a sock or diffuser over the beauty dish if you want even softer results.
Boom Arm or C-Stand for Overhead Positioning
Getting your light high enough and centered requires proper mounting. A boom arm attached to a sturdy light stand lets you position your light directly over your subject without the stand getting in the shot. C-stands with grip arms offer even more stability and precision, though they are heavier and more expensive.
Safety is critical here. An overhead light that falls can cause serious injury. Always use sandbags to counterweight your stands, and double-check all connections before raising your light into position. Never leave an overhead light unattended.
Reflector for Fill Light
A simple reflector is one of the most affordable and versatile tools for butterfly lighting. White, silver, and gold reflectors each produce different effects. For beauty work, I usually reach for white or silver. White provides subtle, natural fill, while silver adds more brightness and a slightly cooler tone.
Position the reflector below your subject’s face, angled upward to bounce light into shadow areas. You can have an assistant hold it, use a reflector holder arm, or even have your subject hold it themselves if they are seated.
Budget-Friendly Alternatives
You do not need to spend thousands to start practicing butterfly lighting. A single speedlight with a small softbox or umbrella, mounted on a basic light stand with boom arm, can produce excellent results. Many photographers have started with garage sale strobes or affordable LED panels and upgraded as their skills and needs grew.
Even household items can work in a pinch. A white poster board makes a decent reflector. A north-facing window with diffusion can serve as a key light for natural light butterfly setups. The technique matters more than the equipment.
Butterfly Lighting Variations and Advanced Techniques
Once you master the basic butterfly lighting setup, you can explore variations that expand its creative possibilities. These advanced techniques let you adapt the pattern for different looks and situations.
Clamshell Lighting Setup Explained
Clamshell lighting is butterfly lighting with fill added from below. The name comes from the way the key light and fill light or reflector open and close like a clam shell around your subject’s face. This setup reduces shadows under the chin and eyes while maintaining the butterfly pattern’s flattering qualities.
To create clamshell lighting, set up your butterfly key light as normal, then add a second light or reflector below your subject’s face. The fill should be about one to two stops less powerful than your key light. This ratio maintains some shadow dimension while filling in areas that might otherwise go too dark.
Clamshell lighting is extremely popular for beauty photography because it produces even, flattering illumination that still has dimension. Many cosmetic campaigns use this setup because it showcases makeup beautifully while keeping skin smooth and luminous.
Hard Light vs Soft Light Butterfly
The quality of your light source affects the mood of your butterfly lighting. Hard light, produced by small, undiffused sources, creates crisp shadows and high contrast. This gives a more dramatic, editorial feel. Soft light, from large diffused sources, creates gradual shadows and lower contrast for a more gentle, approachable look.
For glamour photography, both approaches have their place. Hard light butterfly works well for high-fashion editorials where drama and edge are desired. Soft light butterfly suits beauty and portrait work where a more natural, flattering result is the goal.
Experiment with both by changing your modifier or its distance from your subject. A beauty dish without diffusion produces harder light. Move it closer for softer results, or add a diffusion sock to soften it further.
Natural Light Butterfly Lighting Alternatives
Studio lights are not strictly necessary for butterfly lighting. You can achieve similar results with natural light, though you have less control. A large window with northern exposure provides soft, directional light that can work beautifully for butterfly setups.
Position your subject facing the window with the light coming from above their eye level. This might mean having them stand or sit close to the window while you shoot from slightly below. Use a reflector below their face to fill shadows just as you would with artificial light.
Outdoor butterfly lighting is more challenging but possible. Overcast days provide soft, even light that can approximate studio conditions. Position your subject facing toward the brightest part of the sky while avoiding direct sunlight, which creates harsh shadows.
Butterfly Lighting for Different Face Shapes
Butterfly lighting flatters most face shapes, but understanding how it interacts with different features helps you get the best results from every subject.
Oval and heart-shaped faces respond beautifully to butterfly lighting. The pattern enhances their natural bone structure and maintains their balanced proportions. Round faces benefit from the slimming effect of the downward shadows. Square faces appear softer and more elongated under this pattern.
Subjects with deep-set eyes or prominent brow ridges can present challenges. The high light angle may cause brows to cast shadows into the eye sockets, creating dark eyes. For these subjects, lower your light slightly or add more fill from below. Subjects with long or prominent noses may want to avoid butterfly lighting, as it draws attention to the nose shadow.
Butterfly Lighting for Different Skin Tones
Butterfly lighting works across all skin tones, but slight adjustments can optimize results for different complexions. Lighter skin tones can handle higher contrast lighting without losing detail in highlights. Darker skin tones benefit from slightly lower lighting ratios to maintain richness and avoid blocked-up shadows.
For subjects with darker skin, consider using a slightly larger, softer light source. This helps maintain smooth transitions between highlights and shadows. You may also want to expose slightly to the right, protecting shadow detail while ensuring highlights do not blow out.
Regardless of skin tone, always check your histogram and avoid clipping in either highlights or shadows. Beautiful butterfly lighting requires detail throughout the tonal range.
Combining Butterfly Lighting with Colored Gels
For creative effects, try adding colored gels to your butterfly lighting setup. A subtle warming gel can create a golden, sun-kissed feel. Cool blue gels produce a more fashion-forward, editorial look. You can even gel your fill light differently than your key light for split-toning effects.
Start with subtle colors and build from there. Heavy-handed gelling can quickly become distracting. The goal is enhancement, not domination. A light touch with colored gels can add that extra dimension that makes your butterfly lighting setups stand out.
When to Use Butterfly Lighting (and When to Avoid It)
Butterfly lighting excels in specific situations and falls short in others. Knowing when to use it and when to choose a different pattern is essential for professional results.
Best Use Cases for Butterfly Lighting
Beauty photography is where butterfly lighting truly shines. Cosmetics campaigns, skincare advertisements, and beauty editorials almost universally employ this pattern or its variations. The even, flattering illumination showcases products on skin while making subjects look their best.
Glamour photography benefits equally from butterfly lighting. The dramatic shadow and sculpted cheekbones create that high-end, luxurious feel associated with glamour portraiture. Celebrity portraits, magazine covers, and personal branding shots all work beautifully with this technique.
Headshots for actors and models often use butterfly lighting because it creates a clean, professional look that casting directors expect. Corporate headshots can also benefit, though you may want to use a softer version for a more approachable feel.
Fashion photography frequently employs butterfly lighting for its ability to make subjects look polished and editorial. When the clothing needs to look its best and the model needs to appear glamorous, this pattern delivers consistently.
Face Types That Work Best
Subjects with defined cheekbones and symmetrical features are ideal candidates for butterfly lighting. The pattern enhances what is already there, creating maximum impact. Oval and heart-shaped faces respond particularly well.
Younger subjects often benefit from butterfly lighting because it minimizes texture while emphasizing bone structure. However, the pattern can work beautifully for subjects of any age when applied thoughtfully.
When to Avoid Butterfly Lighting
Not every subject or situation calls for butterfly lighting. Subjects with very long or prominent noses may find the butterfly shadow unflattering, as it draws attention to the nose. Consider loop lighting or Rembrandt lighting instead for these individuals.
Subjects with deep-set eyes or heavy brows may end up with dark, shadowy eyes under butterfly lighting. The high light angle causes brows to cast shadows into the eye sockets. Lower your light or add fill to compensate.
Action or movement-based photography rarely suits butterfly lighting because the pattern requires the subject to face the camera directly. If your subject needs to move or turn frequently, a different lighting approach will serve you better.
Group shots present challenges because butterfly lighting works best for individuals. While you can technically light a group with a single large source overhead, the effect will not be as controlled or flattering as with single subjects.
Common Butterfly Lighting Mistakes to Avoid
Even experienced photographers make mistakes with butterfly lighting. Here are the most common errors I see and how to fix them.
Light Positioned Too High
The most frequent mistake is placing the key light too high. When this happens, the butterfly shadow extends down and touches the upper lip, creating an unflattering look that resembles a mustache. The shadow should never reach the lip. If you see this happening, lower your light gradually until the shadow shortens appropriately.
Light Positioned Too Low
Conversely, positioning your light too low eliminates the butterfly shadow entirely. Without that characteristic shadow, you are not really shooting butterfly lighting anymore. The pattern becomes something closer to flat, frontal lighting. Raise your light until you see that small, defined shadow under the nose.
Subject Turning Their Head
Butterfly lighting requires the subject to face the camera directly. When they turn their head, the symmetrical shadow pattern breaks down, and you lose the effect. Communicate clearly with your subject about maintaining their position, or accept that you will need to switch to a different lighting pattern for turned poses.
Dark Eyes Without Catchlights
When the light is positioned very high, the brow ridge can cast shadows into the eye sockets, making eyes appear dark and lifeless. This raccoon effect is particularly problematic for subjects with deep-set eyes. Lower your light slightly or add fill from below to brighten the eye area. Always check that your subject has visible catchlights in their eyes.
Harsh Shadows Under the Chin
Without fill, butterfly lighting can create dark shadows under the chin and jawline. While some shadow is desirable for dimension, overly dark areas can look unflattering and draw attention away from the face. Add a reflector below or reduce your lighting ratio to soften these shadows while maintaining the overall pattern.
Ignoring the Background
With all attention on the face, it is easy to forget about the background. Butterfly lighting often leaves backgrounds darker because the key light is focused forward. Make sure your background is appropriate for the look you want, and add background lighting if needed to separate your subject from the backdrop.
Frequently Asked Questions
What is butterfly lighting in photography?
Butterfly lighting is a classic portrait lighting pattern where the key light is positioned high and directly in front of the subject, creating a small butterfly-shaped shadow directly beneath the nose. This symmetrical lighting setup places the light on the same axis as the camera lens, producing flattering, glamorous results ideal for beauty and fashion photography.
What are common mistakes with butterfly lighting?
The most common butterfly lighting mistakes include positioning the light too high (creating a shadow that touches the lip), positioning it too low (eliminating the butterfly shadow entirely), allowing the subject to turn their head (breaking the symmetrical pattern), creating dark eyes without catchlights, and producing harsh shadows under the chin without fill light.
Is butterfly lighting still relevant today?
Yes, butterfly lighting remains highly relevant and is still the industry standard for beauty, glamour, and fashion photography. It has been used for decades because it consistently produces flattering results that sculpt cheekbones, narrow the face, and create a polished, editorial look that works perfectly for magazine covers, cosmetic campaigns, and celebrity portraits.
Can I use butterfly lighting outdoors or with natural light?
Yes, you can create butterfly lighting with natural light. Position your subject facing a large window with light coming from above eye level, or shoot on overcast days with the subject facing the brightest part of the sky. Use a reflector below the face to fill shadows just as you would with artificial lighting. Direct sunlight should be avoided as it creates harsh shadows.
What is the difference between butterfly and clamshell lighting?
Butterfly lighting uses a single key light positioned high and centered above the subject. Clamshell lighting adds a fill light or reflector below the subject’s face to soften shadows under the chin and eyes while maintaining the butterfly pattern. Clamshell is essentially butterfly lighting with fill, producing a softer, more even illumination ideal for beauty photography.
Is butterfly lighting flattering for all face shapes?
Butterfly lighting flatters most face shapes but works best for oval, heart-shaped, and round faces. It may not be ideal for subjects with very long or prominent noses (as it draws attention to the nose) or those with deep-set eyes (where the high light can create dark shadows in the eye sockets). Adjustments to light position and fill can help adapt the pattern for different features.
Putting It All Together
Butterfly lighting glamour beauty photography is a technique that has stood the test of time for good reason. When executed properly, it transforms ordinary portraits into glamorous, professional images that showcase your subjects at their absolute best. The distinctive butterfly shadow under the nose, the sculpted cheekbones, and the symmetrical, flattering illumination make this pattern indispensable for anyone serious about beauty and glamour portraiture.
Remember that mastering butterfly lighting takes practice. Start with the basic setup I have outlined here, then experiment with variations as you become more comfortable. Try different modifiers, play with lighting ratios, and adapt the technique for different face shapes and skin tones. The more you practice, the more intuitive the positioning will become.
The key is attention to detail. Watch that butterfly shadow carefully. Check for catchlights in the eyes. Make sure shadows under the chin are controlled. Small adjustments make enormous differences in the final result. Take your time with each setup, and review your images critically.
Whether you are shooting professional beauty campaigns, glamour portraits for private clients, or simply want to elevate your portrait photography skills, butterfly lighting deserves a place in your repertoire. It connects you to a rich tradition of Hollywood glamour while remaining as relevant and powerful in 2026 as it was nearly a century ago. Now go set up your lights and start creating some magic.