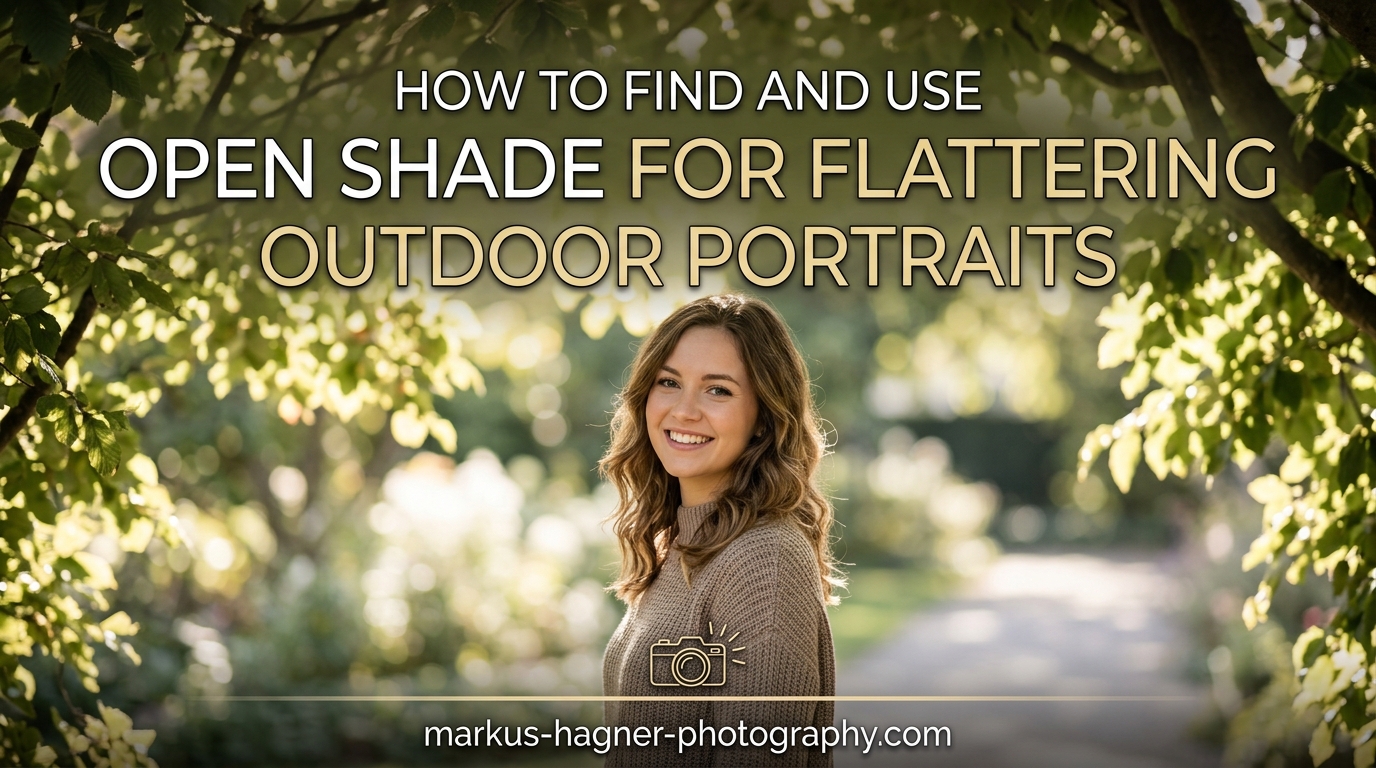
Nothing ruins an outdoor portrait faster than harsh midday sunlight. You know the scene: your subject is squinting, dark shadows carve out their eye sockets, and blown-out highlights make skin look washed out. I used to think the only solution was waiting for golden hour or packing up my gear entirely. Then I discovered open shade.
Open shade is an area that blocks direct sunlight but remains illuminated by surrounding ambient light. This creates soft, even lighting that flatters skin tones and eliminates harsh shadows. In this guide, I will show you exactly how to find open shade, position your subjects for the most flattering results, and avoid the common mistakes that trip up most beginners.
Once you master this technique, you can capture beautiful outdoor portraits at practically any time of day without flash, reflectors, or expensive modifiers.
What Is Open Shade in Photography
Open shade exists wherever an object blocks direct sunlight while still allowing ambient light to illuminate the area. Think of standing in the shadow of a tall building with the bright sky reflecting light onto your face. You are shaded from the harsh sun above, but you are not in darkness.
This differs from deep shade, like the dark corner under a dense tree canopy. Deep shade lacks the open sky above, creating dim, flat lighting that often produces muddy skin tones and noise in your images. Open shade, by contrast, has that open sky acting as a giant softbox.
The key characteristic of open shade is the quality of light. Because the light comes from a broad area of sky rather than a single point source, it wraps around your subject gently. Shadows transition gradually instead of ending abruptly. This soft quality is what makes open shade so flattering for portraits.
I think of it this way: direct sunlight is like a spotlight pointed directly at someone. Open shade is like standing in a room with large windows on all sides. Both illuminate the subject, but one creates a far more pleasing result.
Why Open Shade Is Perfect for Outdoor Portraits
The benefits of shooting in open shade extend far beyond simply avoiding harsh light. Here is why this technique has become essential to my outdoor portrait workflow:
Soft, even lighting across the face. Without direct sun creating hot spots and deep shadows, light distributes evenly across your subject’s features. Every part of their face receives roughly the same exposure.
No more squinting subjects. When bright sunlight hits someone’s eyes, they naturally squint. This tension shows in photos and makes people look uncomfortable. In open shade, eyes relax completely.
Beautiful catchlights naturally appear. Because your subject faces toward the open sky, their eyes reflect that brightness. These catchlights add life and dimension to portraits without any extra effort.
Accurate, flattering skin tones. Direct sun often blows out highlights on skin, especially on noses and foreheads. Open shade preserves detail in highlights while maintaining smooth tonal transitions.
Freedom from golden hour dependency. Before I understood open shade, I felt trapped into shooting only during the first and last hours of daylight. Now I can schedule sessions throughout the day with confidence.
Professional photographers rely on open shade because it produces consistent, repeatable results without requiring any special equipment. You can achieve magazine-quality lighting using nothing but your camera and a well-chosen patch of shade.
How to Find Open Shade Locations
Finding open shade becomes second nature once you know what to look for. The process is surprisingly simple, though it requires training your eye to see shadows differently.
Step 1: Locate the Sun
Before you can find shade, you need to know where the sun sits in the sky. Look at shadows on the ground to determine the sun’s direction. In the northern hemisphere, south-facing building walls cast shadows to the north during midday.
Step 2: Identify Shadow Edges
Look for where shadows begin and end. The boundary between sunlight and shade is your starting point. Large objects like buildings, walls, and trees create the most usable shade areas.
Step 3: Check for Open Sky Above
This is the critical step many photographers miss. Once you find a shaded area, look up. Can you see open sky? If tree branches or overhangs completely block the sky, you are in deep shade, not open shade. Move toward the edge of the shadow until you see sky overhead.
Step 4: Evaluate the Light Direction
Stand where you plan to position your subject. Where does the light come from? Ideally, the brightest part of the open sky should face your subject. This usually means positioning them toward the shadow’s edge, facing away from the blocking object.
Best Open Shade Locations
Building shadows: The north side of buildings (in the northern hemisphere) often provides excellent open shade throughout midday. Alleys between buildings can create beautiful reflected light.
Doorways and alcoves: Deep doorways create natural open shade with the added benefit of architectural framing. Position your subject just inside the doorway facing out.
Tree shade (carefully): Large trees with high canopies work well, but watch for dappled light filtering through leaves. The edge of tree shade near a clearing often works best.
Porches and overhangs: Covered porches with open sides provide controlled shade while still allowing ambient light to illuminate your subject.
Parking structures: The open sides of parking garages create excellent open shade with reflected light bouncing off concrete surfaces.
Weather Considerations
Weather dramatically affects open shade quality. On bright, sunny days, the contrast between sun and shade creates the most defined open shade areas. Overcast days provide naturally soft light everywhere, making the entire outdoors essentially open shade. Partly cloudy conditions offer the most variety, with shifting shade patterns throughout your session.
Seasonal changes matter too. In summer, the sun sits higher, creating smaller shadow areas at midday. Winter sun stays lower, casting longer shadows that provide more usable shade throughout the day. Spring and fall offer a middle ground with comfortable temperatures and good shade availability.
How to Position Your Subject in Open Shade
Finding open shade is only half the equation. Where you place your subject within that shade determines the final look of your portrait.
The Basic Positioning Principle
Position your subject near the edge of the shade, facing toward the open sky. This placement ensures they receive the maximum ambient light while remaining completely shielded from direct sun.
Think of the shade edge as a gradient. At the very edge, light is brightest but you risk direct sun hitting your subject. A few feet into the shade, light remains bright but is completely diffused. Too deep into the shade, and light becomes flat and dim.
Creating Beautiful Catchlights
Catchlights are the reflections of light sources in your subject’s eyes. In open shade, the sky itself becomes the light source reflected in their eyes. For the most attractive catchlights, have your subject face the brightest part of the open sky.
I often position subjects so the sky behind me illuminates their face. This creates large, soft catchlights that give eyes dimension and life.
Working with Light Direction
Even in open shade, light has direction. The brightest area of sky creates a primary light direction, which affects how shadows fall on your subject’s face.
For flattering portraits, position your subject so light comes from slightly in front and to one side. This creates subtle shadows that define facial features without creating harsh contrast. Avoid having the brightest sky directly behind you, which can create flat, shadowless lighting.
Background Considerations
Open shade creates an opportunity to control your background independently from your lighting. Since your subject is in shade while backgrounds might be sunlit, you can create beautiful separation.
Look for backgrounds that are either similarly shaded for consistency, or brightly lit for dramatic contrast. Dark backgrounds in deep shade often produce muddy results, while bright backgrounds can blow out if your exposure is set for the shaded subject.
Positioning Groups in Open Shade
Group portraits require more planning in open shade. The challenge is keeping everyone in consistent lighting while fitting them into often limited shade areas.
For smaller groups, position everyone at roughly the same distance from the shade edge. For larger groups, you may need to find a larger shade source or shoot at an angle where the shade area widens.
Watch for shadows falling between group members. Sometimes a slight repositioning prevents one person’s shadow from falling on another’s face.
Positioning Diagram Concept
Visualize the setup this way: Your blocking object (building, tree, wall) is behind your subject. Your subject faces away from this object toward the open sky. You, the photographer, stand between the subject and the open sky, shooting back toward the shade. This arrangement ensures the open sky illuminates your subject’s face while direct sun never reaches them.
Common Mistakes to Avoid When Using Open Shade
After years of teaching this technique, I see the same mistakes repeatedly. Here is what to watch for:
Mistake 1: Dappled Light
This is the number one problem I encounter. Dappled light occurs when sunlight filters through tree leaves, creating spotted patterns of light and shadow on your subject’s face. These patterns look terrible in portraits, creating bright spots on cheeks and dark patches on foreheads.
The solution is simple: either move your subject completely into solid shade, or choose a different location. Never try to photograph someone in dappled light. Even small patches create unflattering results that are difficult to fix in post-processing.
Mistake 2: Positioning Too Deep in Shade
New photographers often back their subjects far into shade for safety. The result is flat, dim lighting that lacks dimension. Without the open sky overhead, light loses its direction and quality.
Stay near the shade edge where light remains bright but diffused. If you cannot see sky above your subject, you have probably gone too deep.
Mistake 3: Ignoring Light Direction
Even soft shade has direction. If you ignore where the brightest light comes from, you may inadvertently create unflattering shadows. Light coming from below eye level creates strange shadows. Light from directly behind the camera flattens features excessively.
Always check where the brightest sky sits relative to your subject and adjust their angle accordingly.
Mistake 4: Color Cast from Surroundings
Shaded areas often pick up color from their surroundings. Green grass and foliage create green color casts. Blue building walls reflect blue light. Red brick adds warmth.
These color casts affect skin tones in ways that can look unnatural. If you notice strong color reflections, either reposition your subject or plan to adjust white balance in post-processing.
Mistake 5: Inconsistent Positioning Between Shots
During a session, it is easy to gradually drift while shooting. Over the course of 30 minutes, you might move from perfect positioning to having your subject partially in sun. Check your positioning regularly and reset if needed.
Mistake 6: Moving Shade Throughout Sessions
The sun moves constantly, which means your shade moves too. A perfect open shade spot at 2 PM might be in full sun by 3 PM. For longer sessions, scout locations with multiple shade options or plan to move as the light shifts. This is especially important for events like weddings where you cannot control the timing.
Camera Settings for Open Shade Photography
Open shade simplifies your camera settings because lighting remains consistent. Here are my recommendations:
White Balance
Shade typically has a cooler color temperature than direct sunlight. I set my white balance to the Shade preset (approximately 7000K) or shoot in RAW and adjust during editing. Auto white balance often works well in open shade, but can be fooled by colored surroundings.
Metering
Open shade usually has even lighting, making matrix or evaluative metering effective. For more control, spot meter on your subject’s face. The key is ensuring your subject is properly exposed even if bright backgrounds blow out.
Exposure Settings
I typically shoot at ISO 200-400 in open shade, depending on how bright the ambient light remains. Apertures between f/2.8 and f/5.6 work well for portraits, providing subject separation while keeping the face sharp. Shutter speeds are usually fast enough to handhold comfortably.
Exposure Compensation
Bright backgrounds can fool meters into underexposing your shaded subject. I often add +1/3 to +2/3 exposure compensation to ensure faces receive adequate exposure. Check your histogram to verify.
Quick Reference Settings
For a starting point in open shade, try these settings: ISO 400, f/4, 1/250 second, white balance set to Shade. Take a test shot, check your histogram, and adjust from there. This baseline works in most open shade situations.
Frequently Asked Questions
What is open shade in photography?
Open shade is an area that blocks direct sunlight but remains illuminated by surrounding ambient light from the open sky. Unlike deep shade, which is dark and flat, open shade provides soft, even lighting that flatters skin tones and creates beautiful catchlights in the eyes.
How do you find open shade for photography?
To find open shade, locate where large objects like buildings or trees cast shadows, then look for areas within those shadows that still have open sky overhead. Position yourself near the edge of the shade where light remains bright but direct sun is completely blocked.
Why use open shade for outdoor portraits?
Open shade eliminates harsh shadows, prevents squinting, produces even lighting across the face, creates natural catchlights, and allows you to shoot flattering portraits at any time of day rather than being limited to golden hour.
How do you avoid dappled light in photos?
Dappled light occurs when sun filters through tree leaves. To avoid it, either move your subject completely into solid shade away from any light patches, or choose a different location. Never photograph faces in dappled light, as the spotted pattern is extremely unflattering and difficult to fix later.
Start Using Open Shade for Better Portraits
Open shade transformed how I approach outdoor portrait sessions. Instead of feeling trapped by harsh midday sun or limited to golden hour bookings, I now confidently schedule shoots throughout the day. The technique requires no special equipment, just an understanding of how to find and use naturally occurring shade.
Remember the key principles: find shade with open sky overhead, position your subject near the shade edge facing the light, watch for dappled light, and adjust your white balance for the cooler shade temperature. With practice, spotting good open shade becomes automatic.
The next time you head outdoors with your camera, start looking for open shade everywhere you go. Train your eye to see those shadow edges and open sky combinations. Once this becomes second nature, you will never feel limited by harsh sunlight again.
Your subjects will thank you when they see their portraits with soft, flattering light, natural expressions without squinting, and beautiful catchlights bringing their eyes to life. Open shade outdoor portraits are within your reach starting with your very next session.