That darkening around the edges of your photos has a name. Vignetting, sometimes called “fall-off” or “corner darkening,” is one of those optical phenomena every photographer encounters eventually. Whether you see it as an unwanted flaw or a creative tool, understanding what causes vignetting helps you control it rather than letting it control your images.
In this guide, I will explain what vignetting is, break down the four distinct types you might encounter, explore what causes each one, and show you exactly how to correct or embrace this effect in your photography. By the end, you will know when vignetting works in your favor and when it needs fixing.
What Is Vignetting in Photography?
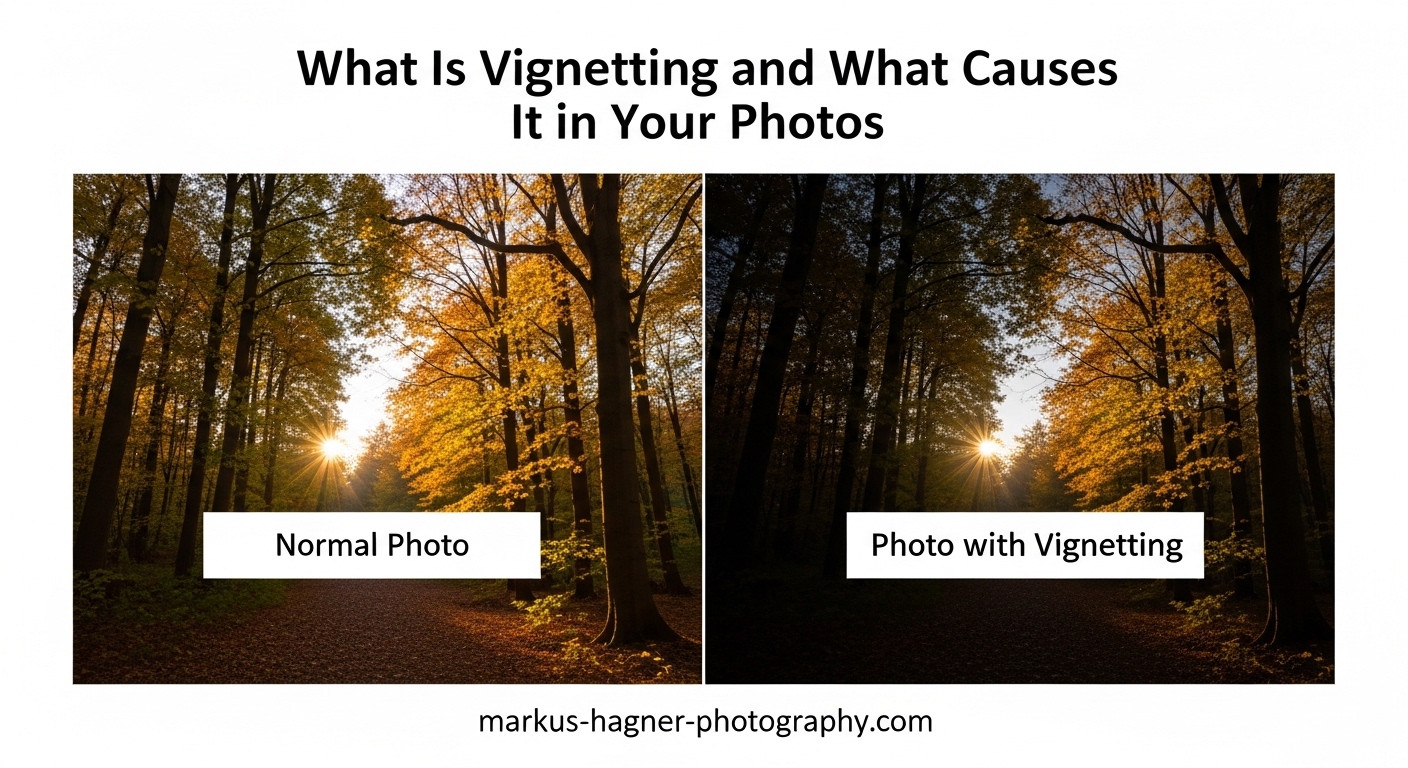
Vignetting is the darkening of image corners compared to the center. This optical phenomenon appears as a gradual reduction in brightness from the middle of your frame toward the edges. The effect ranges from barely noticeable to dramatically obvious, depending on your lens, settings, and accessories.
Think of it this way: light traveling through your lens does not reach every part of your sensor equally. The center receives the most intense illumination while the corners get progressively less. This light falloff creates that characteristic darkening photographers call vignetting.
Not all vignetting comes from your equipment. Photographers frequently add artificial vignettes intentionally during post-processing. This creative technique draws attention toward the center of the frame and can add mood or drama to an image. The key difference lies in intent: unwanted optical vignetting versus deliberate artistic enhancement.
The Technical Side: Why Vignetting Occurs
At its core, vignetting relates to how light rays travel through your lens assembly. Light hitting the center of your sensor travels in a relatively straight path. But rays destined for the corners must approach from steep angles, and these angled paths face more obstacles.
The cosine fourth law explains much of this phenomenon. As the angle of incoming light increases toward the periphery, illumination falls off proportionally to the fourth power of the cosine of that angle. Translation: the farther from center, the less light reaches that point.
Digital sensors add another wrinkle through their microlens design. Each pixel has a tiny lens above it to gather light. When light arrives at extreme angles, those microlenses cannot capture it as efficiently, contributing to additional corner darkening on digital cameras.
The Four Types of Vignetting
Not all vignetting shares the same cause. Understanding the four distinct types helps you identify what is happening in your specific images and choose the right solution. Each type has unique characteristics and requires different approaches to correct or embrace.
Optical Vignetting
Optical vignetting stems from the physical design of your lens itself. Light rays passing through the outer edges of your aperture encounter more obstruction from the lens barrel than rays passing through the center. This creates a natural darkening that varies with your f-stop setting.
Wide apertures make optical vignetting most visible. Shooting at f/1.4 or f/1.8 often produces noticeable corner darkening because the aperture opening uses the full diameter of the lens elements. As you stop down to smaller apertures like f/8 or f/11, the light rays use only the central portion of the lens, reducing this effect significantly.
You can spot optical vignetting by its gradual, natural-looking gradient. It typically appears symmetrical and affects all four corners equally. This type also creates the distinctive “cat’s eye” bokeh shapes visible in out-of-focus highlights toward the edges of wide-aperture images.
Pixel Vignetting
Pixel vignetting relates specifically to digital sensors and their microlens arrays. Each photosite on your sensor has a tiny lens designed to gather incoming light. When light arrives from steep angles at the sensor edges, these microlenses cannot direct it into the photosite as efficiently.
The chief ray angle (CRA) determines how much pixel vignetting occurs. Sensor manufacturers design microlenses with specific angles to match lens designs, but wide-angle lenses in particular send light at angles that challenge this optimization.
This type of vignetting is more pronounced on certain sensor designs and tends to affect wide-angle lenses more than telephotos. Camera manufacturers combat pixel vignetting through in-camera processing that digitally brightens corners based on lens profiles.
Mechanical Vignetting
Mechanical vignetting occurs when physical accessories block light from reaching the corners of your frame. This is the most easily preventable type because it comes from external attachments rather than inherent lens or sensor characteristics.
Common culprits include incorrectly sized lens hoods, stacked filters, and poorly designed filter holder systems. A lens hood meant for a longer focal length might cast shadows when used on a wider lens. Similarly, thick circular polarizers or multiple filters stacked together can obstruct peripheral light rays.
Unlike optical vignetting’s gentle gradient, mechanical vignetting often produces harder edges. The darkening can appear uneven and may show visible geometric patterns that reveal the shape of whatever is causing the obstruction.
Artificial Vignetting
Artificial vignetting is the only type you create intentionally. This refers to vignettes added during post-processing using software like Lightroom, Photoshop, or Camera Raw. Photographers use artificial vignettes to guide viewer attention, create mood, or add a finishing touch to their images.
The vignette effect works because darker edges naturally draw the eye toward brighter areas. By darkening the periphery, you subtly direct attention toward your subject in the center or wherever you place your focal point.
Artificial vignettes offer complete control over intensity, shape, and placement. You can create subtle effects that viewers barely notice or dramatic darkening for stylistic impact. The challenge lies in restraint, as overuse remains one of the most common critiques in photo communities.
What Causes Vignetting in Your Photos?
Multiple factors combine to determine how much vignetting appears in any given image. Understanding these causes helps you predict when vignetting will occur and take steps to minimize or embrace it as needed.
Lens Design and Quality
The design of your lens represents the primary cause of optical vignetting. Wide-angle lenses and fast prime lenses typically exhibit more vignetting than slower or longer focal length options. The complex optical formula required to cover wide angles or achieve wide apertures inherently creates more corner darkening.
Professional-grade lenses often control vignetting better than budget options through more sophisticated optical designs. However, even expensive lenses cannot eliminate the physics of light falloff entirely. Some vignetting remains normal at wide apertures regardless of lens quality.
Aperture Settings
Your chosen f-stop dramatically affects vignetting intensity. Wide apertures like f/1.4, f/1.8, or f/2.8 produce maximum vignetting because the aperture uses the full diameter of the lens elements. Stopping down to f/5.6, f/8, or smaller reduces vignetting considerably as light uses only the central, better-corrected portion of the lens.
If you need minimal vignetting for technical work like product photography or architectural images, stopping down to middle apertures provides a simple solution. The trade-off comes in reduced light and potentially diffraction at very small apertures.
Filter and Accessory Interference
Screw-on filters, filter holders, and lens hoods can all introduce mechanical vignetting. Thick filter rings, stacked filters, or mismatched accessories physically block light from reaching the corners of your frame.
Wide-angle lenses prove especially vulnerable to filter-induced vignetting. A standard thickness filter that works fine at 50mm might cause obvious corner darkening at 16mm or wider. Slim filters designed for wide-angle use help minimize this problem.
Lens hoods must match your specific focal length. Using a hood designed for a longer lens on a wide-angle optic nearly guarantees mechanical vignetting. Always use the hood specifically made for your lens, especially on zooms at their widest settings.
Sensor Size Considerations
Your sensor size influences how much vignetting you see. Full-frame sensors reveal more of the lens’s image circle, including the edges where vignetting is strongest. Crop sensors (APS-C, Micro Four Thirds) use only the central portion of the image circle, effectively cropping away the most affected corners.
This means the same lens typically shows less vignetting on a crop sensor than on full frame. However, wide-angle lenses designed for crop sensors may still exhibit noticeable vignetting at their widest settings and apertures.
When to Use Vignettes (and When to Avoid Them)
Vignetting is neither inherently good nor bad. The question of whether to embrace or eliminate it depends entirely on context, subject matter, and your creative intent. Let me break down scenarios where vignetting helps versus harms your images.
When Vignettes Work Well
Portrait photography often benefits from subtle vignettes. Darkening the edges naturally draws attention toward your subject’s face, creating a gentle spotlight effect. The key word here is subtle. Heavy-handed vignettes that visibly darken skin tones or clothing cross into distraction territory.
Mood and atmosphere benefit from vignettes in many styles. A slight darkening can enhance the emotional quality of an image, adding gravitas to a dramatic scene or nostalgia to a portrait. Vintage-inspired looks frequently incorporate vignettes as part of their aesthetic.
Busy backgrounds become less distracting when vignettes darken the edges. If your composition includes cluttered periphery that competes with your subject, a gentle vignette can subdue those distractions without requiring heavy cropping.
When to Skip the Vignette
Architectural and real estate photography rarely benefit from vignettes. These genres demand even illumination across the frame to accurately represent spaces. Vignetting here looks like a mistake rather than an artistic choice.
Landscape photography usually favors correction over addition. Since landscapes often feature important detail in corners and edges, darkening these areas diminishes the impact of sweeping vistas and foreground elements.
Technical and commercial work requires accurate, even lighting. Product photography, scientific imaging, and documentary work all demand faithful reproduction without stylistic effects that could misrepresent the subject.
The Overuse Warning Signs
From photography forums and critique communities, one theme emerges consistently: photographers often overuse vignettes without realizing it. Watch for these warning signs that your vignette has crossed from enhancement to distraction.
If viewers notice the vignette before your subject, you have applied too much effect. If the darkening visibly affects your subject rather than staying in the periphery, pull back the intensity. If your images begin to look dated or amateurish according to feedback from peers, reconsider your vignette habits.
The best vignettes are often invisible on first glance. They guide the eye without announcing their presence. When someone has to look for the vignette to notice it, you have found the right balance.
How to Correct or Remove Vignetting
Unwanted vignetting responds well to correction through both in-camera processing and post-processing software. Here are the methods I recommend for addressing optical and mechanical vignetting.
In-Camera Vignetting Reduction
Many modern cameras include built-in vignetting correction. These systems apply profile-based adjustments that brighten corners based on your specific lens and aperture combination. Check your camera’s menu for options called “Peripheral Illumination Correction,” “Vignetting Control,” or similar terms.
To enable this feature, your camera needs to recognize the attached lens. Original manufacturer lenses typically work automatically, while third-party options may require profile installation. The correction happens before you see the image, reducing the work needed later.
In-camera correction works best on JPEG files. If you shoot RAW, your editing software will likely provide more sophisticated correction options, making in-camera processing less critical.
Correcting Vignetting in Lightroom
Lightroom offers two primary methods for vignette correction. The automatic approach uses lens profiles, while manual controls provide precise adjustment.
Step 1: Open your image in the Develop module and navigate to the Lens Corrections panel.
Step 2: Check the “Enable Profile Corrections” box. Lightroom will automatically detect your lens and apply manufacturer-designed corrections for vignetting, distortion, and chromatic aberration.
Step 3: If the automatic correction proves too strong or too weak, use the “Vignetting” slider in the profile section to fine-tune the amount.
Step 4: For images without lens profiles or where you want manual control, use the “Manual” tab in Lens Corrections. The “Vignette Amount” slider controls correction intensity, while “Midpoint” adjusts how far the correction extends toward the center.
Positive values in the vignette control brighten corners to correct optical darkening. Negative values add vignettes for creative effect.
Removing Vignettes in Photoshop
Photoshop offers multiple approaches to vignette correction. The Camera Raw filter provides the same controls as Lightroom, while additional methods suit specific workflows.
Method 1: Open your RAW file in Camera Raw or apply the Camera Raw filter to any image. Navigate to the Lens Corrections panel and enable profile corrections exactly as in Lightroom.
Method 2: Use the Lens Correction filter (Filter > Lens Correction). This tool includes a “Vignette” section with Amount and Midpoint sliders similar to Lightroom’s manual controls.
Method 3: For precise control, use a curves adjustment layer with a radial gradient mask. Brighten the corners selectively without affecting the center of your image.
Preventing Mechanical Vignetting
Mechanical vignetting from accessories requires physical solutions rather than software correction. Here is how to prevent this type before it occurs.
Use slim-profile filters on wide-angle lenses to avoid physical obstruction. When stacking filters becomes necessary, limit yourself to two maximum and use the thinnest options available. Check your frame corners at your widest focal length before shooting.
Ensure your lens hood matches your specific lens model. Generic or incorrectly sized hoods frequently cause vignetting, especially on zoom lenses at their widest settings. When in doubt, remove the hood and compare your frame.
FAQ
Why are my photos vignetting?
Your photos are vignetting due to one of four causes: optical vignetting from shooting at wide apertures, pixel vignetting from digital sensor design, mechanical vignetting from filters or lens hoods blocking light, or a combination of these factors. Wide-angle lenses and fast apertures like f/1.4-f/2.8 show the most vignetting. Stopping down to smaller apertures or removing accessories usually reduces the effect.
How to avoid lens vignettes?
To avoid lens vignettes, stop down your aperture to f/5.6 or smaller, use slim-profile filters designed for wide-angle lenses, remove filter stacking, ensure your lens hood matches your specific lens model, and enable in-camera peripheral illumination correction. On crop sensors, vignetting is naturally reduced since the sensor crops the most affected corners of the image circle.
Is vignetting good or bad?
Vignetting is neither inherently good nor bad. It depends entirely on your creative intent and the photography genre. Subtle vignettes can enhance portraits, create mood, and draw attention to subjects. However, vignetting should be avoided in architectural photography, landscapes, and technical work where even illumination matters. The key is using vignettes intentionally rather than letting them appear as unintentional flaws.
How do I remove a vignette from an image?
To remove a vignette from an image, enable lens profile corrections in Lightroom or Camera Raw by checking ‘Enable Profile Corrections’ in the Lens Corrections panel. For manual control, use the Vignette Amount slider with positive values to brighten corners. In Photoshop, use the Lens Correction filter or apply a curves adjustment with a radial gradient mask. Most RAW editors include built-in lens profiles that automatically correct vignetting for popular lens models.
Conclusion
Vignetting represents one of those photographic phenomena that can either plague your images or serve your creative vision. By understanding what is vignetting and what causes it in your photos, you gain control over this effect rather than letting it happen accidentally.
Remember that optical and pixel vignetting come with your equipment and respond well to stopping down your aperture. Mechanical vignetting stems from accessories and requires physical prevention. Artificial vignetting gives you creative control in post-processing. The key lies in knowing which type you are dealing with and choosing the appropriate response.
Whether you correct vignetting for technical accuracy or embrace it for artistic effect, the choice should always be intentional. Use these techniques to ensure vignetting serves your vision, never undermines it.