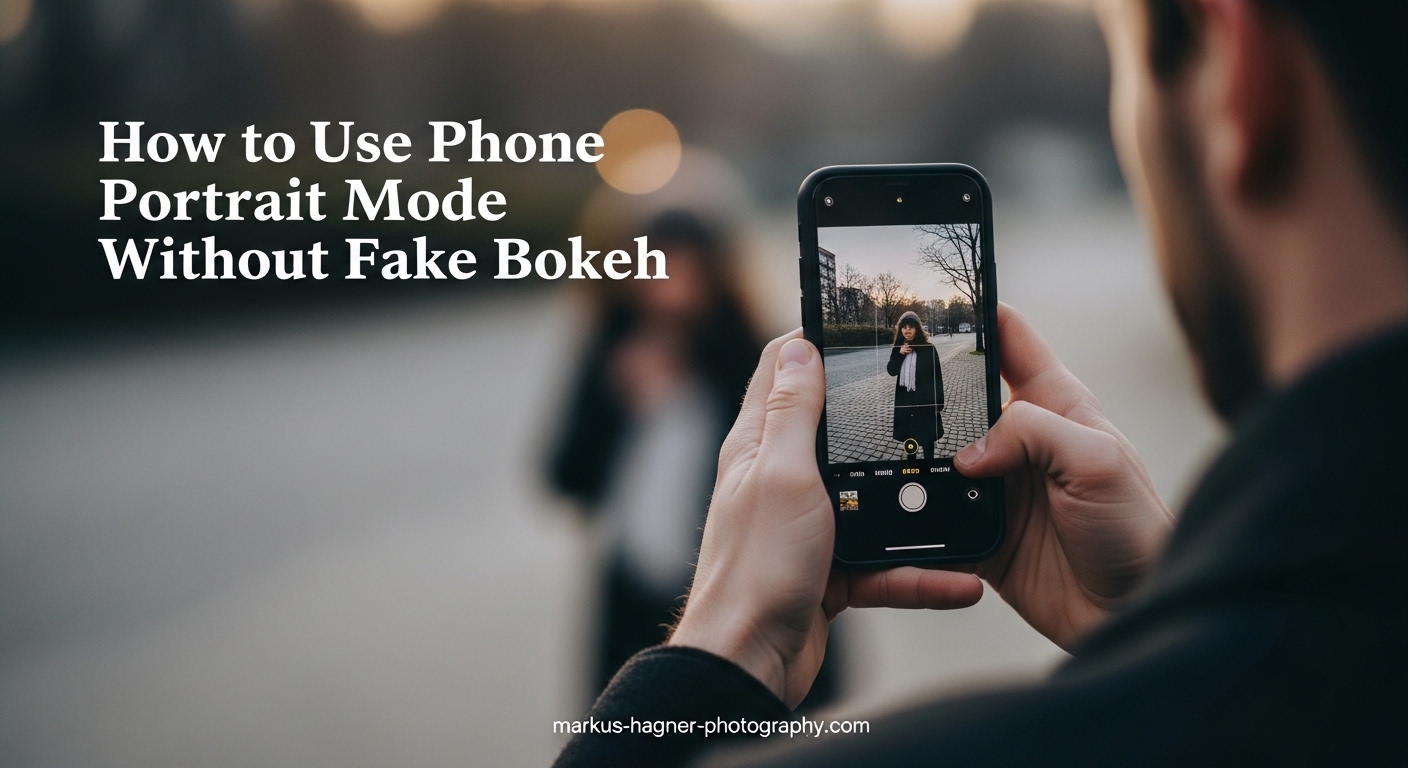
You have probably noticed it. You take a portrait photo with your phone, and something looks off. The background is blurred, sure, but it does not look like the creamy, natural bokeh you see from a real camera. Instead, it looks synthetic. Smeared. Almost like someone went at your photo with a blur tool in an editing app. Learning how to use phone portrait mode without fake bokeh look can transform your smartphone photography from obviously artificial to genuinely professional-looking.
The good news is that your phone’s portrait mode is not fundamentally broken. The problem is how most people use it. After testing portrait mode across dozens of phones and shooting thousands of portrait photos, I have learned that a few simple adjustments can make a dramatic difference. This guide will show you exactly why portrait mode looks fake, and more importantly, how to fix it.
Whether you are shooting with an iPhone, Samsung, Google Pixel, or any other smartphone, the principles remain the same. Understanding what your phone is actually doing when it applies that background blur will help you work with the technology instead of fighting against it.
Understanding Portrait Mode: What Your Phone Actually Does
Before we fix the fake bokeh problem, we need to understand what portrait mode is actually doing. This is not magic. Your phone is not somehow changing its lens to create background blur. Instead, it is using software to simulate an effect that real cameras achieve optically.
The Depth Map: How Your Phone Decides What to Blur
When you tap the shutter button in portrait mode, your phone does several things in a fraction of a second. First, it analyzes the scene to identify your subject. Modern phones use a combination of machine learning, face detection, and sometimes additional sensors to figure out where the person is in the frame.
Next, and this is the critical part, your phone builds a depth map. Think of this as a 3D model of the scene that estimates how far every pixel is from the camera lens. This depth map tells the phone which areas are part of the subject and which areas are in the background.
Finally, the phone applies blur to everything it believes is in the background. The amount of blur typically increases with estimated distance from the subject, mimicking how real optical blur works. But here is the catch: this depth map is a guess. A sophisticated guess, but still a guess.
Edge Detection: Where Things Go Wrong
The depth map needs to know exactly where your subject ends and the background begins. This is called edge detection, and it is the single biggest source of fake-looking portrait mode photos. When your phone misidentifies these edges, you get those telltale artifacts: hair that is partially blurred, halos around heads, and the dreaded blur bleeding onto parts of the subject.
Fine details like loose hair strands, fur, glasses frames, and even hands near the face confuse edge detection algorithms. The phone struggles to determine if these elements are part of the subject or part of the background. When it guesses wrong, the result looks obviously artificial.
Why Phones Cannot Produce Real Bokeh
You might wonder why phones do not just create real background blur. The answer comes down to physics. Real bokeh requires a wide aperture lens and a relatively large sensor. The wider the aperture (lower f-number), the shallower the depth of field, meaning more background blur.
Phone cameras have tiny sensors and tiny lenses. Even when a phone advertises an f/1.8 aperture, that is not the whole story. The actual physical diameter of the lens opening matters more than the f-number alone. Because phone sensors are so small, even a wide f-number aperture results in a tiny physical opening that cannot produce significant optical blur.
This is why portrait mode uses software instead. It is not that phone manufacturers are being cheap. It is that physics literally prevents phones from creating the same optical effect you get from a DSLR or mirrorless camera with a wide-aperture lens.
Portrait Mode vs Real Camera Bokeh: The Key Differences
Understanding the differences between software blur and optical blur helps you set realistic expectations and work within the limitations of portrait mode.
Real optical bokeh has several characteristics that software struggles to replicate. The blur is gradual, not abrupt. Out-of-focus highlights (like lights in the background) render as smooth circles that maintain their shape. The transition between sharp and blurred areas is natural and continuous.
Software blur, on the other hand, often creates an abrupt cutoff between sharp and blurred areas. Background highlights may look smeared rather than circular. And of course, any edge detection errors are immediately visible as unnatural artifacts.
Why Portrait Mode Looks Fake: The Main Culprits
Now that we understand how portrait mode works, let’s look at the specific reasons why it often looks fake. Identifying these problems is the first step toward avoiding them.
Edge Detection Failures Around Hair
Hair is the number one complaint I see in photography forums about portrait mode. Fine strands of hair at the edges of your subject’s head are notoriously difficult for phones to handle correctly. The algorithm sees these thin strands and often cannot decide: is this hair part of the subject, or is it background?
When the phone guesses wrong, you get partially blurred hair, halos around the head, or hair that looks like it is dissolving into the background. This is one of the most obvious signs of artificial blur because nothing in real optical bokeh would create this effect.
Long, loose hair is particularly problematic. The more strands that extend away from the face, the more opportunities for edge detection to fail. Curly hair and flyaway strands create even more challenges.
Blur Intensity Set Too High
Most phones apply way too much blur by default. I am convinced this is a marketing decision. Manufacturers want you to see a dramatic effect so you think the feature is working. But real background blur from a camera is rarely as extreme as what portrait mode applies.
When the blur is too strong, several problems emerge. First, the effect becomes obviously artificial because real lenses rarely blur backgrounds that heavily at typical portrait distances. Second, any edge detection errors become much more visible. A slight halo that might be acceptable with moderate blur becomes glaringly obvious when the blur is cranked up.
Many users on photography forums report that simply reducing the blur intensity makes their portrait mode photos look significantly more natural. This is one of the easiest fixes, and we will cover exactly how to do it later.
Abrupt Transitions Between Sharp and Blurred Areas
Real optical blur creates a gradual transition from sharp to blurred. Objects just behind your subject are only slightly soft, while objects far in the background are more blurred. This gradual falloff looks natural because it matches how our eyes perceive depth.
Portrait mode often creates a much more abrupt transition. Your subject is completely sharp, and everything behind them is equally blurred. This binary approach does not match optical physics and contributes to the artificial appearance.
Problems With Glasses and Accessories
Glasses are another major challenge for portrait mode. The frames themselves can confuse edge detection, but the real problem is the lenses. Glasses can create weird artifacts where the blur seems to go through the lens, or conversely, where parts of the background visible through the glasses remain sharp while the surrounding background is blurred.
Reflective surfaces in general cause problems. Earrings, necklaces, and even shiny fabric can create areas where the phone misidentifies edges. The result is often a visible artifact that draws attention to the artificial nature of the blur.
Hands and Arms Near the Face
When someone has their hands near their face, perhaps resting their chin on their hand or tucking hair behind their ear, portrait mode often struggles. The algorithm may blur parts of the hands or arms while keeping the face sharp, creating an unnatural appearance.
This is particularly noticeable when fingers are near the edge of the face. The phone may blur the tips of fingers while keeping the rest of the hand sharp, or vice versa. These partial-blur artifacts immediately signal that the photo has been processed.
Digital Zoom Compounding Problems
Digital zoom is the enemy of good portrait mode photos. When you zoom digitally, you are cropping into the image and enlarging pixels. This reduces image quality and makes edge detection less accurate.
Some phones apply digital zoom automatically in portrait mode to get a tighter crop on faces. While this can be convenient, it also amplifies any edge detection errors. The lower resolution and increased noise make it harder for the phone to accurately identify edges, leading to more visible artifacts.
Subject Too Close to the Background
One of the most common mistakes is positioning your subject too close to the background. When there is not enough separation between subject and background, even the blur that is applied correctly looks wrong.
With real optical bokeh, having your subject close to the background reduces the blur effect because the background is not far enough from the plane of focus to become significantly out of focus. But portrait mode applies blur regardless of actual distance. The result is a blurred background that does not match the physical relationship between subject and background, creating a subtle but noticeable wrongness.
Poor Lighting Conditions
Lighting affects portrait mode quality in several ways. Low light increases image noise, which makes edge detection less accurate. The phone’s algorithms struggle to distinguish between subject and background when the image is noisy.
Harsh lighting with hard shadows creates problems too. Strong shadows on faces can confuse the depth map, particularly around the edges of shadows. The phone may blur shadow edges incorrectly, creating artifacts that follow shadow boundaries rather than actual subject edges.
Backlighting is particularly challenging. When your subject is backlit, the phone often struggles to properly expose both the subject and background while simultaneously trying to create an accurate depth map.
Complex or Busy Backgrounds
Simple backgrounds are easier for portrait mode to handle. When the background is a solid color or has minimal detail, edge detection errors are less visible because there is less detail to blur incorrectly.
Busy backgrounds with lots of detail make every edge detection error more obvious. Trees with leaves, patterned walls, and crowds of people in the background all create more opportunities for visible artifacts. The phone has to correctly identify edges around every complex element in the background.
How to Use Portrait Mode Without the Fake Bokeh Look
Now we get to the practical solutions. These techniques will help you get natural-looking results from portrait mode on any phone. I have tested these methods across iPhone, Samsung, Google Pixel, and other Android devices, and they consistently improve results.
Step 1: Create Distance Between Subject and Background
This is the single most important technique for natural-looking portrait mode photos. Position your subject at least 6 to 10 feet away from the background. More distance is generally better.
When your subject is far from the background, two things happen. First, the blur effect looks more natural because this mimics how real optical blur works. Second, any edge detection errors are less visible because the background is more uniformly blurred anyway.
Look for open spaces where you can position your subject with empty space behind them. Parks, open fields, and large rooms all work well. Avoid placing subjects directly against walls, hedges, or other backgrounds.
Step 2: Reduce the Blur Intensity
Most phones let you adjust the blur intensity, either before shooting or after. Take advantage of this feature. Reduce the blur to about 50-70% of what the phone applies by default.
On iPhone, you can adjust the depth control (f-number slider) either when taking the photo or when editing later. Slide toward higher f-numbers (like f/8 or f/11) for less blur. On most Android phones, look for a blur intensity slider in portrait mode settings or in the gallery editor.
Less blur looks more natural for two reasons. First, it more closely matches what real camera lenses produce at typical portrait distances. Second, any remaining edge detection errors are much less visible when the blur is subtle.
Step 3: Use Soft, Diffused Lighting
Lighting matters enormously for portrait mode. Soft light helps in multiple ways: it reduces harsh shadows that can confuse edge detection, it creates more flattering portraits, and it helps the phone’s algorithms work more accurately.
Open shade is ideal. Position your subject in the shade of a building, tree, or other large object, but with open sky providing illumination. This creates even, soft light without harsh shadows.
Window light works beautifully for indoor portraits. Place your subject near a large window but not in direct sunlight coming through the window. The large, soft light source creates gentle transitions that flatter faces and help portrait mode perform better.
Overcast days are actually excellent for portrait mode. The cloud cover acts as a giant softbox, creating beautifully diffused light. Many photographers actually prefer overcast conditions for portraits.
Avoid harsh midday sun if possible. The strong directional light creates deep shadows and bright highlights that challenge both the phone’s exposure systems and its edge detection algorithms.
Step 4: Avoid Digital Zoom
Use your feet instead of digital zoom. If you need a tighter composition, walk closer to your subject rather than pinching to zoom on the screen.
Some phones automatically crop in portrait mode to create a more traditional portrait focal length. If your phone does this, see if you can disable it or use the standard camera mode at a closer distance instead.
The telephoto lens on multi-lens phones is fine to use because it provides optical zoom. Just avoid using digital zoom beyond what the telephoto lens provides.
Step 5: Choose Simple Backgrounds
Simple backgrounds make edge detection errors less obvious and create cleaner, more professional-looking portraits. Look for solid colors, simple textures, or areas with minimal detail.
A plain wall works well, especially if it is far behind your subject. A wall with a subtle texture is even better because it provides some visual interest without creating complex edges.
Open sky is an excellent background when you can position your subject so the sky is behind them. Shooting from a low angle with sky behind your subject eliminates background complexity entirely.
Vegetation can work if it is far enough away to become a smooth blur. Trees and bushes in the distance create a pleasant, organic background. But avoid having branches or leaves close to your subject where edge detection might struggle.
Step 6: Pay Attention to Hair and Clothing
Since hair is the biggest challenge for portrait mode, take steps to minimize problems. For subjects with long hair, consider having them style it so loose strands are minimized. A simple ponytail or bun eliminates many flyaway strands that cause artifacts.
If you want hair to be loose, try to position the subject so their hair is against a simple, uniform background rather than a complex one. Edge detection errors are less visible against solid colors.
Avoid clothing with lots of loose fabric, fringe, or other elements that extend away from the body. These create the same edge detection challenges as loose hair.
Step 7: Tap to Focus on the Eyes
Always tap on your subject’s eyes to set focus and exposure. The eyes are the most important part of any portrait, and you want them to be perfectly sharp.
On most phones, tapping on the screen sets both focus and exposure. If you tap on the eyes and the exposure is wrong, most phones let you adjust exposure by sliding up or down after tapping.
Locking focus and exposure (usually by holding your finger on the screen) can help ensure the phone does not change settings at the moment of capture.
Step 8: Take Multiple Shots
Portrait mode results can vary from shot to shot even when conditions seem identical. The algorithms sometimes perform better on one attempt than another.
Take several photos of each pose. Review them and keep the ones with the best edge detection results. This is especially important for challenging situations like subjects with long hair or glasses.
Many phones now capture a burst of images and automatically select the best one, but taking multiple separate shots gives you more control over the final result.
Step 9: Consider Skipping Portrait Mode
Sometimes the best portrait mode photo is no portrait mode at all. If you have a clean background and good light, a regular photo might actually look better than a portrait mode photo with visible artifacts.
Many professional photographers I know prefer regular photo mode for their phone portraits. They rely on composition and lighting to separate the subject from the background rather than software blur.
Some phones capture both the portrait mode version and the regular version. If your phone does this, always review both before deciding which to keep.
Phone-Specific Tips: iPhone, Android, and Beyond
Different phone brands implement portrait mode differently. Understanding your phone’s specific features and quirks helps you get better results.
iPhone Portrait Mode Tips
iPhones have some of the most polished portrait mode implementations, but they still have quirks worth understanding.
Depth Control: On iPhones with Face ID (iPhone X and newer), you can adjust the blur intensity before or after taking the photo. When shooting, look for the f-number slider at the bottom of the screen. When editing, open the photo and tap Edit, then look for the depth control slider.
The f-number scale mimics real camera apertures. Lower numbers (f/1.4, f/2.8) mean more blur. Higher numbers (f/8, f/11, f/16) mean less blur. For natural results, try f/5.6 or f/8.
Portrait Lighting: iPhones offer various lighting effects that can either help or hurt your results. Natural Light is the safest choice. Studio Light and Contour Light can work well but may look artificial if overdone. Stage Light and Stage Light Mono often look very fake and should be used sparingly.
LiDAR Benefits: iPhone Pro models since the 12 Pro include LiDAR sensors that dramatically improve portrait mode edge detection, especially in low light. If you have a LiDAR-equipped iPhone, you will see better results in challenging conditions.
Use the Telephoto: On multi-lens iPhones, portrait mode can use either the main camera or the telephoto. The telephoto often produces more flattering perspective for faces and creates better background separation.
Samsung Portrait Mode Tips
Samsung phones offer robust portrait mode features with some unique options.
Background Blur Adjustment: Samsung lets you adjust blur intensity with a slider. Look for the aperture icon and adjust from f/1.4 (maximum blur) to f/16 (minimum blur). Like iPhone, mid-range values around f/5.6 to f/8 tend to look most natural.
Live Focus: Samsung calls its portrait mode Live Focus on some models. The features are similar, offering background blur and various effects.
Studio Lighting Effects: Samsung offers various lighting effects similar to iPhone. These can be fun but often look processed. The standard blur effect without added lighting usually produces the most natural results.
Color Point: This effect keeps your subject in color while making the background black and white. It can work well but is definitely a stylized look rather than a natural one.
Google Pixel Portrait Mode Tips
Google Pixels have historically had excellent portrait mode thanks to Google’s computational photography expertise.
Google’s Edge Detection: Pixels generally handle edge detection well, particularly with hair. Google’s algorithms are among the best in the industry, though forum users still report issues with very fine hair strands.
Post-Capture Adjustment: You can adjust blur intensity after taking the photo in Google Photos. Open the portrait photo, tap Edit, and look for the blur adjustment tools.
Face Retouching: Google offers face retouching options that you may want to disable for more natural results. These can be found in the camera settings.
How LiDAR and Depth Sensors Improve Results
Newer phones are adding dedicated depth sensors that dramatically improve portrait mode accuracy.
LiDAR (Light Detection and Ranging) sensors emit infrared light pulses and measure how long they take to return. This creates an accurate physical depth map rather than relying purely on software estimation. iPhone Pro models and some Android flagships now include LiDAR.
Time-of-Flight (ToF) sensors work similarly and are found on many Android phones. These sensors measure the time light takes to travel to objects and back, creating a precise depth map.
Phones with these sensors generally produce much better portrait mode results, especially in challenging conditions. Edge detection is more accurate, and results are more consistent from shot to shot.
If you are shopping for a new phone and care about portrait mode, prioritize models with LiDAR or ToF sensors.
Adjusting Settings on Different Phone Brands
Regardless of phone brand, look for these common settings:
Blur Intensity: Almost every phone lets you adjust this. Find it and use it. Default settings are almost always too aggressive.
Beauty/Face Retouching: These features smooth skin and alter facial features. For natural-looking portraits, turn these off or set them to minimum.
HDR: Keep HDR on for most situations. It helps balance exposure between subject and background, which can improve portrait mode results.
Grid Lines: Enable grid lines to help with composition and ensure your subject is properly positioned in the frame.
Post-Processing: Fixing and Fine-Tuning Portrait Mode Photos
Sometimes you take a portrait mode photo and realize later that the blur is too strong or the edge detection has issues. Post-processing can help salvage these shots.
Adjusting Blur Intensity After Shooting
Most phones save the depth map along with the photo, allowing you to adjust blur intensity after capture. This is one of the most powerful tools for natural-looking results.
On iPhone, open the photo in the Photos app, tap Edit, and use the depth control slider (the f-number icon) to adjust blur. You can even remove the blur entirely.
On Samsung, open the photo in the Gallery app, tap Edit, and look for the background blur adjustment. You can increase or decrease the blur intensity.
On Google Pixel, open the photo in Google Photos, tap Edit, and look for the portrait tools to adjust blur.
The key insight here is that you do not need to get the blur perfect in-camera. Err on the side of less blur while shooting, knowing you can always add more later if needed.
Built-in Editing Tools
Beyond blur adjustment, basic editing can help portrait mode photos look more natural.
Exposure: Slightly underexposed portraits often look better. Bright backgrounds can make blur artifacts more visible.
Contrast: Increasing contrast slightly can help your subject stand out from the background, reducing the need for heavy blur.
Vignette: A subtle vignette can draw attention to your subject and make the overall effect look more intentional.
Color Grading: Matching the color tone of your subject to the background can help create visual cohesion that makes the blur look more natural.
Third-Party Apps for Better Portrait Results
Several third-party apps offer more control over portrait-style effects than built-in camera apps.
Focos: Available for iPhone, Focos gives you incredibly detailed control over blur. You can adjust the shape of the bokeh, refocus after capture, and even add lighting effects. It uses the depth data from iPhone portrait photos.
AfterFocus: Available for both iPhone and Android, AfterFocus lets you manually select what to blur. This is useful for photos where automatic edge detection failed.
Snapseed: Google’s free editing app includes a Lens Blur filter that can add blur to regular photos. The results are not as sophisticated as dedicated portrait mode, but it gives you manual control.
Lightroom Mobile: The masking tools in Lightroom Mobile allow you to selectively blur backgrounds. This requires more manual work but gives you complete control.
When to Skip Portrait Mode Entirely
There are situations where portrait mode is more likely to hurt than help.
Group Photos: Portrait mode typically keeps only one person in the sharp focus plane. For groups, you are often better off using regular mode and creating separation through distance and composition.
Pet Portraits: Fur creates major edge detection challenges. Unless you have a phone with excellent depth sensing, regular photos of pets often look better than portrait mode attempts.
Fast Action: Portrait mode typically requires the phone to process more data, which can slow capture. For moving subjects, regular mode gives you a better chance of getting the shot.
Very Busy Backgrounds: When the background is extremely complex, edge detection is more likely to fail. Sometimes a clean regular photo with good composition beats a portrait mode photo full of artifacts.
Quick Reference Checklist for Better Portrait Mode Photos
Before you shoot, run through this checklist:
- Subject positioned at least 6-10 feet from background
- Blur intensity reduced to moderate level
- Soft, diffused lighting (open shade or window light)
- Simple background with minimal complexity
- Hair and clothing arranged to minimize loose strands
- Digital zoom avoided
- Focus locked on the eyes
- Multiple shots taken for best selection
After shooting:
- Review for edge detection errors before deleting alternatives
- Adjust blur intensity in editing if needed
- Compare portrait version to regular version if available
- Apply basic exposure and contrast adjustments
Frequently Asked Questions
How do I turn off background blur on portrait mode?
To turn off background blur on portrait mode, open your portrait photo in the gallery or Photos app and look for the depth control or blur adjustment option. On iPhone, tap Edit and use the f-number slider, sliding to the highest f-number (f/16) to minimize blur. On most Android phones, open the photo in the gallery editor and look for background blur controls. Many phones also let you remove the portrait effect entirely, converting it back to a regular photo.
What is the difference between bokeh and portrait mode?
Bokeh refers to the optical quality of out-of-focus areas in an image, created by the physical properties of a camera lens. Real bokeh comes from wide apertures and large sensors. Portrait mode is a software feature that artificially simulates this blur effect using depth mapping and edge detection. While portrait mode mimics bokeh, it cannot replicate the gradual falloff and natural rendering of true optical blur.
Why does portrait mode look bad?
Portrait mode often looks bad due to edge detection failures, especially around hair, glasses, and hands. The default blur intensity is usually too high, making artifacts more obvious. Abrupt transitions between sharp and blurred areas look unnatural compared to real optical blur. Additionally, poor lighting, digital zoom, complex backgrounds, and subjects too close to the background all contribute to fake-looking results.
How to get bokeh effect on phone?
For the most natural bokeh effect on a phone, use portrait mode with reduced blur intensity, position your subject far from the background, and shoot in soft lighting. Alternatively, use the phone’s telephoto lens at close range, which creates some genuine optical background blur. Some phones with large sensors (like certain Android flagships) can produce real optical blur in certain conditions. For complete control, use third-party apps like Focos or manual editing in apps like Snapseed.
How do I fix portrait mode hair artifacts?
To fix portrait mode hair artifacts, first try reducing the blur intensity in editing, as lighter blur makes edge errors less visible. Position subjects with their hair against a simple, solid-color background to minimize visible errors. For future shots, have subjects tie back long hair or position themselves so hair falls against a uniform background. As a last resort, use a photo editing app to manually fix the affected areas.
Can I add portrait mode blur to a regular photo?
Yes, you can add portrait-style blur to regular photos using various apps. Focos (iPhone) works with any photo and provides detailed control. AfterFocus (iPhone and Android) lets you manually select areas to blur. Snapseed offers a Lens Blur filter. Lightroom Mobile has masking tools for selective blur. While these apps cannot create true optical bokeh, they give you control over the effect without relying on automatic edge detection.
Conclusion
Learning how to use phone portrait mode without fake bokeh look comes down to understanding what your phone is actually doing and working within its limitations. The software blur that portrait mode creates can never perfectly replicate real optical bokeh, but with the right techniques, you can get results that look genuinely professional.
The key principles are straightforward: create distance between your subject and the background, reduce the blur intensity, use soft lighting, choose simple backgrounds, and avoid digital zoom. Pay special attention to hair and accessories that challenge edge detection. Take multiple shots and review them carefully before deciding which to keep.
Remember that portrait mode is a tool, not a requirement. Sometimes the best portrait is a regular photo with good composition and lighting. The most important skill is knowing when portrait mode will help and when it will hurt.
With practice, you will develop an intuition for what works and what does not. Your phone’s portrait mode will become a genuinely useful tool in your photography toolkit rather than a feature that produces obviously artificial results.