I remember the first time I discovered Canon’s Auto Lighting Optimizer (ALO) feature. I was shooting a backlit portrait session, and no matter what I did, my subjects kept coming out too dark while the background was perfectly exposed. Frustrated, I started digging through my camera’s menu and stumbled upon this game-changing setting that would revolutionize how I handle high-contrast scenes.
If you’ve ever struggled with photos where your shadows are too dark or your highlights are blown out, you’re in the right place. Canon’s Auto Lighting Optimizer is one of those hidden gems that many photographers overlook, but once you master it, you’ll wonder how you ever shot without it.
In this comprehensive guide, I’m going to walk you through everything you need to know about ALO – from what it actually does and when to use it, to pro-level settings that will transform your photography. Whether you’re shooting portraits, landscapes, or everyday scenes, understanding ALO will give you more control over your final images and save you hours in post-processing.
Let’s dive in and unlock the full potential of your Canon camera’s Auto Lighting Optimizer!
What is Canon Auto Lighting Optimizer (ALO)?
Canon Auto Lighting Optimizer, or ALO as it’s commonly known, is an intelligent in-camera processing feature that’s been around since 2008. I’ve found that most photographers either don’t know it exists or don’t understand how powerful it can be. Let me break it down for you in simple terms.
ALO is essentially your camera’s built-in solution for handling high-contrast scenes. When you’re shooting in situations where you have bright highlights and dark shadows in the same frame, ALO steps in to analyze the image and make selective adjustments. Unlike exposure compensation, which brightens or darkens the entire image, ALO works smarter – it targets specific areas to bring out more detail where it’s needed most.
Here’s what makes ALO special:
- It selectively adjusts shadows and highlights without affecting the overall exposure
- It can detect faces in your frame, making it particularly useful for portrait photography
- It applies tone curve adjustments similar to what you’d do in post-processing software
- It’s available on all Canon EOS cameras released after 2008, both DSLR and mirrorless
I discovered that ALO works by analyzing the contrast in your image and applying adjustments to minimize loss of detail in both the brightest and darkest areas. Think of it as having a mini photo editor inside your camera that’s working to optimize your images before you even see them.
What’s really cool is that ALO uses artificial intelligence to decide how much correction to apply. This means it can safely be left on most of the time, and it will only make adjustments when it detects they’re needed. I’ve found this particularly helpful when I’m shooting quickly and don’t have time to dial in perfect exposure settings.
The History and Evolution of ALO
When I first started researching ALO, I was surprised to learn that this feature has been around for over 15 years. Canon introduced Auto Lighting Optimizer with the EOS 450D (Rebel XSi) back in 2008, and it’s been a staple feature on all Canon EOS cameras ever since.
What’s interesting is how ALO has evolved over the years. Initially, it was tucked away in the Custom Functions menu, making it somewhat hidden from casual users. But as Canon recognized its value, they moved it to the main Shooting menu and made it easily accessible through the Quick Control screen.
I’ve noticed that newer Canon cameras have more sophisticated ALO algorithms. While the basic principle remains the same, the processing has become more intelligent and subtle. On newer models like the EOS R5 or R6, I find that ALO produces more natural-looking results compared to older cameras where the effect could sometimes be too obvious.
Another evolution I’ve observed is the integration of ALO with other camera features. Modern Canon cameras now handle ALO more efficiently, reducing the processing time that used to slow down burst shooting on earlier models.
It’s worth noting that while ALO is a Canon feature, other camera manufacturers have their own versions. Nikon calls it “Adaptive D-Lighting,” Sony has “Dynamic Range Optimizer,” and Fujifilm includes “D-Range Priority.” However, I’ve found that Canon’s implementation is particularly user-friendly and effective.
How Auto Lighting Optimizer Actually Works?
Understanding the technical side of ALO has helped me use it more effectively. Let me explain what’s happening under the hood when you enable this feature.
When you take a photo with ALO enabled, your camera performs several steps almost instantly:
- Scene Analysis: The camera first analyzes the contrast distribution across your image. It looks for areas that are too dark (shadows) and areas that are too bright (highlights).
- Face Detection: If there are people in your frame, ALO specifically looks for faces. This is why it’s so effective for portrait photography – it knows that preserving detail in faces is usually more important than preserving detail in other parts of the scene.
- Tone Curve Adjustment: Based on its analysis, ALO applies a custom tone curve to your image. This curve lifts the shadows while protecting the highlights, essentially compressing the dynamic range to fit better within what your camera can capture.
- Selective Processing: Unlike global adjustments, ALO works selectively. It might brighten shadow areas by 1-2 stops while leaving highlight areas almost unchanged, or vice versa, depending on what the scene needs.
What I find fascinating is that ALO doesn’t just apply a one-size-fits-all adjustment. The amount of correction varies based on the scene. For a mildly contrasty scene, you might barely notice the effect. For a high-contrast backlit portrait, the difference can be dramatic.
I’ve also learned that ALO works differently depending on your shooting mode:
- In Basic Zone modes (Auto, Portrait, Landscape, etc.), ALO is usually set to Standard and can’t be changed
- In Creative Zone modes (P, Tv, Av, M), you have full control over ALO settings
- In Manual mode, ALO is typically disabled by default, but you can enable it if you want
One thing that surprised me when I first started experimenting with ALO is that it’s only applied to JPEG images in-camera. If you shoot RAW, the ALO setting is saved as metadata but isn’t actually applied to the image file. This means you can apply or adjust ALO later when processing your RAW files in Canon’s Digital Photo Professional software.
ALO Settings Explained: Off, Low, Standard, and High
Canon gives us four options for Auto Lighting Optimizer, and understanding when to use each setting has been crucial for my photography. Let me break down each setting and share my experiences with them.
Off
When ALO is disabled, your camera applies no automatic lighting optimization. This is the “purest” form of your image, with only your exposure settings affecting the final result.
When I use Off:
- When I’m shooting RAW and plan to do all processing in post-production
- When I want complete creative control over my contrast and lighting
- When I’m shooting silhouettes and want to preserve the dark, moody look
- When I’m using Highlight Tone Priority (HTP), as these two features can’t be used together
I’ve found that shooting with ALO off gives me the most flexibility in post-processing, but it requires more attention to exposure settings while shooting.
Low
The Low setting applies a subtle amount of optimization. It’s barely noticeable in most scenes but can help with mildly contrasty situations.
When I use Low:
- For scenes with gentle contrast that just need a little help
- When I want to maintain a natural look but need slight shadow detail
- For architectural photography where I want to preserve some contrast while revealing detail
- When I’m shooting JPEGs but still want a natural, unprocessed look
The Low setting is my go-to when I want to maintain the mood of a scene while still getting a bit more detail in the shadows.
Standard
This is the default setting for most Creative Zone modes, and for good reason. Standard provides a noticeable but not overwhelming amount of optimization.
When I use Standard:
- For everyday photography where I want good results straight out of camera
- For portrait photography, especially in outdoor lighting
- When shooting JPEGs for quick sharing or client delivery
- In situations where I don’t have time for extensive post-processing
I’ve found that Standard strikes the perfect balance for most situations. It’s strong enough to make a difference but subtle enough to look natural.
High
The High setting applies the most aggressive optimization. It can dramatically lift shadows and tame highlights.
When I use High:
- For extreme backlit situations where my subject is in shadow
- When shooting into the sun with a foreground subject
- For high-contrast scenes where I need maximum detail recovery
- When I’m shooting JPEGs and know I won’t have time for post-processing
I have to be careful with the High setting, as it can sometimes make images look flat or washed-out if overused. But in the right situations, it can save photos that would otherwise be unusable.
When to Use Auto Lighting Optimizer: My Personal Guidelines
Through years of shooting with ALO, I’ve developed some clear guidelines for when this feature shines and when it’s better to leave it disabled. Let me share my personal workflow with you.
Perfect Scenarios for ALO
Backlit Portraits This is where ALO truly earns its keep. I remember shooting a family portrait session at golden hour – the sun was behind my subjects, creating that beautiful rim light but leaving their faces in shadow. With ALO set to Standard, the camera automatically brightened their faces while preserving the beautiful background. The result was a perfectly balanced portrait that would have required extensive shadow recovery in post-processing otherwise.
High-Contrast Landscapes When I’m shooting landscapes with bright skies and dark foregrounds, ALO helps me capture more detail in both areas. I recently shot a mountain scene at midday – the sky was bright but the valley below was in deep shadow. With ALO on High, I was able to retain detail in the clouds while bringing out the texture in the mountainside.
Indoor Events Shooting weddings or events indoors often means dealing with mixed lighting and harsh shadows. I’ve found that ALO set to Standard helps balance the exposure between bright windows and darker interior spaces, giving me more usable shots straight out of camera.
Flash Photography When using flash, especially in TTL mode, ALO can help balance the flash-illuminated subject with the ambient light in the background. I’ve noticed that with ALO enabled, my flash photos look more natural and less “flashed.”
When to Disable ALO
Silhouette Photography If you’re intentionally creating silhouettes, ALO will work against you by trying to brighten your subject. I always turn ALO off when shooting silhouettes against sunsets or bright backgrounds.
Low-Key Photography For moody, dramatic images with deep shadows, ALO will lift those shadows and ruin the effect. When I’m going for that dark, cinematic look, ALO stays off.
When Using Highlight Tone Priority These two features are mutually exclusive – you can’t use both at the same time. Since Highlight Tone Priority is designed to preserve highlight detail, I choose it over ALO when shooting scenes with bright highlights that I want to protect.
High ISO Shooting I’ve noticed that ALO can sometimes increase noise in shadow areas, especially at higher ISOs. When I’m shooting in low light and need to use high ISO values, I often disable ALO to keep noise to a minimum.
Burst Mode Photography Because ALO requires additional processing time, enabling it can slow down your camera’s burst speed. When I’m shooting action sequences and need maximum frames per second, I turn ALO off.
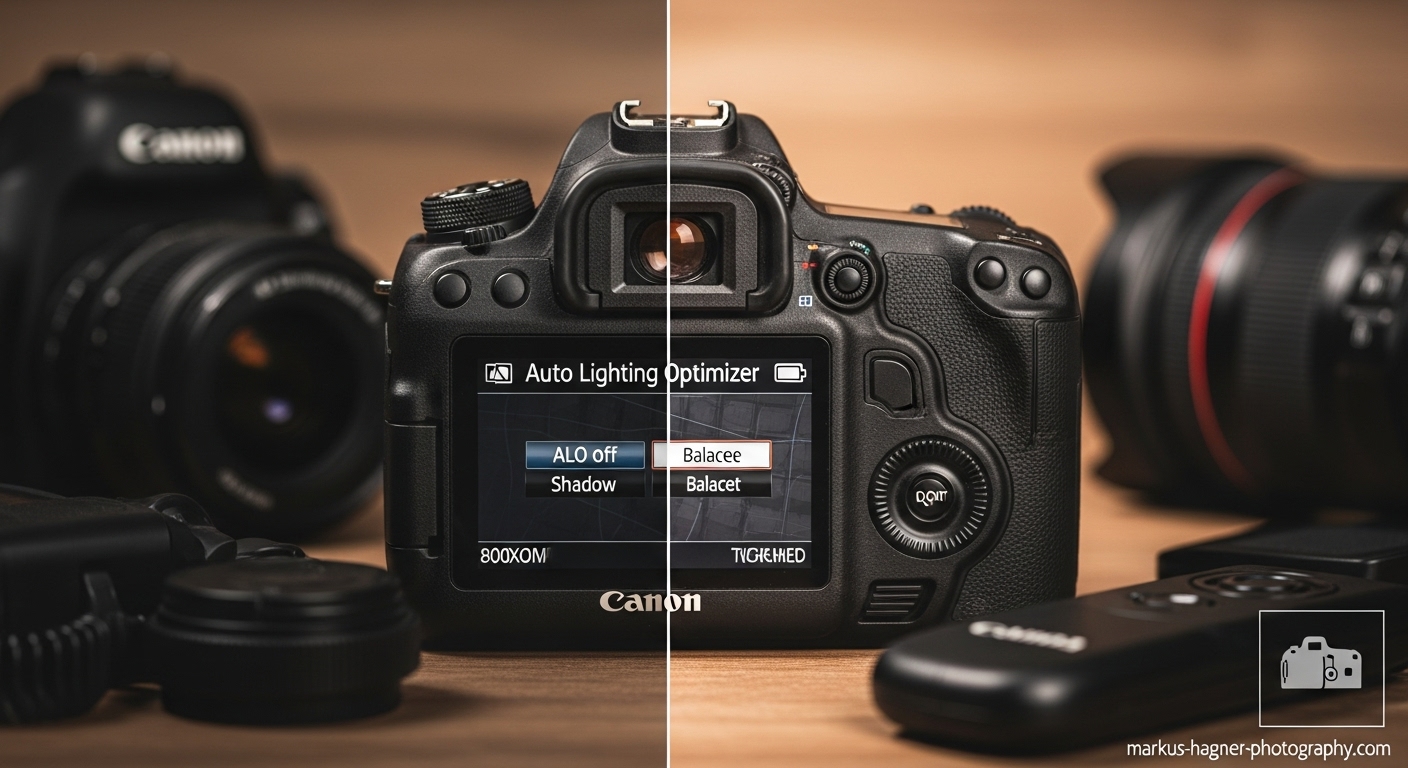
How to Access and Adjust ALO Settings
Now that you understand when to use ALO, let me walk you through exactly how to find and adjust these settings on your Canon camera. The process is similar across most modern Canon EOS cameras, though the exact menu names and locations might vary slightly.
Method 1: Through the Shooting Menu
This is the most straightforward way to access ALO settings:
- Press the Menu button on your camera
- Navigate to the Shooting menu (usually indicated by a camera icon)
- Look for “Auto Lighting Optimizer” or “ALO” – it’s typically on page 2 or 3 of the Shooting menu
- Press Set to enter the ALO settings screen
- Choose your desired setting: Off, Low, Standard, or High
- Press Set again to confirm your choice
On some cameras, you’ll also see an option below the settings that says something like “Disable in M mode.” This is actually telling the camera NOT to apply ALO when you’re in Manual exposure mode. If you want ALO to work in Manual mode, make sure this option is unchecked.
Method 2: Using the Quick Control Screen
For faster access while shooting, I often use the Quick Control method:
- Press the Q button (or tap the Q icon on touchscreen cameras)
- Look for the ALO icon – it looks like a rectangle with a person inside, where the left half is dark and the right half is bright
- Highlight the ALO icon and press Set (or tap it on touchscreen models)
- Select your preferred setting from the options that appear
- Press Set to confirm
The ALO icon will show you the current setting:
- No bars or “Off” text means ALO is disabled
- One bar indicates Low setting
- Two bars show Standard setting
- Three bars represent High setting
Method 3: Through Live View
If you’re shooting in Live View mode, you can access ALO settings directly from the Live View screen:
- Activate Live View by pressing the Live View button
- Press the Info button until you see the shooting information overlay
- Look for the ALO icon in the information display
- Press Set when the ALO icon is highlighted
- Choose your setting and press Set again
I find this method particularly useful when I’m shooting portraits and want to see the effect of different ALO settings in real-time before taking the shot.
ALO and Different Shooting Modes
One thing that confused me when I first started using ALO was how it behaves differently in various shooting modes. Let me clarify how ALO works across different exposure modes so you can plan accordingly.
Manual Mode (M)
By default, ALO is disabled in Manual mode. This makes sense because when you’re shooting in Manual, you’re taking full control of your exposure settings, and Canon assumes you don’t want the camera making automatic adjustments.
However, you can enable ALO in Manual mode if you want. I sometimes do this when I’m shooting in tricky lighting conditions where I want to control my aperture and shutter speed but still need some help with contrast.
To enable ALO in Manual mode:
- Go to the ALO settings in your menu
- Uncheck the option that says “Disable in M mode” or similar
- Choose your desired ALO setting
Aperture Priority (Av) and Shutter Priority (Tv)
In these semi-automatic modes, ALO is typically enabled by default and set to Standard. This is a great starting point for most situations.
I often use ALO in these modes when I’m shooting:
- Portraits where I want to control depth of field (Av) or motion blur (Tv)
- Scenes where I need consistent exposure but varying lighting conditions
- Situations where I want to maintain a specific creative effect while still getting help with contrast
Program Mode (P)
In Program mode, ALO is usually set to Standard by default. This mode is great for when you want the camera to handle most technical decisions while still having some creative control.
I find Program mode with ALO particularly useful for:
- Street photography where I need to react quickly
- Casual family photos where I want good results without fussing with settings
- Learning how different ALO settings affect my images
Basic Zone Modes (Auto, Portrait, Landscape, etc.)
In the fully automatic and scene modes, you typically don’t have control over ALO settings. The camera decides when and how much ALO to apply based on the scene mode you’ve selected.
For example:
- In Portrait mode, the camera might apply more ALO to ensure faces are well-exposed
- In Landscape mode, it might use less ALO to preserve contrast and drama
- In Auto mode, it will analyze the scene and apply ALO as needed
While you can’t adjust ALO in these modes, I’ve found that Canon’s automatic decisions are usually pretty good for general shooting.
ALO and File Formats: JPEG vs RAW
Understanding how ALO works with different file formats is crucial for getting the results you want. I’ve learned this lesson the hard way, so let me save you some trouble.
ALO with JPEG Files
When you shoot JPEG, ALO is applied in-camera before the image is saved to your memory card. This means:
- The effect is permanent and baked into your final image
- You can’t undo or adjust the ALO effect later in post-processing
- The camera’s preview and histogram will accurately reflect the final image
- File sizes remain smaller since the processing is done in-camera
I shoot JPEG with ALO when:
- I need to deliver images quickly without post-processing
- I’m shooting events where speed is more important than flexibility
- I’m confident in my exposure and want consistent results
- I’m shooting for social media or web use where maximum quality isn’t critical
ALO with RAW Files
When you shoot RAW, things work differently:
- The ALO setting is saved as metadata but isn’t applied to the image file
- The RAW file contains all the original data without any ALO processing
- You can apply, adjust, or disable ALO later in post-processing
- The camera’s preview and histogram will show the ALO effect, but the actual file doesn’t have it applied
This is why I sometimes get confused when shooting RAW – the image on my camera’s LCD looks great with ALO applied, but when I import the RAW file into Lightroom or Photoshop, it looks different. The preview was showing the ALO effect, but the actual RAW file doesn’t have it.
To apply ALO to RAW files, you need to use Canon’s Digital Photo Professional (DPP) software. Third-party software like Lightroom won’t recognize the ALO setting and won’t apply it automatically.
I shoot RAW with ALO when:
- I want maximum flexibility in post-processing
- I’m shooting in critical situations where I might need the extra dynamic range
- I’m not sure about the best ALO setting and want to decide later
- I’m shooting professionally and need the highest quality files
My Hybrid Approach
Often, I shoot RAW+JPEG with ALO enabled. This gives me the best of both worlds:
- The JPEG files have ALO applied and are ready for quick sharing
- The RAW files give me the flexibility to adjust or remove ALO later
- I can use the JPEG previews to judge the effect while having the RAW data for backup
ALO vs. Other Canon Features
Canon cameras have several features that can affect your image’s exposure and contrast. Understanding how ALO interacts with these other features has helped me avoid conflicts and get better results.
ALO vs. Highlight Tone Priority (HTP)
This is the most important conflict to understand. ALO and Highlight Tone Priority cannot be used simultaneously. When you enable one, the camera automatically disables the other.
Highlight Tone Priority is designed to preserve detail in bright highlights by essentially underexposing the image slightly and then adjusting the tone curve. It’s great for scenes with bright skies or other highlight areas that might otherwise blow out.
Auto Lighting Optimizer works on both shadows and highlights, making it more versatile for general contrast control.
When I choose HTP over ALO:
- When shooting scenes with bright highlights that I want to preserve
- When I’m more concerned about losing highlight detail than shadow detail
- When shooting in bright, contrasty conditions like midday sun
When I choose ALO over HTP:
- When I need help with both shadows and highlights
- When shooting portraits or other subjects where shadow detail is important
- When I want more balanced overall exposure
ALO vs. Exposure Compensation
Exposure compensation brightens or darkens the entire image, while ALO works selectively on shadows and highlights. They can work together, but sometimes they can work against each other.
I’ve found that when I apply negative exposure compensation to preserve highlights, ALO might try to brighten the shadows, partially counteracting my exposure adjustment. In these cases, I might reduce the ALO strength or disable it entirely.
Conversely, when I apply positive exposure compensation to brighten shadows, ALO can help prevent the highlights from blowing out.
ALO vs. Picture Styles
Picture Styles affect contrast, saturation, and sharpness, while ALO specifically targets dynamic range. They can work together, but I’ve found that some Picture Styles can enhance or diminish the effect of ALO.
For example:
- The “Neutral” Picture Style has low contrast, which might make ALO less noticeable
- The “Landscape” Picture Style has higher contrast, which might make ALO more apparent
- The “Portrait” Picture Style is designed to work well with ALO for better skin tones
ALO vs. Auto Lighting Optimizer in Post-Processing
If you shoot RAW, you can apply ALO in post-processing using Canon’s Digital Photo Professional software. This gives you the advantage of seeing the full image before deciding how much optimization to apply.
I sometimes prefer this approach because:
- I can see the full image on a larger screen before making decisions
- I can fine-tune the ALO strength more precisely
- I can compare before and after versions easily
- I can combine ALO with other adjustments for the best result
Common ALO Problems and Solutions
Through my experience with ALO, I’ve encountered several issues and learned how to solve them. Let me share these common problems and their solutions so you can avoid the same frustrations.
Problem 1: Images Look Flat or Washed-Out
Symptoms: Your photos lack contrast and look dull, especially when using the High ALO setting.
Cause: ALO is reducing contrast too much, making the image appear flat.
Solutions I’ve Found:
- Try reducing the ALO setting from High to Standard or Low
- Shoot in RAW and apply ALO selectively in post-processing
- Increase contrast slightly in post-processing if shooting JPEG
- Use a more contrasty Picture Style to compensate
- Consider whether ALO is necessary for the scene – sometimes it’s better to leave it off
Problem 2: Increased Noise in Shadows
Symptoms: Shadow areas show more noise or grain than expected, especially at higher ISO settings.
Cause: ALO brightens shadow areas, which can make existing noise more visible.
Solutions I’ve Found:
- Use a lower ALO setting (Low instead of Standard or High)
- Shoot at lower ISO values when possible
- Use noise reduction in post-processing
- Consider shooting RAW and applying noise reduction before ALO
- Evaluate whether the shadow detail is worth the noise increase
Problem 3: Slow Burst Shooting
Symptoms: Your camera shoots slower in burst mode when ALO is enabled.
Cause: ALO requires additional processing time for each image.
Solutions I’ve Found:
- Disable ALO when you need maximum burst speed
- Use a lower ALO setting (Low processes faster than High)
- Shoot in RAW+JPEG so you have the RAW files as backup
- Consider whether you really need ALO for the action you’re shooting
- Use a faster memory card to reduce write times
Problem 4: ALO Setting is Grayed Out
Symptoms: You can’t access or change the ALO setting in your menu.
Cause: Several factors can prevent ALO from being available.
Solutions I’ve Found:
- Check if Highlight Tone Priority is enabled (they can’t be used together)
- Make sure you’re not in a Basic Zone mode where ALO is automatic
- Verify that your camera supports ALO (all Canon EOS cameras after 2008 do)
- Check if you’re in a special shooting mode that disables certain features
- Restart your camera if the setting is suddenly unavailable
Problem 5: Inconsistent Results
Symptoms: ALO seems to work differently in similar shooting situations.
Cause: ALO uses AI to analyze each scene individually, so results can vary.
Solutions I’ve Found:
- Understand that ALO is scene-dependent and will adjust based on content
- Use consistent ALO settings for similar scenes
- Shoot in RAW to have more control in post-processing
- Take test shots to see how ALO behaves in specific situations
- Learn to predict when ALO will be more or less aggressive
Pro Tips for Mastering ALO
After years of experimenting with Auto Lighting Optimizer, I’ve developed some advanced techniques that take my results to the next level. Let me share these pro tips with you.
Tip 1: Use ALO as a Creative Tool, Not Just a Fix
Most photographers think of ALO as a problem-solver, but I’ve learned to use it creatively. For example, I sometimes intentionally underexpose my shots by 1/3 to 2/3 of a stop and then use ALO to bring back the shadows. This technique helps me preserve highlight detail while still getting good shadow information.
Tip 2: Combine ALO with Exposure Bracketing
When I’m shooting high-contrast scenes where I’m not sure about the best exposure, I use exposure bracketing with ALO enabled. This gives me multiple versions of the scene with different exposures, all optimized by ALO. Later, I can choose the best one or even blend them in post-processing for maximum dynamic range.
Tip 3: Test ALO Settings Before Critical Shoots
Before an important shoot, I take test shots with different ALO settings to see which works best for the lighting conditions. I’ve found that the “right” ALO setting can vary dramatically depending on the specific lighting and subject matter.
Tip 4: Use the Histogram to Judge ALO Effect
The histogram is your best friend when working with ALO. I’ve learned to read how the histogram changes with different ALO settings:
- With ALO off, you might see a histogram with peaks on both ends (high contrast)
- With ALO on, the histogram typically shifts toward the center (reduced contrast)
- The left side (shadows) usually shows the most dramatic change
Tip 5: Consider Your Final Output
How you plan to use your photos should influence your ALO settings. For example:
- For web and social media, I often use more ALO since these platforms compress images anyway
- For print, I’m more conservative with ALO to maintain the best possible quality
- For professional client work, I often shoot RAW and decide on ALO later
Tip 6: Learn to Predict ALO Behavior
After using ALO extensively, I’ve learned to predict how it will behave in different situations:
- Backlit portraits usually benefit from Standard or High ALO
- Landscapes with bright skies often work well with Low or Standard ALO
- Low-key scenes usually look best with ALO disabled
- High-contrast street photography often benefits from Low ALO
Tip 7: Use ALO to Learn About Exposure
I’ve found that studying how ALO affects my images has taught me a lot about exposure and contrast. By comparing images with and without ALO, I’ve learned to see contrast issues more clearly and understand how to address them manually.
Also Read: Fujifilm vs Canon
Real-World ALO Examples
Let me walk you through some real-world scenarios where ALO has made a significant difference in my photography. These examples will help you understand when and how to use ALO in your own shooting.
Example 1: Backlit Portrait Session
Scenario: I was shooting a family portrait session at sunset. The family was positioned with the sun behind them, creating a beautiful rim light but leaving their faces in shadow.
Challenge: Without ALO, their faces were too dark while the background was perfectly exposed. Using exposure compensation to brighten their faces would have blown out the beautiful sunset sky.
Solution: I set ALO to Standard and exposed for the background. The camera automatically brightened their faces while preserving the sunset colors.
Result: Perfectly balanced portraits with beautiful rim lighting and well-exposed faces. The family was thrilled with the results, and I didn’t need to do any shadow recovery in post-processing.
Example 2: Indoor Wedding Reception
Scenario: Shooting a wedding reception in a dimly lit venue with bright windows and spotlights.
Challenge: The mixed lighting created extreme contrast – bright areas from windows and lights, and dark areas in the corners and under tables.
Solution: I used ALO set to High and shot in RAW+JPEG mode. This gave me usable JPEGs straight out of camera while keeping the RAW files for any necessary adjustments.
Result: The JPEGs were good enough for quick sharing during the event, and the RAW files allowed me to fine-tune the ALO effect later for the final deliverables. The bride and groom got to see great photos immediately, and I still had the flexibility to perfect them later.
Example 3: Landscape Photography at Midday
Scenario: Shooting a mountain landscape at midday with harsh sunlight creating deep shadows in the valleys.
Challenge: The dynamic range was too extreme – the sky was bright but the foreground valleys were in deep shadow.
Solution: I used ALO set to Standard and combined it with a graduated ND filter to balance the sky and foreground.
Result: The combination of the ND filter and ALO gave me a well-balanced image with detail in both the bright sky and the shadowed valleys. The ALO helped bring out detail in the shadows that the filter alone couldn’t address.
Example 4: Street Photography in Mixed Light
Scenario: Shooting street scenes in a city with tall buildings creating harsh shadows and bright sunny areas.
Challenge: The constantly changing light and contrast made it difficult to get consistent exposures.
Solution: I set ALO to Low and used Aperture Priority mode. This gave me consistent results while maintaining a natural look.
Result: I was able to capture the street scenes with good detail in both sunny and shadowed areas, creating a cohesive series of images that worked well together.
Example 5: Product Photography
Scenario: Shooting products for a client with a white background and reflective surfaces.
Challenge: Keeping the background pure white while maintaining detail in the product and avoiding blown-out highlights.
Solution: I used ALO set to Low and carefully controlled my lighting to minimize contrast.
Result: Clean product shots with pure white backgrounds and excellent detail in the products. The subtle ALO setting helped maintain detail without making the images look flat.
ALO for Different Photography Genres
Different types of photography have different needs when it comes to contrast and dynamic range. Let me share how I approach ALO for various photography genres.
Portrait Photography
Portraits are where ALO really shines for me. The face detection aspect of ALO makes it particularly effective for ensuring your subjects look their best.
My Portrait ALO Settings:
- Studio portraits: Low or Off (I control lighting completely)
- Outdoor portraits: Standard (helps with natural light contrast)
- Backlit portraits: High (rescues shadow detail on faces)
- Group portraits: Standard (ensures everyone is well-exposed)
Why it works: ALO’s face detection means it prioritizes detail in faces, which is exactly what we want in portrait photography. I’ve found that it can save portraits that would otherwise be too contrasty.
Landscape Photography
Landscapes often have extreme dynamic range, from bright skies to dark foregrounds. ALO can help, but it needs to be used carefully.
My Landscape ALO Settings:
- Golden hour landscapes: Low or Standard (preserves the warm mood)
- Midday landscapes: Standard (tames harsh contrast)
- Sunrise/sunset: Off or Low (preserves the dramatic contrast)
- Forest scenes: Standard (helps with dappled light)
Why it works: ALO helps balance the extreme dynamic range common in landscapes, but I’m careful not to overdo it and lose the natural drama of the scene.
Street Photography
Street photography often involves quickly changing lighting conditions and subjects. ALO can be a valuable tool for getting consistent results.
My Street ALO Settings:
- Bright sunny days: Low (maintains some contrast)
- Overcast days: Standard (adds some punch to flat light)
- Mixed light situations: Standard (handles varying conditions)
- Night street photography: Off (preserves the mood)
Why it works: Street photography requires quick reactions, and ALO helps ensure consistent results when you don’t have time to dial in perfect exposure for every shot.
Event Photography
Events like weddings, parties, and corporate functions often have challenging and rapidly changing lighting. ALO is invaluable for these situations.
My Event ALO Settings:
- Indoor events: Standard or High (handles mixed lighting)
- Outdoor events: Standard (balances natural light)
- Reception lighting: High (tames harsh artificial lights)
- Ceremony lighting: Standard (preserves mood while adding detail)
Why it works: Event photography demands consistency and reliability, and ALO helps deliver usable shots in a wide variety of lighting conditions.
Wildlife Photography
Wildlife photography often involves subjects in dappled light or backlit situations. ALO can help preserve detail in these challenging conditions.
My Wildlife ALO Settings:
- Backlit animals: High (saves detail in the subject)
- Animals in shade: Standard (brings out shadow detail)
- Bright sunny conditions: Low (maintains natural contrast)
- Dawn/dusk wildlife: Standard (helps with low contrast)
Why it works: Wildlife doesn’t wait for perfect lighting, and ALO helps rescue shots that would otherwise be lost to challenging light conditions.
Advanced ALO Techniques
Once you’ve mastered the basics of ALO, you can start using some advanced techniques to take your photography to the next level. These are the techniques I use when I want to get the most out of this feature.
Technique 1: ALO Stacking
This is a technique I developed where I shoot multiple exposures with different ALO settings and blend them in post-processing.
How it works:
- Shoot the same scene with ALO Off, Low, Standard, and High
- Import all files into your editing software
- Use layer masks to blend the best parts of each version
- For example, use the High ALO version for shadow areas and the Off version for highlight areas
When to use it: For scenes with extreme dynamic range where even a single ALO setting isn’t enough.
Technique 2: ALO with HDR
While ALO isn’t true HDR, I sometimes combine it with HDR techniques for maximum dynamic range.
How it works:
- Enable ALO (usually Standard or High)
- Use exposure bracketing to capture multiple exposures
- Blend the exposures using HDR software
- The ALO-optimized files often produce better HDR results
When to use it: For landscape and architectural photography with extreme dynamic range.
Technique 3: ALO for Focus Stacking
I’ve discovered that ALO can actually help with focus stacking by providing more consistent exposure across multiple frames.
How it works:
- Set ALO to Standard for consistent exposure
- Shoot your focus stack series
- The consistent ALO processing makes blending easier
- The optimized exposure helps maintain detail throughout the focus range
When to use it: For macro photography and product photography where focus stacking is needed.
Technique 4: ALO with Flash
Combining ALO with flash can give you more natural-looking flash photography.
How it works:
- Set your flash to TTL or manual mode
- Enable ALO (usually Standard)
- The ALO helps balance the flash-illuminated subject with the ambient light
- This reduces the “flashed” look and creates more natural results
When to use it: For event photography, portraits, and any situation where you’re using flash.
Technique 5: ALO for Video
While ALO is primarily a still photography feature, I’ve found ways to use it for video as well.
How it works:
- Set ALO before starting video recording
- The ALO setting will affect the video’s contrast and dynamic range
- This can help with high-contrast video scenes
- Note: ALO cannot be changed during video recording
When to use it: For video interviews, event videography, and any video situation with challenging lighting.
Also Read: Mirrorless Vs Dslr
ALO and Post-Processing Workflow
Understanding how ALO fits into your post-processing workflow is crucial for getting the best results. Let me share my approach to integrating ALO into my editing process.
JPEG Workflow with ALO
When I shoot JPEG with ALO enabled, my post-processing approach is different than when I shoot RAW.
My JPEG ALO Workflow:
- Evaluate the ALO effect: Look at how much contrast and shadow detail the ALO has provided
- Adjust exposure if needed: Sometimes ALO isn’t enough, and I need additional exposure adjustments
- Fine-tune contrast: ALO might have reduced contrast too much, so I often add some back
- Adjust shadows and highlights: Even with ALO, I might want to fine-tune these areas
- Apply sharpening: ALO can sometimes soften images slightly, so I add sharpening as needed
Pros: Faster workflow, ready-to-share images, consistent results Cons: Less flexibility, limited adjustment range, potential quality loss
RAW Workflow with ALO
When I shoot RAW, I have much more flexibility with ALO in post-processing.
My RAW ALO Workflow:
- Open in Canon DPP: This is the only software that can apply ALO to RAW files
- Evaluate different ALO settings: I can try Off, Low, Standard, and High to see what works best
- Apply the chosen ALO setting: DPP applies the optimization non-destructively
- Make additional adjustments: Exposure, contrast, color balance, etc.
- Export to other software: I often send the file to Lightroom or Photoshop for final adjustments
Pros: Maximum flexibility, ability to fine-tune ALO, highest quality results Cons: Slower workflow, requires additional software, more complex process
Hybrid Workflow
Often, I use a combination of both approaches for the best results.
My Hybrid ALO Workflow:
- Shoot RAW+JPEG: Get the best of both worlds
- Use JPEGs for quick editing: The ALO-optimized JPEGs are great for fast turnaround
- Use RAWs for critical work: When quality is paramount, I work with the RAW files
- Apply ALO in DPP: For RAW files that need optimization
- Final adjustments in preferred software: Complete the editing process
Pros: Flexibility, speed when needed, quality when required, backup options Cons: Larger file sizes, more complex organization, requires more storage
ALO in Different Editing Software
Not all editing software handles ALO the same way. Here’s what I’ve found:
Canon Digital Photo Professional (DPP):
- Full ALO support for RAW files
- Can apply, adjust, or remove ALO
- Best results for Canon RAW files
Adobe Lightroom/Photoshop:
- No direct ALO support for RAW files
- Can achieve similar results with shadow/highlight adjustments
- JPEGs show the baked-in ALO effect
Capture One:
- No ALO support for RAW files
- Good shadow/highlight recovery tools
- Can approximate ALO effects manually
Other Software:
- Most third-party software doesn’t support ALO
- Manual adjustments are needed to achieve similar results
- Quality varies depending on the software
Frequently Asked Questions About ALO
I’ve compiled the most common questions I get about Auto Lighting Optimizer. These are the questions photographers ask me most often, along with my detailed answers.
Does ALO work with all Canon cameras?
ALO is available on all Canon EOS cameras released after 2008, including both DSLR and mirrorless models. This includes entry-level Rebel series cameras, mid-range cameras like the 80D/90D, and professional models like the 5D series and 1D series. If your Canon camera was made in the last 15 years, it almost certainly has ALO.
Can I use ALO and Highlight Tone Priority together?
No, ALO and Highlight Tone Priority (HTP) are mutually exclusive features. When you enable one, the camera automatically disables the other. This is because they work in different ways – HTP focuses on preserving highlight detail, while ALO works on both shadows and highlights. You need to choose which feature is more important for your specific shooting situation.
Does ALO affect RAW files?
ALO behaves differently with RAW files compared to JPEG files. When you shoot RAW, the ALO setting is saved as metadata but isn’t actually applied to the image file. The RAW file contains all the original data without any ALO processing. To apply ALO to RAW files, you need to use Canon’s Digital Photo Professional (DPP) software. Third-party software like Lightroom won’t recognize or apply the ALO setting.
Why does my burst mode slow down with ALO enabled?
ALO requires additional processing time for each image because it analyzes the scene and applies tone curve adjustments. This extra processing can slow down your camera’s burst speed, especially when using the High ALO setting. If you need maximum burst speed for action photography, consider disabling ALO or using the Low setting.
Can ALO cause noise in my images?
Yes, ALO can sometimes increase the visibility of noise in shadow areas, especially at higher ISO settings. When ALO brightens shadows, it also brightens any noise that’s present in those areas. This is more noticeable with the High ALO setting and at higher ISO values. If you’re concerned about noise, consider using a lower ALO setting or shooting at lower ISO values.
Does ALO work with all shooting modes?
ALO works differently depending on your shooting mode. In Basic Zone modes (Auto, Portrait, Landscape, etc.), ALO is usually automatic and can’t be adjusted. In Creative Zone modes (P, Tv, Av, M), you have full control over ALO settings. In Manual mode, ALO is typically disabled by default, but you can enable it if you want.
Can I see the ALO effect before taking the photo?
Yes, you can see the ALO effect in real-time when using Live View. Activate Live View, and the preview on your screen will show how the current ALO setting will affect your image. This is particularly useful for portraits and other situations where you want to see the effect before taking the shot.
Does ALO affect battery life?
ALO requires additional processing, which can have a small impact on battery life. However, the difference is usually minimal and not noticeable for most shooting situations. If you’re shooting for extended periods and are concerned about battery life, you might consider using a lower ALO setting or disabling it when not needed.
Can I use ALO with third-party lenses?
Yes, ALO works with both Canon and third-party lenses. The ALO feature is part of the camera’s image processing system and doesn’t depend on the lens being used. Whether you’re using Canon L-series lenses or third-party options from Sigma, Tamron, or others, ALO will work the same way.
Does ALO work with video?
While ALO is primarily designed for still photography, it can affect video recording as well. The ALO setting you choose before starting video recording will influence the video’s contrast and dynamic range. However, you cannot change the ALO setting while recording video. This can be useful for high-contrast video scenes, but keep in mind that the effect is baked into the video file and cannot be adjusted later.
Conclusion: Mastering ALO for Better Photography
After years of shooting with Canon’s Auto Lighting Optimizer, I can confidently say that it’s one of the most underutilized features in Canon cameras. When used correctly, ALO can transform your photography, helping you capture better images in challenging lighting conditions and saving you time in post-processing.
I’ve learned that ALO isn’t a magic bullet – it’s a tool that works best when you understand its strengths and limitations. It’s not about leaving it on all the time or turning it off completely; it’s about knowing when and how to use it to enhance your creative vision.
Here are my key takeaways for mastering ALO:
Start with Standard: For most situations, the Standard ALO setting is a great starting point. It provides noticeable improvement without being too aggressive.
Know When to Disable: Learn to recognize situations where ALO might work against you, such as when shooting silhouettes or low-key images.
Experiment with Different Settings: Don’t be afraid to try different ALO settings in various conditions. You’ll quickly learn which settings work best for your style of photography.
Consider Your File Format: Understand how ALO works differently with JPEG and RAW files, and choose the approach that best fits your workflow.
Use it Creatively: Think of ALO not just as a problem-solver, but as a creative tool that can help you achieve specific looks in your photography.
Combine with Other Techniques: ALO works well with other camera features and techniques like exposure compensation, bracketing, and careful lighting control.
Practice, Practice, Practice: The more you use ALO, the better you’ll become at predicting its behavior and using it effectively in your photography.
I encourage you to take what you’ve learned from this guide and apply it to your own photography. Experiment with different ALO settings in various shooting conditions, and pay attention to how it affects your images. With practice, you’ll develop an intuitive understanding of when and how to use ALO to get the best results.
Remember, photography is about continuous learning and improvement. Mastering features like Auto Lighting Optimizer is just one step on your journey to becoming a better photographer. Keep shooting, keep experimenting, and most importantly, keep enjoying the process of creating beautiful images.
Now it’s your turn – grab your Canon camera, enable Auto Lighting Optimizer, and start discovering how this powerful feature can enhance your photography. I’d love to hear about your experiences and see the amazing images you create!