After spending over 15 years retouching portraits for clients ranging from corporate headshots to wedding photography, I have learned one critical lesson: the best retouching is invisible. When someone looks at your edited photo and says “Wow, great editing,” you have already failed. The goal is for them to simply see a great portrait where the subject looks their authentic self.
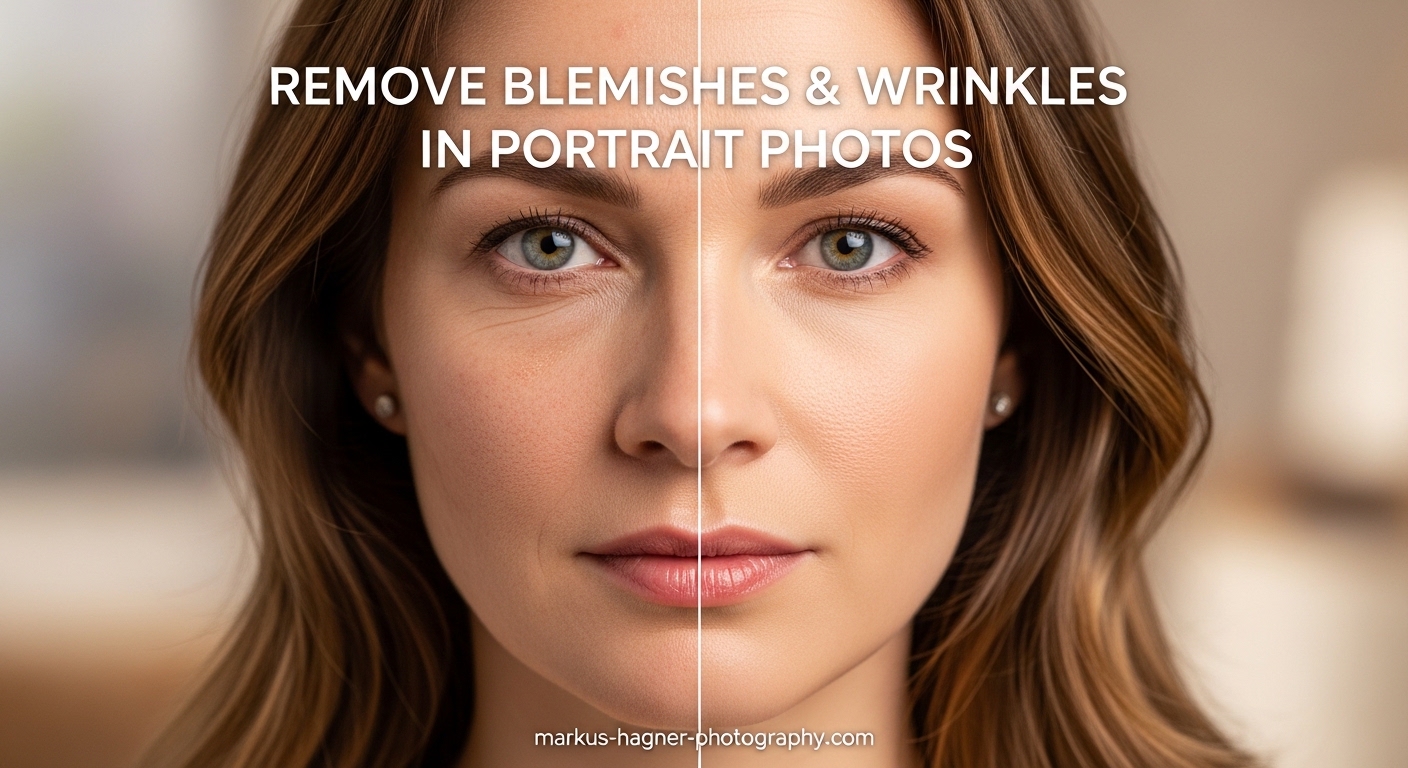
Learning how to remove blemishes and wrinkles in portrait photos without over-editing is a skill that separates amateur editors from professional retouchers. I remember my early days when I would blur skin until my subjects looked like plastic mannequins. It took years of practice and feedback to understand that preserving skin texture matters more than eliminating every imperfection.
In this guide, I will walk you through the exact techniques I use for natural skin retouching. We will cover everything from basic blemish removal with the Spot Healing Brush to advanced methods like frequency separation. More importantly, I will show you how to avoid the dreaded “plastic skin” look that ruins so many otherwise great portraits.
Whether you are editing photos in Photoshop, Lightroom, or mobile apps, these principles apply universally. By the end of this article, you will have a complete workflow for natural portrait enhancement that keeps your subjects looking like themselves, just on their best day.
Understanding Blemishes: What You’re Really Fixing
Before you start clicking away with healing tools, you need to understand what you are actually removing. Not all skin imperfections should be treated the same way. This distinction between temporary and permanent features is the foundation of ethical, natural-looking retouching.
Temporary vs Permanent Skin Features
Temporary blemishes include acne, pimples, minor cuts, temporary redness, and shine from oily skin. These are fair game for removal because they do not represent how the person typically looks. I always remove these without hesitation.
Permanent features include moles, birthmarks, scars, freckles, and character lines that define a person’s face. These require a different approach. Unless a client specifically asks to remove a permanent feature, I either keep them or only subtly reduce their prominence. Removing someone’s signature mole or the scar they have had since childhood fundamentally changes who they are.
Wrinkles fall into a gray area. Deep expression lines that appear only when someone smiles broadly might be softened. Permanent forehead wrinkles or crow’s feet that appear at rest should generally stay, though you can reduce their intensity without erasing them completely.
The Ethics of Portrait Retouching
I have had clients ask me to make them look “20 years younger” or “completely flawless.” While I could technically do this with enough editing, I always have a conversation first. When you remove every line and blemish from a 50-year-old’s face, you are not enhancing them. You are creating a stranger.
Professional photography forums consistently discuss this issue. The consensus among experienced portrait photographers is clear: enhance, do not replace. Your job is to show people at their best, not to show them as someone else entirely.
This matters for practical reasons too. When someone meets your client in person after seeing their heavily retouched photo, the disconnect creates awkwardness. Natural retouching builds genuine confidence rather than false expectations.
Setting Client Expectations
Communication prevents disappointment. I always show clients before and after examples of my retouching style during consultations. This establishes realistic expectations and helps them understand that “natural” does not mean “unedited.”
For photographers just starting out, consider offering different retouching levels. Basic cleanup removes temporary blemishes only. Standard retouching adds subtle skin smoothing and light enhancement. Glamour retouching goes further while still maintaining texture. Let clients choose their comfort level.
Essential Tools for Natural Skin Retouching
The tool you choose significantly impacts your results. Each retouching tool has strengths and weaknesses, and knowing when to use which one separates competent editors from skilled retouchers.
Photoshop: The Professional Standard
Photoshop remains the gold standard for portrait retouching because it offers precise control over every aspect of the process. The main tools I use daily include the Spot Healing Brush, Healing Brush, Clone Stamp, and Patch Tool.
Spot Healing Brush: This is your go-to tool for small, isolated blemishes. It automatically samples surrounding texture and blends it over your target area. For a single pimple or small spot, nothing beats the Spot Healing Brush for speed and natural results.
Healing Brush: When you need more control over the sample source, the Healing Brush lets you Alt-click (Option-click on Mac) to choose exactly which skin texture to clone. This works better for larger blemishes or areas where the Spot Healing Brush picks up unwanted elements.
Clone Stamp: Unlike healing tools that blend texture, the Clone Stamp copies pixels exactly. Use this when you need precise control, especially around edges or when healing tools create unwanted color shifts. I use it frequently around eyes and lips where precision matters.
Patch Tool: For larger areas, the Patch Tool lets you select a region and drag it to a clean source area. This works well for removing larger blemishes or evening out skin tone across broader sections.
Lightroom: Non-Destructive Quick Fixes
Lightroom excels at global adjustments and quick local fixes. The Adjustment Brush with negative Clarity creates subtle skin smoothing without touching Photoshop. I often do 80% of my retouching in Lightroom before moving to Photoshop for detailed work.
The Spot Removal tool in Lightroom works similarly to Photoshop’s healing tools. While less precise, it handles basic blemish removal adequately for most non-commercial work. The advantage is that everything stays non-destructive, meaning you can always revert changes.
Mobile Apps and Free Options
Not everyone needs professional software. Several mobile apps offer surprisingly capable blemish removal. Facetune and AirBrush remain popular choices, though I recommend using their tools at reduced intensity for natural results.
For free desktop options, GIMP provides healing and clone tools similar to Photoshop. The learning curve is steeper, but the results can match professional software once you master the tools. Photopea runs entirely in your browser and offers Photoshop-like tools without any installation.
AI-Powered Retouching: Promise and Limitations
AI retouching tools have improved dramatically, but they still have significant limitations. Apps like Luminar AI and various Photoshop neural filters can automatically smooth skin and remove blemishes. The problem is that AI tends to over-smooth, creating that artificial look we want to avoid.
I use AI tools as a starting point, not a final result. Let AI handle initial cleanup, then manually adjust to restore texture and reduce intensity. Think of AI as an assistant that does the rough work while you provide the artistic judgment.
How to Remove Blemishes and Wrinkles in Portrait Photos: Step-by-Step
Here is the exact workflow I use for natural blemish removal. Follow these steps in order for consistent, professional results.
Step 1: Remove Blemishes with the Spot Healing Brush (Quick Method)
For the fastest blemish removal, use Photoshop’s Spot Healing Brush tool. Select it from the toolbar (or press J on your keyboard). Set your brush size slightly larger than the blemish you want to remove. Click once on each blemish, and Photoshop automatically samples surrounding skin to blend it away.
This method works perfectly for:
– Isolated pimples and acne spots
– Small skin imperfections
– Minor blemishes away from edges
The key is using a brush just slightly larger than the target. Too large, and you pick up unwanted textures. Too small, and the healing does not blend properly.
Step 2: Use the Healing Brush for Larger Areas
When blemishes are larger or the Spot Healing Brush picks up unwanted elements, switch to the Healing Brush. Hold Alt (Option on Mac) and click on clean skin near your target area. This sets your sample point. Then paint over the blemish using short strokes.
The Healing Brush gives you control over texture source. Choose skin that matches the area you are fixing. For example, when fixing cheek blemishes, sample from nearby cheek skin, not forehead or chin where skin texture differs.
I recommend setting brush hardness to 0% and spacing to 25% for smooth blending. These settings create natural transitions without visible brush strokes.
Step 3: Precision Work with the Clone Stamp
Some areas need exact pixel copying rather than blending. Around eyes, lips, and hairlines, the Clone Stamp provides precise control. Set opacity to 50-70% for subtle application, then build up gradually.
The Clone Stamp also helps when healing tools create color shifts. If the Spot Healing Brush leaves a slight discoloration, a light pass with the Clone Stamp set to Color blend mode fixes it without affecting texture.
Always work on a new layer when using the Clone Stamp. Create a new layer, set your Clone Stamp to sample “Current and Below,” and paint on the empty layer. This non-destructive approach lets you adjust opacity or erase mistakes without affecting your original image.
Step 4: Handling Wrinkles Naturally
Wrinkle removal requires more finesse than blemish removal. Complete removal looks artificial, but softening works beautifully. I use two main approaches depending on the wrinkle type.
For expression lines that appear only when someone smiles, light healing works well. Use the Healing Brush at 50% opacity to reduce intensity while maintaining the line’s character. The person still looks like themselves when smiling.
For permanent wrinkles like forehead lines or crow’s feet at rest, dodge and burn creates subtle reduction without erasure. Use the Dodge Tool set to Midtones at 10-15% exposure to lighten shadow areas within the wrinkle. This reduces visual depth without removing the line entirely.
Avoid the temptation to blur wrinkles away. Gaussian blur destroys skin texture and creates that plastic appearance. Subtle dodging preserves texture while reducing wrinkle prominence.
Step 5: Lightroom Quick Fix Method
For photos that do not need Photoshop-level editing, Lightroom handles basic retouching efficiently. Select the Spot Removal tool (press Q) and set it to Heal mode. Click on blemishes just like in Photoshop.
For overall skin smoothing, create an Adjustment Brush with these settings:
– Clarity: -15 to -25 (subtle smoothing)
– Sharpness: +10 to +15 (maintain detail)
– Noise: +10 (smooth grain)
Paint over skin areas, avoiding eyes, lips, and hair. This creates subtle enhancement without texture loss.
Step 6: Mobile App Quick Fixes
When you need to edit on the go, mobile apps offer capable alternatives. In Facetune or AirBrush, locate the Heal or Blemish tool. The key is using the lowest effective intensity setting.
Most users apply mobile healing at 100% intensity, which creates artificial results. Reduce intensity to 40-60% and apply multiple light passes rather than one heavy application. This builds natural-looking correction gradually.
For wrinkle reduction in mobile apps, use the Smooth tool at very low intensity (20-30%) only on wrinkle areas, not the entire face. Targeted application preserves overall skin texture while softening specific lines.
Advanced Techniques for Professional Results
When basic tools are not enough, advanced techniques provide the control needed for commercial-quality retouching. These methods take more time but produce superior results.
Frequency Separation Explained Simply
Frequency separation sounds complex, but the concept is straightforward. It separates your image into two layers: one containing color and tone (low frequency), another containing texture and detail (high frequency). This lets you edit skin tone without affecting texture, and vice versa.
Here is the basic process in Photoshop:
1. Duplicate your background layer twice
2. Name the lower duplicate “Low Frequency” and the upper “High Frequency”
3. Apply Gaussian Blur to the Low Frequency layer (radius around 5-10 pixels until detail disappears)
4. Select the High Frequency layer, set blend mode to Linear Light
5. Apply High Pass filter with the same radius used for Gaussian Blur
6. Group both layers together
Now you can retouch color and tone on the Low Frequency layer using healing tools or the Clone Stamp. Edit texture problems on the High Frequency layer. This separation creates incredibly natural results because you never mix color correction with texture editing.
Frequency separation excels at fixing uneven skin tone, reducing redness, and smoothing color transitions while maintaining every pore and fine detail. It is the technique behind magazine-quality beauty retouching.
Dodge and Burn for Dimensional Retouching
Dodge and burn has been used by photographers since the darkroom era. In digital retouching, it creates subtle contouring and reduces shadow depth in wrinkles without removing them.
Create a new layer filled with 50% gray, set to Overlay blend mode. Use the Dodge Tool (lightens) on shadow areas at 5-10% exposure. Use the Burn Tool (darkens) on highlight areas at the same low exposure. This subtle contrast adjustment adds dimension while reducing wrinkle visibility.
The key is extreme subtlety. Work at low exposure and build up gradually. If your dodge and burn layer looks obviously altered, you have gone too far. Proper dodge and burn should be invisible on its own, only noticeable when toggled off.
High Pass Filter for Skin Texture Enhancement
Ironically, the High Pass filter used in frequency separation also helps enhance texture when used differently. Duplicate your layer, apply High Pass at a low radius (1-2 pixels), set blend mode to Overlay or Soft Light, and reduce opacity to 20-30%.
This technique subtly sharpens skin texture, which helps counteract any accidental smoothing from healing operations. It restores micro-contrast that gives skin its natural appearance.
Use this carefully on portraits with significant retouching. The enhancement helps offset texture loss, but over-application creates artificial sharpness. Less is definitely more.
Non-Destructive Workflow Best Practices
Every technique I have described works best with non-destructive editing. This means never editing directly on your original image layer. Always work on separate layers, use layer masks, and keep adjustment layers separate.
My typical layer stack looks like this:
– Original background (untouched)
– Frequency separation group (if used)
– Healing layer(s) for blemish removal
– Dodge and burn layer
– Color correction adjustments
– Final sharpening
This organization lets you adjust any part of your retouching independently. If wrinkle reduction went too far, reduce the dodge and burn layer opacity without affecting blemish removal. If skin smoothing looks heavy, adjust the frequency separation without redoing everything.
Avoiding Over-Editing: Signs You’ve Gone Too Far
The biggest mistake in portrait retouching is not knowing when to stop. I have ruined plenty of photos by continuing to edit after they looked good. Learning to recognize over-editing signs protects your work from the plastic skin syndrome.
Warning Sign #1: No Visible Pores
Healthy skin has visible pores, even in photographs. If you zoom in and see completely smooth, poreless skin, you have over-edited. Back off your skin smoothing until natural texture returns.
A quick test: view your image at 100% zoom on a quality monitor. If skin looks like polished plastic rather than actual skin, reduce your editing intensity. Natural skin has micro-texture, slight variations, and imperceptible irregularities that give it life.
Warning Sign #2: Uniform Skin Tone
Real skin has subtle color variations. Slight pinkness on cheeks, different tones around the nose, natural shadows around the eyes. If your subject’s face looks like one flat color, frequency separation or healing has gone too far.
I intentionally leave slight color variations even after frequency separation correction. Complete uniformity looks artificial under close inspection. A hint of natural variation maintains realism.
Warning Sign #3: Lost Freckles and Character Marks
If someone has freckles or beauty marks that completely disappear after retouching, you have over-smoothed. These features should remain visible, though you can slightly reduce their intensity.
I have a rule: if I cannot tell whether someone has freckles after retouching, I went too far. Freckles should still be visible, just slightly softer. The same applies to beauty marks and other character-defining features.
Warning Sign #4: Artificial-Looking Transitions
Watch for harsh lines between retouched and unretouched areas. This often happens around the jawline, hairline, or neck where retouched skin meets untreated areas. Smooth transitions are essential for invisible editing.
Use soft brushes and low opacity when working near boundaries. Check your work at different zoom levels to catch transition problems that might not be visible at your working magnification.
Self-Check Strategy: The 10-Second Rule
Here is a technique I use on every portrait: After completing retouching, look away from your screen for 10 seconds. Then look back at your image fresh. Your immediate impression should be “good portrait” not “good retouching.”
If your first thought is about the editing rather than the subject, something stands out as artificial. Trust that initial impression. Fresh eyes catch problems that extended editing sessions obscure.
The Toggle Test
Toggle your retouching layers on and off rapidly. The changes should be subtle enough that the difference is not jarring. If toggling creates an obvious “before and after” moment, your editing is too heavy.
Properly done retouching creates improvement that feels natural. When you toggle it off, the viewer should think “something looks slightly worse” rather than “that is a completely different person.”
Frequently Asked Questions
How do you make blemishes disappear from a portrait?
To remove blemishes from a portrait, use the Spot Healing Brush in Photoshop. Select the tool, set your brush size slightly larger than the blemish, and click once on each spot. The tool automatically samples surrounding skin texture and blends it over the imperfection. For natural results, work on a separate layer and use the lowest effective brush size.
How to get rid of wrinkles in photos?
Reduce wrinkles in photos by using dodge and burn techniques rather than complete removal. Apply the Dodge Tool set to Midtones at 10-15% exposure to lighten shadow areas within wrinkles. This reduces their visual depth while maintaining natural skin texture. Avoid blurring or complete removal, which creates artificial results.
What is the free photo editing app that removes blemishes?
Several free apps remove blemishes effectively. GIMP offers professional-grade healing and clone tools similar to Photoshop. Photopea runs in your browser with Photoshop-like capabilities. For mobile editing, Snapseed provides a healing tool at no cost. Use these tools at reduced intensity for natural-looking results.
Which Photoshop feature is used to remove blemishes and imperfections from photos?
The Spot Healing Brush tool is the primary Photoshop feature for removing blemishes. It automatically samples texture from surrounding areas and blends it over imperfections. The Healing Brush provides more control by letting you choose the sample source manually. For precise work, the Clone Stamp copies exact pixels for complete control.
Conclusion
Learning how to remove blemishes and wrinkles in portrait photos without over-editing comes down to one principle: enhance, do not replace. Your goal is showing subjects at their best while keeping them recognizable. Every technique I have shared, from basic Spot Healing Brush work to advanced frequency separation, serves this purpose.
Start with the basics. Master the Spot Healing Brush and Healing Brush before attempting advanced techniques. Build your skills gradually, and always prioritize natural texture over complete imperfection removal. The toggle test and 10-second rule will keep your editing honest.
Remember that less is genuinely more in portrait retouching. The best compliment you can receive is not “great editing” but rather “you look great in this photo.” When your retouching becomes invisible, you have succeeded. Practice these techniques, develop your eye for natural results, and your portraits will improve dramatically.