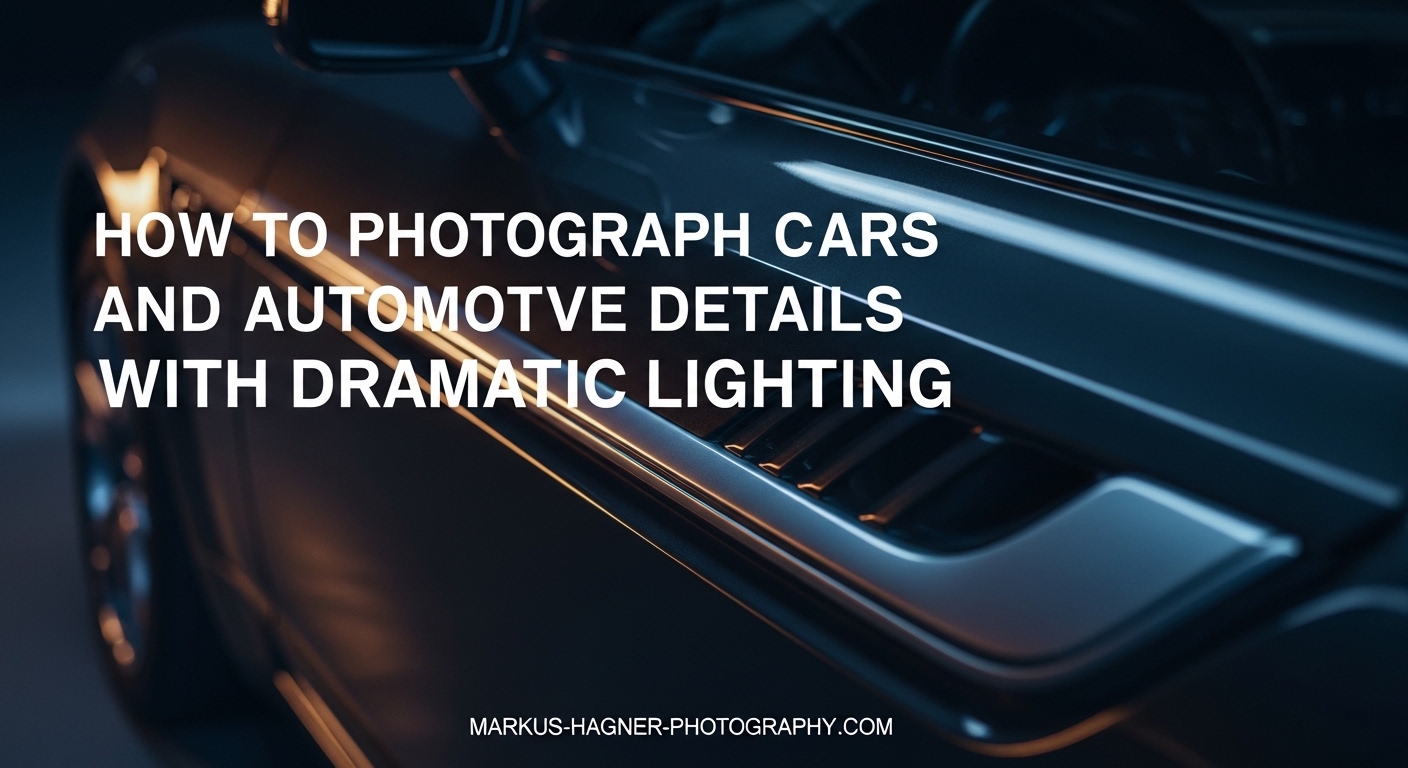
There’s something magical about a perfectly lit car photograph. The way light dances across curved metal, the deep shadows that add mystery, the highlights that reveal every carefully crafted line—it transforms a machine into art. I’ve spent countless hours studying how to photograph cars and automotive details with dramatic lighting, and I’m excited to share everything I’ve learned.
Dramatic lighting in automotive photography emphasizes contrast, shadows, and highlights to create mood and visual impact, making cars appear more powerful and three-dimensional. Whether you’re shooting your own vehicle, building a portfolio, or creating content for clients, mastering lighting techniques will elevate your work above the thousands of mediocre car photos flooding social media every day.
This guide covers everything from understanding light quality to advanced light painting techniques. I’ll share the exact methods professional car photographers use, along with budget-friendly alternatives that deliver stunning results. Let’s dive into the world of automotive lighting.
Understanding Dramatic Lighting in Automotive Photography
Dramatic lighting works by controlling light direction and quality to create strong shadows and highlights that emphasize a car’s lines, curves, and details. The key is understanding how different surfaces respond to light—matte paint absorbs it, metallic finish reflects it, chrome multiplies it, and glass can either work for or against you.
Light quality matters just as much as direction. Soft light wraps around curves and minimizes harsh reflections, while hard light creates crisp shadows and emphasizes texture. The best automotive photographers know when to use each type. I’ve found that dramatic lighting often comes from mixing these qualities—using soft light for the main illumination and hard light for accent shadows.
Contrast is your most powerful tool. Deep shadows add depth and mystery, while carefully placed highlights draw the eye to important details. The interplay between light and dark creates the drama that separates snapshots from compelling photographs. Think about what mood you want to convey—aggressive and powerful, sleek and elegant, or mysterious and moody.
Color temperature also plays a crucial role. Warm light (golden hour, tungsten) feels inviting and nostalgic, while cool light (overcast day, blue hour) feels modern and edgy. You can use these inherent qualities or mix them intentionally to create specific emotional responses in your viewers.
The 20-60-20 Rule: A Working Philosophy
Before we dive into specific techniques, I want to share a framework that changed my approach to car photography. The 20-60-20 rule divides your shooting into three phases: 20% planning and preparation, 60% actual shooting and experimentation, and 20% selection and refinement.
This philosophy prevents the common mistake of rushing into a shoot without preparation while also acknowledging that you need to spend the majority of your time actually creating images. The final 20% isn’t just about editing—it’s about critically selecting your best work and refining it to match your vision.
I’ve tested this approach over dozens of car shoots, and it consistently produces better results than haphazard shooting. The planning phase ensures you have the right equipment and location. The shooting phase gives you freedom to experiment without pressure. The refinement phase transforms good captures into great photographs.
Essential Equipment for Automotive Lighting
You don’t need a truckload of expensive gear to create dramatic car photos, but having the right tools makes the job easier. Here’s what I recommend based on years of experience photographing vehicles in various conditions.
Camera: Any modern camera with manual controls will work. Full-frame sensors handle highlights and shadows better, which helps with high-contrast scenes. But I’ve created stunning images with crop-sensor cameras too. The key is understanding your gear’s limitations and working within them.
Lenses: Wide-angle lenses (24-35mm) are great for environmental shots and showing the car in its surroundings. Mid-range zooms (24-70mm) offer versatility for most situations. Telephoto lenses (70-200mm) compress perspective and are perfect for detail shots. A prime lens with a wide aperture (f/1.4 or f/1.8) is useful for low-light situations and creating background separation.
Lighting Tools: Natural light is free and often the most dramatic. For artificial light, you can start with simple LED panels or even a high-quality flashlight. Studio strobes offer more power and control but aren’t necessary for beginners. Light modifiers like reflectors, diffusers, and scrims help you shape and control light.
Support: A sturdy tripod is non-negotiable for long exposures and light painting. A remote shutter release prevents camera shake during those long exposures. For action shots, consider a gimbal or monopod for smooth panning.
Budget Alternatives: Don’t let equipment costs stop you. A white poster board works as a reflector. A bedsheet can diffuse harsh sunlight. Your smartphone flashlight can create amazing light painting effects. I’ve seen incredible car photos made with nothing but natural light and careful timing.
Natural Lighting Techniques for Dramatic Effect
Natural light remains the most accessible and often the most dramatic option for car photography. Understanding how to work with available light will give you more opportunities than any artificial setup.
Golden Hour Magic
The hour after sunrise and the hour before sunset offer the most naturally dramatic light. The low angle creates long shadows that emphasize form. The warm color temperature adds richness to paint colors. The soft quality minimizes harsh reflections. I’ve found that the last 15 minutes before sunset—the “sweet light”—can transform an ordinary car into something extraordinary.
Position your car so the sun is behind or to the side, not directly in front. This creates rim lighting that separates the vehicle from the background and emphasizes its silhouette. A reflector can fill in shadow areas while maintaining the dramatic feel.
Blue Hour Opportunities
After sunset, before complete darkness, you get a brief window of blue-tinted light. This creates a completely different mood—cool, modern, mysterious. The contrast between natural sky light and artificial lights (headlights, taillights, city lights) can be striking.
Use a tripod during blue hour. Exposures will be longer, but the smooth color gradients are worth the effort. Consider turning on the car’s parking lights or headlights for accent lighting that matches the cool ambient tone.
Overcast Day Advantages
Cloudy days act like a giant softbox, wrapping light evenly around the car. This is perfect for showing paint color accurately and minimizing distracting reflections. While the light may feel flat, you can add drama through composition and camera angles.
I’ve used overcast conditions to capture cars with highly reflective finishes that would be nightmares in direct sun. The soft light reveals subtle curves and details that harsh light would wash out. Look for locations with darker backgrounds to add contrast and prevent the overall image from feeling flat.
Weather as a Lighting Tool
Rain creates reflective surfaces on the ground that double your light source. Puddles become natural mirrors, adding visual interest to the bottom of your frame. Wet asphalt brings out richness in paint colors like nothing else.
Fog adds mystery and depth. It naturally simplifies backgrounds by obscuring distant elements, making your car stand out. The diffused light is incredibly soft and flattering.
Snow acts as a giant reflector, bouncing light into shadow areas and creating a high-key look. The color contrast between white snow and colorful vehicles can be striking.
Light Painting: Creating Nighttime Drama
Light painting is one of the most rewarding techniques for automotive photography. It gives you complete control over where light goes and how it looks. The basic principle is simple: in a dark environment, you use a long exposure while moving a light source to selectively illuminate the car.
Step 1: The Setup
Find a dark location away from street lights and other ambient light sources. Park your car and set up your camera on a tripod. Set your camera to manual mode. Start with these settings: ISO 100, f/8, 30-second exposure. You’ll adjust based on your light power and desired effect.
Use a remote shutter release or timer to prevent camera shake. Set your focus before it gets too dark, then switch to manual focus to lock it in. Turn off any image stabilization, which can cause blur during long exposures.
Step 2: Choosing Your Light
A dedicated LED panel or flashlight works best. I’ve used everything from expensive continuous lights to a basic smartphone flashlight. The key is being able to control the beam—narrow for precise lighting, wide for broader illumination.
Wear dark clothing to minimize your visibility in the frame. Your movement won’t register in the final image if you keep moving and don’t linger in one spot too long.
Step 3: The Painting Process
Start the exposure and begin moving your light around the car. Keep the light moving constantly to prevent hotspots. Paint each section of the car separately—front bumper, hood, roof, doors, rear. Spend more time on areas you want brighter and less on shadow areas.
Work from the camera’s perspective. Areas facing away from the camera need less attention than visible surfaces. Consider the car’s shape—emphasize its lines by running light along curves and body creases.
For a first attempt, try painting each section for 2-3 seconds. Review the image and adjust your timing. It usually takes 5-10 attempts to get the hang of it, but the learning curve is gentle and the results are immediately gratifying.
Advanced Light Painting
Once you master single-exposure light painting, try multi-exposure blending. Take several exposures, each lighting a different section of the car. Combine them in post-processing for perfect control over every highlight and shadow.
You can also add colored gels to your light for creative effects. Orange and blue gels create complementary color contrasts that add visual drama. Just remember that subtlety often beats heavy effects.
Artificial Lighting Methods
While natural light offers beautiful results, artificial lighting gives you consistent, repeatable results regardless of time or weather. Understanding artificial lighting opens up creative possibilities that natural light can’t provide.
The 3-Point Lighting Setup
The foundation of artificial lighting is the 3-point system: key light, fill light, and rim light. The key light is your main source, usually positioned at a 45-degree angle to the car. The fill light softens shadows created by the key, placed on the opposite side at lower intensity. The rim light (or back light) separates the car from the background, positioned behind and above.
This classic setup works because it mimics how we naturally perceive three-dimensional objects. The key light reveals form, the fill prevents shadows from going black, and the rim creates definition and separation.
Studio Strobe Configurations
Studio strobes provide powerful bursts of light that freeze motion and allow you to overpower daylight. For car photography, you typically need 2-4 strobes depending on the size of the vehicle and your desired effect.
Position strobes to create gradient lighting across the car’s surfaces. Large softboxes (4×6 feet or larger) create beautiful, soft light that wraps around curves. Umbrellas offer a softer, more spread-out light. Bare strobes with grids create dramatic, focused light for specific details.
Indirect lighting—bouncing strobes off walls, ceilings, or reflectors—creates the most flattering car light. It minimizes harsh reflections while still providing the power and control that strobes offer.
Continuous Lighting Options
LED panels have become increasingly popular for car photography. What you see is what you get with continuous light, making it easier to visualize your final image. They’re also excellent for video if you’re creating multimedia content.
The main limitation is power compared to strobes. LED panels work best in dim environments or when combined with natural light. Look for panels with adjustable color temperature and high CRI (color rendering index) for accurate color reproduction.
Mixed Lighting Approaches
Some of the most dramatic images combine natural and artificial light. Use natural light as your main source and add artificial light to fill shadows or add accent lighting. This hybrid approach can give you the best of both worlds.
For example, you might shoot during golden hour but use a reflector or fill light to open up shadows on the shadow side of the car. Or use continuous lights to add drama while the sun provides overall illumination.
Camera Settings for Different Scenarios
Understanding exposure settings is crucial for capturing dramatic lighting. Here’s a quick reference guide for common automotive photography situations:
| Scenario | Aperture | Shutter Speed | ISO |
|---|---|---|---|
| Golden Hour (static) | f/8-f/11 | 1/125-1/250 | 100-200 |
| Golden Hour (panning) | f/5.6-f/8 | 1/30-1/60 | 100-200 |
| Blue Hour | f/8-f/11 | 1/15-1/30 (tripod) | 200-400 |
| Light Painting | f/8-f/11 | 10-30 seconds | 100 |
| Studio Strobes | f/8-f/16 | 1/160-1/200 | 100-200 |
| Action/Motion | f/4-f/5.6 | 1/500-1/1000 | 400-800 |
| Interior Details | f/2.8-f/4 | 1/60-1/125 | 400-800 |
| Night with Ambient | f/4-f/5.6 | 1/15-1/30 | 800-1600 |
Aperture Selection: Use f/8-f/11 for overall sharpness throughout the car. Wider apertures (f/2.8-f/4) create shallow depth of field for detail shots or creative backgrounds. Smaller apertures (f/16) are rarely necessary and can actually reduce sharpness due to diffraction.
Shutter Speed Considerations: For static shots, match your shutter speed to your focal length (1/focal length as a minimum) to avoid blur. For panning shots, slower speeds (1/30-1/60) create motion blur in the background. Always use a tripod for exposures longer than 1/60 second.
ISO Management: Keep ISO as low as possible to maintain image quality. Modern cameras handle higher ISO well, but dramatic lighting often has deep shadows that reveal noise. Start at ISO 100-200 and only increase when absolutely necessary.
White Balance: Auto white balance works surprisingly well in mixed lighting. For consistent color, use daylight (5500K) as a baseline and adjust in post. Custom white balance using a gray card gives the most accurate results, especially with artificial lighting.
Shoot RAW: This is non-negotiable for dramatic lighting. RAW files retain highlight and shadow detail that JPEGs discard. They give you the flexibility to recover details in post-processing that would otherwise be lost.
Composition and Angles for Maximum Impact
Lighting alone doesn’t make a great photograph. The right composition and camera angle maximize the dramatic effect of your lighting and present the car in its most flattering perspective.
The Three-Quarter Angle
This is the classic automotive shot for good reason. Position the camera at a 45-degree angle to the car, showing both the front and side. This angle reveals the car’s design language better than any other. The three-quarter view shows how light transitions across body panels and emphasizes surface changes.
I recommend shooting from a low crouching position. This height makes the car look more powerful and adds drama to the composition. Experiment with exactly how low to go—too low can distort perspective, while too high loses the dramatic impact.
Low Angle Drama
Shooting from ground level creates an imposing, powerful presence. The car looms above the viewer, suggesting dominance and strength. This angle works especially well with aggressive vehicles and dramatic lighting that emphasizes the undercarriage and wheel wells.
Use a wide-angle lens from this position for even more drama. Just be careful not to distort the car’s proportions too much. A little distortion adds impact, but too much looks unnatural.
Detail and Close-Up Shots
Automotive details tell stories about craftsmanship and design. Headlights, taillights, grilles, badges, wheels, engine components—each offers opportunities for dramatic lighting and compelling composition.
Use a longer focal length (85mm+) for details to flatten perspective and isolate the subject. A wide aperture (f/2.8-f/4) separates the detail from the background. Consider how light interacts with the specific material—chrome reflects everything, glass can be transparent or reflective, matte paint absorbs light.
I’ve found that shooting details during blue hour or with controlled artificial light creates the most dramatic results. The isolation allows for precise lighting control that’s difficult to achieve with full-car shots.
Managing Reflections
Reflections are the enemy of clean automotive photography. Chrome bumpers, glass surfaces, and glossy paint all reflect their surroundings. The goal is to control what reflects, or minimize reflections entirely.
Polarizing filters reduce glare on non-metallic surfaces like glass and paint. They won’t work on chrome, but they’re invaluable for windshields and glossy paint. Rotate the filter while looking through the viewfinder to find the angle that minimizes reflections.
Position the car so it reflects something clean and neutral. A large open field, a dark wall, or even a black reflector board can create clean reflections. Avoid shooting near trees, buildings, or other cars that will create busy reflections on the car’s surface.
For the most control, shoot in a studio or use large scrims/reflectors to create a controlled environment. Professional car photographers often build temporary reflector walls around vehicles to control reflections completely.
Photographing Car Interiors
Interior car photography presents unique challenges. Confined spaces limit your angles, mixed light sources create color issues, and reflective surfaces complicate exposure. But with the right approach, interiors can be just as dramatic as exteriors.
Shoot toward the back of the car from the front seats, or vice versa. This creates depth and shows the interior’s layout. Use wide-angle lenses carefully—too wide will distort and make the interior look cramped.
Interior lighting often requires multiple exposures. One for the dashboard, one for the seats, one for the windows. Blend these in post for a balanced image that shows detail throughout the dynamic range.
I’ve found that shooting interiors during blue hour gives beautiful ambient illumination. Turn on interior ambient lights (not bright overheads) for accent lighting that matches the cool exterior light.
Post-Processing for Dramatic Effect
Capture is only half the story. Post-processing is where you refine the drama you created during shooting and push it further. The goal isn’t to create something fake—it’s to realize the vision you had when you pressed the shutter.
Enhancing Dramatic Lighting
Dodge and burn is your most powerful tool. selectively brighten highlights and darken shadows to enhance the contrast that creates drama. Work on a separate layer with low opacity and build up the effect gradually. Subtle adjustments often have more impact than heavy-handed changes.
Curves adjustments allow you to add contrast selectively. Create an S-curve to add overall contrast, then mask it to affect only specific areas. Brightness/contrast layers work similarly but with less control.
Color Grading for Mood
Color grade to enhance the mood you established during shooting. Warm highlights with cool shadows creates a cinematic look that works well for car photography. Split toning in Lightroom or color balance in Photoshop allows precise control.
Consider the car’s color when grading. Complementary colors create visual harmony—warm tones on a blue car, cool tones on a red vehicle. Monochromatic treatments can also be striking, especially with silver or black cars.
Handling Reflections in Post
Even with careful shooting, some reflections will need cleanup. The clone stamp and healing brush remove distracting elements. Content-aware fill in Photoshop can replace larger reflections with simulated car surface.
For complex reflections, use frequency separation. This allows you to work on color and texture separately, often making it easier to remove reflections while preserving surface detail.
Recommended Workflow
Start with global adjustments—white balance, exposure, contrast. Then move to selective adjustments using masks or adjustment brushes. Dodge and burn to enhance three-dimensional form. Apply color grading last, as it affects the entire image.
I typically spend 60% of my editing time on selective adjustments and dodge/burn. These subtle changes make the biggest difference in the final impact of the image.
Smartphone Automotive Photography
You don’t need a dedicated camera to create dramatic car photos. Modern smartphones are capable tools, especially for casual shooting or when you don’t have your camera gear. The key is understanding your phone’s limitations and working within them.
Shoot during golden hour when light is optimal. Use the built-in grid to align compositions precisely. Avoid digital zoom—crop in post instead for better quality. Most phones now have a pro mode that allows manual control over exposure settings.
For light painting with a phone, use a separate light source (another phone with flashlight, a dedicated flashlight). Set your phone to manual or night mode, stabilize it against something solid, and use the timer to start the exposure.
The main limitation of phones is dynamic range. High-contrast scenes may blow out highlights or block up shadows. Shoot RAW if your phone supports it, and consider HDR mode for challenging lighting situations.
Common Lighting Mistakes to Avoid
Even experienced photographers make these mistakes. Being aware of them will help you avoid frustration and create better images more consistently.
Photographer in reflections: I can’t tell you how many otherwise great car photos I’ve seen ruined by the photographer clearly visible in the paint or chrome. Wear dark clothing, position yourself carefully, and check your frames before moving on.
Uneven lighting: One side of the car bright, the other lost in shadow. This usually happens when shooting in direct sunlight without fill. Use a reflector or fill light to balance the exposure.
Overpowering artificial light: Using a strobe that’s too bright or positioned too close, creating unnatural highlights. Start with less power and build up. Subtlety usually beats obvious flash.
Wrong time of day: Shooting at noon when the sun is directly overhead. This creates unflattering shadows on the car and harsh reflections on glossy surfaces. Plan shoots for golden or blue hour when possible.
Ignoring car color: Different car colors respond differently to light. Black cars need careful lighting to reveal details. White cars can blow out highlights easily. Metallic paint shows texture differently than matte. Adjust your approach based on the vehicle’s finish.
Poor angle selection: Shooting from standing height every time. Move around—crouch, climb, get low. The most interesting angles are rarely the most convenient ones.
Frequently Asked Questions
What is the 20-60-20 rule in photography?
The 20-60-20 rule divides your workflow into three phases: 20% planning and preparation, 60% actual shooting and experimentation, and 20% selection and refinement. This framework ensures you prepare properly, spend most of your time creating images, and finish with critical selection and editing to produce your best work.
How to create dramatic lighting in photography?
Dramatic lighting is created by controlling light direction and quality to produce strong contrast between highlights and shadows. Position your main light from the side or behind the subject for rim lighting. Use hard light for crisp shadows or soft light for gentle transitions. Deep shadows add mystery while carefully placed highlights reveal important details. The key is intentionality—every shadow and highlight should serve your creative vision.
What is the 3 lighting rule?
The 3-point lighting rule uses three lights: a key light as the main source, a fill light to soften shadows, and a rim light to separate the subject from the background. The key light is typically positioned at a 45-degree angle, the fill light on the opposite side at lower intensity, and the rim light behind and above the subject. This setup creates three-dimensional form while maintaining detail throughout the image.
What are the best camera settings for automotive photography?
For static shots in good light: f/8-f/11 aperture, 1/125-1/250 shutter speed, ISO 100-200. For golden hour shooting: f/8 aperture, 1/125 shutter, ISO 100. For light painting: f/8-f/11, 10-30 second exposure, ISO 100. For action shots: f/4-f/5.6, 1/500-1/1000 shutter, ISO 400-800. Always shoot RAW for maximum flexibility in post-processing.
What time of day is best for car photography?
Golden hour—the hour after sunrise and the hour before sunset—provides the most naturally dramatic light for car photography. The low sun angle creates long shadows that emphasize form, while warm color temperature adds richness to paint colors. Blue hour, just after sunset, offers cool-toned light perfect for modern, moody images. Avoid midday shooting when the sun is directly overhead.
How do I avoid reflections in car photography?
Use polarizing filters to reduce glare on glass and paint. Position the car so it reflects clean, neutral backgrounds like open sky or dark walls. Wear dark clothing and position yourself carefully to avoid being visible in reflections. For maximum control, create temporary reflector walls or shoot in a controlled environment. Large scrims and reflectors help manage what reflects on glossy surfaces.
Conclusion
Dramatic lighting transforms automotive photography from documentation to art. Understanding how light works, practicing different techniques, and developing your vision will set your work apart from the thousands of average car photos shared daily.
Start with natural light and master its nuances. Experiment with light painting—it’s accessible, fun, and produces stunning results. Gradually add artificial lighting as you become more comfortable with lighting principles. Most importantly, shoot often and analyze your results critically.
Every car presents unique challenges and opportunities. A vintage convertible requires a different approach than a modern supercar. A matte-finished SUV needs different lighting than a glossy sports coupe. Develop your intuition for what works and trust it.
The techniques I’ve shared here are the foundation. Your creativity and practice will build on that foundation to create a personal style. Photograph cars because you love them, and that passion will come through in every image.