There is something magical about capturing a bird mid-splash, water droplets frozen in time around its feathers like tiny diamonds. Over the years, I have spent countless hours positioned near bird baths and backyard water features, waiting for that perfect moment when a robin or sparrow decides to take a dip. Learning how to photograph birds bathing and interacting with water has transformed my wildlife photography portfolio and deepened my appreciation for these everyday moments in nature.
In this guide, I will share everything I have learned about bird bath photography, from understanding bird behavior patterns to the specific camera settings that freeze water droplets mid-air. Whether you are working with a simple backyard setup or venturing out to wetlands and natural water sources, these techniques will help you capture stunning images of birds in their most playful and vulnerable moments.
Understanding Bird Behavior at Water Features
Birds visit water features for three main reasons: drinking, bathing, and social interaction. Understanding these behaviors is the foundation of successful water bird photography. When you can predict what a bird will do next, you can be ready with your finger on the shutter before the action even begins.
Most small songbirds prefer shallow water, typically 1 to 1.5 inches deep. This depth allows them to stand comfortably while splashing water over their feathers. Larger birds like robins and grackles can handle slightly deeper water, while tiny species like chickadees and goldfinches stick to the shallowest edges.
Daily and Seasonal Patterns
Morning hours, particularly the first two hours after sunrise, tend to be the busiest times at bird baths. Birds are most active then, refreshing themselves after a night of roosting. Evening visits also increase, especially during hot summer months when birds need to cool down and hydrate before nightfall.
Seasonal behavior varies significantly. Spring brings increased activity as birds establish territories and prepare for breeding. Summer months see the highest traffic, especially during heat waves. Fall visits slow as natural water sources become more available, and winter presents unique challenges with frozen water and survival-focused behavior patterns.
Species-Specific Behaviors
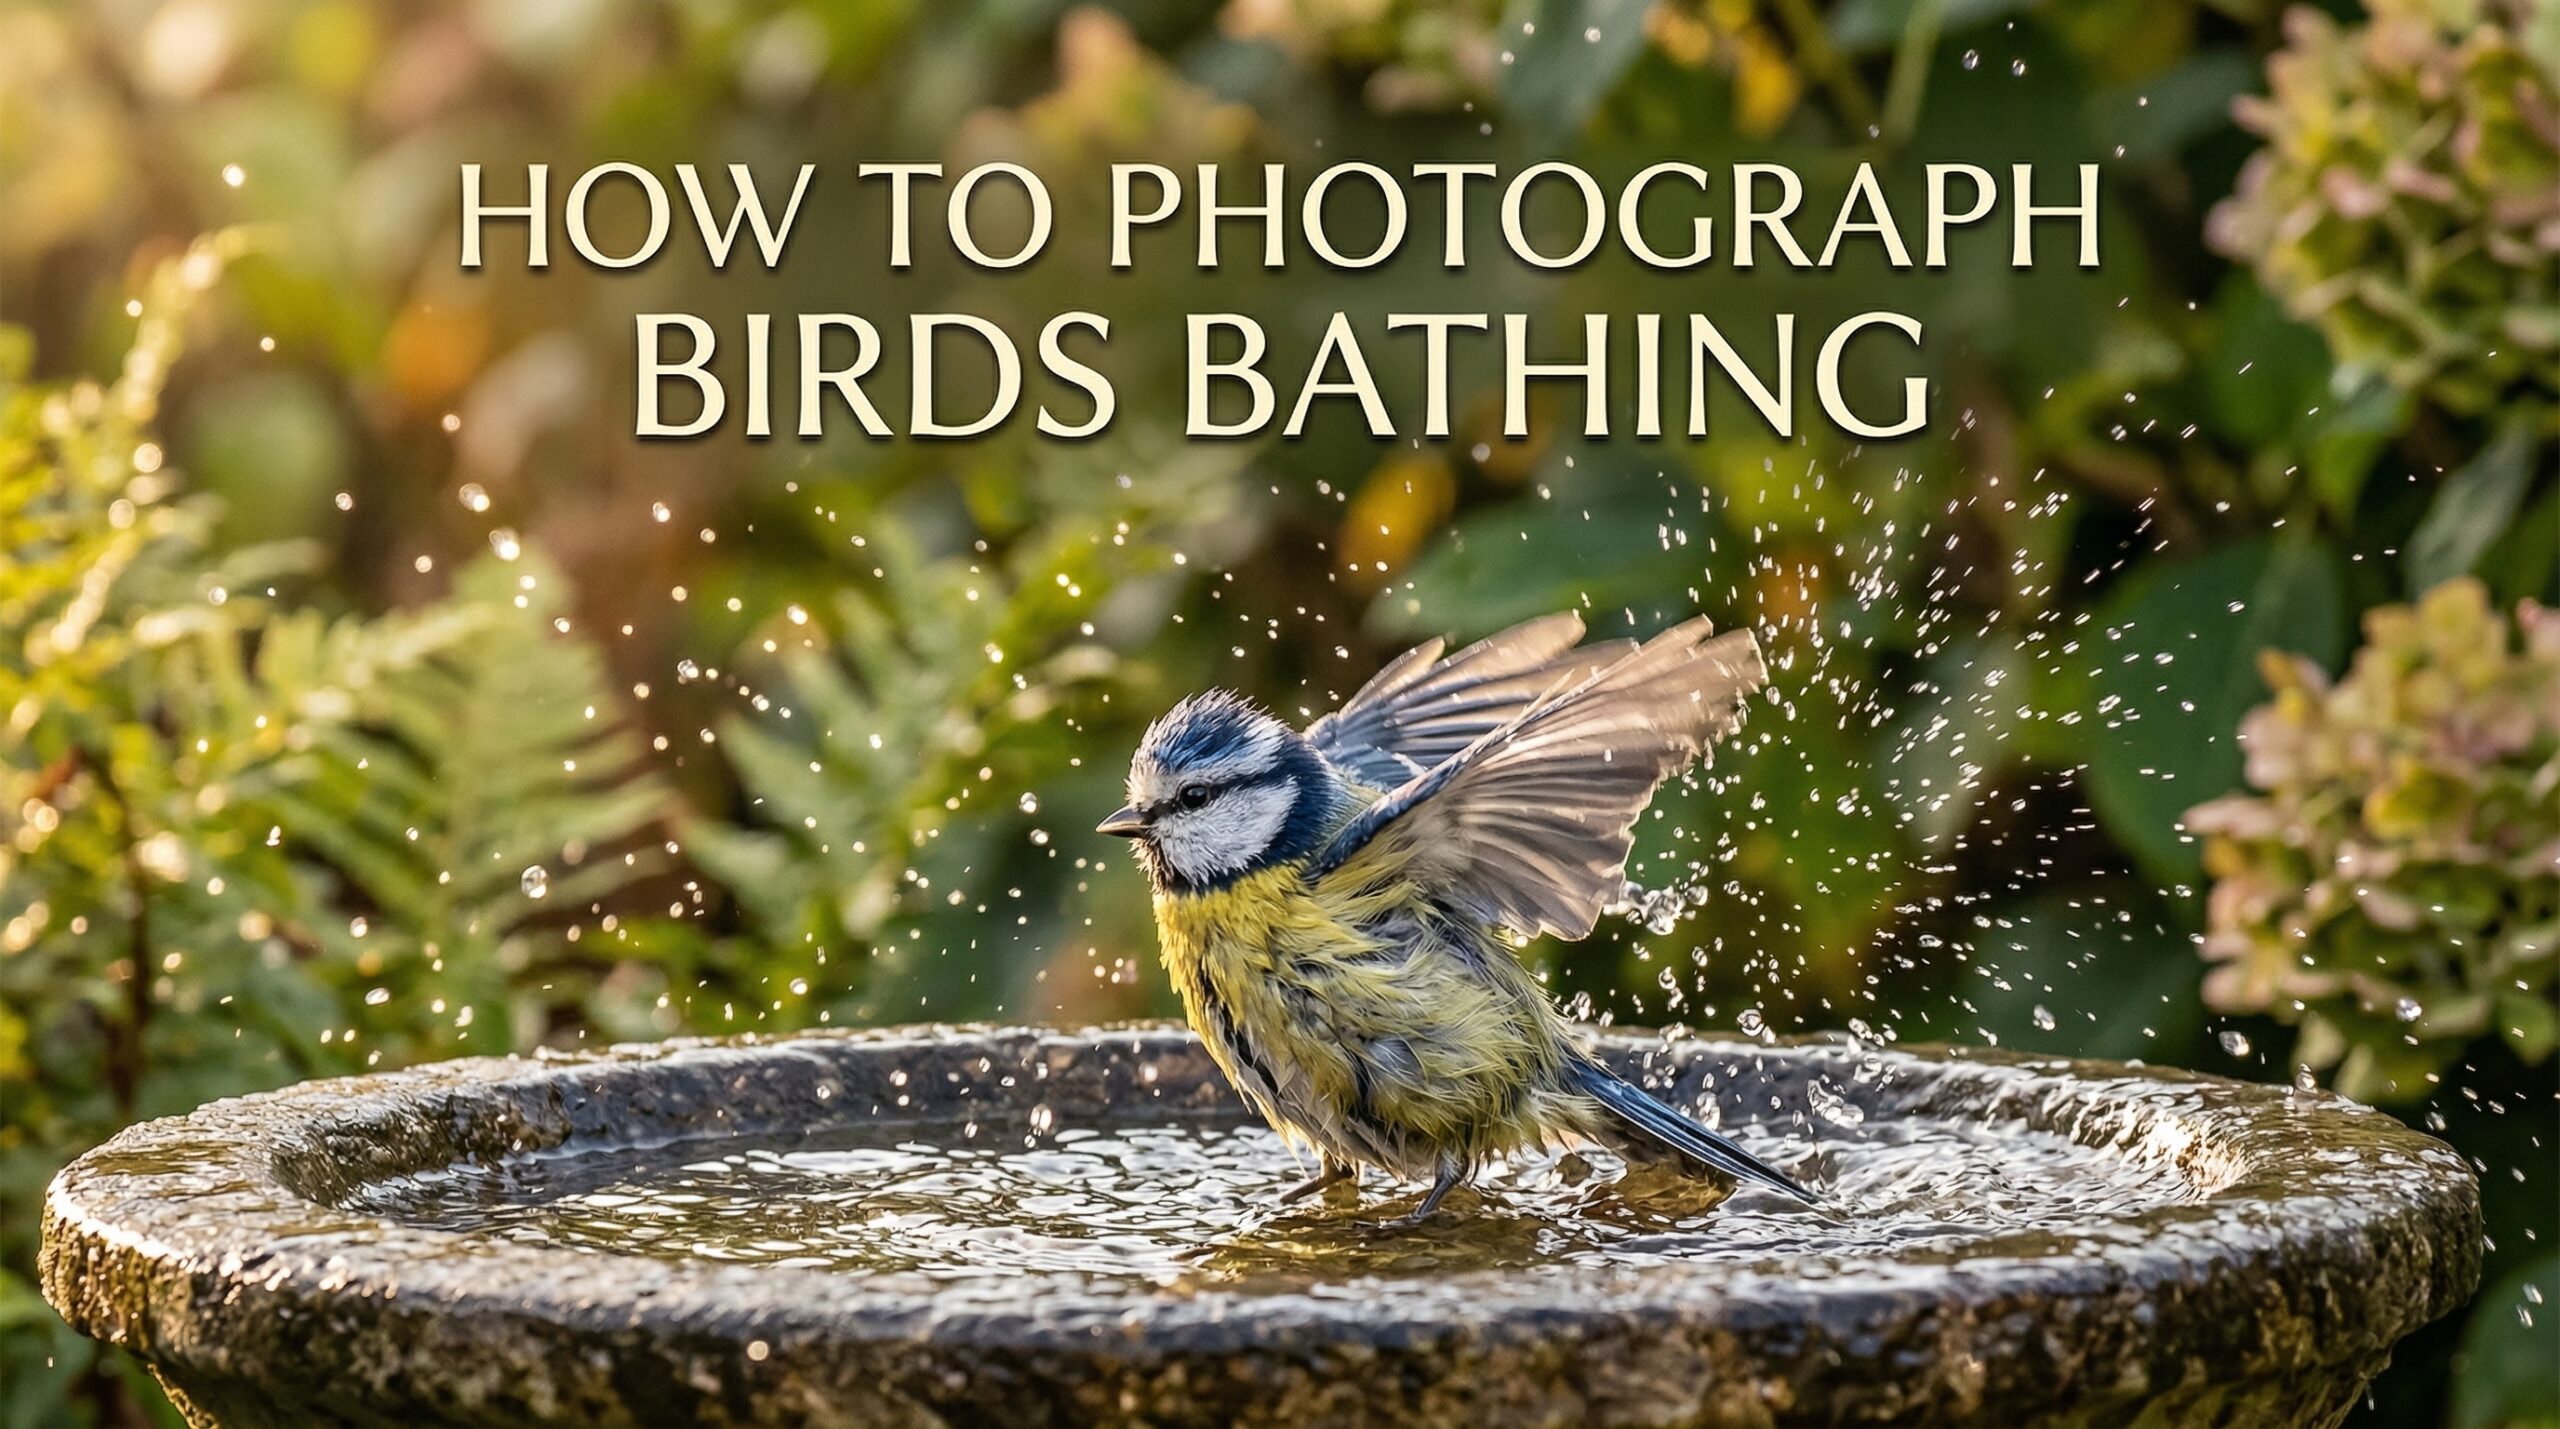
Different bird species interact with water in distinct ways. American Robins are enthusiastic bathers that splash vigorously, creating excellent opportunities for action shots. House Sparrows and finches tend to drink more than they bathe, providing quieter but still charming photo opportunities. Northern Cardinals often approach water cautiously, dipping and splashing with quick, deliberate movements.
Mourning Doves visit water features primarily for drinking, taking long, steady sips while remaining alert. Blue Jays and woodpeckers can be surprisingly dramatic bathers, creating impressive splashes that make for stunning photographs. Understanding these patterns helps you anticipate the type of action you will capture.
Essential Equipment for Bird Water Photography
You do not need expensive gear to get started with bird bath photography, but having the right equipment makes a significant difference in your results. The key is matching your gear to the situations you will encounter.
Camera Body Requirements
A camera capable of shooting at least 5-10 frames per second gives you the best chance of capturing peak action moments. Fast burst rates help you catch the perfect splash or wing position. Good low-light performance is also valuable since early morning light can be challenging.
Look for cameras with reliable continuous autofocus (AF-C or AI Servo modes). Birds move quickly and unpredictably around water, so your camera needs to track motion effectively. Weather-sealing is a bonus if you plan to photograph in damp conditions or light rain.
Lens Recommendations
A telephoto lens is essential for bird photography because it allows you to maintain a comfortable working distance without disturbing your subjects. For backyard bird bath photography, a 200-400mm lens often provides sufficient reach. If you are photographing at wetlands or natural water sources, consider 400-600mm lenses for greater reach.
Zoom lenses offer flexibility, allowing you to adjust framing as birds move closer or farther from your position. Prime lenses typically offer better image quality and wider maximum apertures, which helps in lower light conditions and creates smoother background blur (bokeh).
Support and Accessories
A sturdy tripod is invaluable for bird water photography. It eliminates camera shake during longer shooting sessions and allows you to pre-position your camera at the perfect angle. Ball heads work well for following moving subjects, while gimbal heads excel with heavier telephoto lenses.
Remote shutter releases let you trigger your camera without touching it, reducing vibration and allowing you to step away from your setup. This is particularly useful when birds are skittish and need extra space to feel comfortable approaching the water.
Consider a portable blind or camouflage clothing if you find birds flushing before you can capture them. Even simple solutions like draping neutral-colored fabric over yourself can make a significant difference in how birds respond to your presence.
Setting Up Water Features for Photography
Creating an attractive water feature specifically for photography gives you control over backgrounds, lighting, and positioning. A well-designed setup attracts more birds and produces consistently better images.
Choosing the Right Water Feature
Bird baths are the simplest option for backyard photography. Choose one with a textured surface for secure footing and gentle slopes that accommodate different bird sizes. Avoid glossy or slippery surfaces that might make birds uncomfortable.
Fountains and drippers add movement to the water, which attracts more species and creates interesting visual effects in photographs. The sound of moving water draws birds from greater distances than still water alone. Simple drip systems can be made from a bucket with a small hole or a hose with an adjustable drip attachment.
Small ponds and water gardens offer more natural settings and attract a wider variety of wildlife. These require more maintenance but provide excellent long-term photography opportunities.
Positioning for Success
Place your water feature where you can photograph from a shaded position. Birds prefer water in partly shaded areas with nearby cover for quick escape routes. Position yourself so the sun will be behind you during your planned shooting times, illuminating the birds rather than creating silhouettes.
Background management is crucial. Remove distracting elements like fence lines, bright colors, or cluttered vegetation. A clean, distant background creates smooth bokeh that makes your subject stand out. Natural backgrounds like distant trees or shrubs work best.
Creating Natural-Looking Setups
Add natural elements around your water feature to create more photogenic environments. River rocks provide perching spots and help birds gauge water depth. Branches positioned near the water give birds landing spots and create leading lines in your compositions.
Native plants around the water feature provide additional perches and make the setup look more natural in photographs. Choose plants that attract insects, which will in turn attract more bird species.
Keep the water clean and fresh. Birds will avoid dirty water, and algae growth can ruin otherwise good photographs. Change the water regularly and scrub the basin to prevent buildup.
Camera Settings for Capturing Water Action
Getting your camera settings right is essential for capturing birds interacting with water. The rapid movement of splashing water and active birds requires specific adjustments to achieve sharp, well-exposed images.
Shutter Speed for Freezing Action
Fast shutter speeds are non-negotiable for bird bath photography. To freeze water droplets mid-air, you need speeds of at least 1/1000 second. For the crispest water splash effects, 1/2000 to 1/3000 second works best. These speeds stop even the fastest wing movements and create that dramatic frozen-droplet look.
For a more artistic approach, slower shutter speeds between 1/60 and 1/250 second can create motion blur that conveys the energy of splashing water. This technique requires practice and often works better with stationary subjects like drinking birds.
Aperture and Depth of Field
Wide apertures (f/4 to f/5.6) create shallow depth of field, blurring backgrounds and making your subject pop. This is ideal when you have a clean, distant background and want maximum subject isolation.
Narrower apertures (f/8 to f/11) provide more depth of field, keeping more of your subject in focus. This is helpful when photographing larger birds or when you want some background context in the image. Be aware that very narrow apertures require more light or higher ISO settings.
ISO Considerations
Start with your camera’s base ISO (usually 100 or 200) and increase only as needed. Modern cameras handle higher ISOs well, but keeping ISO low maintains maximum image quality and detail in water droplets.
In early morning light, you may need ISO 800-1600 to maintain fast shutter speeds. This is a worthwhile trade-off for freezing action. Experiment with your specific camera to find the highest ISO that produces acceptable results.
Autofocus and Drive Settings
Set your camera to continuous autofocus mode (AF-C on Nikon/Sony, AI Servo on Canon). This allows the camera to track moving subjects as they splash and move around the water. Select a single focus point or small group of points for precise control over what the camera locks onto.
Use your camera’s fastest burst mode. The more frames you capture per second, the better your chances of getting the perfect moment when wings are fully extended and water droplets are at their most dramatic.
Exposure for Backlit Situations
Backlighting creates stunning effects with water droplets, but it tricks camera meters into underexposing. Use exposure compensation of +1 to +2 stops when shooting backlit scenes. Check your histogram frequently to ensure you are not blowing out highlights while still capturing detail in your subject.
Spot metering on the bird rather than the overall scene helps achieve accurate exposure in challenging lighting. Some photographers prefer manual mode with settings locked in once they have found the right exposure for their specific setup.
Composition Techniques and Camera Angles
Technical settings get you sharp images, but composition makes them compelling. How you frame and position yourself relative to the water feature dramatically affects your final results.
Getting to Water Level
One of the most impactful changes you can make is shooting from water level rather than from above. Low angles create intimate, eye-level perspectives that connect viewers with your subject. This position also separates birds from their backgrounds more effectively, creating cleaner compositions.
Lie prone on the ground or use a low tripod to achieve this angle. It may be uncomfortable, but the results are worth it. Water level shots make small birds appear more majestic and create more dynamic images overall.
Background Management
The background can make or break a bird photograph. Before you even start shooting, survey the area behind your water feature and identify potential distractions. Move or prune vegetation, reposition the water feature, or change your shooting angle to achieve the cleanest possible background.
Distant backgrounds blur more effectively than close ones. If your background is only a few feet behind your subject, even wide apertures may not blur it enough. Reposition your water feature farther from background elements whenever possible.
Using Reflections Creatively
Water surfaces create natural reflections that can add interest to your compositions. Position yourself to capture bird reflections in calm moments before or after active splashing. Reflections work best when the water surface is undisturbed and lighting is even.
Rule of Thirds and Framing
Position birds off-center using the rule of thirds for more dynamic compositions. Leave space in the frame for birds to move into, especially if they are facing or flying in a particular direction. This creates a sense of motion and direction even in static images.
Use natural elements like branches or rocks as framing devices. These elements add context and guide the viewer’s eye toward your subject.
Lighting Considerations for Water Bird Photography
Light quality and direction significantly impact your results. Understanding how different lighting conditions affect water and feathers helps you choose the best times and techniques for your photography sessions.
Golden Hour Advantages
The hour after sunrise and hour before sunset provide warm, directional light that flatters birds and creates beautiful color rendering. Lower sun angles also create longer shadows and more dimensional lighting on your subjects.
Early morning light coincides with peak bird activity, making it the ideal time for bird bath photography. Plan your sessions around these times for the best combination of activity and light quality.
Backlit Photography for Water Halos
Positioning yourself so the sun is behind your subject creates rim lighting that outlines birds with a glowing edge. This technique is particularly effective with water droplets, which catch and reflect light, creating dramatic halos around splashing birds.
Backlighting works best when you have a dark background behind your subject. The contrast between the dark background and illuminated water droplets makes them appear to glow.
Overcast Day Benefits
While sunny days get more attention, overcast conditions offer their own advantages. Cloud cover acts as a giant diffuser, softening light and reducing harsh shadows. Colors often appear more saturated, and you can shoot throughout the day rather than just during golden hours.
Field Techniques and Patience Strategies
Success in bird photography often comes down to patience and preparation. These field techniques help you make the most of your time at the water feature.
Pre-Focusing Technique
Pre-focus on a specific spot where birds typically land or bathe. Switch your lens to manual focus once you have the spot sharp, and wait for birds to enter that plane of focus. This eliminates autofocus lag and ensures sharp images when action happens quickly.
Anticipating Behavior
Watch bird behavior patterns carefully. Birds often pause and look around before bathing, giving you a moment to prepare. Learn to read the signs that indicate a bird is about to splash, and be ready with your finger on the shutter.
Troubleshooting Common Issues
If birds are not visiting your water feature, consider its location, water cleanliness, and nearby cover. Birds need escape routes and prefer water features positioned near shrubs or trees. Moving water attracts more visitors than still water.
When images are consistently soft, check your shutter speed and focus settings. Increase ISO if necessary to maintain faster speeds. Ensure your tripod is stable and that you are not introducing camera shake.
If backgrounds are distracting, reposition your shooting location or the water feature itself. Sometimes moving just a few feet in either direction dramatically improves your background.
Ethical Considerations in Bird Photography
Responsible photography practices protect birds and their habitats. Always prioritize the welfare of your subjects over getting the shot.
Maintain a respectful distance that does not alter bird behavior. If birds flush or appear agitated, you are too close. Use longer lenses or blinds rather than approaching more closely. Never manipulate nests or habitat to improve your shooting position.
Avoid photographing at nests during breeding season, as disturbance can cause nest abandonment. Keep water features clean and safe, and do not use chemicals that might harm birds. Your presence should have no negative impact on the birds you photograph.
What shutter speed should I use for bird bath photography?
Use a minimum shutter speed of 1/1000 second to freeze bird movement, and 1/2000 to 1/3000 second to freeze water droplets mid-splash. Slower speeds between 1/60 and 1/250 second can create artistic motion blur in the water.
How do I set up a bird bath for photography?
Position your bird bath in partial shade with a clean, distant background. Keep water depth at 1-1.5 inches for small birds. Add rocks for perching, place natural branches nearby for landing spots, and ensure birds have nearby cover for safety. Moving water attracts more species than still water.
Should I put rocks in my bird bath?
Yes, rocks provide multiple benefits for both birds and photography. They help birds gauge water depth, offer secure perching spots, and create natural-looking elements in your photographs. Use smooth river rocks positioned to create shallow areas for smaller species.
How can I photograph birds without scaring them?
Use a telephoto lens to maintain distance, wear neutral or camouflage clothing, and consider using a portable blind. Move slowly and avoid sudden movements. Pre-focus on a specific spot and wait patiently. Morning sessions work well since birds are more focused on drinking and bathing than watching for threats.
What time of day is best for bird bath photography?
Early morning, particularly the first two hours after sunrise, offers the best combination of bird activity and quality light. Birds visit water features most actively during this time. Evening sessions can also be productive, especially during hot weather when birds need to cool down before roosting.
Conclusion
Mastering how to photograph birds bathing and interacting with water takes patience, practice, and an understanding of both bird behavior and camera technique. Start with simple setups in your own backyard, experiment with different camera settings, and gradually work toward more challenging situations at natural water features. The combination of technical skill and patient observation will reward you with stunning images that capture the beauty and energy of birds in their most playful moments. Remember to always prioritize ethical practices and bird welfare in your photography journey.